
tensorflow图像基本处理
tensorflow库提供的专门的图片处理库,以下只是部分示例,更多函数请参照源码‘\tensorflow_api\v1\image_init_.py’
加载图像
方式1:
使用tf.gfile.GFile以二进制方式读jpg文件,然后通过tf.image.decode_jpeg进行解码

注函数都返回tensor张量,需在session中运行
import tensorflow as tf

import matplotlib.pyplot as plt
image_raw = tf.gfile.GFile('./image/cat/cat.jpg','rb').read()
with tf.Session() as sess:

    image_data = tf.image.decode_jpeg(image_raw)

    plt.imshow(image_data.eval())

    plt.show()

上面的方法不太适合读取批量数据,批量读取可以采用另一种方式,把图像看成一个文件,用队列的方式进行读取,在tensorflow中,队列不仅仅是一种数据结构,更提供多线程机制
方法2:批量读取文件
path1 = './image/cat/cat.jpg'

file_queue = tf.train.string_input_producer([path1]) #创建输入队列

image_reader = tf.WholeFileReader()

_,image=image_reader.read(file_queue)  #将完整的文件加载到内存

image = tf.image.decode_jpeg(image)

with tf.Session() as sess:

    coord = tf.train.Coordinator() #协同启动的线程

    threads = tf.train.start_queue_runners(sess=sess,coord=coord) #启动线程运行

    plt.imshow(image.eval())

    plt.show()

    coord.request_stop() #通在所有的线程

    coord.join(threads)
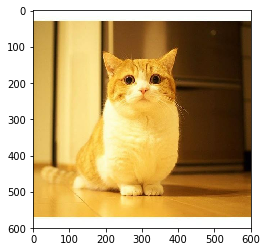
调整图像大小
通过tf.image.resize_image()来调整图片大小
函数原型:
tf.image.resize_images(

                images,

                size,

                method=ResizeMethod.BILINEAR,

                align_corners=False,

                preserve_aspect_ratio=False)
参数:
method:图片形状调整方法,可以取下面的值

        ResizeMethod.BILINEAR:默认方法,双线性插值

        ResizeMethod.NEAREST_NEIGHBOR:最近邻插值

        ResizeMethod.BICUBIC:双三次插值

        ResizeMethod.AREA:区域插值

align_corners:布尔型参数,默认为False,为True时,输入张量和输出张量的四个角的像素点的中心是对齐的,保留四个角的像素值

preserve_aspect_ratio:布尔型参数,默认为False,设置是否保持输入图片的长、宽比,如果设置为True,输入图像 images 的尺寸将调整为输入 size 的大小,同时保持原始输入图片的长宽比。如果输入 size 的比输入图像 images的尺寸大,将会按照比例放大输入图像 images
import tensorflow as tf

import matplotlib.pyplot as plt

import numpy as np

image_raw = tf.gfile.GFile('./image/cat/cat.jpg','rb').read()

with tf.Session() as sess:

    image_data = tf.image.decode_jpeg(image_raw)

    resized = tf.image.resize_images(image_data,[300,300],method=0)

    plt.imshow(np.asarray(resized.eval(),dtype='uint8'))

    plt.show()
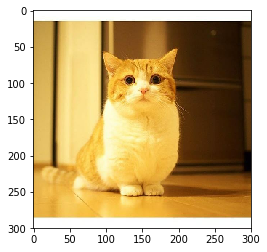
剪切和填充图像
tf.image.resize_image_with_crop_or_pad()
函数原型:
def resize_image_with_crop_or_pad(image, target_height, target_width):
import tensorflow as tf

import matplotlib.pyplot as plt

import numpy as np

image_raw = tf.gfile.GFile('./image/cat/cat.jpg','rb').read()

with tf.Session() as sess:

    image_data = tf.image.decode_jpeg(image_raw)

    resized = tf.image.resize_image_with_crop_or_pad(image_data,1000,1000)

    plt.imshow(np.asarray(resized.eval(),dtype='uint8'))

    plt.show()
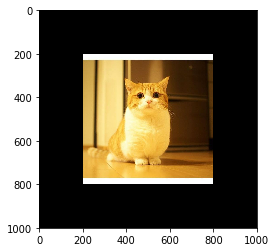
对角线翻转图像
函数原型:
tf.image.transpose_image(image)
with tf.Session() as sess:

    image_data = tf.image.decode_jpeg(image_raw)

    resized = tf.image.transpose_image(image_data)

    plt.imshow(np.asarray(resized.eval(),dtype='uint8'))

    plt.show()

调整图像色彩
def adjust_brightness(image, delta)
def random_brightness(image, max_delta, seed=None)
max_delta:最大差量
with tf.Session() as sess:

    image_data = tf.image.decode_jpeg(image_raw)

    brightness = tf.image.random_brightness(image_data,max_delta=0.4,seed=42)

    plt.imshow(np.asarray(brightness.eval(),dtype='uint8'))

    plt.show()

调整图像色调饱和度
def adjust_hue(images, delta, name=None)
delta:差量
with tf.Session() as sess:

    image_data = tf.image.decode_jpeg(image_raw)

    adjust_hue = tf.image.adjust_hue(image_data,delta=0.4)

    plt.imshow(np.asarray(adjust_hue.eval(),dtype='uint8'))

    plt.show()

tensorflow图像基本处理的更多相关文章
- TensorFlow图像预处理-函数
更多的基本的API请参看TensorFlow中文社区:http://www.tensorfly.cn/tfdoc/api_docs/python/array_ops.html 下面是实验的代码,可以参 ...
- Tensorflow图像操作
图像操作 图像基本概念 在图像数字化表示当中,分为黑白和彩色两种.在数字化表示图片的时候,有三个因素.分别是图片的长.图片的宽.图片的颜色通道数.那么黑白图片的颜色通道数为1,它只需要一个数字就可以表 ...
- TensorFlow 图像预处理(一) 图像编解码,图像尺寸调整
from: https://blog.csdn.net/chaipp0607/article/details/73029923 TensorFlow提供了几类图像处理函数,下面介绍图像的编码与解码,图 ...
- TensorFlow图像预处理完整样例
参考书 <TensorFlow:实战Google深度学习框架>(第2版) 以下TensorFlow程序完成了从图像片段截取,到图像大小调整再到图像翻转及色彩调整的整个图像预处理过程. #! ...
- 吴裕雄 python 神经网络——TensorFlow 图像预处理完整样例
import numpy as np import tensorflow as tf import matplotlib.pyplot as plt def distort_color(image, ...
- TensorFlow框架(2)之TensorBoard详解
为了更方便 TensorFlow 程序的理解.调试与优化,TensorFlow发布了一套叫做 TensorBoard 的可视化工具.你可以用 TensorBoard 来展现你的 TensorFlow ...
- AlexNet 网络详解及Tensorflow实现源码
版权声明:本文为博主原创文章,未经博主允许不得转载. 1. 图片数据处理 2. 卷积神经网络 2.1. 卷积层 2.2. 池化层 2.3. 全链层 3. AlexNet 4. 用Tensorflow搭 ...
- 深度学习动手入门:GitHub上四个超棒的TensorFlow开源项目
作者简介:akshay pai,数据科学工程师,热爱研究机器学习问题.Source Dexter网站创办人. TensorFlow是Google的开源深度学习库,你可以使用这个框架以及Python编程 ...
- 深度学习与计算机视觉(12)_tensorflow实现基于深度学习的图像补全
深度学习与计算机视觉(12)_tensorflow实现基于深度学习的图像补全 原文地址:Image Completion with Deep Learning in TensorFlow by Bra ...
随机推荐
- Global.asax详解
在网上找了N多相关的东西总说的不够细,现在终于找到了.可以了解web.cofig和Global.asax之间的关系以及执行的顺序. 在Global.asax.cs文件中 protected void ...
- Ubuntu16.04 安装openssl
1 下载 https://www.openssl.org/source/ 2 解压 3 安装 # ./config --prefix=/usr/local --openssldir=/usr/loca ...
- MySQL安装的N种方式
一.二进制包安装 1.)下载:在官网的下载页面下的服务器操作系统选择 Linux- Generic : 进制分发版的格式是:mysql-<版本>-<OS>-tar.gz 2. ...
- SQL Server死锁总结
1. 死锁原理 根据操作系统中的定义:死锁是指在一组进程中的各个进程均占有不会释放的资源,但因互相申请被其他进程所站用不会释放的资源而处于的一种永久等待状态. 死锁的四个必要条件:互斥条件(Mutua ...
- [mybatis]Mapper XML 文件——statementType
statementType:STATEMENT,PREPARED 或 CALLABLE(存储过程) 的一个.这会让 MyBatis 分别使用 Statement,PreparedStatement 或 ...
- 原生javascript-Tab选项卡-面向对象
分析个人用原生JS获取类名元素的代码: getByClassName:function(className,parent){ var elem = [], node = parent != undef ...
- SVN更新操作提示需要清理操作,清理操作提示乱码,更新SVN失败
1.下载sqlite3.exe,下载方式如下: 1):sqlite网址:https://www.sqlite.org/download.html (根据操作系统自行下载) 2.下载的文件解压后将sql ...
- http code码实验
500: 1.代码语法错误. 2.代码文件未被授权执行或访问. 502: php-fpm 未启动 302 Moved Temporarily header 跳转 404: 访问的页面不存在,或者没有权 ...
- python类常用装饰器
class Myclass(object): def __init__(self): pass #必须实例化才能调用 def sayhi(self): print 'hello' #静态方法,跟类没什 ...
- day27 CRM delete& action& 嵌入CRM
课程目录:deleteactionpop up window嵌入crm项目 权限(未讲)学员交作业发邮件 代码路径:https://github.com/liyongsan/git_class/tre ...