biancheng-Spring Cloud Alibaba Nacos
参考http://c.biancheng.net/springcloud/what-is-alibaba.html
http://c.biancheng.net/springcloud/nacos.html
Spring Cloud Alibaba
Spring Cloud Alibaba 是阿里巴巴结合自身丰富的微服务实践而推出的微服务开发的一站式解决方案,是 Spring Cloud 第二代实现的主要组成部分。
Spring Cloud Alibaba 吸收了 Spring Cloud Netflix 的核心架构思想,并进行了高性能改进。自 Spring Cloud Netflix 进入停更维护后,Spring Cloud Alibaba 逐渐代替它成为主流的微服务框架。
Spring Cloud Alibaba 是国内首个进入 Spring 社区的开源项目。2018 年 7 月,Spring Cloud Alibaba 正式开源,并进入 Spring Cloud 孵化器中孵化;2019 年 7 月,Spring Cloud 官方宣布 Spring Cloud Alibaba 毕业,并将仓库迁移到 Alibaba Github OSS 下。
虽然 Spring Cloud Alibaba 诞生时间不久,但俗话说的好“大树底下好乘凉”,依赖于阿里巴巴强大的技术影响力,Spring Cloud Alibaba 在业界得到了广泛的使用,成功案例也越来越多。
Spring Cloud Alibaba 组件
Spring Cloud Alibaba 包含了多种开发分布式微服务系统的必需组件
- Nacos:阿里巴巴开源产品,一个更易于构建云原生应用的动态服务发现,配置管理和服务管理平台。
- Sentinel:阿里巴巴开源产品,把流量作为切入点,从流量控制,熔断降级,系统负载保护等多个维度保护服务的稳定性。
- RocketMQ:Apache RocketMQ 是一款基于Java 的高性能、高吞吐量的分布式消息和流计算平台。
- Dubbo:Apache Dubbo 是一款高性能的 Java RPC 框架。
- Seata:阿里巴巴开源产品,一个易于使用的高性能微服务分布式事务解决方案。
- Alibaba Cloud OSS:阿里云对象存储服务器(Object Storage Service,简称OSS),是阿里云提供的海量、安全、低成本、高可靠的云存储服务。
- Alibaba Cloud Schedulerx:阿里中间件团队开发的一款分布式调度产品,支持周期性的任务与固定时间点触发任务。
通过 Spring Cloud Alibaba 的这些组件,我们只需要添加一些注解和少量配置,就可以将 Spring Cloud 应用接入阿里微服务解决方案,通过阿里中间件来迅速搭建分布式应用系统。
Spring Cloud Alibaba 的应用场景
Spring Cloud Alibaba 的应用场景如下:
- 大型复杂的系统,例如大型电商系统。
- 高并发系统,例如大型门户网站、商品秒杀系统。
- 需求不明确,且变更很快的系统,例如创业公司业务系统。
Spring Cloud 两代实现组件对比
下表展示了 Spring Cloud 两代实现的组件对比情况。
| Spring Cloud 第一代实现(Netflix) | 状态 | Spring Cloud 第二代实现(Alibaba) | 状态 |
|---|---|---|---|
| Ereka | 2.0 孵化失败 | Nacos Discovery | 性能更好,感知力更强 |
| Ribbon | 停更进维 | Spring Cloud Loadbalancer | Spring Cloud 原生组件,用于代替 Ribbon |
| Hystrix | 停更进维 | Sentinel | 可视化配置,上手简单 |
| Zuul | 停更进维 | Spring Cloud Gateway | 性能为 Zuul 的 1.6 倍 |
| Spring Cloud Config | 搭建过程复杂,约定过多,无可视化界面,上手难点大 | Nacos Config | 搭建过程简单,有可视化界面,配置管理更简单,容易上手 |
Spring Cloud Alibaba 版本依赖
Spring Cloud、Spring Cloud Alibaba 以及 Spring Boot 之间版本依赖关系如下。
| Spring Cloud 版本 | Spring Cloud Alibaba 版本 | Spring Boot 版本 |
|---|---|---|
| Spring Cloud 2020.0.1 | 2021.1 | 2.4.2 |
| Spring Cloud Hoxton.SR12 | 2.2.7.RELEASE | 2.3.12.RELEASE |
| Spring Cloud Hoxton.SR9 | 2.2.6.RELEASE | 2.3.2.RELEASE |
| Spring Cloud Greenwich.SR6 | 2.1.4.RELEASE | 2.1.13.RELEASE |
| Spring Cloud Hoxton.SR3 | 2.2.1.RELEASE | 2.2.5.RELEASE |
| Spring Cloud Hoxton.RELEASE | 2.2.0.RELEASE | 2.2.X.RELEASE |
| Spring Cloud Greenwich | 2.1.2.RELEASE | 2.1.X.RELEASE |
| Spring Cloud Finchley | 2.0.4.RELEASE(停止维护,建议升级) | 2.0.X.RELEASE |
| Spring Cloud Edgware | 1.5.1.RELEASE(停止维护,建议升级) | 1.5.X.RELEASE |
Spring Cloud Alibaba 组件版本关系
Spring Cloud Alibaba 下各组件版本关系如下表。
| Spring Cloud Alibaba 版本 | Sentinel 版本 | Nacos 版本 | RocketMQ 版本 | Dubbo 版本 | Seata 版本 |
|---|---|---|---|---|---|
| 2.2.7.RELEASE | 1.8.1 | 2.0.3 | 4.6.1 | 2.7.13 | 1.3.0 |
| 2.2.6.RELEASE | 1.8.1 | 1.4.2 | 4.4.0 | 2.7.8 | 1.3.0 |
| 2021.1 or 2.2.5.RELEASE or 2.1.4.RELEASE or 2.0.4.RELEASE | 1.8.0 | 1.4.1 | 4.4.0 | 2.7.8 | 1.3.0 |
| 2.2.3.RELEASE or 2.1.3.RELEASE or 2.0.3.RELEASE | 1.8.0 | 1.3.3 | 4.4.0 | 2.7.8 | 1.3.0 |
| 2.2.1.RELEASE or 2.1.2.RELEASE or 2.0.2.RELEASE | 1.7.1 | 1.2.1 | 4.4.0 | 2.7.6 | 1.2.0 |
| 2.2.0.RELEASE | 1.7.1 | 1.1.4 | 4.4.0 | 2.7.4.1 | 1.0.0 |
| 2.1.1.RELEASE or 2.0.1.RELEASE or 1.5.1.RELEASE | 1.7.0 | 1.1.4 | 4.4.0 | 2.7.3 | 0.9.0 |
| 2.1.0.RELEASE or 2.0.0.RELEASE or 1.5.0.RELEASE | 1.6.3 | 1.1.1 | 4.4.0 | 2.7.3 | 0.7.1 |
Nacos:Spring Cloud Alibaba服务注册与配置中心(非常详细)
Nacos 英文全称为 Dynamic Naming and Configuration Service,是一个由阿里巴巴团队使用 Java 语言开发的开源项目。
Nacos 是一个更易于帮助构建云原生应用的动态服务发现、配置和服务管理平台(参考自 Nacos 官网)。
Nacos 的命名是由 3 部分组成:
| 组成部分 | 全称 | 描述 |
|---|---|---|
| Na | naming/nameServer | 即服务注册中心,与 Spring Cloud Eureka 的功能类似。 |
| co | configuration | 即配置中心,与 Spring Cloud Config+Spring Cloud Bus 的功能类似。 |
| s | service | 即服务,表示 Nacos 实现的服务注册中心和配置中心都是以服务为核心的。 |
我们可以将 Nacos 理解成服务注册中心和配置中心的组合体,它可以替换 Eureka 作为服务注册中心,实现服务的注册与发现;还可以替换 Spring Cloud Config 作为配置中心,实现配置的动态刷新。
Nacos 作为服务注册中心经历了十年“双十一”的洪峰考验,具有简单易用、稳定可靠、性能卓越等优点,可以帮助用户更敏捷、容易地构建和管理微服务应用。
Nacos 支持几乎所有主流类型“服务”的发现、配置和管理:
- Kubernetes Service
- gRPC& Dubbo RPC Service
- Spring Cloud RESTful Service
Nacos 的特性
Nacos 提供了一系列简单易用的特性,能够帮助我们快速地实现动态服务发现、服务配置等功能。
服务发现
Nacos 支持基于 DNS 和 RPC 的服务发现。当服务提供者使用原生 SDK、OpenAPI 或一个独立的 Agent TODO 向 Nacos 注册服务后,服务消费者可以在 Nacos 上通过 DNS TODO 或 HTTP&API 查找、发现服务。
服务健康监测
Nacos 提供对服务的实时健康检查,能够阻止请求发送到不健康主机或服务实例上。Nacos 还提供了一个健康检查仪表盘,能够帮助我们根据健康状态管理服务的可用性及流量。
动态配置服务
动态配置服务可以让我们以中心化、外部化和动态化的方式,管理所有环境的应用配置和服务配置。
动态配置消除了配置变更时重新部署应用和服务的需要,让配置管理变得更加高效、敏捷。
配置中心化管理让实现无状态服务变得更简单,让服务按需弹性扩展变得更容易。
Nacos 提供了一个简洁易用的 UI 帮助我们管理所有服务和应用的配置。Nacos 还提供包括配置版本跟踪、金丝雀发布、一键回滚配置以及客户端配置更新状态跟踪在内的一系列开箱即用的配置管理特性,帮助我们更安全地在生产环境中管理配置变更和降低配置变更带来的风险。
动态 DNS 服务
Nacos 提供了动态 DNS 服务,能够让我们更容易地实现负载均衡、流量控制以及数据中心内网的简单 DNS 解析服务。
Nacos 提供了一些简单的 DNS APIs TODO,可以帮助我们管理服务的关联域名和可用的 IP:PORT 列表。
服务及其元数据管理
Nacos 能让我们从微服务平台建设的视角管理数据中心的所有服务及元数据,包括管理服务的描述、生命周期、服务的静态依赖分析、服务的健康状态、服务的流量管理、路由及安全策略、服务的 SLA 以及 metrics 统计数据。
Nacos 两大组件
与 Eureka 类似,Nacos 也采用 CS(Client/Server,客户端/服务器)架构,它包含两大组件,如下表。
、
| 组件 | 描述 | 功能 |
|---|---|---|
| Nacos Server | Nacos 服务端,与 Eureka Server 不同,Nacos Server 由阿里巴巴团队使用 Java 语言编写并将 Nacos Server 的下载地址给用户,用户只需要直接下载并运行即可。 | Nacos Server 可以作为服务注册中心,帮助 Nacos Client 实现服务的注册与发现。 |
| Nacos Server 可以作为配置中心,帮助 Nacos Client 在不重启的情况下,实现配置的动态刷新。 | ||
| Nacos Client | Nacos 客户端,通常指的是微服务架构中的各个服务,由用户自己搭建,可以使用多种语言编写。 | Nacos Client 通过添加依赖 spring-cloud-starter-alibaba-nacos-discovery,在服务注册中心(Nacos Server)中实现服务的注册与发现。 |
| Nacos Client 通过添加依赖 spring-cloud-starter-alibaba-nacos-config,在配置中心(Nacos Server)中实现配置的动态刷新。 |
Nacos 服务注册中心
Nacos 作为服务注册中心可以实现服务的注册与发现,流程如下图。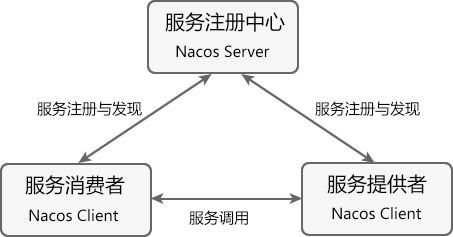
在图 1 中共涉及到以下 3 个角色:
- 服务注册中心(Register Service):它是一个 Nacos Server,可以为服务提供者和服务消费者提供服务注册和发现功能。
- 服务提供者(Provider Service):它是一个 Nacos Client,用于对外服务。它将自己提供的服务注册到服务注册中心,以供服务消费者发现和调用。
- 服务消费者(Consumer Service):它是一个 Nacos Client,用于消费服务。它可以从服务注册中心获取服务列表,调用所需的服务。
Nacos 实现服务注册与发现的流程如下:
- 从 Nacos 官方提供的下载页面中,下载 Nacos Server 并运行。
- 服务提供者 Nacos Client 启动时,会把服务以服务名(spring.application.name)的方式注册到服务注册中心(Nacos Server);
- 服务消费者 Nacos Client 启动时,也会将自己的服务注册到服务注册中心;
- 服务消费者在注册服务的同时,它还会从服务注册中心获取一份服务注册列表信息,该列表中包含了所有注册到服务注册中心上的服务的信息(包括服务提供者和自身的信息);
- 在获取了服务提供者的信息后,服务消费者通过 HTTP 或消息中间件远程调用服务提供者提供的服务。
安装和运行 Nacos Server
下面我们以 Nacos 2.0.3 为例,演示下如何安装和运行 Nacos Server,步骤如下。
1. 使用浏览器访问 Nacos Server 下载页面,并在页面最下方点击链接 nacos-server-2.0.3.zip,如下图。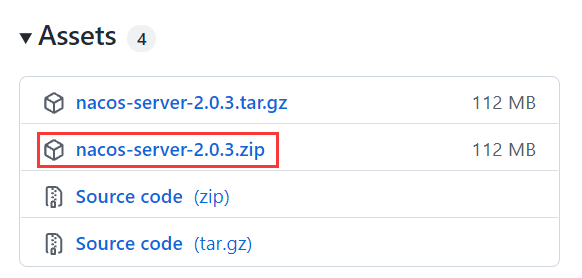
2. 下载完成后,解压 nacos-server-2.0.3.zip,目录结构如下。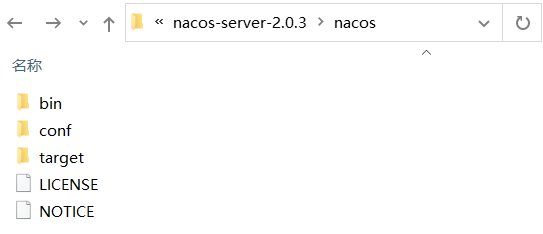
Nacos Server 下各目录说明如下:
- bin:用于存放 Nacos 的可执行命令。
- conf:用于存放 Nacos 配置文件。
- target:用于存放 Nacos 应用的 jar 包。
3. 打开命令行窗口,跳转到 Nacos Server 安装目录的 bin 下,执行以下命令,以单机模式启动 Nacos Server。
startup.cmd -m standalone
4. Nacos Server 启动日志如下。
"nacos is starting with standalone"

         ,--.

       ,--.'|

   ,--,:  : |                                           Nacos 2.0.3

,`--.'`|  ' :                       ,---.               Running in stand alone mode, All function modules

|   :  :  | |                      '   ,'\   .--.--.    Port: 8848

:   |   \ | :  ,--.--.     ,---.  /   /   | /  /    '   Pid: 27512

|   : '  '; | /       \   /     \.   ; ,. :|  :  /`./   Console: http://192.168.3.138:8848/nacos/index.html

'   ' ;.    ;.--.  .-. | /    / ''   | |: :|  :  ;_

|   | | \   | \__\/: . ..    ' / '   | .; : \  \    `.      https://nacos.io

'   : |  ; .' ," .--.; |'   ; :__|   :    |  `----.   \

|   | '`--'  /  /  ,.  |'   | '.'|\   \  /  /  /`--'  /

'   : |     ;  :   .'   \   :    : `----'  '--'.     /

;   |.'     |  ,     .-./\   \  /            `--'---'

'---'        `--`---'     `----'

2021-11-08 16:16:38,877 INFO Bean 'org.springframework.security.access.expression.method.DefaultMethodSecurityExpressionHandler@5ab9b447' of type [org.springframework.security.access.expression.method

.DefaultMethodSecurityExpressionHandler] is not eligible for getting processed by all BeanPostProcessors (for example: not eligible for auto-proxying)

2021-11-08 16:16:38,884 INFO Bean 'methodSecurityMetadataSource' of type [org.springframework.security.access.method.DelegatingMethodSecurityMetadataSource] is not eligible for getting processed by al

l BeanPostProcessors (for example: not eligible for auto-proxying)

2021-11-08 16:16:40,001 INFO Tomcat initialized with port(s): 8848 (http)

2021-11-08 16:16:40,713 INFO Root WebApplicationContext: initialization completed in 14868 ms

2021-11-08 16:16:52,351 INFO Initializing ExecutorService 'applicationTaskExecutor'

2021-11-08 16:16:52,560 INFO Adding welcome page: class path resource [static/index.html]

2021-11-08 16:16:54,239 INFO Creating filter chain: Ant [pattern='/**'], []

2021-11-08 16:16:54,344 INFO Creating filter chain: any request, [org.springframework.security.web.context.request.async.WebAsyncManagerIntegrationFilter@7dd611c8, org.springframework.security.web.con

text.SecurityContextPersistenceFilter@5c7668ba, org.springframework.security.web.header.HeaderWriterFilter@fb713e7, org.springframework.security.web.csrf.CsrfFilter@6ec7bce0, org.springframework.secur

ity.web.authentication.logout.LogoutFilter@7d9ba6c, org.springframework.security.web.savedrequest.RequestCacheAwareFilter@158f4cfe, org.springframework.security.web.servletapi.SecurityContextHolderAwa

reRequestFilter@6c6333cd, org.springframework.security.web.authentication.AnonymousAuthenticationFilter@5d425813, org.springframework.security.web.session.SessionManagementFilter@13741d5a, org.springf

ramework.security.web.access.ExceptionTranslationFilter@3727f0ee]

2021-11-08 16:16:54,948 INFO Initializing ExecutorService 'taskScheduler'

2021-11-08 16:16:54,977 INFO Exposing 16 endpoint(s) beneath base path '/actuator'

2021-11-08 16:16:55,309 INFO Tomcat started on port(s): 8848 (http) with context path '/nacos'

2021-11-08 16:16:55,319 INFO Nacos started successfully in stand alone mode. use embedded storage
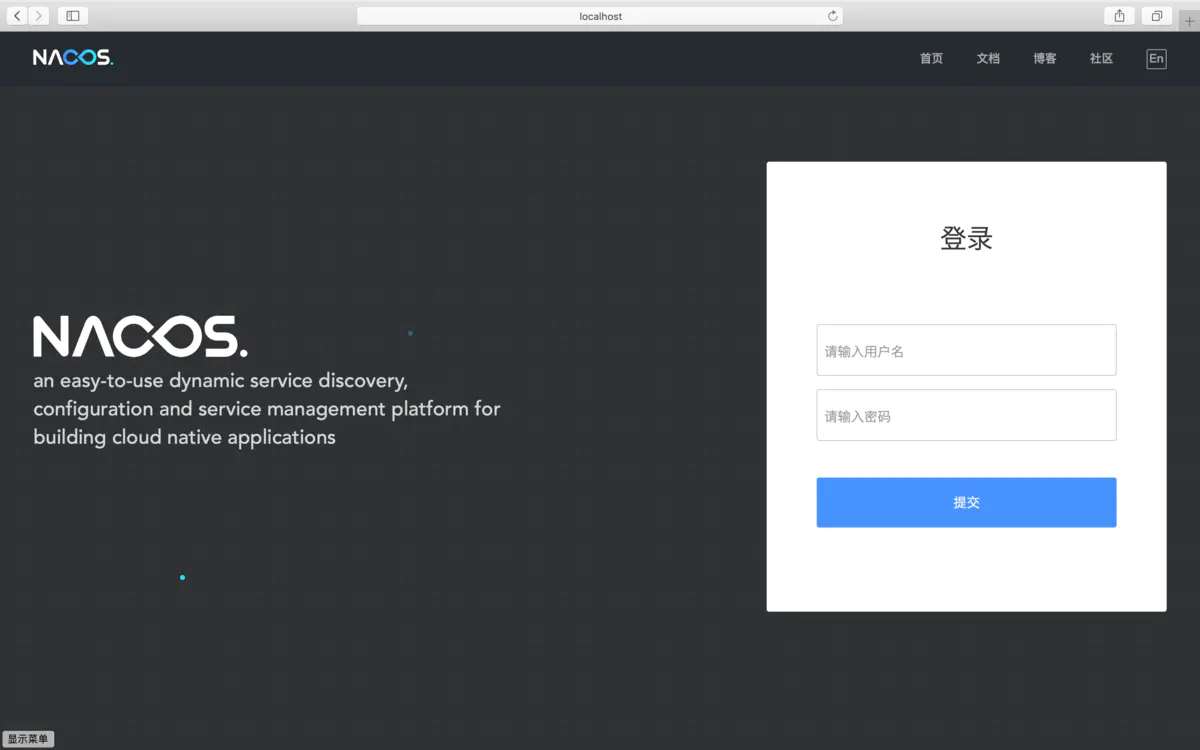
5. 使用浏览器访问“http://localhost:8848/nacos”,跳转到 Nacos Server 登陆页面,如下图。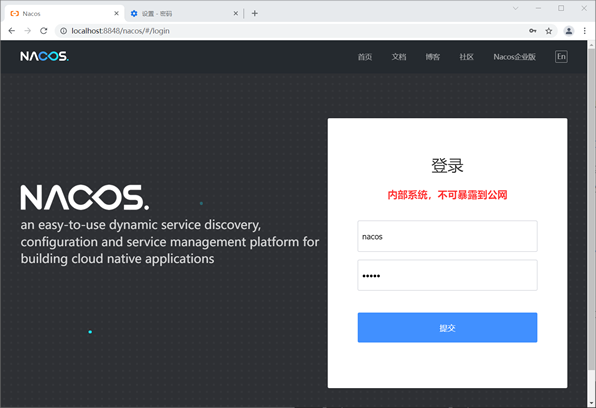
6. 在登陆页输入登录名和密码(默认都是 nacos),点击提交按钮,跳转到 Nacos Server 控制台主页,如下图。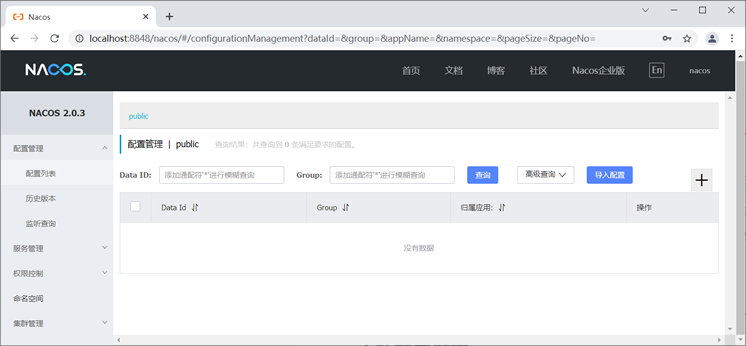
自此,我们就完成了 Nacos Server 的下载、安装和运行工作。
Nacos 服务端搭建(Mac)
一、Nacos Server服务端搭建
1、下载地址:https://github.com/alibaba/Nacos/releases

2、解压并进入nacos的bin目录
2.1、解压
正常情况下下载会自动解压,如未解压,可用命令:tar -zxvf nacos-server-1.2.1.tar.gz
2.2、进入nacos的bin目录
sudo chmod 777 /home/alibaba/ (准备了一个自定义目录存放nacos,可忽略)
mv nacos /home/alibaba/ (移动到自定义目录,可忽略)
cd /home/alibaba/nacos/bin 进入到nacos的bin目录
3、启动单机
执行命令:sh startup.sh -m standalone
4、检查nacos启动的端口
lsof -i:8848
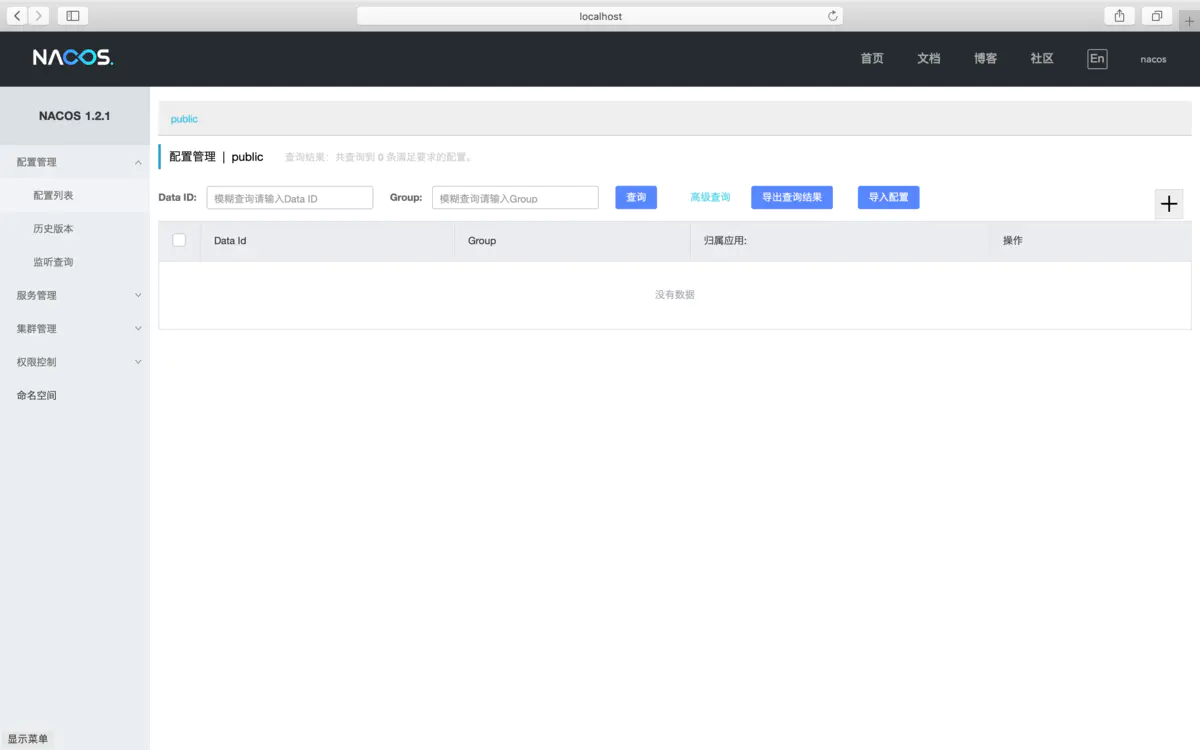
5、访问nacos的服务端
5.1、访问地址:http://127.0.0.1:8848/nacos/index.html
5.2、登录nacos
默认用户名密码 :nacos/nacos
6、停止nacos
进入到nacos的bin目录下:cd /home/alibaba/nacos/bin/
执行命令:sh shutdown.sh
补充:windows下 启动和停止是start.sh、shutdown.sh
7、验证服务器
7.1、服务注册
curl -X POST 'http://127.0.0.1:8848/nacos/v1/ns/instance?serviceName=nacos.naming.serviceName&ip=20.18.7.10&port=8080'
7.2、服务发现
curl -X GET 'http://127.0.0.1:8848/nacos/v1/ns/instance/list?serviceName=nacos.naming.serviceName'
二、Nacos Client服务端搭建
1、加入依赖
<properties>
<spring.cloud.alibaba.version>2.1.0.RELEASE</spring.cloud.alibaba.version>
</properties>
<dependency>
<groupId>com.alibaba.cloud</groupId>
<artifactId>spring-cloud-alibaba-nacos-discovery</artifactId>
<version>${spring.cloud.alibaba.version}</version>
</dependency>
2、加入注解 @EnableDiscoveryClient

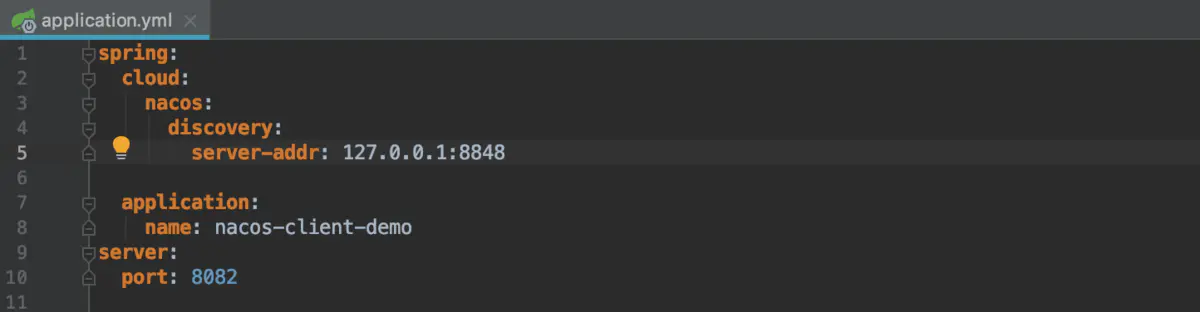
3、yml配置文件
4、Nacos服务列表
坑处:
问题1:服务始终注册不上,Nacos服务列表始终为空
<dependency>
<groupId>org.springframework.boot</groupId>
<artifactId>spring-boot-starter</artifactId>
</dependency>
解决1:
<dependency>
<groupId>org.springframework.boot</groupId>
<artifactId>spring-boot-starter-web</artifactId>
</dependency>
搭建服务提供者
接下来,我们来搭建一个服务提供者,步骤如下。
1. 创建一个名为 spring-cloud-alibaba-demo 的 Maven 工程 ,该工程的 pom.xml 内容如下。
- <?xml version="1.0" encoding="UTF-8"?>
- <project xmlns="http://maven.apache.org/POM/4.0.0"
- xmlns:xsi="http://www.w3.org/2001/XMLSchema-instance"
- xsi:schemaLocation="http://maven.apache.org/POM/4.0.0 http://maven.apache.org/xsd/maven-4.0.0.xsd">
- <modelVersion>4.0.0</modelVersion>
- <packaging>pom</packaging>
- <parent>
- <groupId>org.springframework.boot</groupId>
- <artifactId>spring-boot-starter-parent</artifactId>
- <version>2.5.6</version>
- <relativePath/> <!-- lookup parent from repository -->
- </parent>
- <groupId>net.biancheng.c</groupId>
- <artifactId>spring-cloud-alibaba-demo</artifactId>
- <version>1.0-SNAPSHOT</version>
- <properties>
- <maven.compiler.source>8</maven.compiler.source>
- <maven.compiler.target>8</maven.compiler.target>
- <project.build.sourceEncoding>UTF-8</project.build.sourceEncoding>
- <maven.compiler.source>1.8</maven.compiler.source>
- <maven.compiler.target>1.8</maven.compiler.target>
- <junit.version>4.12</junit.version>
- <log4j.version>1.2.17</log4j.version>
- <lombok.version>1.16.18</lombok.version>
- <spring-cloud.version>2020.0.4</spring-cloud.version>
- </properties>
- <dependencyManagement>
- <dependencies>
- <!--Spring Cloud Alibaba 的版本信息-->
- <dependency>
- <groupId>com.alibaba.cloud</groupId>
- <artifactId>spring-cloud-alibaba-dependencies</artifactId>
- <version>2021.1</version>
- <type>pom</type>
- <scope>import</scope>
- </dependency>
- <!--Spring Cloud 的版本信息-->
- <dependency>
- <groupId>org.springframework.cloud</groupId>
- <artifactId>spring-cloud-dependencies</artifactId>
- <version>${spring-cloud.version}</version>
- <type>pom</type>
- <scope>import</scope>
- </dependency>
- </dependencies>
- </dependencyManagement>
- </project>
在该工程的 pom.xml 中,我们通过 dependencyManagement 对 Spring Cloud Alibaba 的版本信息进行管理,该工程下的各个子模块在引入 Spring Cloud Alibaba 的各个组件时就不要单独指定版本号了。
2. 在 spring-cloud-alibaba-demo 下,创建一个名为 spring-cloud-alibaba-provider-8001 的 Spring Boot 模块,并在其 pom.xml 中添加以下依赖,内容如下。
- <?xml version="1.0" encoding="UTF-8"?>
- <project xmlns="http://maven.apache.org/POM/4.0.0" xmlns:xsi="http://www.w3.org/2001/XMLSchema-instance"
- xsi:schemaLocation="http://maven.apache.org/POM/4.0.0 https://maven.apache.org/xsd/maven-4.0.0.xsd">
- <modelVersion>4.0.0</modelVersion>
- <!--父工程-->
- <parent>
- <groupId>net.biancheng.c</groupId>
- <version>1.0-SNAPSHOT</version>
- <artifactId>spring-cloud-alibaba-demo</artifactId>
- </parent>
- <groupId>net.biancheng.c</groupId>
- <artifactId>spring-cloud-alibaba-provider-8001</artifactId>
- <version>0.0.1-SNAPSHOT</version>
- <name>spring-cloud-alibaba-provider-8001</name>
- <description>Demo project for Spring Boot</description>
- <properties>
- <java.version>1.8</java.version>
- </properties>
- <dependencies>
- <dependency>
- <groupId>org.springframework.boot</groupId>
- <artifactId>spring-boot-starter-web</artifactId>
- </dependency>
- <dependency>
- <groupId>org.springframework.boot</groupId>
- <artifactId>spring-boot-devtools</artifactId>
- <scope>runtime</scope>
- <optional>true</optional>
- </dependency>
- <dependency>
- <groupId>org.projectlombok</groupId>
- <artifactId>lombok</artifactId>
- <optional>true</optional>
- </dependency>
- <dependency>
- <groupId>org.springframework.boot</groupId>
- <artifactId>spring-boot-starter-test</artifactId>
- <scope>test</scope>
- </dependency>
- <!--Spring Cloud Alibaba Nacos discovery -->
- <dependency>
- <groupId>com.alibaba.cloud</groupId>
- <artifactId>spring-cloud-starter-alibaba-nacos-discovery</artifactId>
- </dependency>
- </dependencies>
- <build>
- <plugins>
- <plugin>
- <groupId>org.springframework.boot</groupId>
- <artifactId>spring-boot-maven-plugin</artifactId>
- <configuration>
- <excludes>
- <exclude>
- <groupId>org.projectlombok</groupId>
- <artifactId>lombok</artifactId>
- </exclude>
- </excludes>
- </configuration>
- </plugin>
- </plugins>
- </build>
- </project>
3. 在 spring-cloud-alibaba-provider-8001 的配置文件 application.properties 中添加以下配置,内容如下。
#端口号

server.port=8001

#服务名

spring.application.name=spring-cloud-alibaba-provider

#Nacos Server 的地址

spring.cloud.nacos.discovery.server-addr=127.0.0.1:8848

management.endpoints.web.exposure.include=*
4. 在 net.biacheng.c.controller 包下,创建一个名为 DeptController 的 Controller 类,代码如下。
- package net.biancheng.c.controller;
- import lombok.extern.slf4j.Slf4j;
- import org.springframework.beans.factory.annotation.Value;
- import org.springframework.web.bind.annotation.GetMapping;
- import org.springframework.web.bind.annotation.PathVariable;
- import org.springframework.web.bind.annotation.RestController;
- @RestController
- @Slf4j
- public class DeptController {
- @Value("${server.port}")
- private String serverPort;
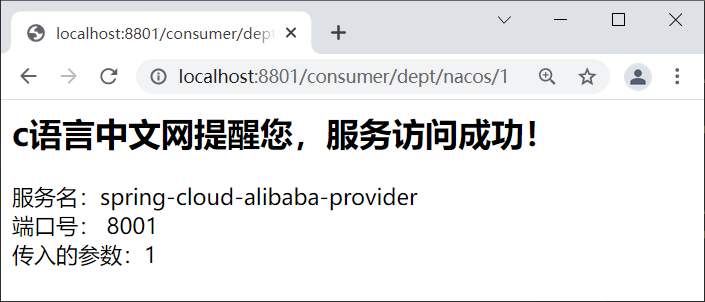
- @GetMapping(value = "/dept/nacos/{id}")
- public String getPayment(@PathVariable("id") Integer id) {
- return "<h2>c语言中文网提醒您,服务访问成功!</h2>服务名:spring-cloud-alibaba-provider<br /> 端口号: " + serverPort + "<br /> 传入的参数:" + id;
- }
- }
5. 在 spring-cloud-alibaba-provider-8001 的主启动类上,使用 @EnableDiscoveryClient 注解开启 Nacos 服务发现功能,代码如下。
- package net.biancheng.c;
- import org.springframework.boot.SpringApplication;
- import org.springframework.boot.autoconfigure.SpringBootApplication;
- import org.springframework.cloud.client.discovery.EnableDiscoveryClient;
- @SpringBootApplication
- @EnableDiscoveryClient //开启服务发现功能
- public class SpringCloudAlibabaProvider8001Application {
- public static void main(String[] args) {
- SpringApplication.run(SpringCloudAlibabaProvider8001Application.class, args);
- }
- }
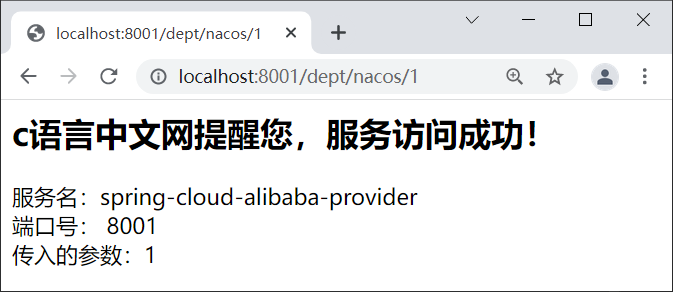
6. 启动 spring-cloud-alibaba-provider-8001,使用浏览器访问“http://localhost:8001/dept/nacos/1”,结果如下图。
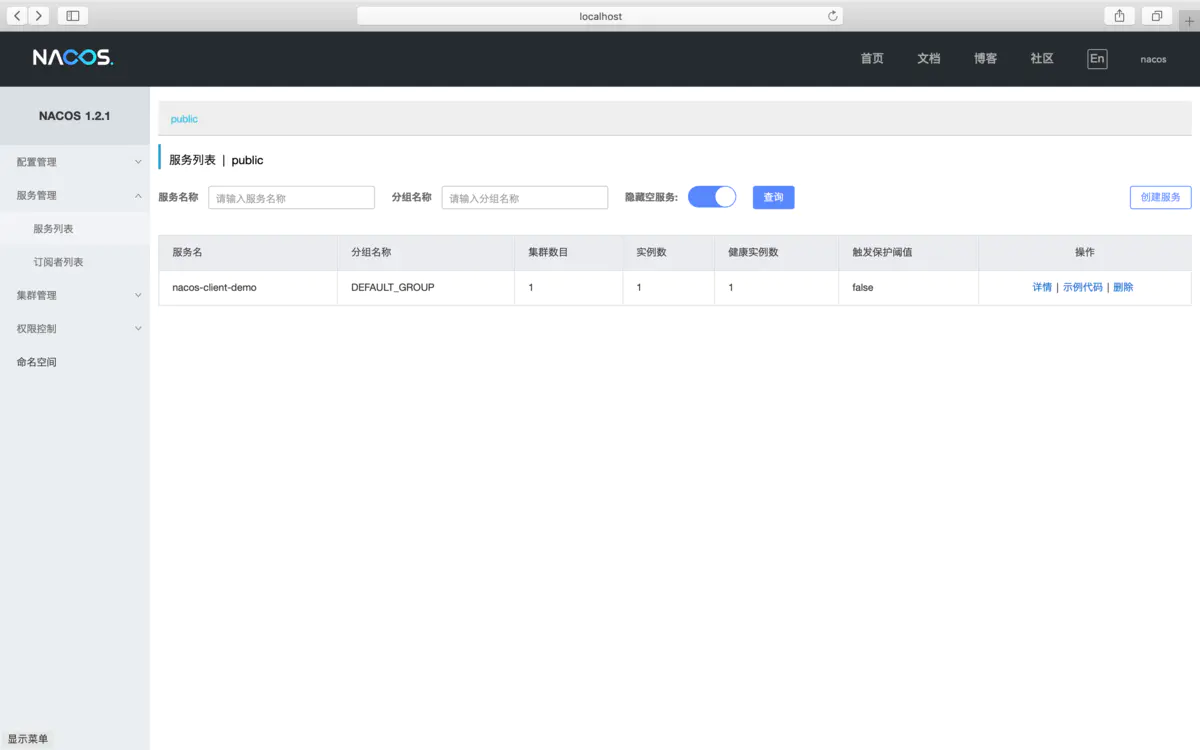
7. 使用浏览器访问“http://localhost:8848/nacos”,查看“服务管理”下的“服务列表”,如下图。
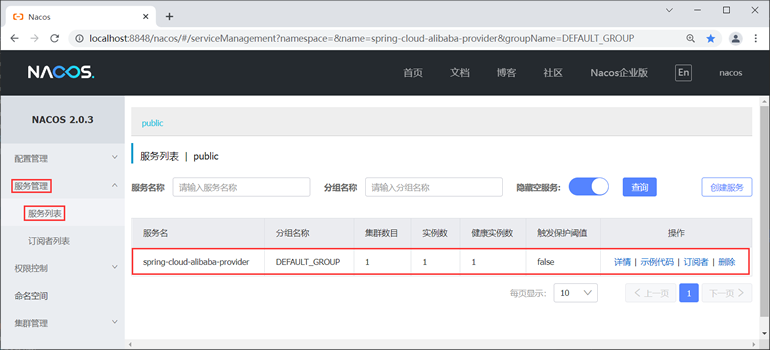
从图 7 可以看到,我们搭建的服务提供者 spring-cloud-alibaba-provider-8001 所提供的服务已经被注册到了 Nacos Server 上了。
搭建服务消费者
下面,我们就来搭建一个服务消费者来消费 spring-cloud-alibaba-provider-8001 提供的服务,步骤如下。
1. 在主工程 spring-cloud-alibaba-demo 下,创建一个名为 spring-cloud-alibaba-consumer-nacos-8801 的 Spring Boot 模块,并在其 pom.xml 中添加以下依赖。
- <?xml version="1.0" encoding="UTF-8"?>
- <project xmlns="http://maven.apache.org/POM/4.0.0" xmlns:xsi="http://www.w3.org/2001/XMLSchema-instance"
- xsi:schemaLocation="http://maven.apache.org/POM/4.0.0 https://maven.apache.org/xsd/maven-4.0.0.xsd">
- <modelVersion>4.0.0</modelVersion>
- <parent>
- <groupId>net.biancheng.c</groupId>
- <version>1.0-SNAPSHOT</version>
- <artifactId>spring-cloud-alibaba-demo</artifactId>
- </parent>
- <groupId>net.biancheng.c</groupId>
- <artifactId>spring-cloud-alibaba-consumer-nacos-8081</artifactId>
- <version>0.0.1-SNAPSHOT</version>
- <name>spring-cloud-alibaba-consumer-nacos-8081</name>
- <description>Demo project for Spring Boot</description>
- <properties>
- <java.version>1.8</java.version>
- </properties>
- <dependencies>
- <!--SpringCloud ailibaba nacos discovery-->
- <dependency>
- <groupId>com.alibaba.cloud</groupId>
- <artifactId>spring-cloud-starter-alibaba-nacos-discovery</artifactId>
- </dependency>
- <!--由于 Netflix Ribbon 进入停更维护阶段,因此新版本的 Nacos discovery 都已经移除了 Ribbon ,此时我们需要引入 loadbalancer 代替 -->
- <dependency>
- <groupId>org.springframework.cloud</groupId>
- <artifactId>spring-cloud-loadbalancer</artifactId>
- </dependency>
- <dependency>
- <groupId>org.springframework.boot</groupId>
- <artifactId>spring-boot-starter-web</artifactId>
- </dependency>
- <dependency>
- <groupId>org.springframework.boot</groupId>
- <artifactId>spring-boot-devtools</artifactId>
- <scope>runtime</scope>
- <optional>true</optional>
- </dependency>
- <dependency>
- <groupId>org.projectlombok</groupId>
- <artifactId>lombok</artifactId>
- <optional>true</optional>
- </dependency>
- <dependency>
- <groupId>org.springframework.boot</groupId>
- <artifactId>spring-boot-starter-test</artifactId>
- <scope>test</scope>
- </dependency>
- </dependencies>
- <build>
- <plugins>
- <plugin>
- <groupId>org.springframework.boot</groupId>
- <artifactId>spring-boot-maven-plugin</artifactId>
- <configuration>
- <excludes>
- <exclude>
- <groupId>org.projectlombok</groupId>
- <artifactId>lombok</artifactId>
- </exclude>
- </excludes>
- </configuration>
- </plugin>
- </plugins>
- </build>
- </project>
注意:由于 Netflix Ribbon 已经进入停更维护状态,Nacos Discovery 已经停了对 Ribbon 的支持,因此我们需要在服务消费者的 pom.xml 中引入 spring-cloud-loadbalancer 才能调用服务提供者提供的服务。
2. 在 spring-cloud-alibaba-consumer-nacos-8801 的配置文件 application.yml 中,添加以下配置。
- server:
- port: 8801 #端口号
- spring:
- application:
- name: spring-cloud-alibaba-consumer #服务名
- cloud:
- nacos:
- discovery:
- server-addr: localhost:8848 #Nacos server 的地址
- #以下配置信息并不是默认配置,而是我们自定义的配置,目的是不在 Controller 内硬编码服务提供者的服务名
- service-url:
- nacos-user-service: http://spring-cloud-alibaba-provider #服务提供者的服务名
3. 在 spring-cloud-alibaba-consumer-nacos-8801 的主启动类上,使用 @EnableDiscoveryClient 注解开启服务发现功能,代码如下。
- package net.biancheng.c;
- import org.springframework.boot.SpringApplication;
- import org.springframework.boot.autoconfigure.SpringBootApplication;
- import org.springframework.cloud.client.discovery.EnableDiscoveryClient;
- @SpringBootApplication
- @EnableDiscoveryClient // 开启服务注册与发现功能
- public class SpringCloudAlibabaConsumerNacos8801Application {
- public static void main(String[] args) {
- SpringApplication.run(SpringCloudAlibabaConsumerNacos8081Application.class, args);
- }
- }
4. 在 net.biancheng.c.config 包下创建一个名为 ApplicationContextBean 的配置类,并使用 @LoadBalanced 注解与 Ribbon 进行集成开启负载均衡功能,代码如下。
- package net.biancheng.c.config;
- import org.springframework.cloud.client.loadbalancer.LoadBalanced;
- import org.springframework.context.annotation.Bean;
- import org.springframework.context.annotation.Configuration;
- import org.springframework.web.client.RestTemplate;
- @Configuration
- public class ApplicationContextBean {
- @Bean
- @LoadBalanced //与 Ribbon 集成,并开启负载均衡功能
- public RestTemplate getRestTemplate() {
- return new RestTemplate();
- }
- }
5. 在 net.biancheng.c.controller 包下,创建一个名为 DeptController_Consumer 的 Controller 类,代码如下。
- package net.biancheng.c.controller;
- import lombok.extern.slf4j.Slf4j;
- import org.springframework.beans.factory.annotation.Value;
- import org.springframework.web.bind.annotation.GetMapping;
- import org.springframework.web.bind.annotation.PathVariable;
- import org.springframework.web.bind.annotation.RestController;
- import org.springframework.web.client.RestTemplate;
- import javax.annotation.Resource;
- @RestController
- @Slf4j
- public class DeptController_Consumer {
- @Resource
- private RestTemplate restTemplate;
- @Value("${service-url.nacos-user-service}")
- private String serverURL; //服务提供者的服务名
- @GetMapping("/consumer/dept/nacos/{id}")
- public String paymentInfo(@PathVariable("id") Long id) {
- return restTemplate.getForObject(serverURL + "/dept/nacos/" + id, String.class);
- }
- }
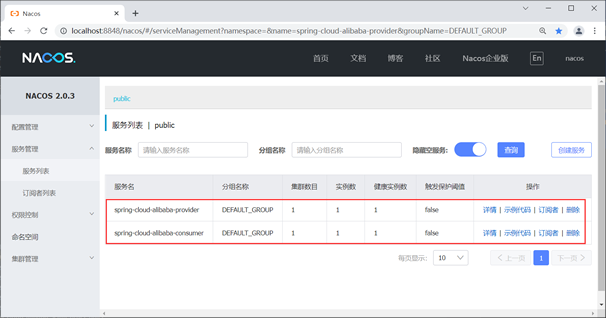
6. 启动 spring-cloud-alibaba-consumer-nacos-8801,查看 Nacos Server 的服务列表,如下图。
7. 使用浏览器访问“http://localhost:8801/consumer/dept/nacos/1”,结果如下图。
Nacos 配置中心
Nacos Server 还可以作为配置中心,对 Spring Cloud 应用的外部配置进行统一地集中化管理。而我们只需要在应用的 POM 文件中引入 spring-cloud-starter-alibaba-nacos-config 即可实现配置的获取与动态刷新。
从配置管理的角度看,Nacos 可以说是 Spring Cloud Config 的替代方案,但相比后者 Nacos 的使用更简单,操作步骤也更少。
接下来,我们通过一个实例来演示下 Nacos 是如何实现配置的统一管理和动态刷新的。
1. 在主工程 spring-cloud-alibaba-demo 下,创建一个名为 spring-cloud-alibaba-config-client-3377 的 Spring Boot 模块,并在其 pom.xml 中添加以下依赖。
- <?xml version="1.0" encoding="UTF-8"?>
- <project xmlns="http://maven.apache.org/POM/4.0.0" xmlns:xsi="http://www.w3.org/2001/XMLSchema-instance"
- xsi:schemaLocation="http://maven.apache.org/POM/4.0.0 https://maven.apache.org/xsd/maven-4.0.0.xsd">
- <modelVersion>4.0.0</modelVersion>
- <parent>
- <groupId>net.biancheng.c</groupId>
- <version>1.0-SNAPSHOT</version>
- <artifactId>spring-cloud-alibaba-demo</artifactId>
- </parent>
- <groupId>net.biancheng.c</groupId>
- <artifactId>spring-cloud-alibaba-config-client-3377</artifactId>
- <version>0.0.1-SNAPSHOT</version>
- <name>spring-cloud-alibaba-nacos-config-client-3377</name>
- <description>Demo project for Spring Boot</description>
- <properties>
- <java.version>1.8</java.version>
- </properties>
- <dependencies>
- <dependency>
- <groupId>org.springframework.boot</groupId>
- <artifactId>spring-boot-starter-web</artifactId>
- </dependency>
- <!--SpringCloud2020及以后的版本默认不启用 bootstrap 配置,我们需要在pom里面显式地引入:-->
- <dependency>
- <groupId>org.springframework.cloud</groupId>
- <artifactId>spring-cloud-starter-bootstrap</artifactId>
- </dependency>
- <dependency>
- <groupId>org.springframework.boot</groupId>
- <artifactId>spring-boot-devtools</artifactId>
- <scope>runtime</scope>
- <optional>true</optional>
- </dependency>
- <dependency>
- <groupId>org.projectlombok</groupId>
- <artifactId>lombok</artifactId>
- <optional>true</optional>
- </dependency>
- <dependency>
- <groupId>org.springframework.boot</groupId>
- <artifactId>spring-boot-starter-test</artifactId>
- <scope>test</scope>
- </dependency>
- <!--Spring Cloud Alibaba Config 依赖-->
- <dependency>
- <groupId>com.alibaba.cloud</groupId>
- <artifactId>spring-cloud-starter-alibaba-nacos-config</artifactId>
- </dependency>
- <!--SpringCloud ailibaba nacos 服务注册与发现模块 -->
- <dependency>
- <groupId>com.alibaba.cloud</groupId>
- <artifactId>spring-cloud-starter-alibaba-nacos-discovery</artifactId>
- </dependency>
- <!--Spring Boot 监控模块-->
- <dependency>
- <groupId>org.springframework.boot</groupId>
- <artifactId>spring-boot-starter-actuator</artifactId>
- </dependency>
- </dependencies>
- <build>
- <plugins>
- <plugin>
- <groupId>org.springframework.boot</groupId>
- <artifactId>spring-boot-maven-plugin</artifactId>
- <configuration>
- <excludes>
- <exclude>
- <groupId>org.projectlombok</groupId>
- <artifactId>lombok</artifactId>
- </exclude>
- </excludes>
- </configuration>
- </plugin>
- </plugins>
- </build>
- </project>
注意:我们使用的 Spring Cloud 2020 版本默认不启用 bootstrap,若想要在应用启动时加载 bootstrap 配置(例如 bootstrap.yml 或 bootstrap.properties),就需要我们在 pom.xml 中显式的引入 spring-cloud-starter-bootstrap 依赖。
2. 在 spring-cloud-alibaba-config-client-3377 的类路径(例如 /resources 目录)下,添加一个 bootstrap.yml,配置内容如下。
- server:
- port: 3377 #端口号
- spring:
- application:
- name: config-client #服务名
- cloud:
- nacos:
- discovery:
- server-addr: 127.0.0.1:8848 #Nacos服务注册中心地址
- config:
- server-addr: 127.0.0.1:8848 #Nacos作为配置中心地址
- file-extension: yaml #指定yaml格式的配置
3. 在 spring-cloud-alibaba-config-client-3377 的类路径(例如 /resources 目录)下,添加一个 application.yml,配置内容如下。
- spring:
- profiles:
- active: dev #激活 dev 的配置
4. 在 net.biancheng.c.controller 包下,创建一个名为 ConfigClientController 的 Controller 类,并在该类上使用 @RefreshScope 注解实现配置的自动更新,代码如下。
- package net.biancheng.c.controller;
- import org.springframework.beans.factory.annotation.Value;
- import org.springframework.cloud.context.config.annotation.RefreshScope;
- import org.springframework.web.bind.annotation.GetMapping;
- import org.springframework.web.bind.annotation.RestController;
- @RestController
- @RefreshScope
- public class ConfigClientController {
- @Value("${config.info}")
- private String ConfigInfo;
- @GetMapping("/config/info")
- public String getConfigInfo(){
- return ConfigInfo;
- }
- }
5. 在 spring-cloud-alibaba-config-client-3377 的主启动类上,使用 @EnableDiscoveryClient 注解开启服务发现功能,代码如下。
- package net.biancheng.c;
- import org.springframework.boot.SpringApplication;
- import org.springframework.boot.autoconfigure.SpringBootApplication;
- import org.springframework.cloud.client.discovery.EnableDiscoveryClient;
- @SpringBootApplication
- @EnableDiscoveryClient
- public class SpringCloudAlibabaNacosConfigClient3377Application {
- public static void main(String[] args) {
- SpringApplication.run(SpringCloudAlibabaNacosConfigClient3377Application.class, args);
- }
- }
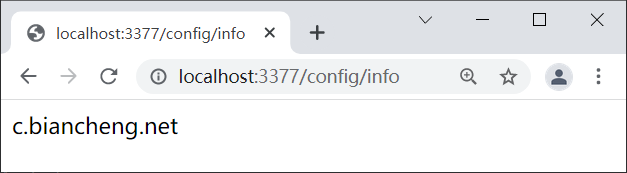
6. 启动 Nacos Server,并在 Nacos Server 控制台的“配置管理”下的“配置列表”中,点击“+”按钮,新建如下配置。
Data ID:        config-client-dev.yaml

Group  :        DEFAULT_GROUP

配置格式:        YAML

配置内容:      config:

                  info: c.biancheng.net
在 Nacos Server 中,配置的 dataId(即 Data ID)的完整格式如下:
${prefix}-${spring.profiles.active}.${file-extension}
dataId 格式中各参数说明如下:
- ${prefix}:默认取值为微服务的服务名,即配置文件中 spring.application.name 的值,我们可以在配置文件中通过配置 spring.cloud.nacos.config.prefix 来指定。
- ${spring.profiles.active}:表示当前环境对应的 Profile,例如 dev、test、prod 等。当没有指定环境的 Profile 时,其对应的连接符也将不存在, dataId 的格式变成 ${prefix}.${file-extension}。
- ${file-extension}:表示配置内容的数据格式,我们可以在配置文件中通过配置项 spring.cloud.nacos.config.file-extension 来配置,例如 properties 和 yaml。
7. 启动 spring-cloud-alibaba-config-client-3377,并使用浏览器访问“http://localhost:3377/config/info”,结果如下图。
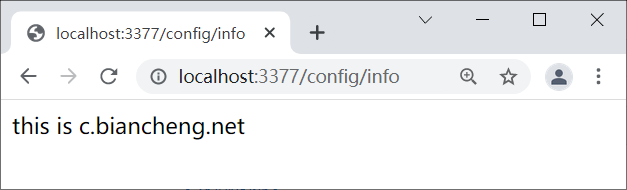
8. 在 Nacos Server 中,将 config-client-dev.yaml 中的配置修改成如下内容。
config:

    info: this is c.biancheng.net
9. 在不重启 spring-cloud-alibaba-config-client-3377 的情况下,使用浏览器再次访问“http://localhost:3377/config/info”,结果如下图。
Nacos Server 集群化部署
在实际的项目开发中,一个微服务系统往往由十几,几十个甚至几百个微服务组成。 这些服务若全部注册到同一台 Nacos Server,就极有可能导致 Nacos Server 因为不堪重负而崩溃,最终导致整个微服务系统瘫痪。解决这个问题最直接的办法就是使用 Nacos Server 集群。
Nacos Server 的集群化部署有一个十分明显的优点,那就是可以保障系统的高可用性。在集群化部署中,只要不是所有的 Nacos Server 都停止工作,Nacos Client 就还可以从集群中正常的 Nacos Server 上获取服务信息及配置,而不会导致系统的整体瘫痪,这就是 Nacos Server 集群化部署的高可用性。
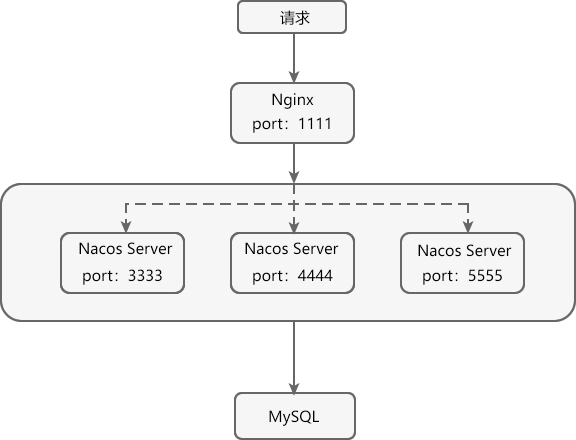
下图展示了 Nacos Server 集群化部署的基本架构。
下面我们以 Windows 系统为例,演示如何部署 Nacos Server 集群。
1. 在 MySQL 中,新建一个名为 nacos_config 的数据库实例,并在该数据库下执行以下 SQL 语句。
/******************************************/

/*   数据库全名 = nacos_config   */

/*   表名称 = config_info   */

/******************************************/

CREATE TABLE `config_info` (

  `id` bigint(20) NOT NULL AUTO_INCREMENT COMMENT 'id',

  `data_id` varchar(255) NOT NULL COMMENT 'data_id',

  `group_id` varchar(255) DEFAULT NULL,

  `content` longtext NOT NULL COMMENT 'content',

  `md5` varchar(32) DEFAULT NULL COMMENT 'md5',

  `gmt_create` datetime NOT NULL DEFAULT CURRENT_TIMESTAMP COMMENT '创建时间',

  `gmt_modified` datetime NOT NULL DEFAULT CURRENT_TIMESTAMP COMMENT '修改时间',

  `src_user` text COMMENT 'source user',

  `src_ip` varchar(50) DEFAULT NULL COMMENT 'source ip',

  `app_name` varchar(128) DEFAULT NULL,

  `tenant_id` varchar(128) DEFAULT '' COMMENT '租户字段',

  `c_desc` varchar(256) DEFAULT NULL,

  `c_use` varchar(64) DEFAULT NULL,

  `effect` varchar(64) DEFAULT NULL,

  `type` varchar(64) DEFAULT NULL,

  `c_schema` text,

  PRIMARY KEY (`id`),

  UNIQUE KEY `uk_configinfo_datagrouptenant` (`data_id`,`group_id`,`tenant_id`)

) ENGINE=InnoDB DEFAULT CHARSET=utf8 COLLATE=utf8_bin COMMENT='config_info';

/******************************************/

/*   数据库全名 = nacos_config   */

/*   表名称 = config_info_aggr   */

/******************************************/

CREATE TABLE `config_info_aggr` (

  `id` bigint(20) NOT NULL AUTO_INCREMENT COMMENT 'id',

  `data_id` varchar(255) NOT NULL COMMENT 'data_id',

  `group_id` varchar(255) NOT NULL COMMENT 'group_id',

  `datum_id` varchar(255) NOT NULL COMMENT 'datum_id',

  `content` longtext NOT NULL COMMENT '内容',

  `gmt_modified` datetime NOT NULL COMMENT '修改时间',

  `app_name` varchar(128) DEFAULT NULL,

  `tenant_id` varchar(128) DEFAULT '' COMMENT '租户字段',

  PRIMARY KEY (`id`),

  UNIQUE KEY `uk_configinfoaggr_datagrouptenantdatum` (`data_id`,`group_id`,`tenant_id`,`datum_id`)

) ENGINE=InnoDB DEFAULT CHARSET=utf8 COLLATE=utf8_bin COMMENT='增加租户字段';

/******************************************/

/*   数据库全名 = nacos_config   */

/*   表名称 = config_info_beta   */

/******************************************/

CREATE TABLE `config_info_beta` (

  `id` bigint(20) NOT NULL AUTO_INCREMENT COMMENT 'id',

  `data_id` varchar(255) NOT NULL COMMENT 'data_id',

  `group_id` varchar(128) NOT NULL COMMENT 'group_id',

  `app_name` varchar(128) DEFAULT NULL COMMENT 'app_name',

  `content` longtext NOT NULL COMMENT 'content',

  `beta_ips` varchar(1024) DEFAULT NULL COMMENT 'betaIps',

  `md5` varchar(32) DEFAULT NULL COMMENT 'md5',

  `gmt_create` datetime NOT NULL DEFAULT CURRENT_TIMESTAMP COMMENT '创建时间',

  `gmt_modified` datetime NOT NULL DEFAULT CURRENT_TIMESTAMP COMMENT '修改时间',

  `src_user` text COMMENT 'source user',

  `src_ip` varchar(50) DEFAULT NULL COMMENT 'source ip',

  `tenant_id` varchar(128) DEFAULT '' COMMENT '租户字段',

  PRIMARY KEY (`id`),

  UNIQUE KEY `uk_configinfobeta_datagrouptenant` (`data_id`,`group_id`,`tenant_id`)

) ENGINE=InnoDB DEFAULT CHARSET=utf8 COLLATE=utf8_bin COMMENT='config_info_beta';

/******************************************/

/*   数据库全名 = nacos_config   */

/*   表名称 = config_info_tag   */

/******************************************/

CREATE TABLE `config_info_tag` (

  `id` bigint(20) NOT NULL AUTO_INCREMENT COMMENT 'id',

  `data_id` varchar(255) NOT NULL COMMENT 'data_id',

  `group_id` varchar(128) NOT NULL COMMENT 'group_id',

  `tenant_id` varchar(128) DEFAULT '' COMMENT 'tenant_id',

  `tag_id` varchar(128) NOT NULL COMMENT 'tag_id',

  `app_name` varchar(128) DEFAULT NULL COMMENT 'app_name',

  `content` longtext NOT NULL COMMENT 'content',

  `md5` varchar(32) DEFAULT NULL COMMENT 'md5',

  `gmt_create` datetime NOT NULL DEFAULT CURRENT_TIMESTAMP COMMENT '创建时间',

  `gmt_modified` datetime NOT NULL DEFAULT CURRENT_TIMESTAMP COMMENT '修改时间',

  `src_user` text COMMENT 'source user',

  `src_ip` varchar(50) DEFAULT NULL COMMENT 'source ip',

  PRIMARY KEY (`id`),

  UNIQUE KEY `uk_configinfotag_datagrouptenanttag` (`data_id`,`group_id`,`tenant_id`,`tag_id`)

) ENGINE=InnoDB DEFAULT CHARSET=utf8 COLLATE=utf8_bin COMMENT='config_info_tag';

/******************************************/

/*   数据库全名 = nacos_config   */

/*   表名称 = config_tags_relation   */

/******************************************/

CREATE TABLE `config_tags_relation` (

  `id` bigint(20) NOT NULL COMMENT 'id',

  `tag_name` varchar(128) NOT NULL COMMENT 'tag_name',

  `tag_type` varchar(64) DEFAULT NULL COMMENT 'tag_type',

  `data_id` varchar(255) NOT NULL COMMENT 'data_id',

  `group_id` varchar(128) NOT NULL COMMENT 'group_id',

  `tenant_id` varchar(128) DEFAULT '' COMMENT 'tenant_id',

  `nid` bigint(20) NOT NULL AUTO_INCREMENT,

  PRIMARY KEY (`nid`),

  UNIQUE KEY `uk_configtagrelation_configidtag` (`id`,`tag_name`,`tag_type`),

  KEY `idx_tenant_id` (`tenant_id`)

) ENGINE=InnoDB DEFAULT CHARSET=utf8 COLLATE=utf8_bin COMMENT='config_tag_relation';

/******************************************/

/*   数据库全名 = nacos_config   */

/*   表名称 = group_capacity   */

/******************************************/

CREATE TABLE `group_capacity` (

  `id` bigint(20) unsigned NOT NULL AUTO_INCREMENT COMMENT '主键ID',

  `group_id` varchar(128) NOT NULL DEFAULT '' COMMENT 'Group ID,空字符表示整个集群',

  `quota` int(10) unsigned NOT NULL DEFAULT '0' COMMENT '配额,0表示使用默认值',

  `usage` int(10) unsigned NOT NULL DEFAULT '0' COMMENT '使用量',

  `max_size` int(10) unsigned NOT NULL DEFAULT '0' COMMENT '单个配置大小上限,单位为字节,0表示使用默认值',

  `max_aggr_count` int(10) unsigned NOT NULL DEFAULT '0' COMMENT '聚合子配置最大个数,,0表示使用默认值',

  `max_aggr_size` int(10) unsigned NOT NULL DEFAULT '0' COMMENT '单个聚合数据的子配置大小上限,单位为字节,0表示使用默认值',

  `max_history_count` int(10) unsigned NOT NULL DEFAULT '0' COMMENT '最大变更历史数量',

  `gmt_create` datetime NOT NULL DEFAULT CURRENT_TIMESTAMP COMMENT '创建时间',

  `gmt_modified` datetime NOT NULL DEFAULT CURRENT_TIMESTAMP COMMENT '修改时间',

  PRIMARY KEY (`id`),

  UNIQUE KEY `uk_group_id` (`group_id`)

) ENGINE=InnoDB DEFAULT CHARSET=utf8 COLLATE=utf8_bin COMMENT='集群、各Group容量信息表';

/******************************************/

/*   数据库全名 = nacos_config   */

/*   表名称 = his_config_info   */

/******************************************/

CREATE TABLE `his_config_info` (

  `id` bigint(64) unsigned NOT NULL,

  `nid` bigint(20) unsigned NOT NULL AUTO_INCREMENT,

  `data_id` varchar(255) NOT NULL,

  `group_id` varchar(128) NOT NULL,

  `app_name` varchar(128) DEFAULT NULL COMMENT 'app_name',

  `content` longtext NOT NULL,

  `md5` varchar(32) DEFAULT NULL,

  `gmt_create` datetime NOT NULL DEFAULT CURRENT_TIMESTAMP,

  `gmt_modified` datetime NOT NULL DEFAULT CURRENT_TIMESTAMP,

  `src_user` text,

  `src_ip` varchar(50) DEFAULT NULL,

  `op_type` char(10) DEFAULT NULL,

  `tenant_id` varchar(128) DEFAULT '' COMMENT '租户字段',

  PRIMARY KEY (`nid`),

  KEY `idx_gmt_create` (`gmt_create`),

  KEY `idx_gmt_modified` (`gmt_modified`),

  KEY `idx_did` (`data_id`)

) ENGINE=InnoDB DEFAULT CHARSET=utf8 COLLATE=utf8_bin COMMENT='多租户改造';

/******************************************/

/*   数据库全名 = nacos_config   */

/*   表名称 = tenant_capacity   */

/******************************************/

CREATE TABLE `tenant_capacity` (

  `id` bigint(20) unsigned NOT NULL AUTO_INCREMENT COMMENT '主键ID',

  `tenant_id` varchar(128) NOT NULL DEFAULT '' COMMENT 'Tenant ID',

  `quota` int(10) unsigned NOT NULL DEFAULT '0' COMMENT '配额,0表示使用默认值',

  `usage` int(10) unsigned NOT NULL DEFAULT '0' COMMENT '使用量',

  `max_size` int(10) unsigned NOT NULL DEFAULT '0' COMMENT '单个配置大小上限,单位为字节,0表示使用默认值',

  `max_aggr_count` int(10) unsigned NOT NULL DEFAULT '0' COMMENT '聚合子配置最大个数',

  `max_aggr_size` int(10) unsigned NOT NULL DEFAULT '0' COMMENT '单个聚合数据的子配置大小上限,单位为字节,0表示使用默认值',

  `max_history_count` int(10) unsigned NOT NULL DEFAULT '0' COMMENT '最大变更历史数量',

  `gmt_create` datetime NOT NULL DEFAULT CURRENT_TIMESTAMP COMMENT '创建时间',

  `gmt_modified` datetime NOT NULL DEFAULT CURRENT_TIMESTAMP COMMENT '修改时间',

  PRIMARY KEY (`id`),

  UNIQUE KEY `uk_tenant_id` (`tenant_id`)

) ENGINE=InnoDB DEFAULT CHARSET=utf8 COLLATE=utf8_bin COMMENT='租户容量信息表';

CREATE TABLE `tenant_info` (

  `id` bigint(20) NOT NULL AUTO_INCREMENT COMMENT 'id',

  `kp` varchar(128) NOT NULL COMMENT 'kp',

  `tenant_id` varchar(128) default '' COMMENT 'tenant_id',

  `tenant_name` varchar(128) default '' COMMENT 'tenant_name',

  `tenant_desc` varchar(256) DEFAULT NULL COMMENT 'tenant_desc',

  `create_source` varchar(32) DEFAULT NULL COMMENT 'create_source',

  `gmt_create` bigint(20) NOT NULL COMMENT '创建时间',

  `gmt_modified` bigint(20) NOT NULL COMMENT '修改时间',

  PRIMARY KEY (`id`),

  UNIQUE KEY `uk_tenant_info_kptenantid` (`kp`,`tenant_id`),

  KEY `idx_tenant_id` (`tenant_id`)

) ENGINE=InnoDB DEFAULT CHARSET=utf8 COLLATE=utf8_bin COMMENT='tenant_info';

CREATE TABLE `users` (

`username` varchar(50) NOT NULL PRIMARY KEY,

`password` varchar(500) NOT NULL,

`enabled` boolean NOT NULL

);

CREATE TABLE `roles` (

`username` varchar(50) NOT NULL,

`role` varchar(50) NOT NULL,

UNIQUE INDEX `idx_user_role` (`username` ASC, `role` ASC) USING BTREE

);

CREATE TABLE `permissions` (

    `role` varchar(50) NOT NULL,

    `resource` varchar(255) NOT NULL,

    `action` varchar(8) NOT NULL,

    UNIQUE INDEX `uk_role_permission` (`role`,`resource`,`action`) USING BTREE

);

INSERT INTO users (username, password, enabled) VALUES ('nacos', '$2a$10$EuWPZHzz32dJN7jexM34MOeYirDdFAZm2kuWj7VEOJhhZkDrxfvUu', TRUE);

INSERT INTO roles (username, role) VALUES ('nacos', 'ROLE_ADMIN');
2. 在 Nacos Server 安装目录下的 conf 文件夹中,将 cluster.conf.example 重命名为 cluster.conf,然后在该文件中添加以下内容。
192.168.3.138:3333

192.168.3.138:4444

192.168.3.138:5555
配置说明如下:
- 192.168.138 为本地电脑主机的 IP 地址,这里最好不要写成 localhost 或 127.0.0.1,否则 Nacos Server 集群可能会搭建失败!
- 本次搭建的 Nacos Server 集群的端口分别为:3333、4444、5555。
3. 在 config 目录下的 application.properties 中,将 server.port(端口号)修改为 3333,并在该文件中添加 MySQL 数据库配置,具体修改内容如下。
server.port=3333

################ MySQL 数据库配置##################

spring.datasource.platform=mysql

db.num=1

db.url.0=jdbc:mysql://127.0.0.1:3306/nacos_config?characterEncoding=utf8&connectTimeout=1000&socketTimeout=3000&autoReconnect=true&useUnicode=true&useSSL=false&serverTimezone=Asia/Shanghai

db.user=root

db.password=root
4. 将该 Nacos Server 目录复制到另外两台机器上,并将它们的端口号分别修改为: 4444 和 5555。
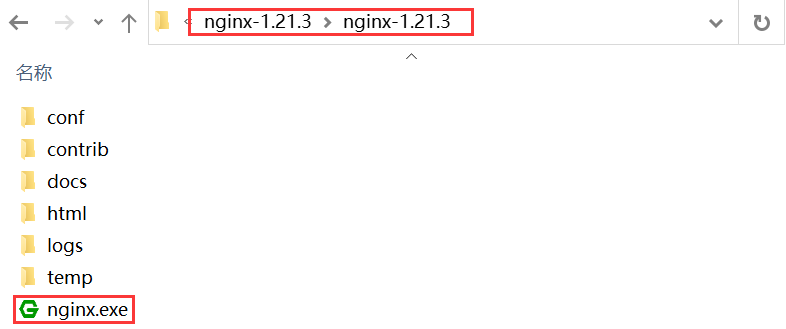
5. 下载 Nginx,并修改 Nginx 中 conf 目录下的 nginx.conf 的配置,内容如下。
#user  nobody;

worker_processes  1;

#error_log  logs/error.log;

#error_log  logs/error.log  notice;

#error_log  logs/error.log  info;

#pid        logs/nginx.pid;

events {

    worker_connections  1024;

}

http {

    include       mime.types;

    default_type  application/octet-stream;

    sendfile        on;

    keepalive_timeout  65;

    upstream cluster{

        server 127.0.0.1:3333;

        server 127.0.0.1:4444;

        server 127.0.0.1:5555;

    }

    server {

        listen       1111;

        server_name  localhost;

        #charset koi8-r;

        #access_log  logs/host.access.log  main;

        location / {

            #root   html;

            #index  index.html index.htm;

            proxy_pass http://cluster;

        }

    }

}
6. 启动集群中所有的 Nacos Server,当出现以下内容时,表示 Nacos Server 启动成功。
"nacos is starting with cluster"

         ,--.

       ,--.'|

   ,--,:  : |                                           Nacos 2.0.3

,`--.'`|  ' :                       ,---.               Running in cluster mode, All function modules

|   :  :  | |                      '   ,'\   .--.--.    Port: ****

:   |   \ | :  ,--.--.     ,---.  /   /   | /  /    '   Pid: 21592

|   : '  '; | /       \   /     \.   ; ,. :|  :  /`./   Console: http://192.168.3.138:3333/nacos/index.html

'   ' ;.    ;.--.  .-. | /    / ''   | |: :|  :  ;_

|   | | \   | \__\/: . ..    ' / '   | .; : \  \    `.      https://nacos.io

'   : |  ; .' ," .--.; |'   ; :__|   :    |  `----.   \

|   | '`--'  /  /  ,.  |'   | '.'|\   \  /  /  /`--'  /

'   : |     ;  :   .'   \   :    : `----'  '--'.     /

;   |.'     |  ,     .-./\   \  /            `--'---'

'---'        `--`---'     `----'

2021-11-09 16:25:00,993 INFO The server IP list of Nacos is [192.168.3.138:3333, 192.168.3.138:4444, 192.168.3.138:5555]

2021-11-09 16:27:07,318 INFO Nacos is starting...

2021-11-09 16:27:08,325 INFO Nacos is starting...

2021-11-09 16:27:09,340 INFO Nacos is starting...

2021-11-09 16:27:10,343 INFO Nacos is starting...

2021-11-09 16:27:10,742 INFO Nacos started successfully in cluster mode. use external storage
7. 当集群中的所有 Nacos Server 都启动成功后,双击 Nignx 安装目录下的 nginx.exe,启动 Nginx。
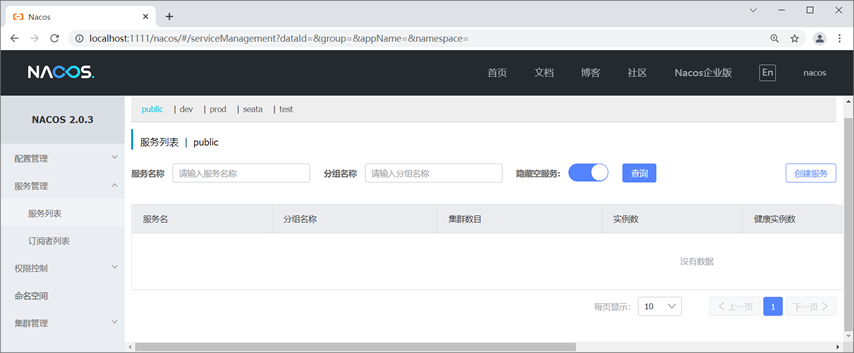
8. 使用浏览器访问“http://localhost:1111/nacos/”,若成功访问 Nacos Server 的控制台,则说明 Nacos 集群部署成功,如下图。
9. 将主工程 spring-cloud-alibaba-demo 下所有子模块配置文件中的 Nacos Server 地址统一修改为:localhost:1111。我们以 spring-cloud-alibaba-consumer-nacos-8801 为例,配置文件 application.yml 的配置内容如下。
- server:
- port: 8801 #端口号
- spring:
- application:
- name: spring-cloud-alibaba-consumer #服务名
- cloud:
- nacos:
- discovery:
- #server-addr: localhost:8848 #单机版 Nacos Server 的地址
- server-addr: localhost:1111 #集群版 Nacos Server 的地址
- #以下配置信息并不是默认配置,而是我们自定义的配置,目的是不在 Controller 内硬编码服务提供者的服务名
- service-url:
- nacos-user-service: http://spring-cloud-alibaba-provider #服务提供者的服务名
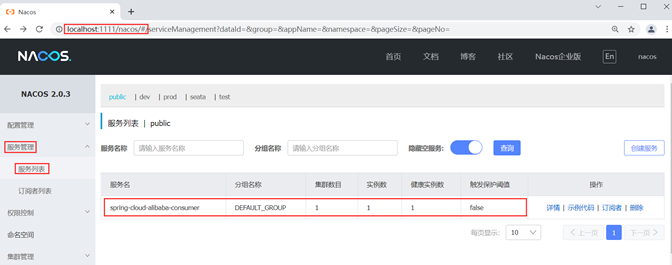
10. 重启 spring-cloud-alibaba-consumer-nacos-8801,并使用浏览器访问“http://localhost:1111/nacos”,查看“服务管理”下的“服务列表”,结果如下图。
biancheng-Spring Cloud Alibaba Nacos的更多相关文章
- Spring Cloud Alibaba | Nacos服务中心初探
目录 Spring Cloud Alibaba | Nacos服务中心初探 1. 什么是Nacos? 1.1 Nacos 1.0 1.2 Nacos 2.0 2. Nacos 架构及概念 2.1 服务 ...
- Spring Cloud Alibaba | Nacos服务注册与发现
目录 Spring Cloud Alibaba | Nacos服务注册与发现 1. 服务提供者 1.1 pom.xml项目依赖 1.2 配置文件application.yml 1.3 启动类Produ ...
- Spring Cloud Alibaba | Nacos配置管理
目录 Spring Cloud Alibaba | Nacos配置管理 1. pom.xml 项目依赖 2. 在 bootstrap.properties 中配置 Nacos server 的地址和应 ...
- Spring Cloud Alibaba | Nacos集群部署
目录 Spring Cloud Alibaba | Nacos集群部署 1. Nacos支持三种部署模式 2. 集群模式下部署Nacos 2.1 架构图 2.2 下载源码或者安装包 2.3 配置集群配 ...
- 0.9.0.RELEASE版本的spring cloud alibaba nacos+feign实例
这里的feign依然是原来的feign,只不过将注册中心由eureka换成了nacos.服务提供方参见0.9.0.RELEASE版本的spring cloud alibaba nacos实例,消费方跟 ...
- 0.9.0.RELEASE版本的spring cloud alibaba nacos实例
简而言之,nacos与eureka的不同之处有三:后台老板.部署方式.功能.nacos是阿里的,eureka是奈飞的:nacos有自己的安装包,需要独立部署,eureka仅作为一个服务组件,引入jar ...
- Spring Cloud Alibaba Nacos
1. Spring Cloud Alibaba 介绍 Spring Cloud Alibaba 为分布式应用程序开发提供了一站式解决方案.它包含了开发分布式应用程序所需的所有组件,使得你可以轻松地使用 ...
- Spring Cloud Alibaba+Nacos搭建微服务架构
1. Spring Cloud Alibaba 简介 Spring Cloud Alibaba是阿里巴巴为分布式应用提供的一站式解决方案,能够更方便快捷地搭建分布式平台,nacos拥有着替换eu ...
- Spring Cloud Alibaba Nacos Config 实战
Nacos 提供用于存储配置和其他元数据的 key/value 存储,为分布式系统中的外部化配置提供服务器端和客户端支持.使用 Spring Cloud Alibaba Nacos Config,您可 ...
- Spring Cloud Alibaba Nacos Config 的使用
Spring Cloud Alibaba Nacos Config 的使用 一.需求 二.实现功能 1.加载 product-provider-dev.yaml 配置文件 2.实现配置的自动刷新 3. ...
随机推荐
- 5.8 Vim多窗口编辑模式
在编辑文件时,有时需要参考另一个文件,如果在两个文件之间进行切换则比较麻烦.可以使用 Vim 同时打开两个文件,每个文件分别占用一个窗口. 例如,在査看 /etc/passwd 时需要参考 /etc/ ...
- yum 安装软件出现 gpg keys 相关问题
问题:Public key for *.rpm is not installed 系统中没有能验证该 RPM 数字签名的公钥 安装现有的 gpg 公钥,在 /etc/pki/rpm-gpg/ 下,可以 ...
- 4.使用二进制方式搭建K8S集群
使用二进制方式搭建K8S集群 注意 [暂时没有使用二进制方式搭建K8S集群,因此本章节内容不完整... 欢迎小伙伴能补充~] 准备工作 在开始之前,部署Kubernetes集群机器需要满足以下几个条件 ...
- 内网 BitTorrent 下载环境搭建——基于 Transmission
背景 前段时间为公司的产品增加了磁力链.种子下载的能力,测试时发现网上搜到的热门种子,有时好用,有时不好用,不好用主要表现在:没速度.速度慢.速度不稳定.下载一部分后没速度等,严重拖累了测试工作.为此 ...
- ubuntu如何安装redis
在终端下输入 sudo apt search redis 查找一下发现了 redis-server 如果找不到 你可能需要使用 update 更新一下了 sudo apt-get update 然后就 ...
- ssh之秘钥登陆
前提: 1. 秘钥的生成需要OpenSSL的支持, 需要自行进行安装 一. 新建用户 在root登陆状态中执行命令: useradd -m ssh-user # centosadduser ssh-u ...
- Threejs的三维坐标系
在三维空间中,所有的物体和相机都需要基于一个统一的坐标系来进行定位和操作.理解坐标系的基本概念,对于创建稳定.准确的三维效果至关重要. 基础 Three.js 采用的是右手坐标系,这意味着如果你将右手 ...
- CF926 Div.2
C. Sasha and the Casino 赌场规则:如果下注 \(y(y > 0)\) 元,如果赢了则除了 \(y\) 元外,额外获得 \(y \times (k - 1)\) 元,否则则 ...
- 开发Git分支管理
目前分支管理 AngularJS在github上的提交记录被业内大多数开发人员认可,逐渐被广泛引用. 代码提交Message格式 type (scope): message 参数介绍: 1.type: ...
- DASCTF X CBCTF 2023 Misc Justlisten WP
DASCTF X CBCTF 2023 Misc Justlisten WP 又是一道很抽象的misc题 首先附件给了一个汉信码,扫码得到: 提示我们使用oursecret: password为0ur ...