Django-CSRF,AJAX,FORM
内容总览
1.CSRF相关
1>CSRF源码分析
2>ajax的实现(ajax的实例(异步计算,参数测试,上传))
3>ajax通过csrf的校验
2.FORM组件
1>基本使用
2>内部校验器
3>自定义函数内部校验
4>is_valid()源码分析
1.django的csrf源码分析
1>global_settings与CsrfViewMiddleware
2>.ajax
a.发请求的途径
浏览器地址栏键入url--->GET
form表单提交数据 ----->根据method决定是POST/GET
a标签超链接 ---> GET
b.ajax是使用js技术发送异步请求,一般传输json数据
特点:局部刷新,当前页面不刷新
异步,客户端发出一个请求后,无需等待服务器响应结,就可以发出第二个请求
c.正常全局刷新
views
def index(request):
    if request.method == 'POST':
        i1 = request.POST.get('i1')
        i2 = request.POST.get('i2')
        i3 = eval(f'{i1}+{i2}')
        print(locals())
    return render(request,'index.html',locals())

html
<form action="" method="post">
    {% csrf_token %}
    <input type="text" name="i1" value="{{ i1 }}">+<input type="text" name="i2" value="{{ i2 }}">=<input type="text" value="{{ i3 }}">

    <button>计算</button>
d.ajax局部刷新
事例一:异步ajax计算
views
import time
def index(request):
    return render(request,'index.html')
def calc1(request):
    if request.method == 'POST':
        i1 = request.POST.get('i1')
        i2 = request.POST.get('i2')
        i3 = eval(f'{i1}+{i2}')
        time.sleep(3)
        return HttpResponse(i3) #返回响应体让ajax接收
def calc2(request):
    if request.method == 'POST':
        i1 = request.POST.get('i1')
        i2 = request.POST.get('i2')
        i3 = eval(f'{i1}+{i2}')
        return HttpResponse(i3)
html
 <input type="text" name="i1" value="{{ i1 }}">+<input type="text" name="i2" value="{{ i2 }}">=<input type="text" name='i3' value="{{ i3 }}">
    <button id="b1">计算</button>
    <br>
      <input type="text" name="i11" value="{{ i11 }}">+<input type="text" name="i22" value="{{ i22 }}">=<input type="text" name='i33' value="{{ i33 }}">
    <button id="b2">计算</button>
    $('#b1').click(function () {
            $.ajax({
                url:'/calc1/',
                type:'post',
                data:{
                    i1:$("[name='i1']").val(),
                    i2:$("[name='i2']").val(),
                },
                success:function (res) {
                    {#res是返回的响应体#}
                    {#console.log(res)#}
                     $("[name='i3']").val(res)
                }
            })
        });
          $('#b2').click(function () {
            $.ajax({
                url:'/calc2/',
                type:'post',
                data:{
                    i1:$("[name='i11']").val(),
                    i2:$("[name='i22']").val(),
                },
                success:function (res) {
                    {#res是返回的响应体#}
                    {#console.log(res)#}
                     $("[name='i33']").val(res)
                }
            })
        });
事例二:参数测试
1>前端数组--->序列化--->后端接收--->反序列化--->拿到数组
#########前后端交交互都应该将数据类型转化为json字符串#########

############前端使用ajax直接传一个列表的情况#############
html
    <button id="b3">参数测试</button>

   $('#b3').click(function () {
            $.ajax({
                url:'/ajax_test/',
                type:'post',
                data:{
                    hobby:['篮球','足球','排球']
                },
                success:function (res) {
                    console.log(res)

                },
                error:function (res) {
                    console.log(33);
                    console.log(res)
                }
            })
        });

views
def ajax_test(request):
    print(request.POST)
#传过来的内容被格式化下属形况
#<QueryDict: {'hobby[]': ['篮球', '足球', '排球']}>
    print(111,request.POST.getlist('hobby[]'))
#111 ['篮球', '足球', '排球']
    hobby= request.POST.get('hobby')
    print(222,hobby,type(hobby))
#222 None <class 'NoneType'>

################前端传一个json字符串的情况############
html
  $('#b3').click(function () {
            $.ajax({
                url:'/ajax_test/',
                type:'post',
                data:{
                    hobby:JSON.stringify(['篮球','足球','排球'])
                },
                success:function (res) {
                    console.log(res)

                },
                error:function (res) {
                    console.log(33);
                    console.log(res)
                }
            })
        });
views
def ajax_test(request):
    print(request.POST)
#前端序列化之后传来一个正常的字符串
#<QueryDict: {'hobby': ['["篮球","足球","排球"]']}>
    print(111,request.POST.getlist('hobby[]'))
#111 []
    hobby= request.POST.get('hobby')
    print(222,hobby,type(hobby))
#222 ["篮球","足球","排球"] <class 'str'>
    hobby_json = json.loads(hobby)
     print(type(hobby_json),hobby_json[0:2])
#<class 'list'> ['篮球', '足球']
#反序列化之后可以正常拿到前端传的列表数据类型
2>后台字典--->序列化------->前端---->反序列化----->拿到字典
#######后台返回一个Jsonresponse,,前端可以直接使用数据类型########
html
    $('#b3').click(function () {
            $.ajax({
                url:'/ajax_test/',
                type:'post',
                data:{
                    {#hobby:['篮球','足球','排球']#}
                    {#hobby:JSON.stringify(['篮球','足球','排球'])#}
                },
                success:function (res) {
                    console.log(res)

                },
                error:function (res) {
                    console.log(33);
                    console.log(res)
                }
            })
        });
views
def ajax_test(request):
     data = {'name': 'sen', 'age': 26}
     return JsonResponse(data)
#浏览器:一个数组
{name: "sen", age: 26}
age: 26
name: "sen"
__proto__: Object
###使用Httpresponse(json.dumps ,content_type='application/json')###
html
与上面一样

views
def ajax_test(request):
    data = {'name': 'sen', 'age': 26}
return  HttpResponse(json.dumps(data),content_type='application/json')

#浏览器也会拿到数组,如果不加content_type 只会拿到json字符串
#例如 {"name": "sen", "age": 26}
事例三:上传
views
from django.http import JsonResponse
def upload(request):
    if request.is_ajax():
        print(request.FILES)
        #<MultiValueDict: {'f1': [<InMemoryUploadedFile: 55.jpg (image/jpeg)>]}>
        f1 = request.FILES.get('f1')
        print(f1)
        #55.jpg
        with open(f1.name,'wb') as f:
            for i in f1.chunks():
                f.write(i)
       #return HttpResponse('ok')       return JsonResponse({'status':0,'msg':'上传成功'}) #以JSON的数据类型返给了前端
html
   <input type="file" id="f1">
    <button id="b4">上传</button>
$('#b4').click(function () {
              form_obj = new FormData();
              {#console.log($('#f1'));#}
              {#jQuery.fn.init [input#f1]#}
              {#0: input#f1#}
              {#console.log($('#f1')[0].files);#}
              {#FileList {0: File(54312), length: 1}#}
              form_obj.append('f1',$('#f1')[0].files[0]);
            $.ajax({
                url:'/upload/',
                type:'post',
                data:form_obj,
                processData:false,
                {#停止ajax对文件的编码处理#}
                contentType:false,
{#业务逻辑JSONRESPONSE的字符串到前端会自动反序列化成数组(字典),方便直接取值#}
               success:function (res) {
                    console.log(res)
if(res.status == 0){ alert(res.msg);
                },
            })
        })
3.ajax通过csrf的验证
a.自行设置通过验证的csrf_token信息
html
#注意:必须要有{% csrf_token%}

#1>POST请求携带的form数据
 $('#b1').click(function () {
            $.ajax({
                url:'/calc1/',
                type:'post',
                data:{
                    i1:$("[name='i1']").val(),
                    i2:$("[name='i2']").val(),
                    csrfmiddlewaretoken:$("[name='csrfmiddlewaretoken']").val(),
                },#浏览器显示:i1=1&i2=3&csrfmiddlewaretoken=0jWWADXuWLyAdj56bFFXzgadAZziwoEvu13C9AD3Ko4bA1G1JGVfxl6THiYlNKJQ

#2>设置在响应头中的键值对
  $('#b2').click(function () {
            $.ajax({
                url:'/calc2/',
                type:'post',
                headers:{'X-csrftoken':$("[name='csrfmiddlewaretoken']").val()},
                data:{
                    i1:$("[name='i11']").val(),
                    i2:$("[name='i22']").val(),
                },#浏览器显示: X-csrftoken:0jWWADXuWLyAdj56bFFXzgadAZziwoEvu13C9AD3Ko4bA1G1JGVfxl6THiYlNKJQ
b.django官网推荐的通过csrf验证的方式
#新建一个ajax-setup.js
#注意 以下条件需要满足一点即可:
#1>html:需要有{%csrf%}
#2>from django.views.decorators.csrf import ensure_csrf_cookie 给视图函数增加一个@ensure_csrf_cookie

function getCookie(name) {
    var cookieValue = null;
    if (document.cookie && document.cookie !== '') {
        var cookies = document.cookie.split(';');
        for (var i = 0; i < cookies.length; i++) {
            var cookie = jQuery.trim(cookies[i]);
            // Does this cookie string begin with the name we want?
            if (cookie.substring(0, name.length + 1) === (name + '=')) {
                cookieValue = decodeURIComponent(cookie.substring(name.length + 1));
                break;
            }
        }
    }
    return cookieValue;
}
var csrftoken = getCookie('csrftoken');

function csrfSafeMethod(method) {
  // these HTTP methods do not require CSRF protection
  return (/^(GET|HEAD|OPTIONS|TRACE)$/.test(method));
}

$.ajaxSetup({
  beforeSend: function (xhr, settings) {
    if (!csrfSafeMethod(settings.type) && !this.crossDomain) {
      xhr.setRequestHeader("X-CSRFToken", csrftoken);
    }
  }
});

html页面:最后在有需求的页面上去引入
<script src="{% static 'ajax-setup.js' %}"></script>
#注意一定页面上一定要有{%csrf%}
2.django的form组件
1>普通的form校验
缺点:校验条件自己定义,需要检验的内容非常多,很繁琐.
views
def reg(request):
    if request.method == 'POST':
        user = request.POST.get('user')
        pwd = request.POST.get('pwd')
        if len(user) <6:
            err_msg='用户名太短了'
        else:
            return HttpResponse('注册成功')
    return render(request,'reg.html',locals())

html
<form action="" method="post">
    {% csrf_token %}
    <p>
        用户名:<input type="text" name="user"><span style="color: red">{{ err_msg }}</span>
    </p>
    <p>
        密码:<input type="password" name="pwd">
    </p>
    <button>注册</button>
</form>
2>form组件的使用
a.导入forms模块,创建一个自定义的类去继承(form.Form),在自定义类种创建一些字段对象
b.创建一个视图方法去实例化这个自定义的类,需要POST判断的时候,将request对象传入自定义类中,再实例化一次,并且用这个对象的is_valid方法进行校验
c.事例用到的参数:
initial :默认给字段对象所对应的input框填入一个字符串,类似于placeholder
min_length,max_length:前端校验,与后端校验的使用一个检测标准最小长度与最大长度.
label:对字段对象对应的input标签,生成一个配套的label标签
widget:插件可以对字段对象的属性进行变更,例如添加一个class属性,更改input的type属性
error_messgaes:根据字段对象里使用的校验标准和默认的校验参数来定义key值和自定义显示的错误信息
CharField:所有的字段对象都可以用这个类去实例化,需要不同的字段类型只需要在widget实例化进行修改即可(例如: widget=forms.widgets.PasswordInput)
ChoiceField:所有选项类的可以根据这个类实例化去修改widget
d.模板语法的使用
对象.字段对象.属性
例如:从views传来一个form_obj的对象,
模板中使用form.as_p :生成P标签(input + label)
form_obj.user.label(取得是user字段对象得label属性)与 form_obj.user.id_for_label(取得是input的id赋给label标签的for属性) 配合,嵌套在label标签中
form_obj.user: 一个input框(属性是自定义类定义的)
form_obj.user.errors.0 :取第一个错误的html的文本值
views
from django import forms
from app01 import models
# Create your views here.

#注册form
class RegForm(forms.Form):
    user=forms.CharField(
        initial='lin',
        min_length=6,
        max_length=10,
        label='用户名',
        widget=forms.widgets.Input(attrs={'class':'form-control'}),
        error_messages={
            'min_length':'长度至少为8位',
            'required':'不能为空'
        }

    )
    pwd=forms.CharField(label='密码',
                        widget=forms.widgets.PasswordInput(attrs={'class':'form-control'}),
                        )
    gender=forms.ChoiceField(choices=((1,'male'),(2,'female'),(3,'other')),
                             widget=forms.RadioSelect()

                             )
    hobby = forms.ChoiceField(
        # choices=((1,'篮球'),(2,'足球'),(3,'双色球')),
        # choices=models.Hobby.objects.all().values_list(), #values_list取出来元组,数据全是值
        label='爱好',
        initial=[1,3],
        widget=forms.SelectMultiple()
    )
    def __init__(self,*args,**kwargs):
        super().__init__(*args,**kwargs)
        self.fields['hobby'].choices=models.Hobby.objects.all().values_list()

def reg2(request):
    form_obj = RegForm()
    if request.method == 'POST':
        form_obj =RegForm(request.POST)
        if form_obj.is_valid():
            return HttpResponse('注册成功')
    return render(request,'reg3.html',{'form_obj':form_obj})
html
{% load static %}
<!DOCTYPE html>
<html lang="en">
<head>
    <meta charset="UTF-8">
    <title>Title</title>
    <link rel="stylesheet" href="{% static 'bootstrap-3.3.7-dist/css/bootstrap.css' %}">
</head>
<body>

<form class="form-horizontal" method="post" action="" novalidate>
    {% csrf_token %}
  <div class="form-group {% if form_obj.user.errors %}has-error{% else %} has-success{% endif %}">
    <label for="{{ form_obj.user.id_for_label }}" class="col-sm-2 control-label">{{ form_obj.user.label }}</label>
    <div class="col-sm-10">
        {{ form_obj.user }}
        <label class="control-label">{{ form_obj.user.errors.0 }}</label>
    </div>
  </div>
  <div class="form-group">
    <label for="{{ form_obj.pwd.id_for_label }}" class="col-sm-2 control-label">{{ form_obj.pwd.label }}</label>
    <div class="col-sm-10">
      {{ form_obj.pwd }}
        <span>{{ form_obj.pwd.errors }}</span>
    </div>
  </div>

    <div class="form-group">
    <label for="{{ form_obj.gender.id_for_label }}" class="col-sm-2 control-label">{{ form_obj.gender.label }}</label>
    <div class="col-sm-10">
      {{ form_obj.gender }}
        <span>{{ form_obj.gender.errors }}</span>
    </div>
  </div>

      <div class="form-group">
    <label for="{{ form_obj.hobby.id_for_label }}" class="col-sm-2 control-label">{{ form_obj.hobby.label }}</label>
    <div class="col-sm-10">
      {{ form_obj.hobby }}
        <span>{{ form_obj.hobby.errors }}</span>
    </div>
  </div>
{#    所有的错误提示#}
    {{ form_obj.errors }}

  <div class="form-group">
    <div class="col-sm-offset-2 col-sm-10">
      <button type="submit" class="btn btn-default">注 册</button>
    </div>
  </div>
</form>
3>form的内置校验器
min_length,max_length,require
前端检测:只要在自定义类中的字段属性例如user定义了上述方法,并且前端开启了检测,即可在input框中对条件进行校验,无需传入数据重新实例化自定义类.
def reg2(request):
    form_obj = RegForm()
    if request.method == 'POST':
        pass
        # form_obj =RegForm(request.POST)
        # if form_obj.is_valid():
        #     return HttpResponse('注册成功')
    return render(request,'reg3.html',{'form_obj':form_obj})
后台检测:需要前端进行POST提交之后,后台进行form_obj=RegForm(request.POST)实例化,将对象的POST方法取到的数据传入对象中,这样前端传入的form_obj的对象可以在模板语言中使用错误检测,form_obj.errors.
def reg2(request):
    form_obj = RegForm()
    if request.method == 'POST':
        # pass
        form_obj =RegForm(request.POST) #需要传入request.POST方法的数据
        # if form_obj.is_valid():
        #     return HttpResponse('注册成功')
    return render(request,'reg3.html',{'form_obj':form_obj})
4>form的自定义校验(向实例化对象传入request.POST数据,实例化的同时就会执行is_valid方法)
a.使用django提供的方式校验
from django.core.validators import RegexValidator

#字段对象里使用检测机制,并自定义规则
    phone = forms.CharField(
        label='手机号',
        validators=[RegexValidator(r'1[3-9]\d{9}','手机号不合格')]
    )
b.自定以函数
from django.core.exceptions import ValidationError
def check_name(value):
    if 'lin' in value:
        raise ValidationError('不符合规格')

#字段对象直接使用自定义的函数进行校验
user=forms.CharField(
        initial='lin',
        min_length=6,
        max_length=10,
        label='用户名',
        widget=forms.widgets.Input(attrs={'class':'form-control'}),
        validators=[check_name],
        error_messages={
            'min_length':'长度至少为8位',
            'required':'不能为空'
        }
    )
def reg2(request): form_obj = RegForm() if request.method == 'POST': # pass form_obj =RegForm(request.POST) #注意 必须实例化自定义对象,并且传入request.POST的数据才可以实现内置校验 # if form_obj.is_valid(): # print(form_obj.cleaned_data) # return HttpResponse('注册成功') return render(request,'reg3.html',{'form_obj':form_obj})
4>form的is_valid方法的源码分析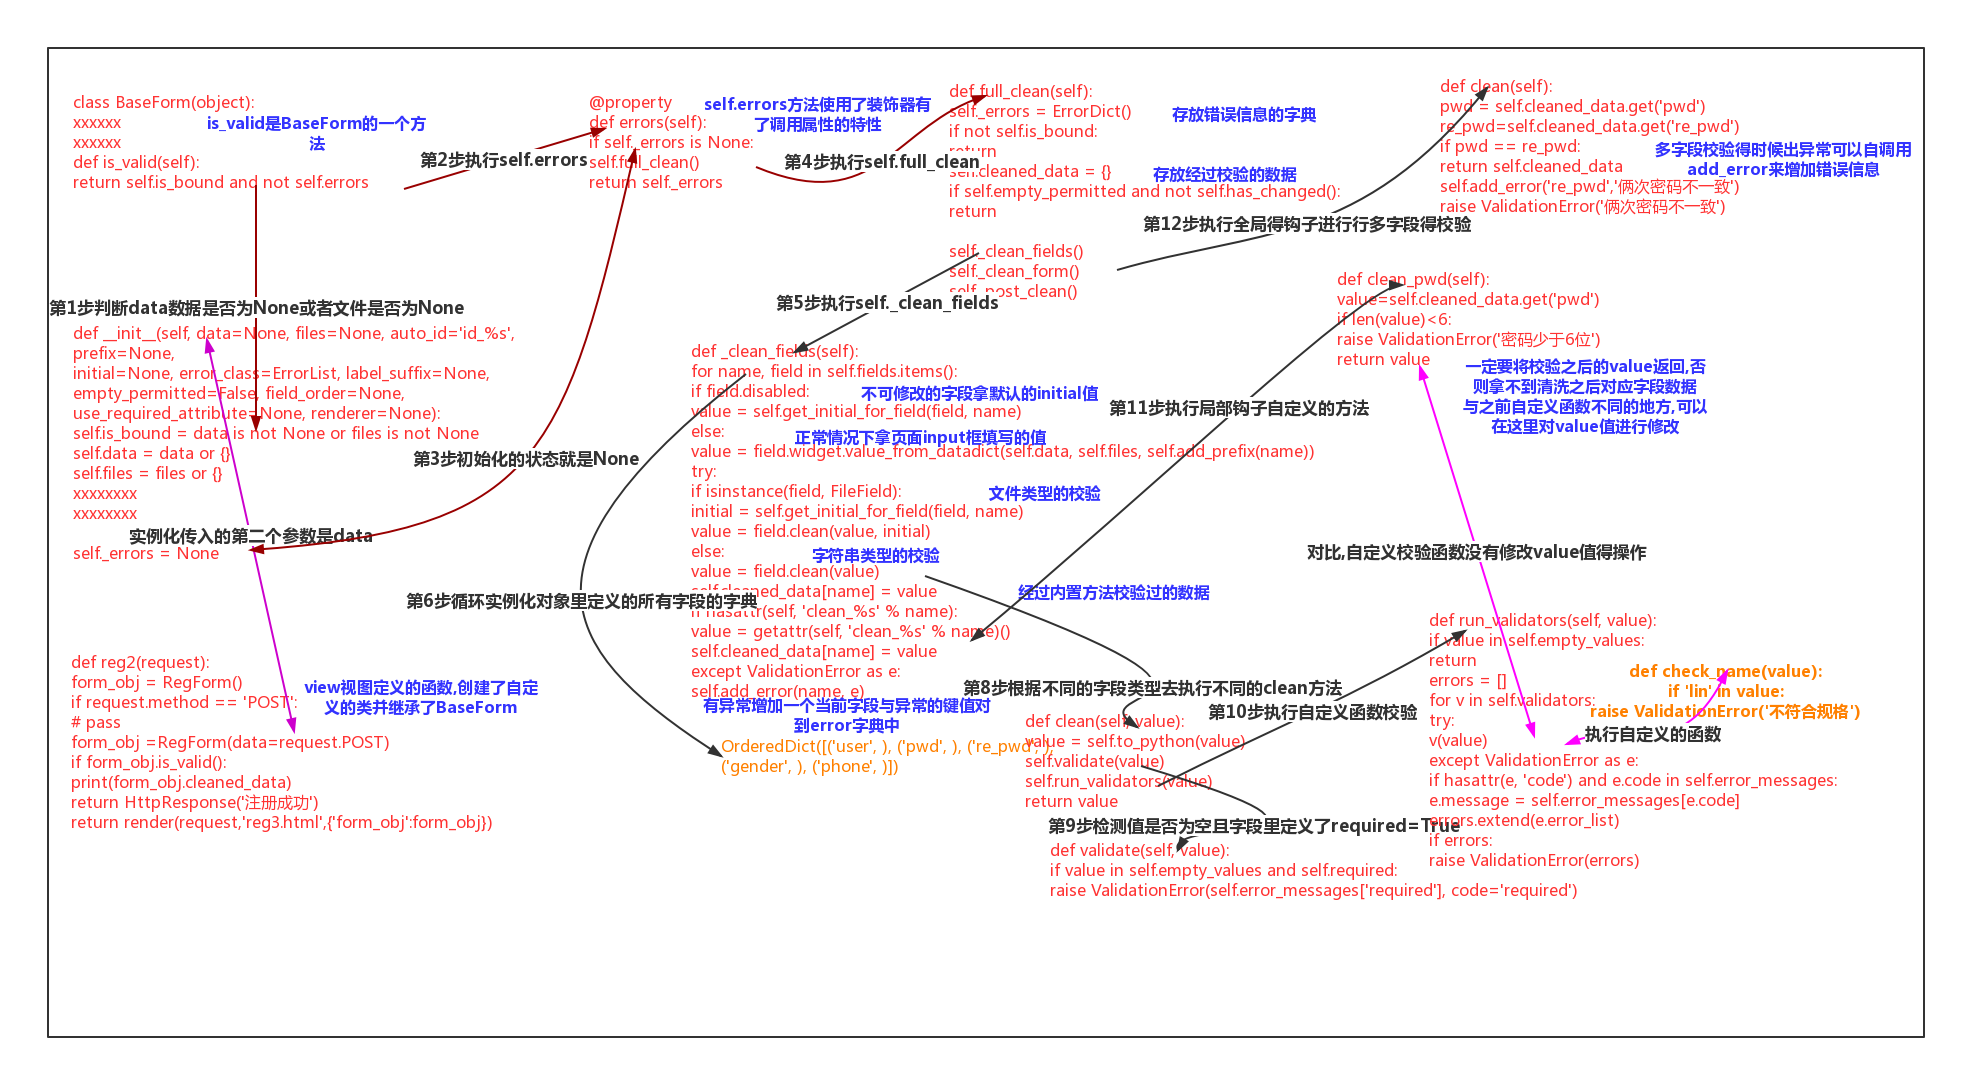
Django-CSRF,AJAX,FORM的更多相关文章
- Django 基于Ajax & form 简单实现文件上传
前端实现 <!DOCTYPE html> <html lang="zh-CN"> <head> <meta charset="U ...
- Django框架 之 Form表单和Ajax上传文件
Django框架 之 Form表单和Ajax上传文件 浏览目录 Form表单上传文件 Ajax上传文件 伪造Ajax上传文件 Form表单上传文件 html 1 2 3 4 5 6 7 <h3& ...
- python Django之Ajax
python Django之Ajax AJAX,Asynchronous JavaScript and XML (异步的JavaScript和XML),一种创建交互式网页应用的网页开发技术方案. 异步 ...
- pythonのdjango CSRF简单使用
一.简介 django为用户实现防止跨站请求伪造的功能,通过中间件 django.middleware.csrf.CsrfViewMiddleware 来完成.而对于django中设置防跨站请求伪造功 ...
- Django之Ajax文件上传
请求头ContentType ContentType指的是请求体的编码类型,常见的类型共有3种: 1 application/x-www-form-urlencoded(看下图) 这应该是最常见的 P ...
- Django CSRF提交遇见的问题
简介 django为用户实现防止跨站请求伪造的功能,通过中间件 django.middleware.csrf.CsrfViewMiddleware 来完成.而对于django中设置防跨站请求伪造功能有 ...
- python 全栈开发,Day75(Django与Ajax,文件上传,ajax发送json数据,基于Ajax的文件上传,SweetAlert插件)
昨日内容回顾 基于对象的跨表查询 正向查询:关联属性在A表中,所以A对象找关联B表数据,正向查询 反向查询:关联属性在A表中,所以B对象找A对象,反向查询 一对多: 按字段:xx book ----- ...
- django csrf使用教程,解决Forbidden (403)CSRF verification failed. Request aborted.
Django版本号:1.11.15 django中post请求报错:Forbidden (403)CSRF verification failed. Request aborted. HelpReas ...
- Django 2.0 学习(22):Django CSRF
Django CSRF CSRF攻击过程 攻击说明: 1.用户C打开浏览器,访问受信任网站A,输入用户名和密码请求登陆网站A: 2.在用户信息通过验证后,网站A产生Cookie信息并返回给浏览器,此时 ...
- Django 之Ajax&Json&CORS&同源策略&Jsonp用法
什么是Json 定义: JSON(JavaScript Object Notation, JS 对象标记) 是一种轻量级的数据交换格式.它基于 ECMAScript (w3c制定的js规范)的一个子集 ...
随机推荐
- [题解]玩具谜题(toy)
玩具谜题(toy) 来源:noip2016 提高组 day1 [题目描述] 小南有一套可爱的玩具小人, 它们各有不同的职业. 有一天, 这些玩具小人把小南的眼镜藏了起来. 小南发现玩具小人们围成了一个 ...
- Python----Kernel SVM
什么是kernel Kernel的其实就是将向量feature转换与点积运算合并后的运算,如下, 概念上很简单,但是并不是所有的feature转换函数都有kernel的特性. 常见kernel 常见k ...
- vue前端开发。。。
1. 官网下载 https://nodejs.org/en/ 2. 安装cnpm 在命令行: npm install -g cnpm --registry=https://registry.np ...
- ArrayList循环遍历并删除元素的几种情况
如下代码,想要循环删除列表中的元素b,该怎么处理? public class ListDemo { public static void main(String[] args) { ArrayList ...
- 【zabbix教程系列】五、邮件报警设置(脚本方式)
本方式是使用外部邮箱账号发送报警邮件到指定邮箱. 好处是:此邮箱账号既能发送邮件,也能接收邮件,而且避免被当做垃圾邮件. 一.zabbix-server端安装mailx服务 [root@ltt01 ~ ...
- STL用法整理
百度百科 STL是Standard Template Library的简称,中文名标准模板库,惠普实验室开发的一系列软件的统称.从根本上说,STL是一些“容器”的集合,这些“容器”有list,vect ...
- IOS 选择会员资格
选择会员资格 针对所有 Apple 平台进行开发从未如此简单.要开始为 macOS.iOS.tvOS 和 watchOS 开发 app,请从 Mac App Store 下载 Xcode.如果您已准备 ...
- 基于Python清除破损图片需求实现
处理同事爬取的图片时,其因爬取过程中因图片类型/网络等问题,获取到较大批次破损图片,现需清除破损文件,并做简要记录. 要点: 在python中,可以使⽤imghdr模块中的what()⽅法判断图⽚⽂件 ...
- Linux下MySql的登陆和管理操作
一.mysql数据库启停1.linux下启动mysql的命令: mysqladmin start/ect/init.d/mysql start (前面为mysql的安装路径)2.linux下重启 ...
- php Header 函数使用
<?php header('HTTP/1.1 200 OK'); // ok 正常访问 header('HTTP/1.1 404 Not Found'); //通知浏览器 页面不存在 heade ...