JUnit5的条件测试、嵌套测试、重复测试
条件测试
JUnit5支持条件注解,根据布尔值判断是否执行测试。
自定义条件
@EnabledIf和@DisabledIf注解用来设置自定义条件,示例:
@Test

@EnabledIf("customCondition")

void enabled() {

    // ...

}

@Test

@DisabledIf("customCondition")

void disabled() {

    // ...

}

boolean customCondition() {

    return true;

}
其中customCondition()方法用来返回布尔值,它可以接受一个ExtensionContext类型的参数。如果定义在测试类外部,那么需要是static方法。
内置条件
JUnit5的org.junit.jupiter.api.condition包中内置了一些条件注解。
操作系统条件
@EnabledOnOs和DisabledOnOs,示例:
@Test

@EnabledOnOs(MAC)

void onlyOnMacOs() {

    // ...

}

@TestOnMac

void testOnMac() {

    // ...

}

@Test

@EnabledOnOs({ LINUX, MAC })

void onLinuxOrMac() {

    // ...

}

@Test

@DisabledOnOs(WINDOWS)

void notOnWindows() {

    // ...

}

@Target(ElementType.METHOD)

@Retention(RetentionPolicy.RUNTIME)

@Test

@EnabledOnOs(MAC)

@interface TestOnMac {

}
JRE条件
@EnabledOnJre和@DisabledOnJre用于指定版本,@EnabledForJreRange和@DisabledForJreRange用于指定版本范围,示例:
@Test

@EnabledOnJre(JAVA_8)

void onlyOnJava8() {

    // ...

}

@Test

@EnabledOnJre({ JAVA_9, JAVA_10 })

void onJava9Or10() {

    // ...

}

@Test

@EnabledForJreRange(min = JAVA_9, max = JAVA_11)

void fromJava9to11() {

    // ...

}

@Test

@EnabledForJreRange(min = JAVA_9)

void fromJava9toCurrentJavaFeatureNumber() {

    // ...

}

@Test

@EnabledForJreRange(max = JAVA_11)

void fromJava8To11() {

    // ...

}

@Test

@DisabledOnJre(JAVA_9)

void notOnJava9() {

    // ...

}

@Test

@DisabledForJreRange(min = JAVA_9, max = JAVA_11)

void notFromJava9to11() {

    // ...

}

@Test

@DisabledForJreRange(min = JAVA_9)

void notFromJava9toCurrentJavaFeatureNumber() {

    // ...

}

@Test

@DisabledForJreRange(max = JAVA_11)

void notFromJava8to11() {

    // ...

}
JVM系统属性条件
@EnabledIfSystemProperty和@DisabledIfSystemProperty,示例:
@Test

@EnabledIfSystemProperty(named = "os.arch", matches = ".*64.*")

void onlyOn64BitArchitectures() {

    // ...

}

@Test

@DisabledIfSystemProperty(named = "ci-server", matches = "true")

void notOnCiServer() {

    // ...

}
环境变量条件
@EnabledIfEnvironmentVariable和@DisabledIfEnvironmentVariable,示例:
@Test

@EnabledIfEnvironmentVariable(named = "ENV", matches = "staging-server")

void onlyOnStagingServer() {

    // ...

}

@Test

@DisabledIfEnvironmentVariable(named = "ENV", matches = ".*development.*")

void notOnDeveloperWorkstation() {

    // ...

}
嵌套测试
嵌套测试可以帮助我们对测试结构进行分层。借助于Java嵌套类的语法,JUnit5可以通过@Nested注解,实现嵌套测试,示例:
import static org.junit.jupiter.api.Assertions.assertEquals;

import static org.junit.jupiter.api.Assertions.assertFalse;

import static org.junit.jupiter.api.Assertions.assertThrows;

import static org.junit.jupiter.api.Assertions.assertTrue;

import java.util.EmptyStackException;

import java.util.Stack;

import org.junit.jupiter.api.BeforeEach;

import org.junit.jupiter.api.DisplayName;

import org.junit.jupiter.api.Nested;

import org.junit.jupiter.api.Test;

@DisplayName("A stack")

class TestingAStackDemo {

    Stack<Object> stack;

    @Test

    @DisplayName("is instantiated with new Stack()")

    void isInstantiatedWithNew() {

        new Stack<>();

    }

    @Nested

    @DisplayName("when new")

    class WhenNew {

        @BeforeEach

        void createNewStack() {

            stack = new Stack<>();

        }

        @Test

        @DisplayName("is empty")

        void isEmpty() {

            assertTrue(stack.isEmpty());

        }

        @Test

        @DisplayName("throws EmptyStackException when popped")

        void throwsExceptionWhenPopped() {

            assertThrows(EmptyStackException.class, stack::pop);

        }

        @Test

        @DisplayName("throws EmptyStackException when peeked")

        void throwsExceptionWhenPeeked() {

            assertThrows(EmptyStackException.class, stack::peek);

        }

        @Nested

        @DisplayName("after pushing an element")

        class AfterPushing {

            String anElement = "an element";

            @BeforeEach

            void pushAnElement() {

                stack.push(anElement);

            }

            @Test

            @DisplayName("it is no longer empty")

            void isNotEmpty() {

                assertFalse(stack.isEmpty());

            }

            @Test

            @DisplayName("returns the element when popped and is empty")

            void returnElementWhenPopped() {

                assertEquals(anElement, stack.pop());

                assertTrue(stack.isEmpty());

            }

            @Test

            @DisplayName("returns the element when peeked but remains not empty")

            void returnElementWhenPeeked() {

                assertEquals(anElement, stack.peek());

                assertFalse(stack.isEmpty());

            }

        }

    }

}
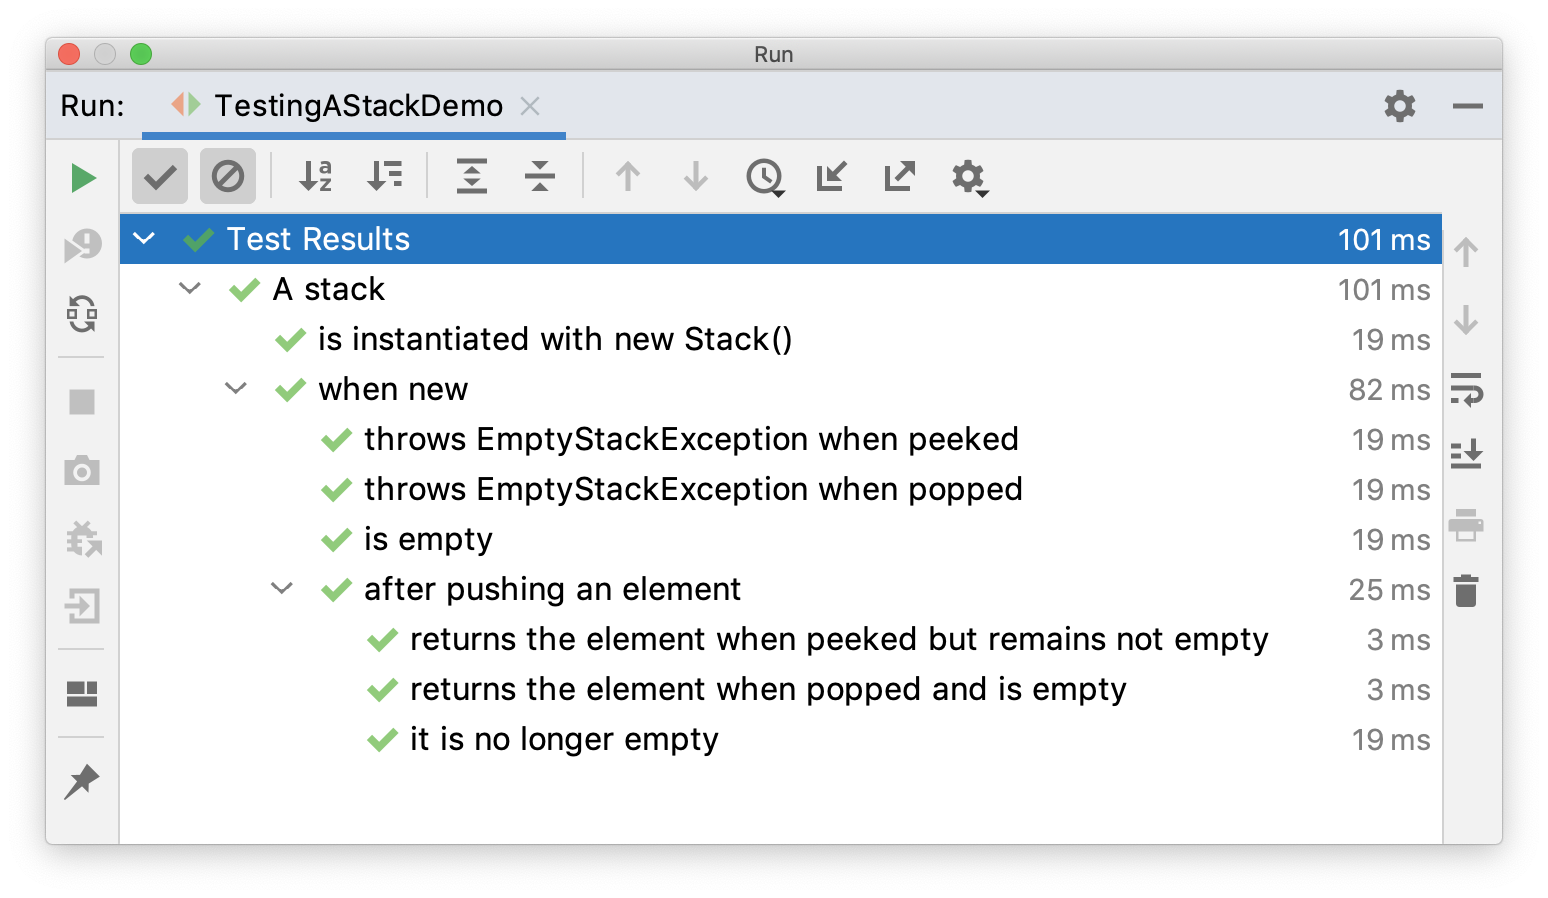
外部测试类通过@BeforeEach向内部测试类传递变量。
执行后结果:
重复测试
@RepeatedTest注解能控制测试方法的重复执行次数,示例:
import static org.junit.jupiter.api.Assertions.assertEquals;

import java.util.logging.Logger;

import org.junit.jupiter.api.BeforeEach;

import org.junit.jupiter.api.DisplayName;

import org.junit.jupiter.api.RepeatedTest;

import org.junit.jupiter.api.RepetitionInfo;

import org.junit.jupiter.api.TestInfo;

class RepeatedTestsDemo {

    private Logger logger = // ...

    @BeforeEach

    void beforeEach(TestInfo testInfo, RepetitionInfo repetitionInfo) {

        int currentRepetition = repetitionInfo.getCurrentRepetition();

        int totalRepetitions = repetitionInfo.getTotalRepetitions();

        String methodName = testInfo.getTestMethod().get().getName();

        logger.info(String.format("About to execute repetition %d of %d for %s", //

            currentRepetition, totalRepetitions, methodName));

    }

    @RepeatedTest(10)

    void repeatedTest() {

        // ...

    }

    @RepeatedTest(5)

    void repeatedTestWithRepetitionInfo(RepetitionInfo repetitionInfo) {

        assertEquals(5, repetitionInfo.getTotalRepetitions());

    }

    @RepeatedTest(value = 1, name = "{displayName} {currentRepetition}/{totalRepetitions}")

    @DisplayName("Repeat!")

    void customDisplayName(TestInfo testInfo) {

        assertEquals("Repeat! 1/1", testInfo.getDisplayName());

    }

    @RepeatedTest(value = 1, name = RepeatedTest.LONG_DISPLAY_NAME)

    @DisplayName("Details...")

    void customDisplayNameWithLongPattern(TestInfo testInfo) {

        assertEquals("Details... :: repetition 1 of 1", testInfo.getDisplayName());

    }

    @RepeatedTest(value = 5, name = "Wiederholung {currentRepetition} von {totalRepetitions}")

    void repeatedTestInGerman() {

        // ...

    }

}
其中name可以用来自定义重复测试的显示名字,{currentRepetition}和{totalRepetitions}是当前次数和总共次数的变量。
执行结果:
├─ RepeatedTestsDemo

│  ├─ repeatedTest()

│  │  ├─ repetition 1 of 10

│  │  ├─ repetition 2 of 10

│  │  ├─ repetition 3 of 10

│  │  ├─ repetition 4 of 10

│  │  ├─ repetition 5 of 10

│  │  ├─ repetition 6 of 10

│  │  ├─ repetition 7 of 10

│  │  ├─ repetition 8 of 10

│  │  ├─ repetition 9 of 10

│  │  └─ repetition 10 of 10

│  ├─ repeatedTestWithRepetitionInfo(RepetitionInfo)

│  │  ├─ repetition 1 of 5

│  │  ├─ repetition 2 of 5

│  │  ├─ repetition 3 of 5

│  │  ├─ repetition 4 of 5

│  │  └─ repetition 5 of 5

│  ├─ Repeat!

│  │  └─ Repeat! 1/1

│  ├─ Details...

│  │  └─ Details... :: repetition 1 of 1

│  └─ repeatedTestInGerman()

│     ├─ Wiederholung 1 von 5

│     ├─ Wiederholung 2 von 5

│     ├─ Wiederholung 3 von 5

│     ├─ Wiederholung 4 von 5

│     └─ Wiederholung 5 von 5
小结
本文分别对JUnit5的条件测试、嵌套测试、重复测试进行了介绍,它们可以使得测试更加灵活和富有层次。除了这些,JUnit5还支持另一个重要且常见的测试:参数化测试。
参考资料:
https://junit.org/junit5/docs/current/user-guide/#writing-tests-conditional-execution
https://junit.org/junit5/docs/current/user-guide/#writing-tests-nested
https://junit.org/junit5/docs/current/user-guide/#writing-tests-repeated-tests
JUnit5的条件测试、嵌套测试、重复测试的更多相关文章
- 如何避免测试人员提交重复的Bug
我们在软件测试过程中,由于不同人员测试同一个项目,所以往往会出现Bug重复提交情况,导致对整个项目和人员产生影响: 浪费测试人员时间和精力,从而影响测试进度 浪费开发人员重复看Bug时间 若开发人员由 ...
- junit测试延伸--方法的重复测试
在实际编码测试中,我们有的时候需要对一个方法进行多次测试,那么怎么办呢?这个问题和测试套件解决的方案一样,我们总不能不停的去右键run as,那怎么办呢?还好伟大的junit帮我们想到了. OK,现在 ...
- LTP--linux稳定性测试 linux性能测试 ltp压力测试 内核更新 稳定性测试
LTP--linux稳定性测试 linux性能测试 ltp压力测试 zhangzj1030关注14人评论33721人阅读2011-12-09 12:07:45 说明:在写这篇文章之前,本人也不曾了 ...
- 组合测试(Combinatorial Test)/配对测试 (pairwise)
组合测试方法:配对测试实践 实施组合测试 常用的Pairwise工具集:http://www.pairwise.org/tools.asp 成对测试(Pairwise Testing)又称结对测试.两 ...
- Selenium & Webdriver 远程测试和多线程并发测试
Selenium & Webdriver 远程测试和多线程并发测试 Selenium Webdriver自动化测试,初学者可以使用selenium ide录制脚本,然后生成java程序导入ec ...
- 【星云测试】开发者测试(2)-采用精准测试工具对J2EE Guns开发框架进行测试
配置测试Guns Guns简介 Guns是一个近几年来基于SpringBoot的开源便利且较新的JavaEE项目开发框架,它整合了springmvc + shiro + mybatis-plus + ...
- 使用iozone测试磁盘性能(测试文件读写)
IOzone是一个文件系统测试基准工具.可以测试不同的操作系统中文件系统的读写性能.可以通过 write, re-write, read, re-read, random read, random w ...
- web 压力测试工具ab压力测试详解
Web性能压力测试工具之ApacheBench(ab)详解 原文:http://www.ha97.com/4617.html PS:网站性能压力测试是性能调优过程中必不可少的一环.只有让服务器处在高压 ...
- 【测试基础】App测试要点总结
测试工作过程中思维过程:测试人员常被看作Bug寻找者,程序的破坏者. 1.好的测试工程师所具备的能力: 细心的观察能力 有效的提问能力 产品的业务能力 好奇心 2.测试人员需要询问问题:测试人员的核心 ...
随机推荐
- java命令的本质逻辑揭秘
前言 在日常编码中,有了ide的支持,我们已经很少直接在命令行中直接执行java XXX命令去启动一个项目了.然而我们有没有想过,一个简单的java命令背后究竟做了些什么事情?让我们看下下面几个简单的 ...
- 入坑java工程师那些事
最近在知乎上看到好多关于转行做java的朋友,有的在担心学历,有的在想着如何学习java,有的在纠结如何面试.作为一个工作了近10年的java程序员来聊聊我的一些想法,主要从学历.个人能力.工作环境等 ...
- 如何屏蔽 iOS 软件自动更新,去除更新通知和标记
适用于 iOS.iPadOS 和 watchOS,即 iPhone.iPad 和 Apple Watch 通用. 请访问原文链接:https://sysin.org/article/Disable-i ...
- 深度学习LiDAR定位:L3-Net
深度学习LiDAR定位:L3-Net 摘要 本文提出L3-Net--一种新颖的基于学习的LiDAR定位系统,可实现厘米级的定位,与现有最高水平的传统定位算法相媲美.与传统定位算法不同,本文创新地实现了 ...
- 摄像头ISP系统原理(中)
摄像头ISP系统原理(中) AF(FOCUS)----自动对焦 根据光学知识,景物在传感器上成像最清晰时处于合焦平面上.通过更改 LENS 的位置,使得景物在传感器上清晰的成像,是 ISP FOCUS ...
- 谷歌chrome浏览器network中Stalled分析和优化
谷歌chrome浏览器network中Stalled分析和优化 问题由来 最近项目上要求首页的加载速度,查看浏览器的network发现接口加载速度非常慢. 问题解决思路 SSL 网上有人因为图片加载, ...
- 自动化工具之Appium工具简单介绍
背景 自动化,性能测试,接口测试,开发平台等工作,到底测试的价值在哪里,其实价值来源不断充实与为大众服务,今天简单介绍ui小工具appium攻击. 简单介绍 Appium 是一个自动化测试开源工具,支 ...
- 【渗透实战】那些奇葩的WAF_第二期_无意发现通杀漏洞,空字节突破上传!
/文章作者:Kali_MG1937 CSDN博客号:ALDYS4 QQ:3496925334 未经许可,禁止转载/ 该博文为本人18年左右的渗透记录,文法粗糙,技术含量极低,流水账文章,且今日不知为何 ...
- Visual Studio 2022 Preview 1 和.NET 6 Preview 5 正式发布
具有里程碑意义的Visual Studio 2022 Preview 1正式发布,重点是64位,而没有增加新功能,并且同时也发布了.NET 6 Preview 5. https://devblogs. ...
- 【模拟7.27】单(liu_runda学长的神题)
好像用到一些高中数学知识...... 满分做法: case 0:已知a数组求b数组 因为是树状结构,设当前节点x 儿子to 我们从任意一点出发可求出b[root]来,之后我们可以通过寻找两两相连节点的 ...