基于全注解的SpringMVC+Spring4.2+hibernate4.3框架搭建
概述
详细
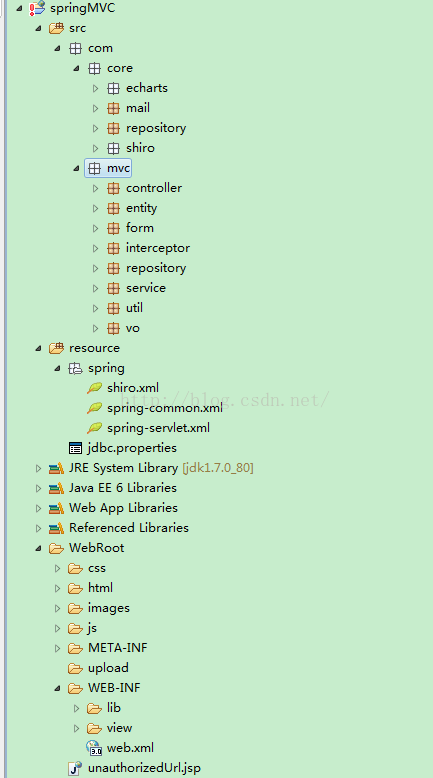
本教程框架为基于全注解的SpringMVC+Spring4.2+hibernate4.3,开发工具为myEclipse.
整体目录结构如下图:
最近在鼓捣SpringMVC框架,现将成果都记录下来,免得前学后忘。之前用的框架一直是S2SH,一直苦于要配置一堆的配置文件,自从接触SpringMVC,发现这才是我一直想要的框架,基于全注解,开发过程中零配置,实在快哉。此教程非常适合零基础的人学习回归正题,基于全注解驱动的SpringMVC+Spring4.2+hibernate4.3框架搭建(整合)过程如下,:
开发工具为myEclipse
第一步:新建一个web项目
在eclipse中新建一个web项目,略。
第二步:加入所需的jar包
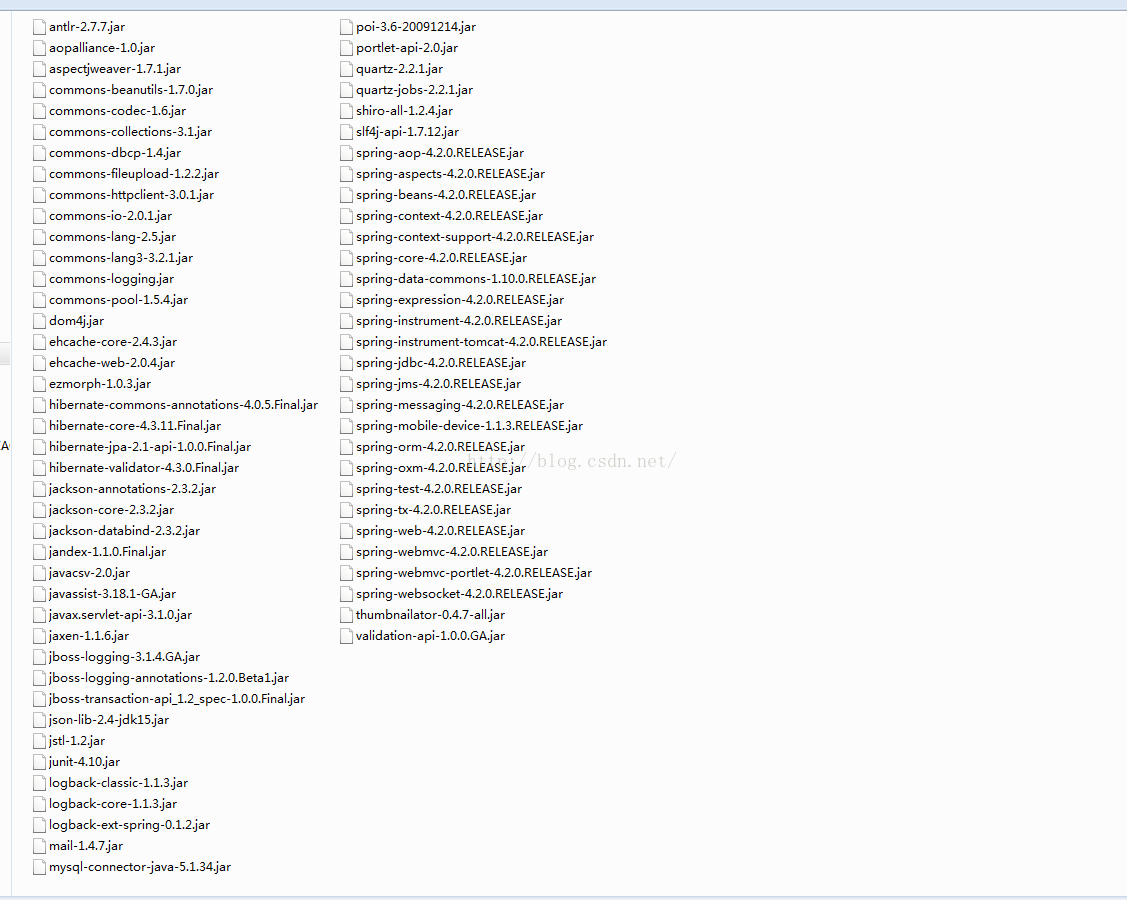
jar包下载地址:http://download.csdn.net/detail/qq_33556185/9472726
第三步:接下来我们开始SpringMVC容器的配置
为了分工明确,我们将SpringMVC的配置单独写在spring-servlet.xml里,Spring的配置写在spring-common.xml(事务、数据源、sessionFactory等等)里。
spring-common.xml和spring-servlet.xml先加入如下schemal
<beans xmlns="http://www.springframework.org/schema/beans"

    xmlns:xsi="http://www.w3.org/2001/XMLSchema-instance" xmlns:p="http://www.springframework.org/schema/p"

    xmlns:context="http://www.springframework.org/schema/context" xmlns:tx="http://www.springframework.org/schema/tx"

    xmlns:aop="http://www.springframework.org/schema/aop" xmlns:mvc="http://www.springframework.org/schema/mvc"

    xmlns:task="http://www.springframework.org/schema/task" xmlns:cache="http://www.springframework.org/schema/cache"

    xmlns:util="http://www.springframework.org/schema/util"

    xmlns:websocket="http://www.springframework.org/schema/websocket"

    xsi:schemaLocation="http://www.springframework.org/schema/beans http://www.springframework.org/schema/beans/spring-beans-4.1.xsd

                    http://www.springframework.org/schema/aop http://www.springframework.org/schema/aop/spring-aop-4.1.xsd

                    http://www.springframework.org/schema/tx http://www.springframework.org/schema/tx/spring-tx-4.1.xsd

                    http://www.springframework.org/schema/context http://www.springframework.org/schema/context/spring-context-4.1.xsd

                    http://www.springframework.org/schema/mvc http://www.springframework.org/schema/mvc/spring-mvc-4.1.xsd

                    http://www.springframework.org/schema/task http://www.springframework.org/schema/task/spring-task-4.1.xsd

                    http://www.springframework.org/schema/cache http://www.springframework.org/schema/cache/spring-cache-4.1.xsd

                    http://www.springframework.org/schema/util http://www.springframework.org/schema/util/spring-util-4.1.xsd">
然后spring容器的配置先放下,先来配置springMVC(spring-servlet.xml)的配置
在schemal的结尾处加入这一句:default-autowire="byName" ,依赖注入将根据name自动装配。
接下来启动注解驱动的SpringMVC功能:
<mvc:annotation-driven />
扫描注解包(在SpringMVC的容器里,只扫描Controller注解就行了)
<context:component-scan base-package="com.mvc.rest"

        use-default-filters="false">

        <context:include-filter type="annotation"

            expression="org.springframework.stereotype.Controller" />

</context:component-scan>
use-default-filters默认为true,默认会扫描@Component、@Controller、@Repository、@Service的注解,在这里只扫描@Controller注解是因为,SpringMVC的容器没有事务的能力,所以扫描@Repository、@Service的注解只能放在Spring的容器。也正因为如此,事务的配置要写在Spring的容器。
然后是对模型视图名称的解析,在请求时模型视图名称添加前后缀(前缀是从控制器里返回的视图的父目录,此处配置的是让容器在WEB-INF/view/下找寻对应的视图;后缀是给视图名称追加后缀名,此处配置的是jsp后缀)
<bean class="org.springframework.web.servlet.view.InternalResourceViewResolver" p:prefix="/WEB-INF/view/" p:suffix=".jsp" />
配置CommonsMultpartResolver,上传文件的时候要用到CommonsMultpartResolver,maxUploadSize设置上传文件的大小限制,上传文件必须先配置此解析器。
<bean id="multipartResolver" class="org.springframework.web.multipart.commons.CommonsMultipartResolver">

     <property name="maxUploadSize" value="10485760" />

</bean>
配置login视图解析,在登录拦截器里,校验未登录的话,要跳转到登录页面,然后由于login页面放在WEB-INF目录下,所以设置跳转到login.jsp会跳转不过去,在此处设置如下,在返回此view-name的地方,容器便不会当作Controller的路径,当作视图的路径跳转,在拦截器里便可以跳转到login页面(此配置告诉容器,这不是一个controller的方法的路径,而是一个视图的名称,请当作视图处理)。
<mvc:view-controller path="/" view-name="login" />
拦截器的配置也是放在SpringMVC的容器里,拦截器以后的文章里再详细解说。
到此spring-servlet.xml的配置就告一段落了,spring-servlet.xml的全文如下:
<?xml version="1.0" encoding="UTF-8"?>

<!--suppress ALL -->

<beans xmlns="http://www.springframework.org/schema/beans"

    xmlns:xsi="http://www.w3.org/2001/XMLSchema-instance" xmlns:p="http://www.springframework.org/schema/p"

    xmlns:context="http://www.springframework.org/schema/context" xmlns:tx="http://www.springframework.org/schema/tx"

    xmlns:aop="http://www.springframework.org/schema/aop" xmlns:mvc="http://www.springframework.org/schema/mvc"

    xmlns:task="http://www.springframework.org/schema/task" xmlns:cache="http://www.springframework.org/schema/cache"

    xmlns:util="http://www.springframework.org/schema/util"

    xsi:schemaLocation="http://www.springframework.org/schema/beans http://www.springframework.org/schema/beans/spring-beans-4.1.xsd

        http://www.springframework.org/schema/aop http://www.springframework.org/schema/aop/spring-aop-4.1.xsd

        http://www.springframework.org/schema/tx http://www.springframework.org/schema/tx/spring-tx-4.1.xsd

        http://www.springframework.org/schema/context http://www.springframework.org/schema/context/spring-context-4.1.xsd

        http://www.springframework.org/schema/mvc http://www.springframework.org/schema/mvc/spring-mvc-4.1.xsd

        http://www.springframework.org/schema/task http://www.springframework.org/schema/task/spring-task-4.1.xsd

        http://www.springframework.org/schema/cache http://www.springframework.org/schema/cache/spring-cache-4.1.xsd

        http://www.springframework.org/schema/util http://www.springframework.org/schema/util/spring-util-4.1.xsd"

    default-autowire="byName">

    <mvc:annotation-driven />

    <!-- controller包(自动注入) -->

    <context:component-scan base-package="com.mvc.rest" use-default-filters="false">

      <context:include-filter type="annotation" expression="org.springframework.stereotype.Controller" />

    </context:component-scan>

    <!-- 对模型视图名称的解析,在请求时模型视图名称添加前后缀 -->

    <bean class="org.springframework.web.servlet.view.InternalResourceViewResolver"

        p:prefix="/WEB-INF/view/" p:suffix=".jsp" />

    <mvc:view-controller path="/" view-name="login" />

    <bean id="multipartResolver"

        class="org.springframework.web.multipart.commons.CommonsMultipartResolver">

        <property name="maxUploadSize" value="10485760" />

    </bean>

    <!-- 配置拦截器, 多个拦截器,顺序执行

        <mvc:interceptors>

           <mvc:interceptor>

            <mvc:mapping path="/*" />

           <bean class="com.mvc.rest.interceptor.CommonInterceptor"></bean>

     </mvc:interceptor> </mvc:interceptors> -->

</beans>
第四步:我们配置web.xml
先配置CharacterEncodingFilter编码过滤器,此过滤器必须放在配置文件的最上面,有多个过滤器的时候,也应该放在第一位。encoding目标编码,forceEncoding设为true,会忽略请求来源的编码,强制使用encoding设置的编码。
<filter>

       <filter-name>CharacterEncodingFilter</filter-name>

       <filter-class>org.springframework.web.filter.CharacterEncodingFilter</filter-class>

       <init-param>

           <param-name>encoding</param-name>

           <param-value>utf-8</param-value>

       </init-param>

       <init-param>

           <param-name>forceEncoding</param-name>

           <param-value>true</param-value>

       </init-param>

</filter>

<filter-mapping>

       <filter-name>CharacterEncodingFilter</filter-name>

       <url-pattern>/*</url-pattern>

</filter-mapping>
然后配置ContextLoaderListener,此监听用来加载我们写的配置文件
<listener>

    <listener-class>org.springframework.web.context.ContextLoaderListener</listener-class>

</listener>
然后加载Spring配置文件
<context-param>

    <param-name>contextConfigLocation</param-name>

    <param-value>

        classpath*:/spring/spring-common.xml

    </param-value>

</context-param>
接下来就是配置SpringMVC的核心Servlet,所有请求都要先经过DispatcherServlet,然后进行分发到对应的控制器。该Servlet须第一个被加载,且在初始化的时候去加载SpringMVC的配置文件——spring-servlet.xml
<servlet>

    <servlet-name>spring-mvc</servlet-name>

    <servlet-class>org.springframework.web.servlet.DispatcherServlet</servlet-class>

    <init-param>

        <description>spring mvc</description>

        <param-name>contextConfigLocation</param-name>

        <param-value>classpath*:/spring/spring-servlet.xml</param-value>

    </init-param>

    <load-on-startup>1</load-on-startup>

</servlet>
然后设置DispatcherServlet拦截的请求,此处的servlet-name,即是上面配置的DispatcherServlet的name,url-pattern设置为斜杠,则会拦截所有请求,也即静态资源html、css、js也直接请求。
<servlet-mapping>

<servlet-name>spring-mvc</servlet-name>

<url-pattern>/</url-pattern>

</servlet-mapping>
为此,我们需要设置,哪些资源不进行拦截
<servlet-mapping>

      <servlet-name>default</servlet-name>

      <url-pattern>/html/*</url-pattern>

</servlet-mapping>

<servlet-mapping>

      <servlet-name>default</servlet-name>

      <url-pattern>/js/*</url-pattern>

</servlet-mapping>

<servlet-mapping>

       <servlet-name>default</servlet-name>

      <url-pattern>/css/*</url-pattern>

</servlet-mapping>

     <servlet-mapping>

<servlet-name>default</servlet-name>

      <url-pattern>/images/*</url-pattern>

</servlet-mapping>
到此,SpringMVC就可以正常使用了。
欢迎页面的设置,原本此处只能设置视图名,*.jsp或者*.html,因为在spring-servlet.xml里设置了视图解析:<mvc:view-controller path="/" view-name="login" />,所以,此处设置为welcome-file设置为login,容器便会将其解析为视图login.jsp,绕过WEB-INFO下的资源无法直接访问的限制。
<welcome-file-list>

     <welcome-file>login</welcome-file>

</welcome-file-list>
我们还可以设置error-page的页面
<error-page>

   <error-code>404</error-code>

   <location>/html/error/404.html</location>

</error-page>

<error-page>

   <error-code>500</error-code>

   <location>/html/error/500.html</location>

</error-page>
为了集成hibernate,我们还要配置OpenSessionInViewFilter,此过滤器会将Hibernate的Session和一次完整的请求过程绑定起来,事务控制,必须配置此过滤器。
<filter>

    <filter-name>openSession</filter-name>

    <filter-class>org.springframework.orm.hibernate4.support.OpenSessionInViewFilter</filter-class>

 </filter>

 <filter-mapping>

<filter-name>openSession</filter-name>

<url-pattern>/*</url-pattern>

 </filter-mapping>
完整的web.xml的配置如下:
<?xml version="1.0" encoding="UTF-8"?>

<web-app xmlns:xsi="http://www.w3.org/2001/XMLSchema-instance"

    xmlns="http://java.sun.com/xml/ns/javaee" xmlns:web="http://java.sun.com/xml/ns/javaee/web-app_2_5.xsd"

    xsi:schemaLocation="http://java.sun.com/xml/ns/javaee http://java.sun.com/xml/ns/javaee/web-app_3_0.xsd"

    id="WebApp_ID" version="3.0">

    <filter>

        <filter-name>CharacterEncodingFilter</filter-name>

        <filter-class>org.springframework.web.filter.CharacterEncodingFilter</filter-class>

        <init-param>

            <param-name>encoding</param-name>

            <param-value>utf-8</param-value>

        </init-param>

        <init-param>

            <param-name>forceEncoding</param-name>

            <param-value>true</param-value>

        </init-param>

    </filter>

    <filter-mapping>

        <filter-name>CharacterEncodingFilter</filter-name>

        <url-pattern>/*</url-pattern>

    </filter-mapping>

    <listener>

        <listener-class>org.springframework.web.context.ContextLoaderListener</listener-class>

    </listener>

    <context-param>

        <param-name>contextConfigLocation</param-name>

        <param-value>

            classpath*:/spring/spring-common.xml

        </param-value>

    </context-param>

    <servlet>

        <servlet-name>spring-mvc</servlet-name>

        <servlet-class>org.springframework.web.servlet.DispatcherServlet</servlet-class>

        <init-param>

            <description>spring mvc</description>

            <param-name>contextConfigLocation</param-name>

            <param-value>classpath*:/spring/spring-servlet.xml</param-value>

        </init-param>

        <load-on-startup>1</load-on-startup>

    </servlet>

    <filter>

        <filter-name>openSession</filter-name>

        <filter-class>org.springframework.orm.hibernate4.support.OpenSessionInViewFilter</filter-class>

    </filter>

    <filter-mapping>

        <filter-name>openSession</filter-name>

        <url-pattern>/*</url-pattern>

    </filter-mapping>

    <servlet-mapping>

        <servlet-name>spring-mvc</servlet-name>

        <url-pattern>/</url-pattern>

    </servlet-mapping>

    <welcome-file-list>

        <welcome-file>login</welcome-file>

    </welcome-file-list>

    <servlet-mapping>

        <servlet-name>default</servlet-name>

        <url-pattern>/html/*</url-pattern>

    </servlet-mapping>

    <servlet-mapping>

        <servlet-name>default</servlet-name>

        <url-pattern>/js/*</url-pattern>

    </servlet-mapping>

    <servlet-mapping>

        <servlet-name>default</servlet-name>

        <url-pattern>/css/*</url-pattern>

    </servlet-mapping>

    <servlet-mapping>

        <servlet-name>default</servlet-name>

        <url-pattern>/images/*</url-pattern>

    </servlet-mapping>

    <error-page>

        <error-code>404</error-code>

        <location>/html/error/404.html</location>

    </error-page>

    <error-page>

        <error-code>500</error-code>

        <location>/html/error/500.html</location>

    </error-page>

</web-app>
第五步:配置spring-common.xml(数据源、事务、sessionFactory)
配置数据源jdbc.properties:
jdbc.driverClassName=com.mysql.jdbc.Driver

jdbc.url=jdbc\:mysql\://121.40.90.125\:3306/test

jdbc.username=root

jdbc.password=exceptoin882465\!@\#
解析properties:
<bean class="org.springframework.beans.factory.config.PropertyPlaceholderConfigurer">

<span style="font-family:Microsoft YaHei;">   </span><property name="locations">

    <value>classpath:jdbc.properties</value>

<span style="font-family:Microsoft YaHei;">   </span></property>

</bean>
数据库连接池的配置取properties中的值:
<bean id="dataSource" destroy-method="close"<span style="font-family:Microsoft YaHei;">  </span>class="org.apache.commons.dbcp.BasicDataSource">

    <property name="driverClassName" value="${jdbc.driverClassName}" />

    <property name="url" value="${jdbc.url}" />

    <property name="username" value="${jdbc.username}" />

    <property name="password" value="${jdbc.password}" />

</bean>
若不设置url的编码,在MySQL数据库里,保存进去的中文会变成问号。
配置sessionFactory
<bean id="sessionFactory" class="org.springframework.orm.hibernate4.LocalSessionFactoryBean">

<property name="dataSource" ref="dataSource" />

<property name="hibernateProperties">

    <props>

            <prop key="hibernate.dialect">org.hibernate.dialect.MySQLDialect</prop>

            <prop key="hibernate.hbm2ddl.auto">update</prop>

            <prop key="hibernate.show_sql">true</prop>

            <prop key="hibernate.format_sql">true</prop>

    </props>

</property>

<!-- 注解方式配置 -->

<property name="packagesToScan">

  <list>

    <value>com.mvc.rest.entity</value>

 </list>

</property>

 </bean>
packagesToScan扫描我们的hibernate实体文件。
最后配置事务
<bean id="txManager"

        class="org.springframework.orm.hibernate4.HibernateTransactionManager">

        <property name="sessionFactory" ref="sessionFactory" />

    </bean>

    <tx:advice id="txAdvice" transaction-manager="txManager">

        <tx:attributes>

            <tx:method name="save*" propagation="REQUIRED" />

            <tx:method name="add*" propagation="REQUIRED" />

            <tx:method name="edit*" propagation="REQUIRED" />

            <tx:method name="update*" propagation="REQUIRED" />

            <tx:method name="delete*" propagation="REQUIRED" />

            <tx:method name="register*" propagation="REQUIRED" />

            <tx:method name="all" propagation="REQUIRED" />

            <tx:method name="changePassword*" propagation="REQUIRED" />

            <tx:method name="restPassword*" propagation="REQUIRED" />

            <tx:method name="authorize*" propagation="REQUIRED" />

            <tx:method name="send*" propagation="REQUIRED" />

            <tx:method name="init*" propagation="REQUIRED" />

            <!-- <tx:method name="*" read-only="true"/> -->

        </tx:attributes>

    </tx:advice>

    <aop:config>

        <aop:pointcut id="serviceOperation"

            expression="execution(* com.mvc.rest.service.impl.*.*(..))" />

        <aop:advisor advice-ref="txAdvice" pointcut-ref="serviceOperation" />

</aop:config>
完整的spring-common.xml的配置如下:
<?xml version="1.0" encoding="UTF-8"?>

<!--suppress ALL -->

<beans xmlns="http://www.springframework.org/schema/beans"

    xmlns:xsi="http://www.w3.org/2001/XMLSchema-instance" xmlns:p="http://www.springframework.org/schema/p"

    xmlns:context="http://www.springframework.org/schema/context" xmlns:tx="http://www.springframework.org/schema/tx"

    xmlns:aop="http://www.springframework.org/schema/aop" xmlns:mvc="http://www.springframework.org/schema/mvc"

    xmlns:task="http://www.springframework.org/schema/task" xmlns:cache="http://www.springframework.org/schema/cache"

    xmlns:util="http://www.springframework.org/schema/util"

    xmlns:websocket="http://www.springframework.org/schema/websocket"

    xsi:schemaLocation="http://www.springframework.org/schema/beans http://www.springframework.org/schema/beans/spring-beans-4.1.xsd

        http://www.springframework.org/schema/aop http://www.springframework.org/schema/aop/spring-aop-4.1.xsd

        http://www.springframework.org/schema/tx http://www.springframework.org/schema/tx/spring-tx-4.1.xsd

        http://www.springframework.org/schema/context http://www.springframework.org/schema/context/spring-context-4.1.xsd

        http://www.springframework.org/schema/mvc http://www.springframework.org/schema/mvc/spring-mvc-4.1.xsd

        http://www.springframework.org/schema/task http://www.springframework.org/schema/task/spring-task-4.1.xsd

        http://www.springframework.org/schema/cache http://www.springframework.org/schema/cache/spring-cache-4.1.xsd

        http://www.springframework.org/schema/util http://www.springframework.org/schema/util/spring-util-4.1.xsd">

    <context:component-scan base-package="com.mvc.rest" />

    <!-- properties文件解析器 -->

    <bean class="org.springframework.beans.factory.config.PropertyPlaceholderConfigurer">

        <property name="locations">

            <value>classpath:jdbc.properties</value>

        </property>

    </bean>

    <!-- 配置数据源 -->

    <bean id="dataSource" destroy-method="close"

        class="org.apache.commons.dbcp.BasicDataSource">

        <property name="driverClassName" value="${jdbc.driverClassName}" />

        <property name="url" value="${jdbc.url}" />

        <property name="username" value="${jdbc.username}" />

        <property name="password" value="${jdbc.password}" />

    </bean>

    <bean id="sessionFactory"

        class="org.springframework.orm.hibernate4.LocalSessionFactoryBean">

        <property name="dataSource" ref="dataSource" />

        <property name="hibernateProperties">

            <props>

                <prop key="hibernate.dialect">org.hibernate.dialect.MySQLDialect</prop>

                <prop key="hibernate.hbm2ddl.auto">update</prop>

                <prop key="hibernate.show_sql">true</prop>

                <prop key="hibernate.format_sql">true</prop>

            </props>

        </property>

        <!-- 注解方式配置 -->

        <property name="packagesToScan">

            <list>

                <value>com.mvc.rest.entity</value>

            </list>

        </property>

    </bean>

    <bean id="txManager"

        class="org.springframework.orm.hibernate4.HibernateTransactionManager">

        <property name="sessionFactory" ref="sessionFactory" />

    </bean>

    <tx:advice id="txAdvice" transaction-manager="txManager">

        <tx:attributes>

            <tx:method name="save*" propagation="REQUIRED" />

            <tx:method name="add*" propagation="REQUIRED" />

            <tx:method name="edit*" propagation="REQUIRED" />

            <tx:method name="update*" propagation="REQUIRED" />

            <tx:method name="delete*" propagation="REQUIRED" />

            <tx:method name="register*" propagation="REQUIRED" />

            <tx:method name="all" propagation="REQUIRED" />

            <tx:method name="changePassword*" propagation="REQUIRED" />

            <tx:method name="restPassword*" propagation="REQUIRED" />

            <tx:method name="authorize*" propagation="REQUIRED" />

            <tx:method name="send*" propagation="REQUIRED" />

            <tx:method name="init*" propagation="REQUIRED" />

            <!-- <tx:method name="*" read-only="true"/> -->

        </tx:attributes>

    </tx:advice>

    <aop:config>

        <aop:pointcut id="serviceOperation"

            expression="execution(* com.mvc.rest.service.impl.*.*(..))" />

        <aop:advisor advice-ref="txAdvice" pointcut-ref="serviceOperation" />

    </aop:config>

</beans>
到此,基于全注解的SpringMVC+Spring4.2+hibernate4.3框架搭建大功告成。
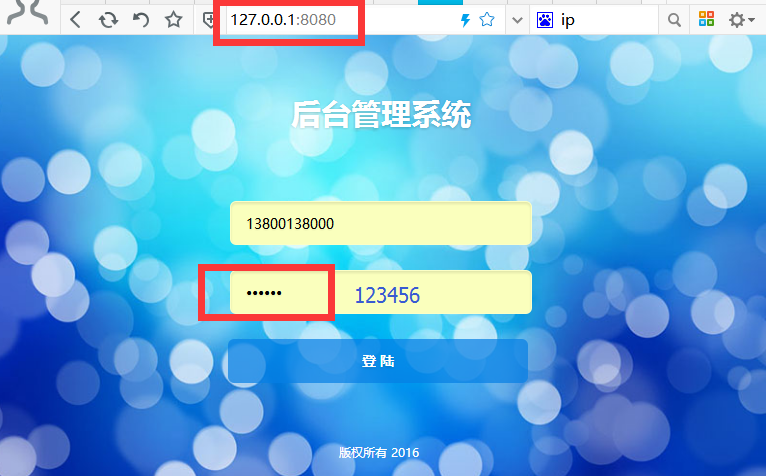
第六步:运行
DB安装:

当然,你不安装也是可以的,本项目可以通过hibernate反向创建db和表,但数据没法创建,而且密码我们采用MD5加密,所以,为了省事,建议执行以下脚本,这个脚本是已经包含了创建DB的了。
DB安装后,需要配置下项目的jdbc连接:
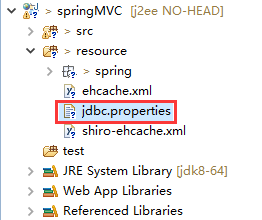
配置如下:

请根据自己的实际情况修改。
然后是运行起来:
注:本文著作权归作者,由demo大师发表,拒绝转载,转载需要作者授权
基于全注解的SpringMVC+Spring4.2+hibernate4.3框架搭建的更多相关文章
- 基于SpringMVC下的Rest服务框架搭建【1、集成Swagger】
基于SpringMVC下的Rest服务框架搭建[1.集成Swagger] 1.需求背景 SpringMVC本身就可以开发出基于rest风格的服务,通过简单的配置,即可快速开发出一个可供客户端调用的re ...
- [转]基于全注解的Spring3.1 mvc、myBatis3.1、Mysql的轻量级项目
摘要 对于现在主流的j2ee企业级开发而言,ssh(struts+hibernate+spring)依然是一个事实的标准.由struts充当的mvc调度控制:hibernate的orm持久化映射:sp ...
- 基于SpringMVC下的Rest服务框架搭建【集成Swagger】
1.需求背景 SpringMVC本身就可以开发出基于rest风格的服务,通过简单的配置,即可快速开发出一个可供客户端调用的rest服务,通常这些服务要不就是用于手机app的开发,要不就是提供给第三方开 ...
- 基于SSH2的OA项目1.0_20161206_需求分析与框架搭建
1. SSH项目 OA项目,办公自动化,将公司的数据,文档,流程实现在系统中的管理. 降低人员交流过程中的成本.提高办公的效率. 2 .系统管理 主要实现系统权限的管理,不同的用户登陆后看到菜单项不一 ...
- struts2 spring3.2 hibernate4.1 框架搭建 整合
ssh是企业开发中常遇到的框架组合,现将框架的搭建过程记录下来,以便以后查看.我的搭建过程是,首先struts,然后spring,最后hibernate.struts2的最新版本为2.3.8,我下载的 ...
- Struts2.3+Spring3.2+Hibernate4.2框架搭建
一.环境 SSH使用的版本:struts2.3.14.spring3.2.2.hibernate4.2.0 数据库:MYSQL tomcat版本:apache-tomcat-7.0.42 二.所需要导 ...
- 基于IDEA 最新Spirng3.2+hibernate4+struts2.3 全注解配置 登录
原文 基于IDEA 最新Spirng3.2+hibernate4+struts2.3 全注解配置 登录 首先说说 IDEA 12,由于myeclipse越来越卡,我改用idea12 了,发现其功能强悍 ...
- 基于已构建S2SH项目配置全注解方式简化配置文件
如果还不熟悉s2sh项目搭建的朋友可以先阅读 eclipse环境下基于tomcat-7.0.82构建struts2项目 eclipse环境下基于已构建struts2项目整合spring+hiberna ...
- 最新版本的Struts2+Spring4+Hibernate4三大框架整合(截止2014-10-15,提供源码下载)
一. 项目名称:S2316S411H436 项目原型:Struts2.3.16 + Spring4.1.1 + Hibernate4.3.6 + Quartz2.2.1 源代码下载地址: 基本版:ht ...
随机推荐
- 突发奇想之:源码及文档,文档包括源码---xml格式的源码,文档源码合并;注释文档化,文档代码化;
目前源码和文档一般都是分开的,我在想为什么 源码不就是最好的文档么? 但是一般源码都是文本text的,格式化需要人为统一规范,所以源码中的文档在现实中不是那么的易于实践. 而且 源码 不能包括图片.附 ...
- Asp.net5 Session Set扩展
关于Asp.net 5 如何使用Session大家可以参考http://www.mikesdotnetting.com/article/270/sessions-in-asp-net-5 和http: ...
- iOS开发-UILabel和UIButton添加下划线
关于UILabel和UIButton有的时候需要添加下划线,一般有两种方式通过默认的NSMutableAttributedString设置,第二种就是在drawRect中画一条下划线,本文就简单的选择 ...
- Nginx如何启用ETag,提高访问速度
ETag全称EntityTags,HTTP协议规格说明中定义“ETag”为“被请求变量的实体值”. 我们也可以把ETag理解为是一个客户端与服务器关联的记号.这个记号告诉客户端,当前网页在上次请求之后 ...
- Kafka:ZK+Kafka+Spark Streaming集群环境搭建(十三)kafka+spark streaming打包好的程序提交时提示虚拟内存不足(Container is running beyond virtual memory limits. Current usage: 119.5 MB of 1 GB physical memory used; 2.2 GB of 2.1 G)
异常问题:Container is running beyond virtual memory limits. Current usage: 119.5 MB of 1 GB physical mem ...
- 向windows添加环境变量
以NASM为例,软件安装完毕后,启动Windows操作系统的命令窗口,在安装目录(比如C:\Program Files\NASM)下运行nasm是ok的,但是在其他任意目录下运行nasm就会报错. 这 ...
- redis清除数据/xargs使用
redis清除数据/xargs使用 redis比memcache好的地方之一,如果memcache,恐怕就得关掉重启了. 1 使用cli FLUSHDB 清除一个数据库,FLUSHALL清除整个red ...
- unity3d Player Settings 中的Stripping Level(剥离等级)对应每个等级具体剥离了哪些库
http://docs.unity3d.com/410/Documentation/ScriptReference/MonoCompatibility.html
- 【Python】使用torrentParser1.02对多文件torrent的分析结果
C:\Users\horn1\Desktop\python\41-torrentParser>python torrentParser.py 文件名=./6.torrent 文件结构: anno ...
- 解决Android Studio无法下载sdk的问题
因为google被墙了,android sdk无法下载.然后各种百度,都是说让设置代理,给的代理地址一般都是用的下面这个代理服务器: 大连东软信息学院镜像服务器地址: mirrors.neusoft. ...