SpringMVC教程4
一、数据回写
数据回写:在做数据更新的时候服务端查询的数据自动填充到表单中。
1.1默认方式
通过前面讲解的 Map Mode ModelMap绑定数据
	@RequestMapping("/doLogin")

	public String doLogin(String username, String password, Model model) {

		if ("zhangsan".equals(username) && "123".equals(password)) {

			return "index";

		}

		model.addAttribute("username", username);

		model.addAttribute("password", password);

		return "forward:/login";

	}
页面中回写
<form action="/doLogin" method="post">

			<table>

				<tr>

					<td>用户名</td>

					<td><input type="text" name="username" value="${username}"></td>

				</tr>

				<tr>

					<td>密码</td>

					<td><input type="password" name="password" value="${password}"></td>

				</tr>

				<tr>

					<td><input type="submit" value="登录"></td>

				</tr>

			</table>

		</form>
2.通过Model方式
如果使用对象去接收客户端传来的数据,那么对象默认会被自动放到model中,在前端页面可以直接使用对象中的数据。
表单代码如下:
	/**

	 *

	 * 请求地址:

	 * http://localhost:8080/SpringMVC-06-backvalue/

	 * add1?username=a13&password=11111

	 */

	@RequestMapping("/add1")

	public String add1(Book book) {

		System.out.println(book);

		return "/user.jsp";

	}
页面中
	<form action="add1" method="post">

		<table>

			<tr>

				<td>用户名</td>

				<td><input type="text" name="username"

					value="${book.username }"></td>

			</tr>

			<tr>

				<td>用户密码</td>

				<td><input type="text" name="password"

					value="${book.password }"></td>

			</tr>

			<tr>

				<td><input type="submit" value="注册"></td>

			</tr>

		</table>

	</form>
效果

3.@ModelAttribute注解实现
3.1 修改参数回显变量名
在需要回传的对象前添加@ModelAttribute("bb")注解,在界面中就可以通过bb前缀来获取回写信息。


3.2 配置全局变量名
给接口中的每个方法统一返回一份数据
@Controller

public class UserController {

	/**

	 *

	 * 请求地址: http://localhost:8080/SpringMVC-06-backvalue/

	 * add1?username=a13&password=11111

	 */

	@RequestMapping("/add1")

	public String add1(@ModelAttribute("bb") Book book) {

		System.out.println(book);

		return "/user.jsp";

	}

	/**

	 * 该类中的其他方法处理请求后都会绑定返回List集合,

	 * 在页面中可以通过"as"作为key获取

	 * @return

	 */

	@ModelAttribute("as")

	public List<String> getAllAddress() {

		List<String> as = new ArrayList<>();

		as.add("深圳");

		as.add("广州");

		as.add("海口");

		return as;

	}

}
页面中获取
<body>

	获取全局配置返回的信息:<span style="color:red">${as}</span>

	<form action="add1" method="post">

		<table>

			<tr>

				<td>用户名</td>

				<td><input type="text" name="username"

					value="${bb.username }"></td>

			</tr>

			<tr>

				<td>用户密码</td>

				<td><input type="text" name="password"

					value="${bb.password }"></td>

			</tr>

			<tr>

				<td><input type="submit" value="注册"></td>

			</tr>

		</table>

	</form>

</body>
测试效果:

二、异常处理
项目中的异常需要统一处理,正常情况下,需要提前准备好一个错误页面,当项目出错了,将该页面展示给用户。
步骤:
2.1创建自定义异常类(可选)
/**

 * 自定义异常

 *

 * @author dpb【波波烤鸭】

 *

 */

public class CustomException extends Exception {

	private String message;

	public CustomException(String message) {

		super(message);

		this.message = message;

	}

	@Override

	public String getMessage() {

		return message;

	}

	public void setMessage(String message) {

		this.message = message;

	}

}
2.2定义异常处理器
/**

 * 自定义异常处理器

 * @author dpb【波波烤鸭】

 *

 */

@Component //注意该类需要交给Spring容器管理

public class MyExceptionResolver implements HandlerExceptionResolver {

	@Override

	public ModelAndView resolveException(HttpServletRequest req

			, HttpServletResponse resp, Object obj,

			Exception ex) {

		System.out.println(ex.getMessage());

		ModelAndView mv = new ModelAndView();

		mv.setViewName("/error.jsp");

		return mv;

	}

}
2.3需要异常处理的地方抛出异常

2.4测试


 搞定
搞定
三、JSON数据交互
3.1响应JSON数据
1. 添加依赖:
对于Gson和jackson这两个json处理依赖,直接添加即可。 除此之外,其他的json解析器如fastjson都需要手动配置HttpMessageConverter.
实际上,在SpringMVC中,是由一个名叫HttpMessageConverter的类来提供对象到JSON字符串的转换的。而SpringMVC默认就提供了Gson和Jackson的HttpMessageConverter,分别是org.springframework.http.converter.json.GsonHttpMessageConverter和MappingJackson2HttpMessageConverter。对于其他的JSON解析器,只需要开发者手动配置一下HttpMessageConverter即可。
本案例使用 jackson处理
Jackson的maven坐标:
<dependency>

	<groupId>com.fasterxml.jackson.core</groupId>

	<artifactId>jackson-core</artifactId>

	<version>2.5.2</version>

</dependency>

<dependency>

	<groupId>com.fasterxml.jackson.core</groupId>

	<artifactId>jackson-databind</artifactId>

	<version>2.5.2</version>

</dependency>
2.在返回对象上添加@ResponseBody注解即可
/**

 * JSON

 *

 * @author dpb【波波烤鸭】

 *

 */

@Controller

public class UserController {

	@GetMapping("/user")

	@ResponseBody

	public User getUser() {

		User user = new User();

		List<String> favorites = new ArrayList<>();

		favorites.add("足球");

		favorites.add("篮球");

		user.setFavorites(favorites);

		user.setUsername("zhagnsan");

		user.setPassword("123");

		return user;

	}

	@GetMapping("/users")

	@ResponseBody

	public List<User> getALlUser() {

		List<User> users = new ArrayList<>();

		for (int i = 0; i < 10; i++) {

			User e = new User();

			e.setUsername("zhangsan:" + i);

			e.setPassword("pwd:" + i);

			users.add(e);

		}

		return users;

	}

	@GetMapping("/map")

	@ResponseBody

	public Map<String, Object> user() {

		HashMap<String, Object> map = new HashMap<>();

		map.put("total", 100);

		map.put("rows", "aaa");

		return map;

	}

}
3.测试
JSON对象
 JSON数组嵌套

Map返回JSON数据
 额外说明:
额外说明:
默认情况下,JSON处理的HttpMessageConverter在org.springframework.http.converter.support.AllEncompassingFormHttpMessageConverter类中,如果当前项目的classpath下有jackson或者gson的依赖,则会被该类自动加载,然后,创建相应的HttpMessageConverter。
对于fastjson,由于系统未提供自动支持,因此需要开发者手动配置fastjson的HttpMessageConverter,配置方式如下:
1.引入fastjson依赖
2.加入配置:
<mvc:annotation-driven validator="validatorFactoryBean">

		<mvc:message-converters>

			<bean

				class="com.alibaba.fastjson.support.spring.FastJsonHttpMessageConverter"></bean>

		</mvc:message-converters>

	</mvc:annotation-driven>
HttpMessageConverter承担两个事:
1.将请求结果转为json
2.将浏览器发送来的json转为对象
3.2 接收JSON数据
注意:json只能是在请求体中,因此,json只能放在post或者put请求中,注意,请勿使用get/delete请求去测试json参数传递。
示例代码如下:
/**

 * JSON

 *

 * @author dpb【波波烤鸭】

 *

 */

@Controller

public class UserController {

	@PostMapping("/test2")

	@ResponseBody

	public void test2(@RequestBody User user) {

		System.out.println(user);

	}

}
通过jquery的ajax发送json数据测试
<html>

<head>

<meta http-equiv="Content-Type" content="text/html; charset=UTF-8">

<title>Insert title here</title>

<script type="text/javascript" src="js/jquery.min.js"></script>

</head>

<body>

	<input type="button" value="提交JSON数据" onclick="fun1();">

	<script type="text/javascript">

		function fun1(){

			$.ajax({

	              type: 'POST',

	              url: "test2",

	              contentType: "application/json",//如果想以json格式把数据提交到后台的话,这个必须有,否则只会当做表单提交

	              data: JSON.stringify({"username":"sam","password":"12"}),//JSON.stringify()必须有,否则只会当做表单的格式提交

	              dataType: "json",//期待返回的数据类型

	              success: function(data){

	                  alert("success:"+data);

	              },

	              error:function(data){

	                  alert("error"+data);

	              }

	            });

		}

	</script>

</body>

</html>
 服务端获取到了ajax提交的json数据
 在springmvc中,直接接收json参数,如果参数中有日期的话,不需要定义日期类型转换器,日期的转换由gson/jackson/fastjson来提供。
四、Restful风格
RESTful是一种软件设计规范,是客户端和服务端进行数据交互的一个规范。
早期使用JSP页面开发网页时,数据交互基本都是通过表单提交,然后通过内置对象传递。当HTML5兴起,移动互联网兴起,网站后端服务,不仅要考虑PC端的网页,也要考虑移动端数据的展示、小程序、HTML5页面等。如果需要多个终端(Android、iOS、小程序、Pad、HTML5页面)共用一个后端,一般来说主流方案就是使用JSON进行传递。RESTful则规范了请求的URL,注意RESTful只是一个规范,不是一个技术。
在RESTful中:
1.一个URL操作一个资源
2.请求的URL中不能有动词
3.使用HTTP的请求方式来描述请求行为,例如:
GET(查) http://localhost:8080/book/1 查询id为1的书
POST(增) http://localhost:8080/book/1 添加一本书,书的id为1
DELETE(删) http://localhost:8080/book/1 删除id为1的书
PUT(改) http://localhost:8080/book/1 修改id为1的书
在RESTful接口中,所有的方法都是返回JSON,没有返回页面的(ModelAndView),因此,所有的方法上都需要添加@ResponseBody注解。一个替代的简化方案,是使用 @RestController 代替@Controller。@RestController实际上是一个组合注解,是@Controller和@ResponseBody的组合:
 案例代码
案例代码
/**

 * RestFul

 * @author dpb【波波烤鸭】

 *

 */

@RestControllerpublic

class UserController {

	@Autowired

	UserService userService;

	/** * 查询所有、分页查询、条件查询 * 一般都是直接使用资源的复数形式来做路径 * * @return */

	@GetMapping("/users")

	public List<User> getAllUser(@RequestParam(defaultValue = "1") Integer page,

			@RequestParam(defaultValue = "4") Integer count) {

		return userService.getAllUser(page, count);

	}

	/**

	 * * 按照id查询 例如 http://localhost:8080/user/1 表示查询id为1的用户 * * @param id

	 * * @return

	 */

	@GetMapping("/user/{id}")

	public User getUserById(@PathVariable Integer id) {

		return userService.getUserById(id);

	}

	/** * 使用POST请求来完成添加功能 * * @param user * @return */

	@PostMapping("/user")

	public RespBean addUser(@RequestBody User user) {

		int result = userService.addUser(user);

		if (result == 1) {

			return RespBean.ok("添加成功!");

		}

		return RespBean.error("添加失败!");

	}

	@DeleteMapping("/user/{id}")

	public RespBean deleteUserById(@PathVariable Integer id) {

		int result = userService.deleteUserById(id);

		if (result == 1) {

			return RespBean.ok("删除成功!");

		}

		return RespBean.error("删除失败!");

	}

	@PutMapping("/user")

	public RespBean updateUserById(@RequestBody User user) {

		int result = userService.updateUserById(user);

		if (result == 1) {

			return RespBean.ok("修改成功!");

		}

		return RespBean.error("修改失败!");

	}

}
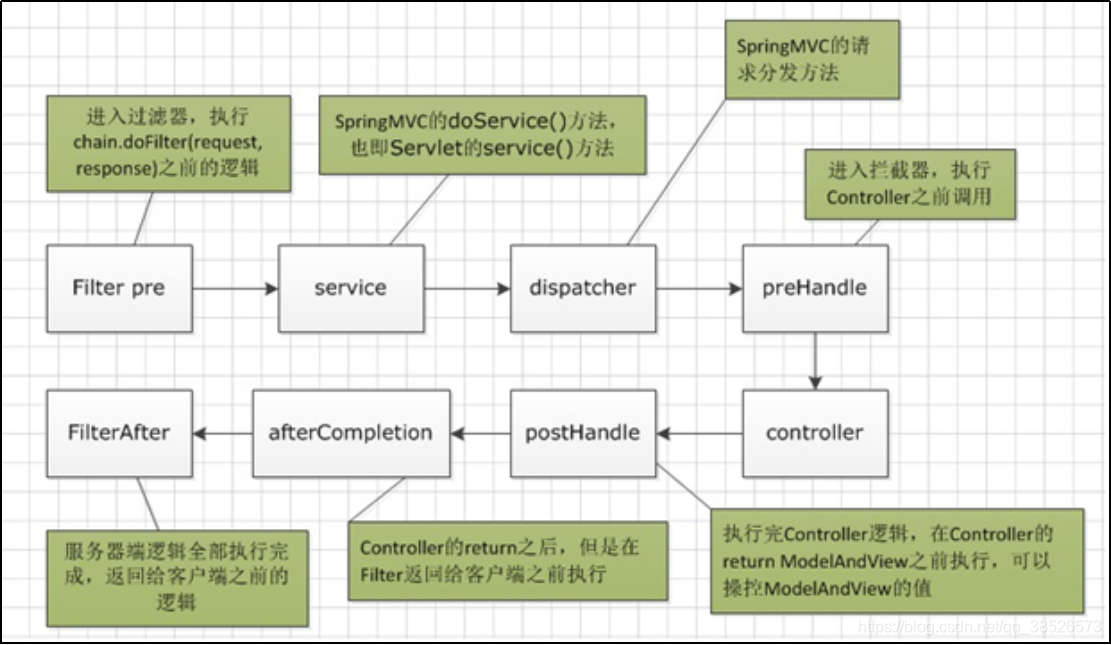
五、拦截器
1.简介
SpringMVC中的拦截器对应了Web基础中的过滤器。
拦截器和过滤器的区别:
1.一般来说,如果使用了SpringMVC框架,然后有拦截器的需求,建议使用拦截器而不是过滤器
2.过滤器依赖于Servlet容器,而拦截器是SpringMVC自带的,不依赖容器
3.拦截器的功能更为强大,因为拦截器是一中AOP风格的过滤器(实际上这个功能过滤器也能实现,只是没有拦截器这么简单明了)
2.使用
2.1定义拦截器
/**
* 自定义拦截器
* @author dpb【波波烤鸭】
*
*/
public class FirstIntercepter implements HandlerInterceptor{
/**
* 进入Handler之前调用的方法
* 处理:
* 用于身份确认和授权
* 比如确认当前请求是否登陆,如果登陆就方法,否则拦截跳回登陆界面
* @return
* true 放过
* false 拦截
*/
@Override
public boolean preHandle(HttpServletRequest request, HttpServletResponse response, Object handler)
throws Exception {
System.out.println("preHandle 执行了...");
return true;
}
/**
* 进入Handler之后,返回ModelAndView对象之前执行
* 可以修改调整的视图
*/
@Override
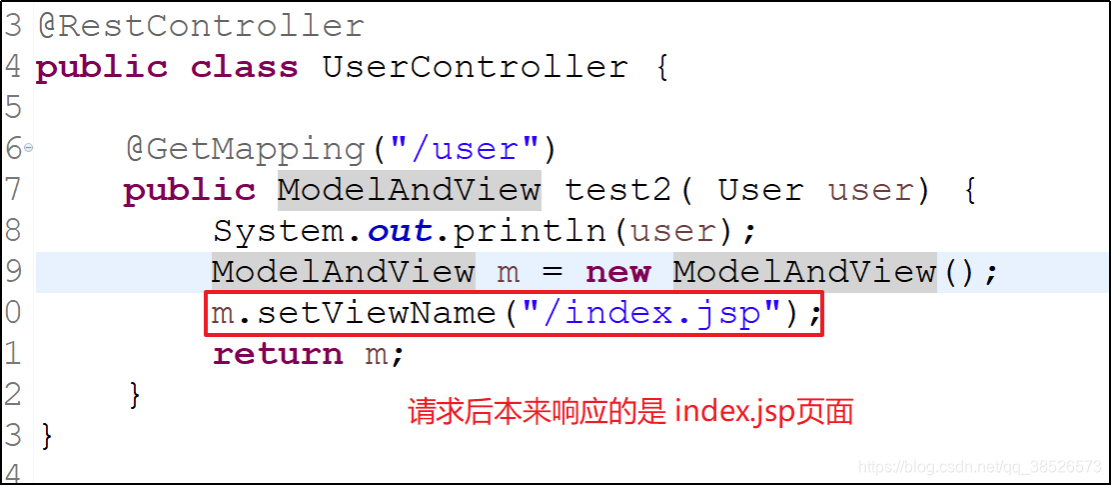
public void postHandle(HttpServletRequest request, HttpServletResponse response, Object handler,
ModelAndView modelAndView) throws Exception {
// TODO Auto-generated method stub
System.out.println("ModelAndView之前执行...");
modelAndView.setViewName("/error.jsp");
modelAndView.addObject("msg", "传递的信息...");
}
/**
* 执行完成Handler之后执行此方法,
* 应用场景:
* 统一异常处理,统一日志处理,资源释放
*/
@Override
public void afterCompletion(HttpServletRequest request, HttpServletResponse response, Object handler, Exception ex)
throws Exception {
System.out.println("执行完Handler到返回客户端之前执行...");
}
}
2.2配置拦截条件
<beans xmlns="http://www.springframework.org/schema/beans"

	xmlns:xsi="http://www.w3.org/2001/XMLSchema-instance" xmlns:context="http://www.springframework.org/schema/context"

	xmlns:mvc="http://www.springframework.org/schema/mvc"

	xsi:schemaLocation="http://www.springframework.org/schema/mvc http://www.springframework.org/schema/mvc/spring-mvc-4.3.xsd

		http://www.springframework.org/schema/beans http://www.springframework.org/schema/beans/spring-beans.xsd

		http://www.springframework.org/schema/context http://www.springframework.org/schema/context/spring-context-4.3.xsd">

	<mvc:annotation-driven></mvc:annotation-driven>

	<context:component-scan base-package="com.dpb.*"></context:component-scan>

	<!-- 拦截器的配置 -->

	<mvc:interceptors>

		<mvc:interceptor>

			<!-- ** 表示当前目录及其子目录路径 -->

			<mvc:mapping path="/**"/>

			<bean class="com.dpb.interceptor.FirstIntercepter"></bean>

		</mvc:interceptor>

	</mvc:interceptors>

</beans>
2.3测试

3.拦截器工作原理
上一篇:SpringMVC教程3
下一篇:整合Spring和SpringMVC
SpringMVC教程4的更多相关文章
- SpringMVC教程3
SpringMVC教程2 一.文件上传 1.引入相关jar包 maven坐标 <!-- fileUpload 解析上传的文件用到的jar --> <dependency> &l ...
- SpringMVC教程1
一.SpringMVC介绍 1.MVC介绍 ==模型-视图-控制器(MVC== 是一个众所周知的以设计界面应用程序为基础的设计模式.它主要通过分离模型.视图及控制器在应用程序中的角色将业务逻辑从界面中 ...
- SpringMVC教程2
接上篇文章-SpringMVC教程1 五.基本操作 1.响应请求的方式 1.1ModeAndView /** * 查询方法 * @return */ @RequestMapping("/qu ...
- Java系列教程-SpringMVC教程
SpringMVC教程 1.SpringMVC概述 1.回顾MVC 1.什么是MVC MVC是模型(Model).视图(View).控制器(Controller)的简写,是一种软件设计规范. 是将业务 ...
- SpringMVC教程--Idea中使用Maven创建SpringMVC项目
1.新建项目 参照idea教程中的创建maven项目https://www.cnblogs.com/daxiang2008/p/9061653.html 2.POM中加入依赖包 (1)指定版本 (2) ...
- myeclipse配置springmvc教程
之前一直是使用Eclipse创建Web项目,用IDEA和MyEclipse的创建SpringMVC项目的时候时不时会遇到一些问题,这里把这个过程记录一下,希望能帮助到那些有需要的朋友.我是用的是MyE ...
- springmvc教程(1)
idea搭建springmvc maven项目 jdk:1.8 maven:Bundled (Maven 3) idea版本: 开始搭建第一个springmvc maven项目 1.点击File-&g ...
- SpringMVC教程--eclipse中使用maven创建springMVC项目
一.在eclipse中创建maven-archetype-webapp项目: 1.新建项目选择maven项目 2.默认,下一步 3.选择maven-archetype-webapp,其他保持默认即可 ...
- SpringMVC 教程 - Controller
原文地址:https://www.codemore.top/cates/Backend/post/2018-04-10/spring-mvc-controller 声明Controller Contr ...
随机推荐
- echo 转义字符的使用
man echo 查看 echo 的使用文档 -n 不尾随换行符 -e 启用解释反斜杠的转义功能 -E 禁用解释反斜杠的转义功能(默认) --help 显示此帮助信息并退出 --version 显示版 ...
- idea连接操作数据库
场景 本文主要以DB2作为演示,其他数据库大同小异: 网上有很多推荐DB2的连接软件工具,但是因为DB2的使用场景不多,这次是在做数据资产管理的数据质量分析时使用到,在做数据交换时要在DB2中建表并同 ...
- mysql的innodb和myisam的区别和应用场景
1. 区别: (1)事务处理: MyISAM是非事务安全型的,而InnoDB是事务安全型的(支持事务处理等高级处理): (2)锁机制不同: MyISAM是表级锁,而InnoDB是行级锁: (3)sel ...
- Linux学习笔记:Tomcat安装与使用
Tomcat是一个Servlet容器服务器,用java实现的. 目录结构 Tomcat的安装也很简单,从官网下载安装包.解压后的tomcat目录 apache-tomcat-7.0.92 下的子目录为 ...
- 10.18 nslookup:域名查询工具
功能说明 nslookup命令是常用的域名解析查询工具. 如果系统没有nslookup命令,则需要安装下面的软件包: yum-y inatall bind-otil9 语法格式 nslookup ...
- shell脚本学习-执行
跟着RUNOOB网站的教程学习的笔记 Shell与Shell脚本 Shell是用户与Linux系统的桥梁.它既是一种命令语言,也是一种程序设计语言. Shell脚本是一种Shell编写的脚本程序,其实 ...
- Maths | 二次型求偏导
- Android-Java-构造方法内存图
描述Dog对象: package android.java.oop07; // 描述Dog对象/实体 public class Dog { private String name; private i ...
- pgsqls修改表字段长度
alter table T_RPACT_PROTO_EDIT_RECORD alter column remark type VARCHAR(1024); 需要注意type关键字
- Java集合框架之一:ArrayList源码分析
版权声明:本文为博主原创文章,转载请注明出处,欢迎交流学习! ArrayList底层维护的是一个动态数组,每个ArrayList实例都有一个容量.该容量是指用来存储列表元素的数组的大小.它总是至少等于 ...