VS2013(Win10X64)-配置编译Caffe
主要看这篇文章,有点小瑕疵,瑕不掩瑜。参考链接:http://www.bubuko.com/infodetail-902302.html
文中红色标记为文章小瑕疵的地方,在此文中标记出来,做为修改对上一文的补充。
参考原文链接:http://blog.csdn.net/joshua_1988/article/details/45048871
2014年4月的时候自己在公司就将Caffe移植到Windows系统了,今年自己换了台电脑,想在家里也随便跑跑,本来也装了Ubuntu可以很方便的配置好,无奈在家的风格是“娱乐的时候抽空学习”,所以移植到Windows还是很有必要的。但是,公司禁止将公司内部资料带出,很多地方又都忘记了,周末磨了一天终于移植完,本篇为记录将Caffe移植至Windows7 x64系统下的一些关键步骤。下面介绍如何从源码建立VS2013工程。
1. 从 https://github.com/BVLC/caffe 下载caffe源码,master或者dev版本都可以,本文中以dev为例
2. 新建一个空的控制台VS2013工程,起名为caffe-dev。
File --> New --> Project
选择Win32 Console Application
选择工程路径,比如D:\CODE\CXX
给项目命名caffe-dev
单击OK后选择Empty project
3. 将工程的Solution Platform改为x64
Build --> Configuration Manager --> Active solution platform --> new --> x64 --> OK
4. 设置CUDA编译
property--> Build dependencies --> Build Customizations... --> CUDA 6.5 --> OK
5. 设置一些工程下的路径,注意Debug和Release下都要设置
在Project --> Properties --> Configuration Properties --> VC++ Directories --> Include Directories中添加openblas、opencv、boost和cuda,例如
C:\Tools\boost_1_57\include;
C:\Tools\OpenBLAS_MinGW\include;
C:\Tools\opencv\build\include;
C:\Tools\opencv\build\include\opencv;
C:\Tools\opencv\build\include\opencv2;
C:\Program Files\NVIDIA GPU Computing Toolkit\CUDA\v7.5\include;
在Project --> Properties --> Configuration Properties --> VC++ Directories --> Library Directories中添加openblas、opencv、boost和cuda,例如
C:\Tools\OpenBLAS_MinGW\lib;
C:\Tools\opencv\build\x64\vc12\lib;
C:\Tools\boost_1_56\lib64-msvc-12.0;
C:\Program Files\NVIDIA GPU Computing Toolkit\CUDA\v6.5\lib\x64;
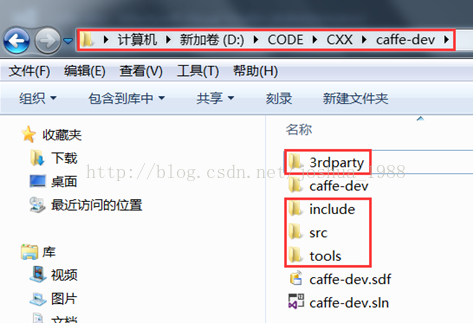
6. 将压缩包内的include、src和tools文件夹拷贝到工程根目录下,同时把整理好的3rdparty文件夹也拷贝到工程目录下
7. 添加caffe的路径和3rdparty中第三方依赖库的路径,同样Debug和Release都要设置
在Project --> Properties --> Configuration Properties --> C/C++ --> General --> Additional Include Directories中添加
../include;../src
../3rdparty/include
../3rdparty/include/hdf5
../3rdparty/include/lmdb
C:\Tools\Caffe-3rd\include;
在Project --> Properties --> Configuration Properties --> Linker --> General --> Additional Library Directories中添加
../3rdparty/libC:\Tools\Caffe-3rd\lib\LevelDB;
C:\Tools\Caffe-3rd\lib\lmdb;
C:\Tools\Caffe-3rd\lib\openblas;
C:\Tools\Caffe-3rd\lib\protobuf;
C:\Tools\Caffe-3rd\lib\snappy;
在Project --> Properties --> Configuration Properties --> Linker --> Input --> Additional Dependencies中添加
opencv_core2410.lib
opencv_highgui2410.lib
opencv_imgproc2410.libopencv_ts300.lib
opencv_world300.lib
cudart.lib
cublas.lib
curand.lib
gflags.lib
libglog.lib
libopenblas.dll.alibopenblas.lib
libprotobuf.lib
libprotoc.lib
leveldb.lib
lmdb.lib
libhdf5.lib
libhdf5_hl.lib
Shlwapi.lib
注意在Debug下应添加
xxxd.lib形式的自己确认一下debug命名 静态库
opencv_core2410d.lib
opencv_highgui2410d.lib
opencv_imgproc2410d.libopencv_ts300d.lib
opencv_world300d.lib
cudart.lib
cublas.lib
curand.lib
gflagsd.lib
libglogd.lib
libopenblas.dll.alibopenblas.lib
libprotobuf-gd.lib
libprotoc.lib
leveldbd.lib
lmdbd.lib
libhdf5.lib
libhdf5_hl.lib
Shlwapi.lib
8. 利用protoc.exe和caffe.proto生成caffe.pb.h和caffe.pb.cc文件
在编译protobuf的时候会生成一个可执行文件protoc.exe,在工程的D:\CODE\CXX\caffe-dev\src\caffe\proto路径下有一个文件叫caffe.proto,可以将protoc.exe拷贝到该路径下,在命令行中进入D:\CODE\CXX\caffe-dev\src\caffe\proto路径,输入命令
编译blob.cpp
直接编译时会报错,缺少文件”caffe\proto\caffe.pb.h”
这个时候需要将proto.exe放到../3rdparty/bin文件夹
将 GernaratePB.bat 放在../scripts文件夹,点击运行,可以生成文件
可以看到在该路径下会生成caffe.pb.h和caffe.pb.cc,在D:\CODE\CXX\caffe\include\caffe中新建一个文件夹proto,
将生成的两个文件移动到D:\CODE\CXX\caffe\include\caffe\proto中<del>cd C:\Tools\caffe-master\src\caffe\proto
protoc --cpp_out="." caffe.proto</del>
9. 准备mkstemp.h和mkstemp.cpp文件。
将mkstemp.h放在include/caffe/util/路径下,mkstemp.h中的内容为
 #include <windows.h>

 #include <io.h>

 int mkstemp(char *templates);
将mkstemp.cpp放在src/caffe/util/路径下,mkstemp.cpp中的内容为
/* mkstemp extracted from libc/sysdeps/posix/tempname.c.  Copyright

       (C) 1991-1999, 2000, 2001, 2006 Free Software Foundation, Inc.

       The GNU C Library is free software; you can redistribute it and/or

       modify it under the terms of the GNU Lesser General Public

       License as published by the Free Software Foundation; either

       version 2.1 of the License, or (at your option) any later version.  */

    #include "caffe/util/mkstemp.hpp"

    #include <errno.h>

    #include <fcntl.h>

    #include <sys/stat.h>

    static const char letters[] =

    "abcdefghijklmnopqrstuvwxyzABCDEFGHIJKLMNOPQRSTUVWXYZ0123456789";

    /* Generate a temporary file name based on TMPL.  TMPL must match the

       rules for mk[s]temp (i.e. end in "XXXXXX").  The name constructed

       does not exist at the time of the call to mkstemp.  TMPL is

       overwritten with the result.  */

    int mkstemp (char *tmpl)

    {

      int len;

      char *XXXXXX;

      static unsigned long long value;

      unsigned long long random_time_bits;

      unsigned int count;

      int fd = -1;

      int save_errno = errno;

      /* A lower bound on the number of temporary files to attempt to

         generate.  The maximum total number of temporary file names that

         can exist for a given template is 62**6.  It should never be

         necessary to try all these combinations.  Instead if a reasonable

         number of names is tried (we define reasonable as 62**3) fail to

         give the system administrator the chance to remove the problems.  */

    #define ATTEMPTS_MIN (62 * 62 * 62)

      /* The number of times to attempt to generate a temporary file.  To

         conform to POSIX, this must be no smaller than TMP_MAX.  */

    #if ATTEMPTS_MIN < TMP_MAX

      unsigned int attempts = TMP_MAX;

    #else

      unsigned int attempts = ATTEMPTS_MIN;

    #endif

      len = strlen (tmpl);

      if (len < 6 || strcmp (&tmpl[len - 6], "XXXXXX"))

        {

          errno = EINVAL;

          return -1;

        }

    /* This is where the Xs start.  */

      XXXXXX = &tmpl[len - 6];

      /* Get some more or less random data.  */

      {

        SYSTEMTIME      stNow;

        FILETIME ftNow;

        // get system time

        GetSystemTime(&stNow);

        stNow.wMilliseconds = 500;

        if (!SystemTimeToFileTime(&stNow, &ftNow))

        {

            errno = -1;

            return -1;

        }

        random_time_bits = (((unsigned long long)ftNow.dwHighDateTime << 32)

                            | (unsigned long long)ftNow.dwLowDateTime);

      }

      value += random_time_bits ^ (unsigned long long)GetCurrentThreadId ();

      for (count = 0; count < attempts; value += 7777, ++count)

        {

          unsigned long long v = value;

          /* Fill in the random bits.  */

          XXXXXX[0] = letters[v % 62];

          v /= 62;

          XXXXXX[1] = letters[v % 62];

          v /= 62;

          XXXXXX[2] = letters[v % 62];

          v /= 62;

          XXXXXX[3] = letters[v % 62];

          v /= 62;

          XXXXXX[4] = letters[v % 62];

          v /= 62;

          XXXXXX[5] = letters[v % 62];

          fd = open (tmpl, O_RDWR | O_CREAT | O_EXCL, _S_IREAD | _S_IWRITE);

          if (fd >= 0)

        {

          errno = save_errno;

          return fd;

        }

          else if (errno != EEXIST)

        return -1;

        }

      /* We got out of the loop because we ran out of combinations to try.  */

      errno = EEXIST;

      return -1;

    }
10. 将caffe的源文件添加到工程中
将D:\CODE\CXX\caffe-dev\src\caffe路径下除了test文件中的所有源文件添加到工程中,如果想要跑一些测试代码,也可以把test中的源文件加进去
将D:\CODE\CXX\caffe-dev\include\caffe\proto下的caffe.pb.cc添加到工程中
将D:\CODE\CXX\caffe-dev\tools下的caffe.cpp添加到工程中
11. 修改一些代码
在include/caffe/common.hpp中添加
#include <direct.h>
在include/caffe/util/io.hpp中添加
#include "mkstemp.hpp",并将close函数替换为_close,将
char* mkdtemp_result = mkdtemp(temp_dirname_cstr);替换为errno_t mkdtemp_result = _mktemp_s(temp_dirname_cstr, sizeof(temp_dirname_cstr));
将bnll_layer.cu中的
const float kBNLL_THRESHOLD = 50.;修改为#define kBNLL_THRESHOLD 50.
将util/db.cpp中的
mkdir(source.c_str(), 0744)修改为_mkdir(source.c_str())将util/io.cpp中的
open函数替换为_open,close函数替换为_close将util/io.cpp中
ReadProtoFromBinaryFile函数中的int fd = open(filename, O_RDONLY);替换为int fd = open(filename, O_RDONLY | O_BINARY);在util/math_functions.cpp中添加
#define __builtin_popcount __popcnt

#define __builtin_popcountl __popcnt
在common.cpp中添加
#include <process.h>将
pid = getpid();替换为pid = _getpid(); (这里本来有个笔误,谢谢dongb5lz的提醒)注释掉
::google::InstallFailureSignalHandler();将solver.cpp中的
snprintf函数替换为sprintf_s
编译吧!!!!
.....................
按照文章http://www.bubuko.com/infodetail-902302.html里面的顺序编译.....,排错逐个排除....
VS2013(Win10X64)-配置编译Caffe的更多相关文章
- VS2013配置编译Caffe-Win10_X64
原文链接:http://blog.csdn.net/joshua_1988/article/details/45036993 有少量修改................ 2014年4月的时候自己在公司 ...
- ubuntu14.04下安装cudnn5.1.3,opencv3.0,编译caffe及配置matlab和python接口过程记录
已有条件: ubuntu14.04+cuda7.5+anaconda2(即python2.7)+matlabR2014a 上述已经装好了,开始搭建caffe环境. 1. 装cudnn5.1.3,参照: ...
- vs2015编译caffe
有些时候,需要在python3的环境下import caffe,需要用vs2015在python3的环境下,编译pycaffe. microsoft的windows版本的caffe,依赖的库Nuget ...
- ubuntu下 编译Caffe的Matlab接口
一般情况下不愿意使用Caffe的Matlab接口,总觉得Linux版的Matlab很难配置,但是现在搞目标检测,得到的源码是使用的Caffe的Matlab接口,只能硬着头皮上了. (1)修改caffe ...
- windows下编译caffe报错:error MSB4062: 未能从程序集 E:\NugetPackages\OpenCV.2.4.10\......的解决办法
参考博客:http://blog.csdn.net/u013277656/article/details/75040459 在windows上编译caffe时,用vs打开后会自动加载还原NugetPa ...
- 在vs2013上的编译tesseract-ocr
在vs2013上的编译tesseract-ocr OCR(Optical Character Recognition):光学字符识别,是指对图片文件中的文字进行分析识别,获取的过程. Tesserac ...
- vs2013下配置opencv1.0.0
vs2013下配置opencv1.0.0 2019-4-25 17:13:13 原因 现在最新opencv已经到4.0.1版了.用opencv1.0原因: 小.源码包只有10M左右. 清晰.他的文档结 ...
- Ubuntu16.04安装编译caffe以及一些问题记录
前期准备: 最好是python虚拟环境 [anaconda的创建虚拟环境] 创建 conda create -n caffeEnv(虚拟环境名字) python=3.6 激活环境 source act ...
- 【Caffe】Ubuntu16.04上配置安装caffe(Only CPU)
一.首先看看自己的系统,Ubuntu16.04,cpu,没有Nvidia,没有opencv 二.安装依赖包 安装protobuf,leveldb,snappy,OpenCV,hdf5, protobu ...
随机推荐
- webpack-dev-server和webpack
指导小伙伴在webstorm+nodejs环境下新建项目时,小伙伴出现了一个很神奇的问题:没有执行webpack-dev-server情况下,即使执行npm init,也不会出现package.jso ...
- 关于PyQt5,在pycharm上的安装步骤及使用技巧
前序 之前学习了一款GUI图形界面设计的Tkinter库,但是经大佬的介绍,PyQT5全宇宙最强,一脸的苦笑 毫不犹豫的选择转战PyQT5,在学习之前需要先安装一些必须程序,在一番查阅后,发现PyQt ...
- 开源GIS软件 2
Android上的导航软件 AndNav AndNav 是一款 Android 手机上的 GPS导航软件(非开源).软件支持GPS定位信息,目的地查询,道路建议管理,导航提示等功能,十分强大的一款软件 ...
- Android ORMLite ForeignCollection关联外部集合
<Android ORMLite ForeignCollection关联外部集合> Android ORMLite ForeignCollection关联外部集合的功能,适合层 ...
- VIM 移动
基础 字符移动 k 上移 k h 左移 h l l 右移 j j 下移 你也可以使用键盘上的方向键来移动,但这么做h j k l的存在就失去了意义 之所以使用h j k l来控制方向,其主要目的是让你 ...
- 我对ThreadLocal的理解
声明:小弟菜狗一个.对ThreadLocal的描写叙述和理解难免有所偏差 近期由于须要深入的了解android的handler消息机制而去查看了Looper的源代码.众所周知在主线程中是不须要在程序猿 ...
- springboot + rabbitmq 整合示例
几个概念说明:Broker:简单来说就是消息队列服务器实体.Exchange:消息交换机,它指定消息按什么规则,路由到哪个队列.Queue:消息队列载体,每个消息都会被投入到一个或多个队列.Bindi ...
- 浅谈EL与JSTL
讲道理,自己在博大精深的Java世界里还只是一个很小很小的菜鸟.处于成长与学习之中,但学习一个漫长的过程.尤其对于那些知识点我觉得总结是尤为重要的.反正在我看来这段时间里虽然过了很多知识但却是一脸懵逼 ...
- 虚拟机中的ip和本机的ip不是一个网段的
将虚拟机的网络适配器 模式改为桥接模式 然后就会和主机处于同一个网段了
- ListView实现简单列表
ListView实现简单列表 效果图: 啥也没干的ListView张这样: fry.Activity01 package fry; import com.example.ListView.R; imp ...