vue-cli3+typescript+router
vue基于类的写法,和基于对象的写法并不一致。
使用vue-cli3创建的项目,src目录下的文件结构并没有多大区别,store、router、app、view、components、aeests该有的还是有的。
但是,多了一个东西:vue-property-decorator,vue-property-decorator是vue-class-component的超集。
import { Component, Emit, Inject, Model, Prop, Provide, Vue, Watch } from 'vue-property-decorator'
最主要的区别就是这里,组件的定义,参数的接受,方法的定义,等等。
但是本文主要讲的是router的监听。
路由监听
用vue2的vue-cli创建项目,在src下有App.vue,main.js,其中如果要做路由权限控制,可以通过在main.js添加以下代码来控制:
import router from './router'

router.beforeEach((to, from, next) => {

    /*如果需要登录,当前没有登录,直接跳转到登录页*/

    if (to.meta.Auth && !store.state.loginStatus) {

        return next({ name: 'Login', query: {path: to.name}})

    }

    next()

})
这个功能,在新版本的vue3中依然可以使用,因为使用了typescript,所以应该是main.ts文件。
但是如果要在组件内部使用路由监听,就遇到问题了,路由钩子beforeRouteEnter,beforeRouteLeave,beforeRouteUpdate不生效。
解决方案:
// main.ts

import Component from 'vue-class-component'

Component.registerHooks([

  'beforeRouteEnter',//进入路由之前

  'beforeRouteLeave',//离开路由之前

  'beforeRouteUpdate'

])
路由规则文件:
//router.ts

import Vue from 'vue';

import Router from 'vue-router';

import Home from './views/Home.vue';

Vue.use(Router);

export default new Router({

  mode: 'history',

  base: process.env.BASE_URL,

  routes: [

    {

      path: '/',

      name: 'home',

      component: Home,

    },

    {

      path: '/about',

      name: 'about',

      // route level code-splitting

      // this generates a separate chunk (about.[hash].js) for this route

      // which is lazy-loaded when the route is visited.

      component: () => import(/* webpackChunkName: "about" */ './views/About.vue'),

    },

  ],

});
路由载入组件:
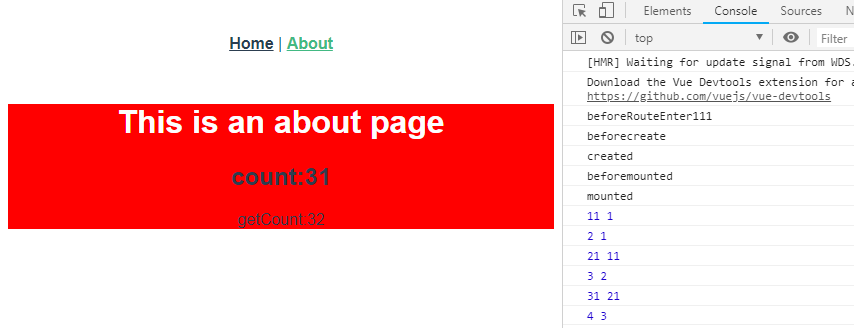
//About.vue

<template>

  <div class="about">

    <h1>This is an about page</h1>

    <h2 @click="click(10)">count:{{count}}</h2>
   <p>getCount:{{getCount}}</p>

  </div>

</template>

<script lang="ts">

  import { Component, Emit, Inject, Model, Prop, Provide, Vue, Watch } from 'vue-property-decorator'

  @Component

  export default class About extends Vue {

    private count: number = ;

    private num: number = ;

    private click(num: number) {

      this.count = num + this.count;

      this.num++

    }

  // 相当于computed属性

     get getCount() {

       return this.count +

     }

    beforeCreate() {

      console.log('beforecreate');

    }

    created() {

      console.log('created')

    }

    beforeMount() {

      console.log('beforemounted');

    }

    mounted() {

      console.log('mounted');

    }

    beforeRouteEnter(to: any, from: any, next: () => void): void {

      console.log('beforeRouteEnter111');

      next();

    }

    beforeRouteUpdate(to: any, from: any, next: () => void): void {

      console.log('beforeRouteUpdate111');

      next();

    }

    beforeRouteLeave(to: any, from: any, next: () => void): void {

      console.log('beforeRouteLeave111');

      next();

    }

    @Watch('count') // 监听count

    private aaa(val: any, oldval: any) {

      console.log(val, oldval);

    }

    @Watch('num') // 监听num

    private bbb(a: number, b: number) {

      console.log(a, b)

    }

  }

</script>

<style lang="less">

  .about {

    background-color: red;

    h1 {

      color: #fdfdfd;

    }

  }

</style>
效果图:
prop传值及component组件
// home.vue

<template>

  <div class="home">

    <img alt="Vue logo" src="../assets/logo.png">

    <HelloWorld :msg='msg' :title='title'/>

  </div>

</template>

<script lang="ts">

  import { Component, Vue } from 'vue-property-decorator';

  import HelloWorld from '@/components/HelloWorld.vue'; // @ is an alias to /src

  @Component({

    components: {

      HelloWorld,

    },

  })

  export default class Home extends Vue {

    private msg: String = "Welcome to Your Vue.js + TypeScript App"

    private title: String = 'I am title'

  }

</script>
// helloworld.vue

<template>

  <div class="hello">

    <h2>title:{{title}}</h2>

    <h1>msg:{{ msg }}</h1>

  </div>

</template>

<script lang="ts">

import { Component, Prop, Vue } from 'vue-property-decorator';

@Component

export default class HelloWorld extends Vue {

  @Prop() private msg !: string;

  @Prop() private title !: string;

}

</script>

<!-- Add "scoped" attribute to limit CSS to this component only -->

<style scoped lang="less">

h3 {

  margin: 40px  ;

}

ul {

  list-style-type: none;

  padding: ;

}

li {

  display: inline-block;

  margin:  10px;

}

a {

  color: #42b983;

}

</style>
效果展示:

vue-cli3+typescript+router的更多相关文章
- Vue Cli3 TypeScript 搭建工程
Vue Cli3出来也一段时间了,我想尝试下Vue结合TypeScript搭建个工程,感受下Vue下用TS...网上有一篇讲的非常详细的教程 vue-cli3.0 搭建项目模版教程(ts+vuex+ ...
- 01-路由跳转 安装less this.$router.replace(path) 解决vue/cli3.0语法报错问题
2==解决vue2.0里面控制台包的一些语法错误. https://www.jianshu.com/p/5e0a1541418b 在build==>webpack.base.conf.j下注释掉 ...
- vue cli3 项目配置
[转]https://juejin.im/post/5c63afd56fb9a049b41cf5f4 基于vue-cli3.0快速构建vue项目 本章详细介绍使用vue-cli3.0来搭建项目. 本章 ...
- VUE CLI3.X 创建项目
Node.js环境搭建 Node.js基于V8引擎,可以让js代码脱离浏览器运行 Vue CLI3.0 需要Node.js 8.9或者更高版本. 用nvm或者nvm-windows在同一台电脑中管理多 ...
- 在 vue cli3 的项目中配置双服务,模拟 ajax 分页请求
最近安装了下vue cli3版本,与 cli 2 相比,文件少了,以前配置方法也不管用了.demo 中的大量的数据,需要做成 ajax 请求的方式来展示数据,因此,需要启动两个服务,一个用作前端请求, ...
- 安装VUE Cli3 框架方法
下面为大家介绍一下怎样安装 VUE Cli3的步骤 官网地址 https://cli.vuejs.org/zh/guide/installation.html 一.首先要检查一下是否安装node环 ...
- vue与TypeScript集成配置最简教程
https://blog.csdn.net/u014633852/article/details/73706459 https://segmentfault.com/a/119000001187808 ...
- vue cli3超详细创建多页面配置
1.首先按照vue cli3 给的入门文档下载个vue cli3 如果之前下载了vue cli2的要先卸载之前的 2.检查安装是否成功 3.ok,现在环境搭建好了,新建项目 vue create he ...
- Vue CLI3 关闭热替换后出现的warning
用vue cli3做项目的时候如果开启了typescript的严格模式,在dev server热替换的时候往往就会打出一大堆warning,严重的影响了编译效率.官方并没有提供关闭warning的ap ...
随机推荐
- structure vs class in swift language
Both class and structure can do: Define properties to store values Define methods to provide functio ...
- eas之kdtable分组
如何指定是否要进行数据分组以及对哪些列进行分组 // 指定KDTable要进行数据分组 table.getGroupManager().setGroup(true); // 指明要对0.1.2三列进行 ...
- Codeforces Round #548 (Div. 2) B. Chocolates
You went to the store, selling
- php第六讲
继承和静态 <!DOCTYPE html PUBLIC "-//W3C//DTD XHTML 1.0 Transitional//EN" "http://www.w ...
- 使用Arcgis进行画面(线)并计算大小(长度)。
在使用Arcgis API for JavaScript进行做地图开发的过程中,在地图进行画线.画面是经常使用的功能.本文主要介绍这一功能. 本文适用Arcgis API版本:Arcgis API f ...
- 爬虫系列(八) 用requests实现天气查询
这篇文章我们将使用 requests 调用天气查询接口,实现一个天气查询的小模块,下面先贴上最终的效果图 1.接口分析 虽然现在网络上有很多免费的天气查询接口,但是有很多网站都是需要注册登陆的,过程比 ...
- web跨域通信问题解决
Web页面的跨域问题产生原因是企图使用JS脚本读写不同域的JS作用域.问题根源来自JavaScript的同源策略:出于安全考虑,Javascript限制来自不同源的web页面JS脚本之间进行交互.否则 ...
- 命令行下配置Windows 2003防火墙
命令:netsh firewall 参数: ? // 显示命令列表 add // 添加防火墙配置 delete // 删除防火墙配置 dump // 显示一个配置脚本 help // 显示命令列表 r ...
- Timus - 1213 - Cockroaches!
先上题目: 1213. Cockroaches! Time limit: 1.0 secondMemory limit: 64 MB It's well-known that the most ten ...
- 【ACM】nyoj_540_奇怪的排序_201308050951
奇怪的排序时间限制:1000 ms | 内存限制:65535 KB 难度:1描述 最近,Dr. Kong 新设计一个机器人Bill.这台机器人很聪明,会做许多事情.惟独对自然数的理解与人类不一样, ...