python Scrapy 从零开始学习笔记(一)
在之前我做了一个系列的关于 python 爬虫的文章,传送门:https://www.cnblogs.com/weijiutao/p/10735455.html,并写了几个爬取相关网站并提取有效信息的案例:https://www.cnblogs.com/weijiutao/p/10614694.html 等,从本章开始本人将继续深入学习 python 爬虫,主要是基于 Scrapy 库展开,特此记录,与君共勉!
Scrapy 官方网址:https://docs.scrapy.org/en/latest/
Scrapy 中文网址:https://scrapy-chs.readthedocs.io/zh_CN/latest/index.html
Scrapy 框架
Scrapy是用纯Python实现一个为了爬取网站数据、提取结构性数据而编写的应用框架,用途非常广泛。
框架的力量,用户只需要定制开发几个模块就可以轻松的实现一个爬虫,用来抓取网页内容以及各种图片,非常之方便。
Scrapy 使用了 Twisted
['twɪstɪd](其主要对手是Tornado)异步网络框架来处理网络通讯,可以加快我们的下载速度,不用自己去实现异步框架,并且包含了各种中间件接口,可以灵活的完成各种需求。
Scrapy架构图(绿线是数据流向):

Scrapy Engine(引擎): 负责Spider、ItemPipeline、Downloader、Scheduler中间的通讯,信号、数据传递等。Scheduler(调度器): 它负责接受引擎发送过来的Request请求,并按照一定的方式进行整理排列,入队,当引擎需要时,交还给引擎。Downloader(下载器):负责下载Scrapy Engine(引擎)发送的所有Requests请求,并将其获取到的Responses交还给Scrapy Engine(引擎),由引擎交给Spider来处理,Spider(爬虫):它负责处理所有Responses,从中分析提取数据,获取Item字段需要的数据,并将需要跟进的URL提交给引擎,再次进入Scheduler(调度器),Item Pipeline(管道):它负责处理Spider中获取到的Item,并进行进行后期处理(详细分析、过滤、存储等)的地方.Downloader Middlewares(下载中间件):你可以当作是一个可以自定义扩展下载功能的组件。Spider Middlewares(Spider中间件):你可以理解为是一个可以自定扩展和操作引擎和Spider中间通信的功能组件(比如进入Spider的Responses;和从Spider出去的Requests)
以上是 Scrapy 的架构图,从流程上看还是很清晰的,我就只简单的说一下,首先从红色方框的 Spider 开始,通过引擎发送给调度器任务,再将请求任务交给下载器并处理完后返回结果给 Spider,最后将结果交给关到来处理我们的结果就可以了。
上面的话可能还是会有些拗口,在接下来我们会一点点进行剖析,最后会发现利用 Scrapy 框架来做爬虫是如此简单。
Scrapy的安装
windows 安装 pip install scrapy
Mac 安装 sudo pip install scrapy
pip 升级 pip install --upgrade pip
本人目前使用的是Mac电脑,目前使用的是 python3 版本,内容上其实都大同小异,如遇系统或版本问题可及时联系,互相学习!
安装完成后我们在终端输出 Scrapy 即可安装是否成功:

新建项目
在 Scrapy 安装成功之后,我们就需要用它来开发我们的爬虫项目了,进入自定义的项目目录中,运行下列命令:
scrapy startproject spiderDemo
运行上面的命令行就会在我们项目目录下生成一下目录结构:
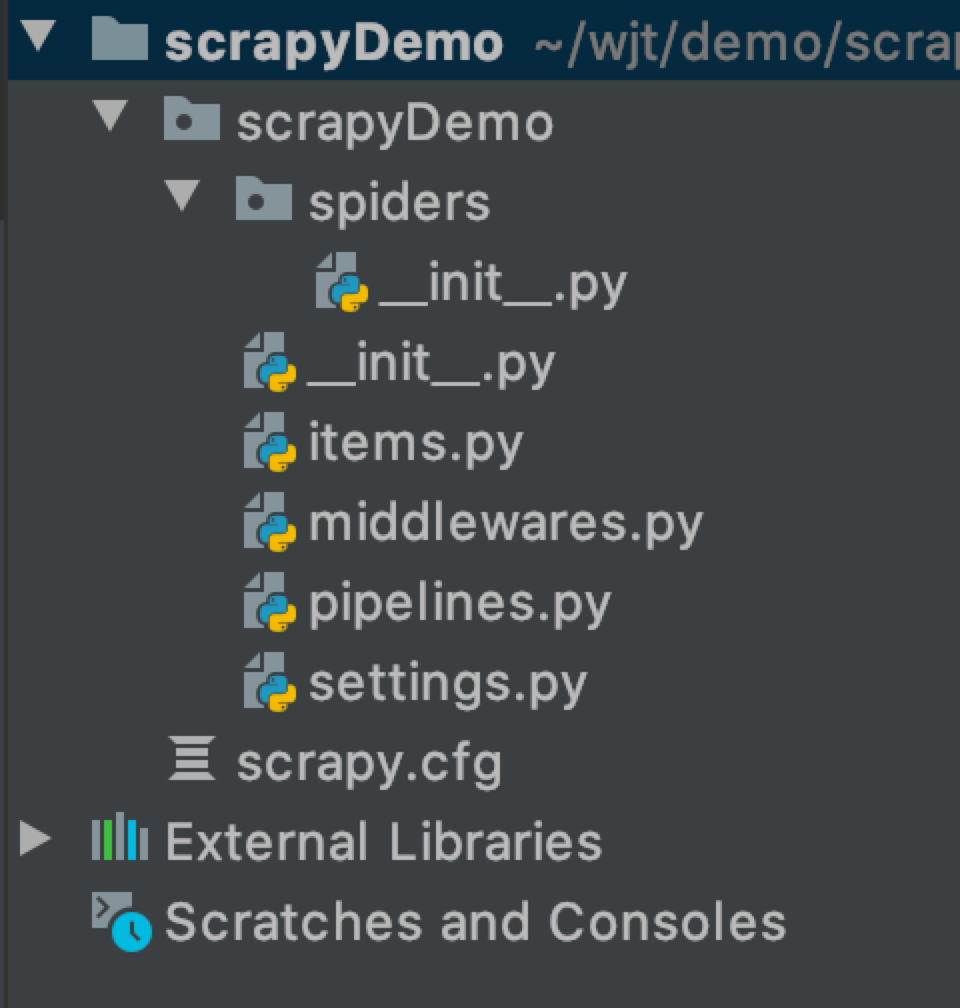
下面来简单介绍一下各个主要文件的作用:
scrapy.cfg :项目的配置文件
scrapyDemo/ :项目的Python模块,将会从这里引用代码
scrapyDemo/items.py :项目的目标文件
scrapyDemo/middlewares.py :项目的中间件文件
scrapyDemo/pipelines.py :项目的管道文件
scrapyDemo/settings.py :项目的设置文件
scrapyDemo/spiders/ :存储爬虫代码目录
接下来我们对各文件里的内容简单说一下,里面的代码目前都是最简单的基本代码,在接下来做案例的时候我们会再有针对地对文件做一下解释。
其中的 __init_.py 文件内容都是空的,但是却不能删除掉,否则项目将无法启动。
spiderDemo/items.py
 # -*- coding: utf-8 -*-

 # Define here the models for your scraped items

 #

 # See documentation in:

 # https://docs.scrapy.org/en/latest/topics/items.html

 import scrapy

 class ScrapydemoItem(scrapy.Item):

     # define the fields for your item here like:

     # name = scrapy.Field()

     pass
该文件是用来定义我们通过爬虫所获取到的有用的信息,即 scrapy.Item
scrapyDemo/middlewares.py
 # -*- coding: utf-8 -*-

 # Define here the models for your spider middleware

 #

 # See documentation in:

 # https://docs.scrapy.org/en/latest/topics/spider-middleware.html

 from scrapy import signals

 class ScrapydemoSpiderMiddleware(object):

     # Not all methods need to be defined. If a method is not defined,

     # scrapy acts as if the spider middleware does not modify the

     # passed objects.

     @classmethod

     def from_crawler(cls, crawler):

         # This method is used by Scrapy to create your spiders.

         s = cls()

         crawler.signals.connect(s.spider_opened, signal=signals.spider_opened)

         return s

     def process_spider_input(self, response, spider):

         # Called for each response that goes through the spider

         # middleware and into the spider.

         # Should return None or raise an exception.

         return None

     def process_spider_output(self, response, result, spider):

         # Called with the results returned from the Spider, after

         # it has processed the response.

         # Must return an iterable of Request, dict or Item objects.

         for i in result:

             yield i

     def process_spider_exception(self, response, exception, spider):

         # Called when a spider or process_spider_input() method

         # (from other spider middleware) raises an exception.

         # Should return either None or an iterable of Request, dict

         # or Item objects.

         pass

     def process_start_requests(self, start_requests, spider):

         # Called with the start requests of the spider, and works

         # similarly to the process_spider_output() method, except

         # that it doesn’t have a response associated.

         # Must return only requests (not items).

         for r in start_requests:

             yield r

     def spider_opened(self, spider):

         spider.logger.info('Spider opened: %s' % spider.name)

 class ScrapydemoDownloaderMiddleware(object):

     # Not all methods need to be defined. If a method is not defined,

     # scrapy acts as if the downloader middleware does not modify the

     # passed objects.

     @classmethod

     def from_crawler(cls, crawler):

         # This method is used by Scrapy to create your spiders.

         s = cls()

         crawler.signals.connect(s.spider_opened, signal=signals.spider_opened)

         return s

     def process_request(self, request, spider):

         # Called for each request that goes through the downloader

         # middleware.

         # Must either:

         # - return None: continue processing this request

         # - or return a Response object

         # - or return a Request object

         # - or raise IgnoreRequest: process_exception() methods of

         #   installed downloader middleware will be called

         return None

     def process_response(self, request, response, spider):

         # Called with the response returned from the downloader.

         # Must either;

         # - return a Response object

         # - return a Request object

         # - or raise IgnoreRequest

         return response

     def process_exception(self, request, exception, spider):

         # Called when a download handler or a process_request()

         # (from other downloader middleware) raises an exception.

         # Must either:

         # - return None: continue processing this exception

         # - return a Response object: stops process_exception() chain

         # - return a Request object: stops process_exception() chain

         pass

     def spider_opened(self, spider):

         spider.logger.info('Spider opened: %s' % spider.name)
该文件为中间件文件,名字后面的s表示复数,说明这个文件里面可以放很多个中间件,我们用到的中间件可以在此定义
spiderDemo/pipelines.py
 # -*- coding: utf-8 -*-

 # Define your item pipelines here

 #

 # Don't forget to add your pipeline to the ITEM_PIPELINES setting

 # See: https://docs.scrapy.org/en/latest/topics/item-pipeline.html

 class ScrapydemoPipeline(object):

     def process_item(self, item, spider):

         return item
该文件俗称管道文件,是用来获取到我们的Item数据,并对数据做针对性的处理。
scrapyDemo/settings.py
 # -*- coding: utf-8 -*-

 # Scrapy settings for scrapyDemo project

 #

 # For simplicity, this file contains only settings considered important or

 # commonly used. You can find more settings consulting the documentation:

 #

 #     https://docs.scrapy.org/en/latest/topics/settings.html

 #     https://docs.scrapy.org/en/latest/topics/downloader-middleware.html

 #     https://docs.scrapy.org/en/latest/topics/spider-middleware.html

 BOT_NAME = 'scrapyDemo'

 SPIDER_MODULES = ['scrapyDemo.spiders']

 NEWSPIDER_MODULE = 'scrapyDemo.spiders'

 # Crawl responsibly by identifying yourself (and your website) on the user-agent

 #USER_AGENT = 'scrapyDemo (+http://www.yourdomain.com)'

 # Obey robots.txt rules

 ROBOTSTXT_OBEY = True

 # Configure maximum concurrent requests performed by Scrapy (default: 16)

 #CONCURRENT_REQUESTS = 32

 # Configure a delay for requests for the same website (default: 0)

 # See https://docs.scrapy.org/en/latest/topics/settings.html#download-delay

 # See also autothrottle settings and docs

 #DOWNLOAD_DELAY = 3

 # The download delay setting will honor only one of:

 #CONCURRENT_REQUESTS_PER_DOMAIN = 16

 #CONCURRENT_REQUESTS_PER_IP = 16

 # Disable cookies (enabled by default)

 #COOKIES_ENABLED = False

 # Disable Telnet Console (enabled by default)

 #TELNETCONSOLE_ENABLED = False

 # Override the default request headers:

 #DEFAULT_REQUEST_HEADERS = {

 #   'Accept': 'text/html,application/xhtml+xml,application/xml;q=0.9,*/*;q=0.8',

 #   'Accept-Language': 'en',

 #}

 # Enable or disable spider middlewares

 # See https://docs.scrapy.org/en/latest/topics/spider-middleware.html

 #SPIDER_MIDDLEWARES = {

 #    'scrapyDemo.middlewares.ScrapydemoSpiderMiddleware': 543,

 #}

 # Enable or disable downloader middlewares

 # See https://docs.scrapy.org/en/latest/topics/downloader-middleware.html

 #DOWNLOADER_MIDDLEWARES = {

 #    'scrapyDemo.middlewares.ScrapydemoDownloaderMiddleware': 543,

 #}

 # Enable or disable extensions

 # See https://docs.scrapy.org/en/latest/topics/extensions.html

 #EXTENSIONS = {

 #    'scrapy.extensions.telnet.TelnetConsole': None,

 #}

 # Configure item pipelines

 # See https://docs.scrapy.org/en/latest/topics/item-pipeline.html

 #ITEM_PIPELINES = {

 #    'scrapyDemo.pipelines.ScrapydemoPipeline': 300,

 #}

 # Enable and configure the AutoThrottle extension (disabled by default)

 # See https://docs.scrapy.org/en/latest/topics/autothrottle.html

 #AUTOTHROTTLE_ENABLED = True

 # The initial download delay

 #AUTOTHROTTLE_START_DELAY = 5

 # The maximum download delay to be set in case of high latencies

 #AUTOTHROTTLE_MAX_DELAY = 60

 # The average number of requests Scrapy should be sending in parallel to

 # each remote server

 #AUTOTHROTTLE_TARGET_CONCURRENCY = 1.0

 # Enable showing throttling stats for every response received:

 #AUTOTHROTTLE_DEBUG = False

 # Enable and configure HTTP caching (disabled by default)

 # See https://docs.scrapy.org/en/latest/topics/downloader-middleware.html#httpcache-middleware-settings

 #HTTPCACHE_ENABLED = True

 #HTTPCACHE_EXPIRATION_SECS = 0

 #HTTPCACHE_DIR = 'httpcache'

 #HTTPCACHE_IGNORE_HTTP_CODES = []

 #HTTPCACHE_STORAGE = 'scrapy.extensions.httpcache.FilesystemCacheStorage'
该文件为我们的设置文件,一些基本的设置需要我们在此文件中进行配置,如我们的中间件文件当中的两个类 ScrapydemoSpiderMiddleware,ScrapydemoDownloaderMiddleware 在 settings.py 中就能找到。
在 settings 文件中,我们常会配置到如上面的字段 如:ITEM_PIPELINES(管道文件),DEFAULT_REQUEST_HEADERS(请求报头),DOWNLOAD_DELAY(下载延迟)
,ROBOTSTXT_OBEY(是否遵循爬虫协议)等。
本章我们就先简单的介绍一下 scrapy 的基本目录,下一章我们来根据 scrapy 框架实现一个爬虫案例。
python Scrapy 从零开始学习笔记(一)的更多相关文章
- python Scrapy 从零开始学习笔记(二)
在之前的文章中我们简单了解了一下Scrapy 框架和安装及目录的介绍,本章我们将根据 scrapy 框架实现博客园首页博客的爬取及数据处理. 我们先在自定义的目录中通过命令行来构建一个 scrapy ...
- Python scrapy爬虫学习笔记01
1.scrapy 新建项目 scrapy startproject 项目名称 2.spiders编写(以爬取163北京新闻为例) 此例中用到了scrapy的Itemloader机制,itemloade ...
- Requests:Python HTTP Module学习笔记(一)(转)
Requests:Python HTTP Module学习笔记(一) 在学习用python写爬虫的时候用到了Requests这个Http网络库,这个库简单好用并且功能强大,完全可以代替python的标 ...
- python网络爬虫学习笔记
python网络爬虫学习笔记 By 钟桓 9月 4 2014 更新日期:9月 4 2014 文章文件夹 1. 介绍: 2. 从简单语句中開始: 3. 传送数据给server 4. HTTP头-描写叙述 ...
- Python Built-in Function 学习笔记
Python Built-in Function 学习笔记 1. 匿名函数 1.1 什么是匿名函数 python允许使用lambda来创建一个匿名函数,匿名是因为他不需要以标准的方式来声明,比如def ...
- 2019-03-22 Python Scrapy 入门教程 笔记
Python Scrapy 入门教程 入门教程笔记: # 创建mySpider scrapy startproject mySpider # 创建itcast.py cd C:\Users\theDa ...
- Python快速入门学习笔记(二)
注:本学习笔记参考了廖雪峰老师的Python学习教程,教程地址为:http://www.liaoxuefeng.com/wiki/001374738125095c955c1e6d8bb49318210 ...
- python数据分析入门学习笔记
学习利用python进行数据分析的笔记&下星期二内部交流会要讲的内容,一并分享给大家.博主粗心大意,有什么不对的地方欢迎指正~还有许多尚待完善的地方,待我一边学习一边完善~ 前言:各种和数据分 ...
- python网络爬虫学习笔记(二)BeautifulSoup库
Beautiful Soup库也称为beautiful4库.bs4库,它可用于解析HTML/XML,并将所有文件.字符串转换为'utf-8'编码.HTML/XML文档是与“标签树一一对应的.具体地说, ...
随机推荐
- leetcode 6 z字型变换
执行用时 :64 ms, 在所有 Python3 提交中击败了99.74%的用户由题目可知 我们的最终字符串会被摆成 numRows 行,那我们理解为 最终结果是numRows个字符串相加 先建立等于 ...
- PHP输入流
PHP输入流php://input,对于这个的官方解释是: php://input可以读取没有处理过的POST数据.相较于$HTTP_RAW_POST_DATA而言,它给内存带来的压力较小,并且不需要 ...
- 入门大数据---Spark_RDD
一.RDD简介 RDD 全称为 Resilient Distributed Datasets,是 Spark 最基本的数据抽象,它是只读的.分区记录的集合,支持并行操作,可以由外部数据集或其他 RDD ...
- openstack迁移计算节点所有云主机
迁移计算节点所有云主机 -------高德置地 王锦雄 使用host-evacuate-live热迁移主机 查看主机目前的云主机情况 nova hypervisor-servers cloud1 ...
- Python实用笔记 (17)模块
一个abc.py的文件就是一个名字叫abc的模块,一个xyz.py的文件就是一个名字叫xyz的模块. 现在,假设我们的abc和xyz这两个模块名字与其他模块冲突了,于是我们可以通过包来组织模块,避免冲 ...
- Spring Redis开启事务支持错误用法导致服务不可用
1.事故背景 在APP访问服务器接口时需要从redis中获取token进行校验,服务器上线后发现一开始可以正常访问,但只要短时间内请求量增长服务则无法响应 2.排查流程 (1)使用top指令查看C ...
- 【贪心】Emergency Evacuation
题目 大致题意 把指定的人从同一出口送出车外,且同一位置不能同时有两个人,求所需的最短时间. 分析 第一感觉就是利用贪心思想解决问题,但是这道题的数据范围用模拟的话肯定是会爆掉的,所以这是不可取的.我 ...
- RabbitMQ(dotnet基本使用
前言 RabbitMQ环境环境搭建及基本配置,在此不讨论.网上一大堆. NET环境下,Rabbit库可以在官网或NUGET上查找得到. 生产者 static void Main(string[] ar ...
- 日期类&&包装类&&System类&&Math类&&Arrays数组类&&大数据类
day 07 日期类 Date 构造函数 Date():返还当前日期. Date(long date):返还指定日期 date:时间戳--->距离1970年1月1日 零时的毫秒数 常用方法 日期 ...
- pycharm远程连接vagrant虚拟机中mariadb数据库
1.虚拟机数据库设置--重启数据库 (1)vi /etc/my.cnf bind = 0.0.0.0 (2).远程不能用root用户连,得新建用户 select host,user from mysq ...