
[Android]使用RecyclerView替代ListView(三)
以下内容为原创,转载请注明:
来自天天博客:http://www.cnblogs.com/tiantianbyconan/p/4268097.html
这次来使用RecyclerView实现PinnedListView的效果,效果很常见:
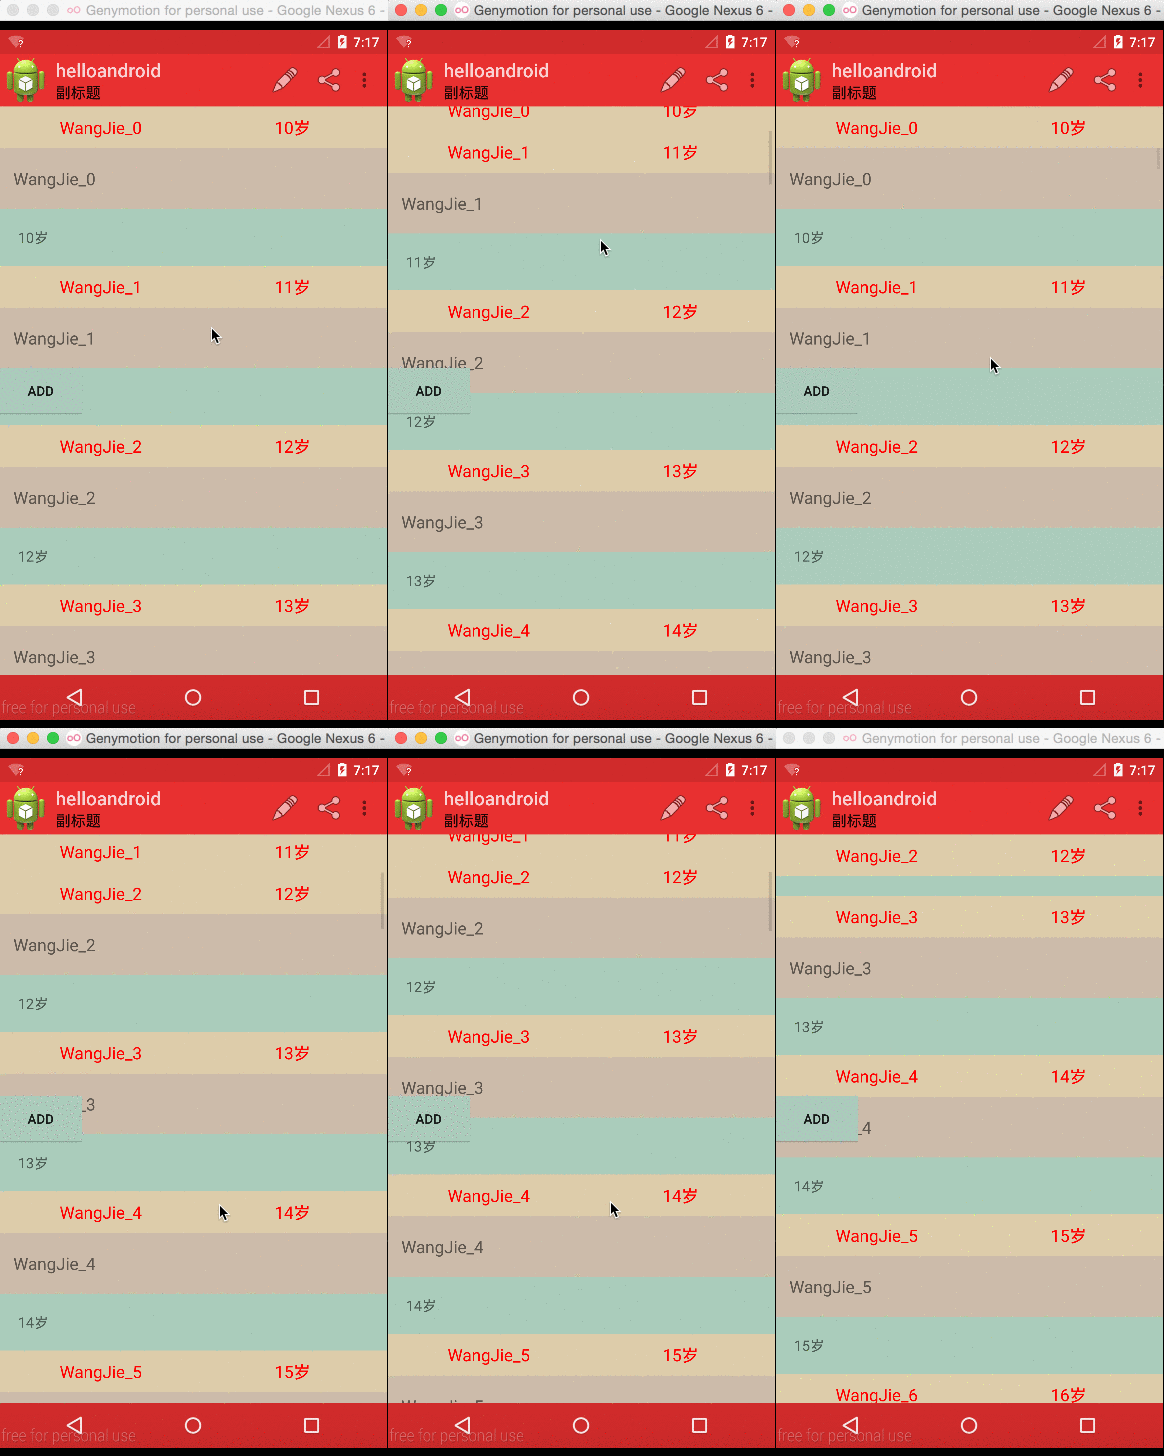
开发的代码建立在上一篇([Android]使用RecyclerView替代ListView(二):http://www.cnblogs.com/tiantianbyconan/p/4242541.html)基础之上。
修改布局如下:
 <?xml version="1.0" encoding="utf-8"?>

 <LinearLayout xmlns:android="http://schemas.android.com/apk/res/android"

               android:orientation="vertical"

               android:layout_width="match_parent"

               android:layout_height="match_parent">

     <android.support.v7.widget.Toolbar

             android:id="@+id/recycler_view_pinned_toolbar"

             android:layout_height="wrap_content"

             android:layout_width="match_parent"

             android:background="?attr/colorPrimary"

             />

     <android.support.v4.widget.SwipeRefreshLayout

             android:id="@+id/recycler_view_pinned_srl"

             android:layout_width="match_parent"

             android:layout_height="wrap_content"

             >

         <com.wangjie.androidbucket.support.recyclerview.pinnedlayout.PinnedRecyclerViewLayout

                 android:id="@+id/recycler_view_pinned_layout"

                 android:layout_width="match_parent" android:layout_height="match_parent">

             <android.support.v7.widget.RecyclerView

                     android:id="@+id/recycler_view_pinned_rv"

                     android:scrollbars="vertical"

                     android:layout_width="match_parent"

                     android:layout_height="match_parent"

                     android:background="#bbccaa"

                     />

             <Button

                     android:id="@+id/recycler_view_pinned_add_btn"

                     android:layout_width="wrap_content" android:layout_height="wrap_content"

                     android:layout_centerVertical="true"

                     android:background="#abcabc"

                     android:text="add"

                     />

         </com.wangjie.androidbucket.support.recyclerview.pinnedlayout.PinnedRecyclerViewLayout>

     </android.support.v4.widget.SwipeRefreshLayout>

 </LinearLayout>
可以看到RecyclerView是被一个PinnedRecyclerViewLayout(https://github.com/wangjiegulu/AndroidBucket/blob/master/src/com/wangjie/androidbucket/support/recyclerview/pinnedlayout/PinnedRecyclerViewLayout.java)包含在里面的。这个在项目AndroidBucket(https://github.com/wangjiegulu/AndroidBucket)中。先看看代码中怎么使用吧,具体实现待会说。
 pinnedLayout.initRecyclerPinned(recyclerView, layoutManager, LayoutInflater.from(context).inflate(R.layout.recycler_view_item_float, null));

 pinnedLayout.setOnRecyclerViewPinnedViewListener(this);
如上,使用方式很简单:
Line1:初始化绑定PinnedRecyclerViewLayout和RecyclerView,并设置需要被顶上去的pinnedView
Line2:设置OnRecyclerViewPinnedViewListener,作用是在顶部被顶上去替换掉的时候,会回调重新渲染数据,传入的OnRecyclerViewPinnedViewListener是this,显然,此Activity实现了这个接口,实现代码如下:
 // 渲染pinnedView数据

     @Override

     public void onPinnedViewRender(PinnedRecyclerViewLayout pinnedRecyclerViewLayout, View pinnedView, int position) {

         switch (pinnedRecyclerViewLayout.getId()) {

             case R.id.recycler_view_pinned_layout:

                 TextView nameTv = (TextView) pinnedView.findViewById(R.id.recycler_view_item_float_name_tv);

                 nameTv.setText(personList.get(position).getName());

                 TextView ageTv = (TextView) pinnedView.findViewById(R.id.recycler_view_item_float_age_tv);

                 ageTv.setText(personList.get(position).getAge() + "岁");

                 break;

         }

     }
然后,我们来看看PinnedRecyclerViewLayout是怎么实现的。
 /**

  * Author: wangjie

  * Email: tiantian.china.2@gmail.com

  * Date: 2/2/15.

  */

 public class PinnedRecyclerViewLayout extends RelativeLayout {

     private static final String TAG = PinnedRecyclerViewLayout.class.getSimpleName();

     public static interface OnRecyclerViewPinnedViewListener {

         void onPinnedViewRender(PinnedRecyclerViewLayout pinnedRecyclerViewLayout, View pinnedView, int position);

     }

     private OnRecyclerViewPinnedViewListener onRecyclerViewPinnedViewListener;

     public void setOnRecyclerViewPinnedViewListener(OnRecyclerViewPinnedViewListener onRecyclerViewPinnedViewListener) {

         this.onRecyclerViewPinnedViewListener = onRecyclerViewPinnedViewListener;

     }

     public PinnedRecyclerViewLayout(Context context) {

         super(context);

         init(context);

     }

     public PinnedRecyclerViewLayout(Context context, AttributeSet attrs) {

         super(context, attrs);

         init(context);

     }

     public PinnedRecyclerViewLayout(Context context, AttributeSet attrs, int defStyleAttr) {

         super(context, attrs, defStyleAttr);

         init(context);

     }

     private void init(Context context) {

     }

     private View pinnedView;

     private ABaseLinearLayoutManager layoutManager;

     public void initRecyclerPinned(RecyclerView recyclerView, ABaseLinearLayoutManager layoutManager, View pinnedView) {

         this.pinnedView = pinnedView;

         this.layoutManager = layoutManager;

         this.addView(this.pinnedView);

         RelativeLayout.LayoutParams lp = new RelativeLayout.LayoutParams(ViewGroup.LayoutParams.MATCH_PARENT, ViewGroup.LayoutParams.WRAP_CONTENT);

         this.pinnedView.setLayoutParams(lp);

         layoutManager.getRecyclerViewScrollManager().addScrollListener(recyclerView, new OnRecyclerViewScrollListener() {

             @Override

             public void onScrollStateChanged(RecyclerView recyclerView, int newState) {

             }

             @Override

             public void onScrolled(RecyclerView recyclerView, int dx, int dy) {

                 refreshPinnedView();

             }

         });

         pinnedView.setVisibility(GONE);

     }

     // 保存上次的position

     private int lastPosition = RecyclerView.NO_POSITION;

     public void refreshPinnedView() {

         if (null == pinnedView || null == layoutManager) {

             Logger.e(TAG, "Please init pinnedView and layoutManager with initRecyclerPinned method first!");

             return;

         }

         if (VISIBLE != pinnedView.getVisibility()) {

             pinnedView.setVisibility(VISIBLE);

         }

         int curPosition = layoutManager.findFirstVisibleItemPosition();

         if (RecyclerView.NO_POSITION == curPosition) {

             return;

         }

         View curItemView = layoutManager.findViewByPosition(curPosition);

         if (null == curItemView) {

             return;

         }

         // 如果当前的curPosition和上次的lastPosition不一样,则说明需要重新刷新数据,避免curPosition一样的情况下重复刷新相同数据

         if (curPosition != lastPosition) {

             if (null != onRecyclerViewPinnedViewListener) {

                 onRecyclerViewPinnedViewListener.onPinnedViewRender(this, pinnedView, curPosition);

             }

             lastPosition = curPosition;

         }

         int displayTop;

         int itemHeight = curItemView.getHeight();

         int curTop = curItemView.getTop();

         int floatHeight = pinnedView.getHeight();

         if (curTop < floatHeight - itemHeight) {

             displayTop = itemHeight + curTop - floatHeight;

         } else {

             displayTop = 0;

         }

         RelativeLayout.LayoutParams lp = (LayoutParams) pinnedView.getLayoutParams();

         lp.topMargin = displayTop;

         pinnedView.setLayoutParams(lp);

         pinnedView.invalidate();

     }

 }
这个PinnedRecyclerViewLayout 是继承RelativeLayout的,因为我们需要在里面添加一个被顶上去的pinnedView,需要覆盖在RecyclerView上面。
Line44:把传进来的pinnedView增加到PinnedRecyclerViewLayout 里面
Line47~56:在ABaseLinearLayoutManager中增加一个滚动的监听器,因为我们需要在滚动的时候动态的改变pinnedView的位置,这样才能模拟顶上去的效果。并滚动时调用refreshPinnedView来刷新pinnedView的位置。
Line57:因为在调用initRecyclerPinned方法时,RecyclerView可能还没有数据源,所以不需要显示这个pinnedView,等到真正滚动的时候再显示就可以了。
refreshPinnedView()方法的作用是在滚动的同时用来刷新pinnedView的位置和显示的数据:
Line71~78:通过layoutManager获取当前第一个显示的数据position,然后根据position获取当前第一个显示的View。
Line79~85:如果当前的curPosition和上次的lastPosition不一样,则说明需要重新刷新数据,避免curPosition一样的情况下重复刷新相同数据。
Line87~95:根据当前第一个显示的View,根据它的top、它的高度和pinnedView的高度计算出pinnedView需要往上移动的距离(画个几何图一目了然了)。
Line96~99:刷新pinnedView的位置
示例代码:
https://github.com/wangjiegulu/RecyclerViewSample
[Android]使用RecyclerView替代ListView(一):
http://www.cnblogs.com/tiantianbyconan/p/4232560.html
[Android]使用RecyclerView替代ListView(二):
http://www.cnblogs.com/tiantianbyconan/p/4242541.html
[Android]使用RecyclerView替代ListView(三)的更多相关文章
- [Android]使用RecyclerView替代ListView(二)
以下内容为原创,转载请注明: 来自天天博客:http://www.cnblogs.com/tiantianbyconan/p/4242541.html 以前写过一篇“[Android]使用Adapte ...
- [Android]使用RecyclerView替代ListView(一)
以下内容为原创,欢迎转载,转载请注明 来自天天博客:http://www.cnblogs.com/tiantianbyconan/p/4232560.html RecyclerView是一个比List ...
- [Android]使用RecyclerView替代ListView(四:SeizeRecyclerView)
以下内容为原创,欢迎转载,转载请注明 来自天天博客:<> [Android]使用RecyclerView替代ListView(四:SeizeRecyclerView) 在RecyclerV ...
- Android笔记——RecyclerView替代ListView
ListView是常用列表控件,但设置Adapter时自定义代码较为复杂,因此Android3.0后,增加RecyclerView替代ListView RecyclerView没有提供OnItemCl ...
- Android之RecyclerView简单使用(三)
使用过ListView滴小伙伴都知道.ListView有这样一个属性android:divider,用来设置每一个item之间切割线滴属性.问题来了,那么RecyclerView这个控件有没有这个属性 ...
- Android最新组件RecyclerView,替代ListView
转载请注明出处:http://blog.csdn.net/allen315410/article/details/40379159 万众瞩目的android最新5.0版本号不久前已经正式公布了,对于我 ...
- 浅谈RecyclerView(完美替代ListView,GridView)
Android RecyclerView 是Android5.0推出来的,导入support-v7包即可使用. 个人体验来说,RecyclerView绝对是一款功能强大的控件. 首先总结下Recycl ...
- Android控件RecyclerView与ListView的异同
在我的一篇介绍Android新控件RecyclerView的博客(Android L新控件RecyclerView简介)中,一个读者留言说RecyclerView跟ListView之间好像没有什么不同 ...
- Android RecyclerView与ListView比较
RecyclerView 概述 RecyclerView 集成自 ViewGroup .RecyclerView是Android-support-V7版本中新增的一个Widgets,官方对于它的介绍是 ...
随机推荐
- web前端学习笔记(CSS盒子的浮动)
在标准流中,一个块级元素在水平方向会自动伸展,直到包含它的元素的边界:而在竖直方向和兄弟元素依次排列,不能并排.使用“浮动”方式后,块级元素的表现就会有所不同. CSS中有一个float属性 ...
- [java] jsoup使用简介-汇率换算器实现-插曲2
[java] jsoup使用简介-汇率换算器实现-插曲2 // */ // ]]> [java] jsoup使用简介-汇率换算器实现-插曲2 Table of Contents 1 系列文章 ...
- 【转】图文详解YUV420数据格式
YUV格式有两大类:planar和packed. 对于planar的YUV格式,先连续存储所有像素点的Y,紧接着存储所有像素点的U,随后是所有像素点的V.对于packed的YUV格式,每个像素点的Y, ...
- 微信开发之.Net
撸主是一个新手,最近几天在研究微信服务号交互,上网搜了搜C#的代码,再结合自己的习惯,下面把代码解析一下,其中有些代码非本人原创. 首先,你要有个公众服务号,只有服务号才可以自定义菜单,没有条件的可以 ...
- 【Swift学习】Swift编程之旅---方法(十五)
在Swift中结构体和枚举也能够定义方法,而在 Objective-C 中,类是唯一能定义方法的类型. 实例方法 实例方法是属于某个特定类.结构体或者枚举类型实例的方法,实例方法提供访问和修改实例属性 ...
- 学习ASP.NET Web API框架揭秘之“HTTP方法重写”
最近在看老A的<ASP.NET Web API 框架揭秘>,这本书对于本人现阶段来说还是比较合适的(对于调用已经较为熟悉,用其开发过项目,但未深入理解过很多内容为何可以这样“调用”).看到 ...
- angularjs中的页面访问权限设置
11月在赶一个项目,这阵子比较忙,挤挤时间更一篇博客吧,如标题所述说说在ng中页面访问权限控制的问题,水平有限各位看官见谅: 在以往的项目中,前后端常见的配合方式是前端提供页面和ui加一点DuangD ...
- 用原生JS读写CSS样式的方法总结
为了日后方便查询,本人翻阅了一些资料总结了以下方法,仅限原生JS,如有不对的地方欢迎指出!只求大家看完觉得有学到点什么就OK了! 一.可以通过DOM节点对象的style对象(即CSSStyleDe ...
- rtf格式的一些说明,转载的
RTF是Rich TextFormat的缩写,意即多文本格式.这是一种类似DOC格式(Word文档)的文件,有很好的兼容性,使用Windows"附件"中的"写字板&quo ...
- LINQ的All的方法
方法All返回布尔值bool,判断集合中是否所有元素都满足某一条件,通俗一点说,就是每一个元素,均符合同一个条件,它才返回真,不然返回假. 举列,创建一个model: source code: nam ...