linearlayout-weight 属性作用
今天用到了weight的属性,现在就把这个属性的具体意义记录一下。也是参考网上的讲解,只不过自己验证了一下而已
参考自 http://blog.csdn.net/jincf2011/article/details/6598256
我们首先看一下网上对它的总结
在layout_width設置為fill_parent的時候,layout_weight所代表的是你的控件要優先盡可能的大,但這個大是有限度的,即fill_parent.
在layout_width設置為wrap_content的時候,layout_weight所代表的是你的控件要優先盡可能的小,但這個小是有限度的,即wrap_content.
layout_height 同 layout_width.
下面我们看一下验证结果
1.xml布局如下
<RelativeLayout xmlns:android="http://schemas.android.com/apk/res/android"

    android:layout_width="match_parent"

    android:layout_height="match_parent"

    android:paddingBottom="@dimen/activity_vertical_margin"

    android:paddingLeft="@dimen/activity_horizontal_margin"

    android:paddingRight="@dimen/activity_horizontal_margin"

    android:paddingTop="@dimen/activity_vertical_margin" >

    <LinearLayout

        android:layout_width="match_parent"

        android:layout_height="match_parent"

        android:orientation="vertical" >

        <ScrollView

            android:layout_width="match_parent"

            android:layout_height="0dp"

            android:layout_weight="1" >

            <LinearLayout

                android:id="@+id/ll"

                android:layout_width="match_parent"

                android:layout_height="wrap_content"

                android:background="#ff0000"

                android:orientation="vertical" >

                <TextView

                    android:id="@+id/tv"

                    android:layout_width="wrap_content"

                    android:layout_height="wrap_content" />

                <Button

                    android:id="@+id/bt0"

                    android:layout_width="wrap_content"

                    android:layout_height="wrap_content"

                    android:clickable="false"

                    android:longClickable="false"

                    android:text="long fasle" />

                <Button

                    android:layout_width="wrap_content"

                    android:layout_height="wrap_content"

                    android:clickable="false"

                    android:longClickable="false"

                    android:text="long fasle" />

                <Button

                    android:layout_width="wrap_content"

                    android:layout_height="wrap_content"

                    android:clickable="false"

                    android:longClickable="false"

                    android:text="long fasle" />

                <Button

                    android:layout_width="wrap_content"

                    android:layout_height="wrap_content"

                    android:clickable="false"

                    android:longClickable="false"

                    android:text="long fasle" />

                <Button

                    android:layout_width="wrap_content"

                    android:layout_height="wrap_content"

                    android:clickable="false"

                    android:longClickable="false"

                    android:text="long fasle" />

                <Button

                    android:layout_width="wrap_content"

                    android:layout_height="wrap_content"

                    android:clickable="false"

                    android:longClickable="false"

                    android:text="long fasle" />

                <Button

                    android:layout_width="wrap_content"

                    android:layout_height="wrap_content"

                    android:clickable="false"

                    android:longClickable="false"

                    android:text="long fasle" />

                <Button

                    android:layout_width="wrap_content"

                    android:layout_height="wrap_content"

                    android:clickable="false"

                    android:longClickable="false"

                    android:text="long fasle" />

                <Button

                    android:layout_width="wrap_content"

                    android:layout_height="wrap_content"

                    android:clickable="false"

                    android:longClickable="false"

                    android:text="long fasle" />

                <Button

                    android:id="@+id/bt1"

                    android:layout_width="wrap_content"

                    android:layout_height="wrap_content"

                    android:layout_marginLeft="10dp"

                    android:clickable="false"

                    android:text="click fase" />

                <Button

                    android:layout_width="wrap_content"

                    android:layout_height="wrap_content"

                    android:clickable="false"

                    android:longClickable="false"

                    android:text="long fasle" />

                <Button

                    android:layout_width="wrap_content"

                    android:layout_height="wrap_content"

                    android:clickable="false"

                    android:longClickable="false"

                    android:text="long fasle" />

                <Button

                    android:id="@+id/bt2"

                    android:layout_width="wrap_content"

                    android:layout_height="wrap_content"

                    android:layout_marginLeft="10dp"

                    android:text="long click true" />

            </LinearLayout>

        </ScrollView>

        <LinearLayout

            android:layout_width="match_parent"

            android:layout_height="0dp"

            android:layout_weight="1"

            android:background="#0000ff" >

            <Button

                android:layout_width="wrap_content"

                android:layout_height="wrap_content"

                android:layout_marginLeft="10dp"

                android:text="long click true" />

        </LinearLayout>

    </LinearLayout>

</RelativeLayout>
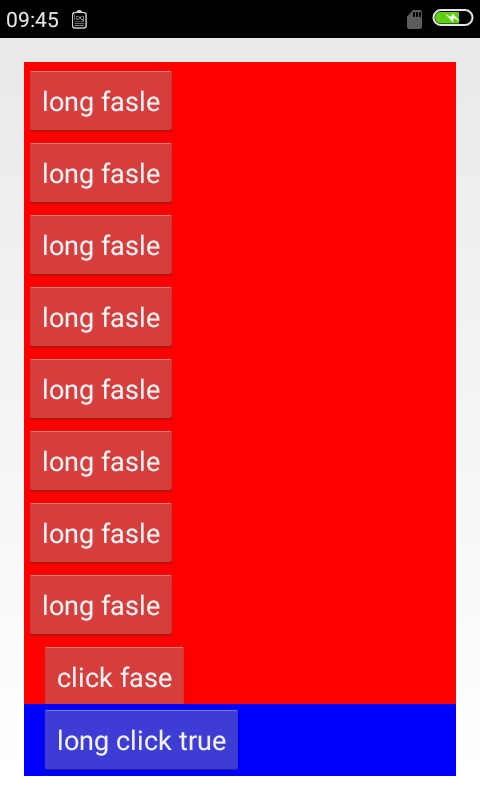
其实就是写了两个linearlayout,第一个控件非常多(不妨称之为l1),会超出屏幕,第二个就含有一个button(l2)
1.当我们没有使用weight的时候
<LinearLayout

            android:layout_width="match_parent"

            android:layout_height="wrap_content"

            android:id="@+id/l1"

            android:background="#ff0000" >

<LinearLayout

            android:layout_width="match_parent"

            android:layout_height="wrap_content"

            android:id="@+id/l2"

            android:background="#0000ff" >
结果

很容易猜到,l1会充满整个屏幕,并把l2挤出去
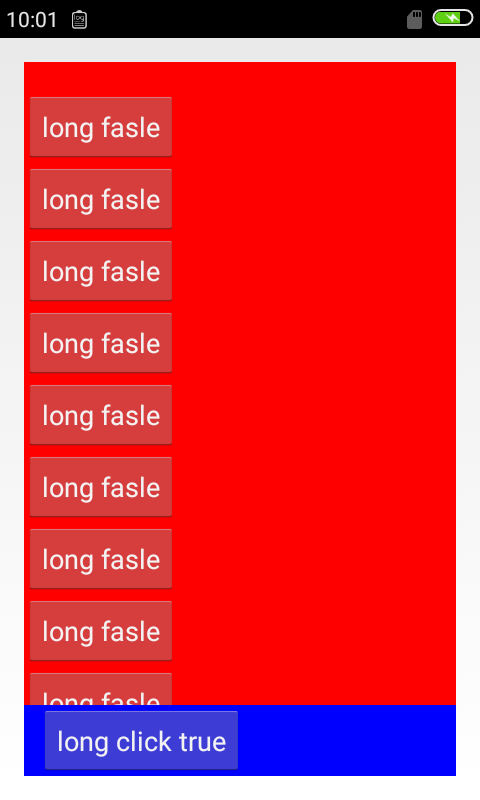
2.当我们对了l1使用weight的时候
<LinearLayout

            android:layout_width="match_parent"

            android:layout_height="0dp"

            android:layout_weight="1"

            android:id="@+id/l1"

            android:background="#ff0000" >

<LinearLayout

            android:layout_width="match_parent"

            android:layout_height="wrap_content"

            android:id="@+id/l2"

            android:background="#0000ff" >
结果
我们发现,这时候,l1会尽可能占据控空间,但是会给l2留出空间显示
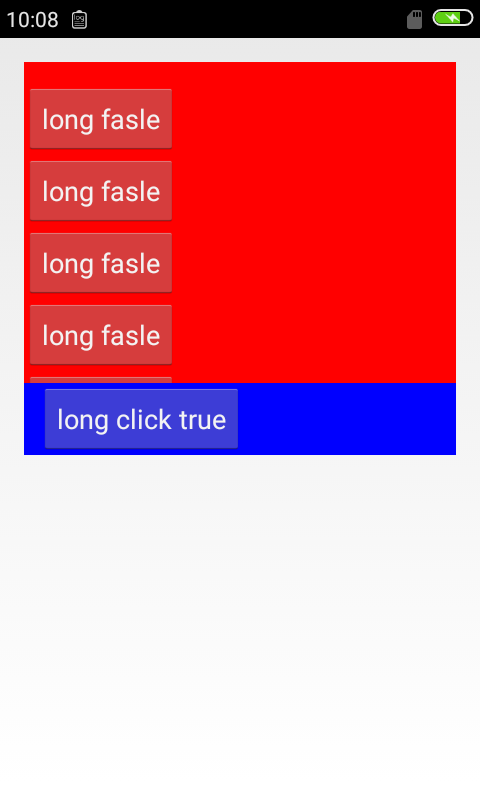
3.当我们给两个linearlayout都添加weight属性的时候
<LinearLayout

            android:layout_width="match_parent"

            android:layout_height="wrap_content"

            android:layout_weight="1"

            android:id="@+id/l1"

            android:background="#ff0000" >

<LinearLayout

            android:layout_width="match_parent"

            android:layout_height="wrap_content"

            android:layout_weight="1"

            android:id="@+id/l2"

            android:background="#0000ff" >
结果

这时候,权重虽然都是1.感觉还是有优先级的,仍然是先让l1满足自身的最小wrap,假如这时候我们把两个height都设置为0dp,看 下结果

因为这时候没有所谓满足最小wrap(变为0了),所以权重又开始起到均分空间的作用了
4.我们继续更改下
<LinearLayout

            android:layout_width="match_parent"

            android:layout_height="wrap_content"

            android:layout_weight="5"

            android:id="@+id/l1"

            android:background="#ff0000" >

<LinearLayout

            android:layout_width="match_parent"

            android:layout_height="wrap_content"

            android:layout_weight="1"

            android:id="@+id/l2"

            android:background="#0000ff" >
结果
到此,我们基本上就验证了开始结论的正确性。至于match_parent的情况,这里不再说明了。
最后我们看下android:weightSum 属性
<LinearLayout

        android:layout_width="match_parent"

        android:layout_height="match_parent"

        android:weightSum="2"

        android:orientation="vertical" >

        <ScrollView

            android:id="@+id/l1"

            android:layout_width="match_parent"

            android:layout_height="0dp"

            android:layout_weight="1"

             >
结果
我们看到l1占据了父容器的一半。其实这条属性的意义已经体现出来了,就是把一个linearlayout的权重比例固定,可以理解为分成了2份,而它的子控件(l1)通过weight获得了1份
linearlayout-weight 属性作用的更多相关文章
- weight属性你用的真的6嘛?
相信大家在日常开发中一定使用过weight这个属性,它的作用一个是权重,另一个就是渲染优先级,但是你真的能很6的使用它嘛?如果不是,那么请继续往下看!!! 我们知道,当weight起到不同作用的时候, ...
- android LinearLayout android:layout_weight 作用,固定比例
android 中的 LinearLayout 是线性布局有水平布局horizontal 垂直布局vertical .本文针对 水平布局horizontal 布局的weight属性做一个标记,以免 ...
- Android开发技巧一--weight属性实现视图的居中(半)显示
面试时,一位面试官问到:“如果我想讲按钮居中显示,并且占据其父视图宽度的一半,应该怎么做到呢?”即实现这种效果: 我们使用weightSum属性和layout_weight属性实现这一要求: < ...
- Android Hack1 使用weight属性实现视图的居中显示
本文地址:http://www.cnblogs.com/wuyudong/p/5898403.html,转载请注明源地址. 如果要实现如下图所示的将按钮居中显示,并且占据父视图的一半,无论屏幕是否旋转 ...
- Android weight属性详解
android:layout_weight是一个经常会用到的属性,它只在LinearLayout中生效,下面我们就来看一下: 当我们把组件宽度设置都为”match_parent”时: <Butt ...
- android gravity属性 和 weight属性
来看这个布局文件 <?xml version="1.0" encoding="utf-8"?> <LinearLayout xmlns:and ...
- 关于weight属性使用的一些细节
之前被这个属性困扰过好久,今天一个偶然的机会,终于把这个搞清楚了,现在与大家分享一下. 假设我们要在一个LinearLayout布局中显示两个按钮,button1和button2,button2的宽度 ...
- Android——android weight 属性(百度)
LinearLayout 在androidUI布局中使用非常多,它其中有个很方便又很有意思的属性 weight ,这个属性理解起来不是那么简单的,而真正理解了又觉得非常简单! 下面就通过一个例子来说明 ...
- 【转】android gravity属性 和 weight属性
有点忘记这两个属性了,复习一下. 来看这个布局文件 <?xml version="1.0" encoding="utf-8"?> <Linea ...
随机推荐
- Case study: word play
For the exercises in this chapter we need a list of English words. There are lots of word lists avai ...
- php文件加载、错误处理、方法函数和数组
数组运算符注意:php中,数组的元素的顺序,不是由下标(键名)决定的,而是完全由加入的顺序来决定.联合(+):将右边的数组项合并到左边数组的后面,得到一个新数组.如有重复键,则结果以左边的为准$v1 ...
- vue滚动行为
有人问道如何记录vue页面的滚动条位置,再次载入组件的时候页面滚动到记录的位置? 思路: 记录滚动条位置我们好记 我们要在组件销毁之前也就是页面跳转的时候 需要用到生命周期beforeDistory将 ...
- [TJOI2017]城市(树的直径)
[TJOI2017]城市 题目描述 从加里敦大学城市规划专业毕业的小明来到了一个地区城市规划局工作.这个地区一共有ri座城市,<-1条高速公路,保证了任意两运城市之间都可以通过高速公路相互可达, ...
- 05-数据类型转换(bool转换)
05-数据类型转换(bool转换)
- Qt之图形(绘制文本)
简述 前面我们讲解了Qt图形的基本绘制,其中包括: 绘制文本.直线.直线.矩形.弧线.椭圆.多边形.图片,以及其它一些高级用法,比如:渐变.转换等. 本节我们来详细讲解文字的绘制.主要通过QPaint ...
- 【JavaScript】JavaScript中的replaceAll
JavaScript中是没有replaceAll的.仅仅有replace,replace仅仅能替换字符中的第一个字符.并且这个replace里面不支持正則表達式,以达到replaceAll的目的. 只 ...
- CKEditor高级编辑器
是否感觉后台分类描写叙述信息.商品描写叙述信息以及文章描写叙述信息 编写时很的不方便?有时候会将word的格式也复制过来了?那这个插件就比較适合了. 本插件使用CKEditor最新版本号,复制过来的内 ...
- linux设备驱动归纳总结(三):4.ioctl的实现
linux设备驱动归纳总结(三):4.ioctl的实现 一.ioctl的简单介绍: 尽管在文件操作结构体"struct file_operations"中有非常多相应的设备操作函数 ...
- Android LruCache 压缩图片 有效避免程序OOM
转载请注明出处:http://blog.csdn.net/guolin_blog/article/details/9316683 本篇文章主要内容来自于Android Doc,我翻译之后又做了些加工, ...