
canvas 实现光线沿不规则路径运动
canvas 实现光线沿不规则路径运动
此文章为原创,请勿转载
1.svg实现
2.canvas实现
3.坑点
svg让动画沿着不规则路径运动
查阅svg文档后发现,svg动画运动有两种实现方式,且都非常简单,但对于100%实现设计师给出的效果有很大的距离
使用offset-path偏移路径和offset-roate偏移角度让元素沿着不规则路径走
	<!DOCTYPE html>

	<html>

	<head>

		<title>offset-path/offset-roate</title>

	</head>

	<style type="text/css">

		* {

			padding: 0;

			margin: 0;

			box-sizing: border-box;

		}

		body {

			background: #000;

		}

		.line {

			width: 80px;

			height: 3px;

	        position: absolute;

	        background: red;

			offset-path: path("M10 80 L 77.5 60 L 145 80 L 280 100 L 500 80 L 600 120 L 800 80 L 950 120 L 950 200 L 930 250 L 950 300 L 950 500");

	        animation: move 10s linear infinite;

		}

		@keyframes move {

			100% {

				offset-distance: 2000px;

			}

		}

		.line1 {

			position: absolute;

			left: 100px;

			width: 20px;

			height: 20px;

			border-radius: 50%;

			background: red;

			offset-path: path("M0,0a72.5,72.5 0 1,0 145,0a72.5,72.5 0 1,0 -145,0");

	   		offset-rotate: 0deg;

	   		animation: load 1.8s cubic-bezier(0.86, 0, 0.07, 1) infinite;

	   		animation-delay: 0.147s;

	    	animation-fill-mode: forwards;

		}

		@keyframes load {

			from {

		        offset-distance: 0;

		    }

		    to {

		        offset-distance: 100%;

		    }

		}

	</style>

	<body>

		<h2>路径偏移</h2>

		<div class="line"></div>

		<svg width="100%" height="600px" version="1.0" id="svg1">

			<path d="M10 80 L 77.5 60 L 145 80 L 280 100 L 500 80 L 600 120 L 800 80 L 950 120 L 950 200 L 930 250 L 950 300 L 950 500" fill="#tranparent" stroke="#FFF"></path>

		</svg>

		<h2>角度偏移</h2>

		<div class="line1">

		</div>

	</body>

	</html>
此种方式的限制是滚动元素无法随路径进行没有规律的变化
使用stroke-dasharray和stroke-dashoffset让路径边线动起来
stroke-dasharray:设置shap和text 边框虚线的实线长度与实线之间的间隔(虚线长度)
stroke-dashoffser:设置边框线条相对于默认位置的偏移(正值:向左,负值:向右)
	<!DOCTYPE html>

	<html>

	<head>

		<title>stroke-dasharray/stroke-dashoffser</title>

	</head>

	<style type="text/css">

		* {

			padding: 0;

			margin: 0;

			box-sizing: border-box;

		}

		body {

			background: #000;

			color: #fff;

		}

		.move {

			animation: moving 5s infinite;

		}

		@keyframes moving {

			0% {

				stroke-dashoffset: 80px;

			}

			100% {

				stroke-dashoffset: -1600px;

			}

		}

	</style>

	<body>

	<h2>设置stroke-dasharray</h2>

	<b>storke-dasharray设置为80 ,此时实线和实线间隔一样</b>

	<svg width="100%" height="600px" version="1.0" id="svg1">

		<path d="M10 80 L 77.5 60 L 145 80 L 280 100 L 500 80 L 600 120 L 800 80 L 950 120 L 950 200 L 930 250 L 950 300 L 950 500" fill="#tranparent" stroke="#FFF" stroke-dasharray="80"></path>

	</svg>

	<b>storke-dasharray设置为80 320,此时实线和是实线间隔的1/4</b>

	<svg width="100%" height="600px" version="1.0" id="svg1">

		<path d="M10 80 L 77.5 60 L 145 80 L 280 100 L 500 80 L 600 120 L 800 80 L 950 120 L 950 200 L 930 250 L 950 300 L 950 500" fill="#tranparent" stroke="#FFF" stroke-dasharray="80 320"></path>

	</svg>

	<h2>设置stroke-dashoffset让边线相对于初始位置发生偏移</h2>

	<svg width="100%" height="600px" version="1.0" id="svg1">

		<path d="M10 80 L 77.5 60 L 145 80 L 280 100 L 500 80 L 600 120 L 800 80 L 950 120 L 950 200 L 930 250 L 950 300 L 950 500" fill="#tranparent" stroke="#FFF" stroke-dasharray="80 320" stroke-dashoffset="40"></path>

	</svg>

	<h2>通过设置stroke-dasharray 和 stroke-dashoffset让边线动起来</h2>

	<svg width="100%" height="600px" version="1.0" id="svg1">

		<path d="M10 80 L 77.5 60 L 145 80 L 280 100 L 500 80 L 600 120 L 800 80 L 950 120 L 950 200 L 930 250 L 950 300 L 950 500" fill="#tranparent" stroke="#FFF"></path>

		<path d="M10 80 L 77.5 60 L 145 80 L 280 100 L 500 80 L 600 120 L 800 80 L 950 120 L 950 200 L 930 250 L 950 300 L 950 500" fill="#tranparent" stroke="red" stroke-dasharray="80 1600" stroke-dashoffset="0" class="move"></path>

	</svg>

	</body>

	</html>
此种方式通过边框偏移的效果可以设置跟随路径的滚线条,但是无法设置线条的光线效果,即实线的阴影和实线的渐变效果(渐变区域需随着偏移路径的变化而变化)
canvas实现线条延不规则路径运动
线条实现
对于不规则路径,如果直接用画线条的方式实现光线,需要计算每一个开始点和结束点的位置,中间还可能存在转折点,计算起来非常麻烦,不可取
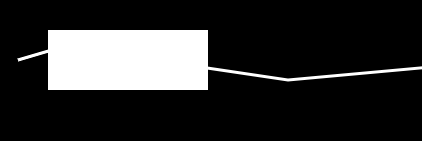
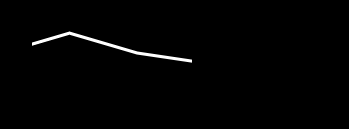
故这边采取canvas组合图形的模式,取线条和一个图形重叠部分(类似于灯罩)来实现光线效果
组合前
组合后
	<!DOCTYPE html>

	<html>

	<head>

		<title>canvas实现不规则路径光效</title>

	</head>

	<style type="text/css">

		body {

			background: #000;

		}

		#wrap {

			position: absolute;

			width: 1200px;

			height: 600px

		}

	</style>

	<body>

		<div id="wrap">

			<canvas id="canvas" width="1200" height="600"></canvas>

		</div>

	</body>

	<script type="text/javascript">

		var path = 'M 10 80 L 77.5 60 L 145 80 L 280 100 L 500 80 L 600 120 L 800 80 L 950 120 L 950 200 L 930 250 L 950 300 L 950 500';

		var list = path.match(/([A-Z]([^A-Z]){1,})/g).map(item => {

			return {

				x: item.split(' ')[1],

				y: item.split(' ')[2],

				action: item.split(' ')[0],

			}

		});//获取每个点位置

		var canvas = document.getElementById('canvas');

		var ctx = canvas.getContext('2d');

		ctx.strokeStyle = 'rgba(255,255,255,1)';

		function drawPath() {

			ctx.lineWidth = 3;

			ctx.beginPath();

			list.forEach(item => {

				if(item.action == 'M') ctx.moveTo(item.x, item.y);

				if(item.action == 'L') ctx.lineTo(item.x, item.y);

			});

			ctx.stroke();

		}

		drawPath();

		function drawLine() {

			//设置图形组合方式 默认source-over

			ctx.globalCompositeOperation = "destination-in";

			ctx.lineWidth = 60;

			ctx.beginPath();

			ctx.moveTo(40, 80);

			ctx.lineTo(200, 80);

			ctx.stroke();

		}

		drawLine();

	</script>

	</html>
让线条动起来
当我们实现好线条剩下就需要让线条动起来,由于线条是通过灯罩的方式来实现的,让线条运动只需要让灯罩动起来就好

	<!DOCTYPE html>

	<html>

	<head>

		<title>canvas实现不规则路径光效</title>

	</head>

	<style type="text/css">

		body {

			background: #000;

		}

		#wrap {

			position: absolute;

			width: 1200px;

			height: 600px

		}

	</style>

	<body>

		<div id="wrap">

			<canvas id="canvas" width="1200" height="600"></canvas>

		</div>

	</body>

	<script type="text/javascript">

		var path = 'M 10 80 L 77.5 60 L 145 80 L 280 100 L 500 80 L 600 120 L 800 80 L 950 120 L 950 200 L 930 250 L 950 300 L 950 500';

		var list = path.match(/([A-Z]([^A-Z]){1,})/g).map(item => {

			return {

				x: item.split(' ')[1],

				y: item.split(' ')[2],

				action: item.split(' ')[0],

			}

		});//获取每个点位置

		var step = 3;

		var x1, x2, y1, y2;//确定路径中最大最小点

		var timer;

		var canvas = document.getElementById('canvas');

		var ctx = canvas.getContext('2d');

		ctx.strokeStyle = 'rgba(255,255,255,1)';

		ctx.shadowColor = 'rgba(255,255,255,1)';

		ctx.lineCap = 'round';

		ctx.shadowBlur = 3;

		list.forEach(item => {

			x1 = !x1 || Number(item.x) < x1 ? Number(item.x) : x1;

			y1 = !y1 || Number(item.y) < y1 ? Number(item.y) : y1;

			x2 = !x2 || Number(item.x) > x2 ? Number(item.x) : x2;

			y2 = !y2 || Number(item.y) > y2 ? Number(item.y) : y2;

		});

		function drawPath() {

			ctx.lineWidth = 3;

			ctx.beginPath();

			list.forEach(item => {

				if(item.action == 'M') ctx.moveTo(item.x, item.y);

				if(item.action == 'L') ctx.lineTo(item.x, item.y);

			});

			//添加光效渐变

			var grd = ctx.createLinearGradient(arrLine[arrLine.length - 1].x, arrLine[arrLine.length - 1].y, arrLine[0].x, arrLine[0].y);

			grd.addColorStop(0, 'rgba(255, 255, 255, 0)');   //定义渐变线起点颜色

	        grd.addColorStop(1, 'rgba(255, 255, 255, 1)');  //定义渐变线结束点的颜色

	        ctx.strokeStyle = grd;

			ctx.stroke();

		}

		//设计合适的初始线条状态

		var arrLine = Array(10).fill(0).map((item, inx) => {

			return {

				x: x1 - 20 * inx,

				y: y1 + 30,

			}

		});

		//随时间变化图形路径

		function getArrLine() {

			var isEnd

			arrLine = arrLine.map(item => {

				var x = item.x;

				var y = item.y;

				if(x < x2 - 30) {

					x = x + step > x2 -30 ? x2 - 30 : x + step;

				} else if(x == x2 -30 && y < y2) {

					y = y + step > y2 ? y2 : y + step;

				} else {

					isEnd = true;

				}

				return {

					x,

					y

				}

			});

			isEnd && timer && cancelAnimationFrame(timer);

		}

		//绘制图形

		function drawLine() {

			//设置图形组合方式 默认source-over

			ctx.globalCompositeOperation = "destination-in";

			ctx.lineWidth = 70;

			ctx.beginPath();

			arrLine.forEach((item, inx) => {

				if(inx == 0) {

					ctx.moveTo(item.x, item.y);

				} else {

					ctx.lineTo(item.x, item.y);

				}

			})

			ctx.stroke();

		}

		function start() {

			ctx.clearRect(0, 0, 1200, 600);

			ctx.globalCompositeOperation = 'source-over';

			drawPath();

			drawLine();

			getArrLine();

			timer = requestAnimationFrame(start);

		}

		timer = requestAnimationFrame(start);

	</script>

	</html>
这种实现方式也有一定的条件限制,那就是路径可大体抽象成为一个有一定规律的图型或者线条,比如上面demo中路径可抽象成为一个矩形的两边,或者是2条连接的直线
我们必须从没有具体规则的路径中抽象出一个大体的规则,不同路径规则不同
上面的例子就是将不规则路径抽象成了一个直角的规则路径

可优化点
这边找到了2个可优化的点
1.时间方向上: 为了让动画消耗较小,代码中的定时器已经用的是requestAnimationFrame, 但是由于光线的特殊性(自带模糊效果),为了性能更加,尝试了2次requestAnimationFrame调用一次绘图的方式,效果较前者未有明显区别
2.绘图方向上: 从上图可发现,灯罩每次只圈出路径的一部分,故绘图中不需要每次都绘制全部路径,只需要找出灯罩前后的路径点,将这一段路径绘制出来就好
坑点
在完成这个动动画效果之后遇到一个至今原因不明的bug,随着屏幕放置时间的变长,动画越来越慢,打开任务管理器,未见内存泄漏或者cpu使用率过高。打开performance,发现页面调帧严重,屏幕帧数越来越低,单个Frame CPU time越来越长,范围来看,script和render和paint耗时未发生线性变化,只有system时间越来越来长,越来越长,期望能被大佬告知原因
一开始

到后来
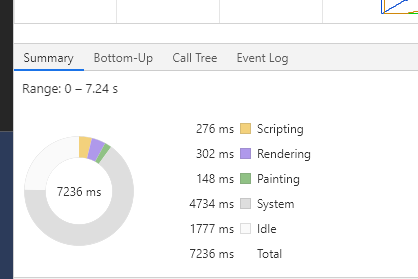
解决的办法较为...,光线每循环一个周期,我销毁了之前的canvas并新建了canvas,上层规避了system time不知道为什么越来越长的问题
chrome版本:80.0.3987.163(正式版本) (64 位)
canvas 实现光线沿不规则路径运动的更多相关文章
- WPF编程,通过Path类型制作沿路径运动的动画一种方法。
原文:WPF编程,通过Path类型制作沿路径运动的动画一种方法. 版权声明:我不生产代码,我只是代码的搬运工. https://blog.csdn.net/qq_43307934/article/de ...
- 简单聊一聊那些svg的沿路径运动
之前遇见动画就很想用css实现,显然有些效果是我们力所不能及,实现起来麻烦,效果不好,让人捉急.其实归结起来,不同的动画有自己的优势,根据实际情况进行取舍.本文就告诉大家如何用SVG写出个简单动画.就 ...
- u3d 逐个点运动,路径运动。 U3d one by one, path motion.
u3d 逐个点运动,路径运动. U3d one by one, path motion. 作者:韩梦飞沙 Author:han_meng_fei_sha 邮箱:313134555@qq.com E-m ...
- WPF编程,通过Path类型制作沿路径运动的动画另一种方法。
原文:WPF编程,通过Path类型制作沿路径运动的动画另一种方法. 版权声明:我不生产代码,我只是代码的搬运工. https://blog.csdn.net/qq_43307934/article/d ...
- Canvas中点到点的路径运动
/*随机生成两个点,然后以两点为端点,进行运动,主要使用了SetInterval,对画布进行不断的擦除描绘的操作*/1 <!DOCTYPE html> <html xmlns=&qu ...
- ThreeJS模拟人沿着路径运动-路径箭头使用纹理offset偏移
<!DOCTYPE html> <html lang="en"> <head> <meta charset="UTF-8&quo ...
- OpenLayer实现路径运动
近期由于业务的需求,让我这从未想过要碰Web Gis的业余前端开发者,走了Web Gis的开发道路.功能需求很简单,但却也是让自己难为了好几天.如,应该选择那个Gis框架,Gis框架的兼容性如何,直接 ...
- canvas判断点是否在路径内
应用场景 我们的项目中有个功能是,canvas上的某个图片选中后可以再这个图片上用鼠标拖拽绘制画笔线条. 当然绘制的边界要控制在图片大小范围内的,那么鼠标是可以随意动的,怎么能控制只在图片上的时候才绘 ...
- [js高手之路] html5 canvas系列教程 - 开始路径beginPath与关闭路径closePath详解
路径在canvas绘图中,经常被用到,是一个非常重要的概念. 比如:我们要在canvas画出3条直线,要求用不同的颜色加以区分. <style> body { background: #0 ...
随机推荐
- Django CBV加装饰器、Django中间件、auth模块
一. CBV加装饰器 在视图层中,基于函数的视图叫FBV(function base views),基于类的视图叫CBV(class base views).当需要用到装饰器时,例如之前的基于Cook ...
- 【NLP面试QA】预训练模型
目录 自回归语言模型与自编码语言 Bert Bert 中的预训练任务 Masked Language Model Next Sentence Prediction Bert 的 Embedding B ...
- redhat7安装
------------恢复内容开始------------ 新建虚拟机向导(自定义) 指定虚拟机安装位置,把他放在固态硬盘提升他的运行速度(不推荐,一般将位置定为非系统盘) 选择系统镜像文件 开机选 ...
- CTF_WriteUp_HTTP基本认证(Basic access authentication)
HTTP基本认证 在HTTP中,基本认证(英语:Basic access authentication)是允许http用户代理(如:网页浏览器)在请求时,提供用户名和密码 的一种方式.HTTP基本认证 ...
- 基础组合问题 ————从n个物品里选m个
package test; import java.util.*; public class Main{ public static int f(int n,int k, int goal){ if( ...
- Hive设置配置参数的方法,列举8个常用配置
Hive设置配置参数的方法 Hive提供三种可以改变环境变量的方法,分别是: (1).修改${HIVE_HOME}/conf/hive-site.xml配置文件: (2).命令行参数: (3).在已经 ...
- effective-java学习笔记---使用实例属性替代序数35
永远不要从枚举的序号中得出与它相关的值; 请将其保存在实例属性中: public enum Ensemble { SOLO(1), DUET(2), TRIO(3), QUARTET(4), QUIN ...
- CF 1012C Dp
Welcome to Innopolis city. Throughout the whole year, Innopolis citizens suffer from everlasting cit ...
- coding++:MySQL-ERROR:Column 'complaint_settlement_id' in field list is ambiguous
(多表查询出现的问题)列'ID'在字段列表中重复,其实就是两张表有相同的字段,但是使用时表字段的名称前没有加表名,导致指代不明. 如 前面加上表名前缀就没问题了.
- 常见Web安全漏洞--------防盗链
1,防盗链防止盗用自己服务上的东西... 2,XSS服务上有这么一张图: <!DOCTYPE html> <html> <head lang="en" ...