[js高手之路] html5 canvas系列教程 - 开始路径beginPath与关闭路径closePath详解
路径在canvas绘图中,经常被用到,是一个非常重要的概念.
比如:我们要在canvas画出3条直线,要求用不同的颜色加以区分.
 <style>

 body {

     background: #000;

 }

 #canvas{

     background:white;

 }

 </style>

 <script>

 window.onload = function(){

     var oCanvas = document.querySelector( "#canvas" ),

         oGc = oCanvas.getContext( '2d' );

         oGc.strokeStyle = 'red';

         oGc.moveTo( 50, 50 );

         oGc.lineTo( 500, 50 );

         oGc.stroke();

         oGc.strokeStyle = 'orange';

         oGc.moveTo( 50, 150 );

         oGc.lineTo( 500, 150 );

         oGc.stroke();

         oGc.strokeStyle = 'yellow';

         oGc.moveTo( 50, 250 );

         oGc.lineTo( 500, 250 );

         oGc.stroke();

 }

 </script>

 </head>

 <body>

 <canvas id="canvas" width="600" height="300"></canvas>

 </body>
在画每一条线之前,我都用storeStyle设置了线的颜色,但是,出来的结果却是3条黄色的线,并不是红、橙、黄三条颜色不同的线。为什么呢?
首先我们要搞清楚canvas渲染图形,它是基于状态的,所谓状态就是每一次用( stroke/fill )之类的API渲染图形的时候,canvas会检查整个程序定义的( strokeStyle, fillStyle, lineWidth等 )当一个状态值没有被改变时,canvas就一直用这个状态。如果被改变,这里就要注意了:
1,如果使用beginPath()开始一个新的路径,则不同路径使用当前路径的值
2,如果没有使用beginPath()开始一个新的路径,后面的会覆盖前面的.
而我们这个程序就是属于第2种情况,尽管strokeStyle被改变了,但是没有用beginPath()开启新路径,所以前面两个strokeStyle会被最后一个strokeStyle='yellow'覆盖。所以3条线都是黄色.
看完这段解释,你应该知道怎样修改了吧?
只需要把每条线设置在不同的路径中,就可以区分了
 <style>

 body {

     background: #000;

 }

 #canvas{

     background:white;

 }

 </style>

 <script>

 window.onload = function(){

     var oCanvas = document.querySelector( "#canvas" ),

         oGc = oCanvas.getContext( '2d' );

         oGc.beginPath();

         oGc.strokeStyle = 'red';

         oGc.moveTo( 50, 50 );

         oGc.lineTo( 500, 50 );

         oGc.stroke();

         oGc.beginPath();

         oGc.strokeStyle = 'orange';

         oGc.moveTo( 50, 150 );

         oGc.lineTo( 500, 150 );

         oGc.stroke();

         oGc.beginPath();

         oGc.strokeStyle = 'yellow';

         oGc.moveTo( 50, 250 );

         oGc.lineTo( 500, 250 );

         oGc.stroke();

 }

 </script>

 </head>

 <body>

 <canvas id="canvas" width="600" height="300"></canvas>

 </body>
closePath:关闭路径
所谓关闭路径就是:指的是将同一个路径中的起点与终点相连接.
比如,我们画个三角形,不使用路径的时候,我们这样做:
 <style>

 body {

     background: #000;

 }

 #canvas{

     background:white;

 }

 </style>

 <script>

 window.onload = function(){

     var oCanvas = document.querySelector( "#canvas" ),

         oGc = oCanvas.getContext( '2d' );

     oGc.moveTo( 50, 50 );

     oGc.lineTo( 250, 50 );

     oGc.lineTo( 250, 150 );

     oGc.lineTo( 50, 50 );

     oGc.stroke();

 }

 </script>

 </head>

 <body>

 <canvas id="canvas" width="600" height="300"></canvas>

 </body>
最后一次用lineTo( 50, 50 )连接到起点,如果我们使用closePath,就不需要这一步操作了.
 <style>

 body {

     background: #000;

 }

 #canvas{

     background:white;

 }

 </style>

 <script>

 window.onload = function(){

     var oCanvas = document.querySelector( "#canvas" ),

         oGc = oCanvas.getContext( '2d' );

     oGc.moveTo( 50, 50 );

     oGc.lineTo( 250, 50 );

     oGc.lineTo( 250, 150 );

     oGc.closePath();

     oGc.stroke();

 }

 </script>

 </head>

 <body>

 <canvas id="canvas" width="600" height="300"></canvas>

 </body>
在stroke之前,用closePath关闭路径,他就会把( 250, 150)这个点和起始点( 50, 50 )连接起来.
画2个三角形:
     var oCanvas = document.querySelector( "#canvas" ),

         oGc = oCanvas.getContext( '2d' );

     oGc.moveTo( 50, 50 );

     oGc.lineTo( 250, 50 );

     oGc.lineTo( 250, 150 );

     oGc.closePath();

     oGc.stroke();

     oGc.moveTo( 50, 150 );

     oGc.lineTo( 250, 150 );

     oGc.lineTo( 250, 250 );

     oGc.closePath();

     oGc.stroke();
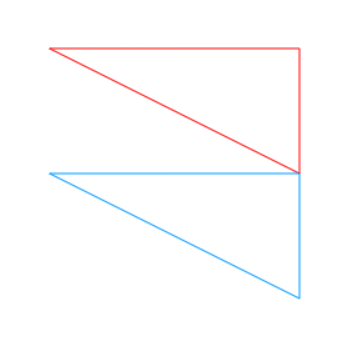
使用路径,绘制两个不同颜色的三角形:
 <style>

 body {

     background: #000;

 }

 #canvas{

     background:white;

 }

 </style>

 <script>

 window.onload = function(){

     var oCanvas = document.querySelector( "#canvas" ),

         oGc = oCanvas.getContext( '2d' );

     //这段oGc.beginPath可有可无,不会影响结果,但是建议加上,代码可读性比较好一点

     oGc.beginPath();

     oGc.strokeStyle = 'red';

     oGc.moveTo( 50, 50 );

     oGc.lineTo( 250, 50 );

     oGc.lineTo( 250, 150 );

     oGc.closePath();

     oGc.stroke();

     oGc.beginPath();

     oGc.strokeStyle = '#09f';

     oGc.moveTo( 50, 150 );

     oGc.lineTo( 250, 150 );

     oGc.lineTo( 250, 250 );

     oGc.closePath();

     oGc.stroke();

 }

 </script>

 </head>

 <body>

 <canvas id="canvas" width="600" height="300"></canvas>

 </body>
[js高手之路] html5 canvas系列教程 - 开始路径beginPath与关闭路径closePath详解的更多相关文章
- [js高手之路] html5 canvas系列教程 - 掌握画直线图形的常用API
我们接着上文[js高手之路] html5 canvase系列教程 - 认识canvas以及基本使用方法继续. 一.直线的绘制 cxt.moveTo( x1, y1 ): 将画笔移动到x1, y1这个点 ...
- [js高手之路] html5 canvas系列教程 - arcTo(弧度与二次,三次贝塞尔曲线以及在线工具)
之前,我写了一个arc函数的用法:[js高手之路] html5 canvas系列教程 - arc绘制曲线图形(曲线,弧线,圆形). arcTo: cxt.arcTo( cx, cy, x2, y2, ...
- [js高手之路] html5 canvas系列教程 - arc绘制曲线图形(曲线,弧线,圆形)
绘制曲线,经常会用到路径的知识,如果你对路径有疑问,可以参考我的这篇文章[js高手之路] html5 canvas系列教程 - 开始路径beginPath与关闭路径closePath详解. arc:画 ...
- [js高手之路] html5 canvas系列教程 - 图片操作(drawImage,clip,createPattern)
接着上文[js高手之路] html5 canvas系列教程 - 文本样式(strokeText,fillText,measureText,textAlign,textBaseline)继续,本文介绍的 ...
- [js高手之路] html5 canvas系列教程 - 文本样式(strokeText,fillText,measureText,textAlign,textBaseline)
接着上文线条样式[js高手之路] html5 canvas系列教程 - 线条样式(lineWidth,lineCap,lineJoin,setLineDash)继续. canvas提供两种输出文本的方 ...
- [js高手之路] html5 canvas系列教程 - 线条样式(lineWidth,lineCap,lineJoin,setLineDash)
上文,写完弧度与贝塞尔曲线[js高手之路] html5 canvas系列教程 - arcTo(弧度与二次,三次贝塞尔曲线以及在线工具),本文主要是关于线条的样式设置 lineWidth: 设置线条的宽 ...
- [js高手之路] html5 canvas系列教程 - 像素操作(反色,黑白,亮度,复古,蒙版,透明)
接着上文[js高手之路] html5 canvas系列教程 - 状态详解(save与restore),相信大家都应该玩过美颜功能,而我们今天要讲的就是canvas强大的像素处理能力,通过像素处理,实现 ...
- [js高手之路] html5 canvas系列教程 - 状态详解(save与restore)
本文内容与路径([js高手之路] html5 canvas系列教程 - 开始路径beginPath与关闭路径closePath详解)是canvas中比较重要的概念.掌握理解他们是做出复杂canvas动 ...
- [js高手之路] html5 canvas系列教程 - 线形渐变,径向渐变与阴影设置
接着上文[js高手之路] html5 canvas系列教程 - 像素操作(反色,黑白,亮度,复古,蒙版,透明)继续. 一.线形渐变 线形渐变指的是一条直线上发生的渐变. 用法: var linear ...
随机推荐
- 【Unity游戏开发】浅谈Unity游戏开发中的单元测试
一.单元测试的定义与作用 单元测试定义:单元测试在传统软件开发中是非常重要的工具,它是指对软件中的最小可测试单元进行检查和验证,一般情况下就是对代码中的一个函数去进行验证,检查它的正确性.一个单元测试 ...
- Struts2使用自定义拦截器导致Action注入参数丢失、url参数
写struts2项目时发现前台超链接中的参数无法传到action, 所有带有传递参数的均无法正常使用了,在Action中所有的参数无法被注入. 后来经过debug发现其中的页面都要先经过拦截器,而后再 ...
- 【前端】vue.js环境配置以及实例运行简明教程
vue.js环境配置以及实例运行简明教程 声明:本文档编写参考如下两篇博客,是对它们的修改与补充,欢迎点击链接查看原文: 原文1:vue.js在windows本地下搭建环境和创建项目 原文2:Vue. ...
- java面向对象(一)
[toc] 面向对象 我们都说java是面向对象的编程语言,那什么是面向对象呢?什么是类呢?什么是方法呢? 类.对象.方法 类是对象的抽象定义,对象是类的具体实例. 类:指的是一类东西,比如汽车,人类 ...
- java中的jdk切换(无需卸载原有jdk)
该转自 : http://blog.csdn.net/u010011371/article/details/50749954 很好的一片文章,适合我这种小白,方便以后使用. 之前一直使用的是JDK1 ...
- IOS学习【前言】
2016-1-14 16年开始时导师安排任务,开始IOS学习之旅 经过几天的学习,感觉还是需要作比较多的学习笔记,因此开始用博客记录整个过程,方便以后查看学习与分享. 主要记录一些关键的问题处理方法 ...
- 算法学习:Pac-Man的简单对抗
Pacman项目是加州大学伯克利分校提供的一个可视化的AI学习平台.其主体利用python完成.该项目提供了丰富的说明文档,以及预先实现了一些简单的算法供参考各接口的使用. http://ai.ber ...
- VHDL学习:利用Quartus自带库3步快速完成状态机
Quartus自带库里面有各种编程语言的模板,供开发者参考. 初学者利用VHDL实现状态机比较生疏的情况下,可以调出该模板,适当修改即可. 本文将描述如何利用Quartus自带库调出状态机模板,并适当 ...
- Java学习记录:降低耦合度
耦合度定义 耦合度(Coupling)是对模块间关联程度的度量.耦合的强弱取决与模块间接口的复杂性.调用模块的方式以及通过界面传送数据的多少. 模块间的耦合度是指模块之间的依赖关系,包括控制关系.调用 ...
- Nginx做文件下载服务器
这是最简单的一种办法,贴完代码就能用 server { listen 80; charset utf-8; server_name localhost; root /data/file/; autoi ...