
day111 爬虫第一天
一、模拟浏览器发请求.
import requests

r1 =requests.get(

    url ="https://dig.chouti.com/",

    headers ={

        "user-agent":'Mozilla/5.0 (Windows NT 6.1; WOW64) AppleWebKit/537.36 (KHTML, like Gecko) Chrome/67.0.3396.99 Safari/537.36' # 模拟浏览器

            }

)

print(r1.text)
二、拿到访问的cookie (cookie.get_dict)
import requests

r1 =requests.get(

    url ="https://dig.chouti.com/",

    headers ={

        "user-agent":'Mozilla/5.0 (Windows NT 6.1; WOW64) AppleWebKit/537.36 (KHTML, like Gecko) Chrome/67.0.3396.99 Safari/537.36'

            }

                )

r1_cookie_dict =r1.cookies.get_dict()  #取cookie方式.

print(r1_cookie_dict)
三 、 通过拿到的Cookie自动登录
import requests

r1 =requests.get(

    url ="https://dig.chouti.com/",

    headers ={

        "user-agent":'Mozilla/5.0 (Windows NT 6.1; WOW64) AppleWebKit/537.36 (KHTML, like Gecko) Chrome/67.0.3396.99 Safari/537.36'

            }

                )

r1_cookie_dict =r1.cookies.get_dict()

print(r1_cookie_dict)
打印cookie 数据{'gpsd': '2b374387cb18e6231dad05778939ed9e', 'JSESSIONID': 'aaaq8zR3Ff_WQ8XSSeysw'}
import requests

r2 =requests.post(

    url= 'https://dig.chouti.com/login',

    headers={

        'user-agent': 'Mozilla/5.0 (Windows NT 6.1; WOW64) AppleWebKit/537.36 (KHTML, like Gecko) Chrome/67.0.3396.99 Safari/537.36'

    }, # headers 里的数据为请求头.

    data={

        "phone":"8618611998441",

        "password":"xxx",

        "oneMonth":1

    },  #data 里的数据为请求体.

    cookies =r1_cookie_dict  #通过第一次访问拿到cookie

)

print(r2.text) #打印请求结果

打印结果:{"result":{"code":"9999", "message":"", "data":{"complateReg":"0","destJid":"cdu_53188065757"}}}
四、点赞请求
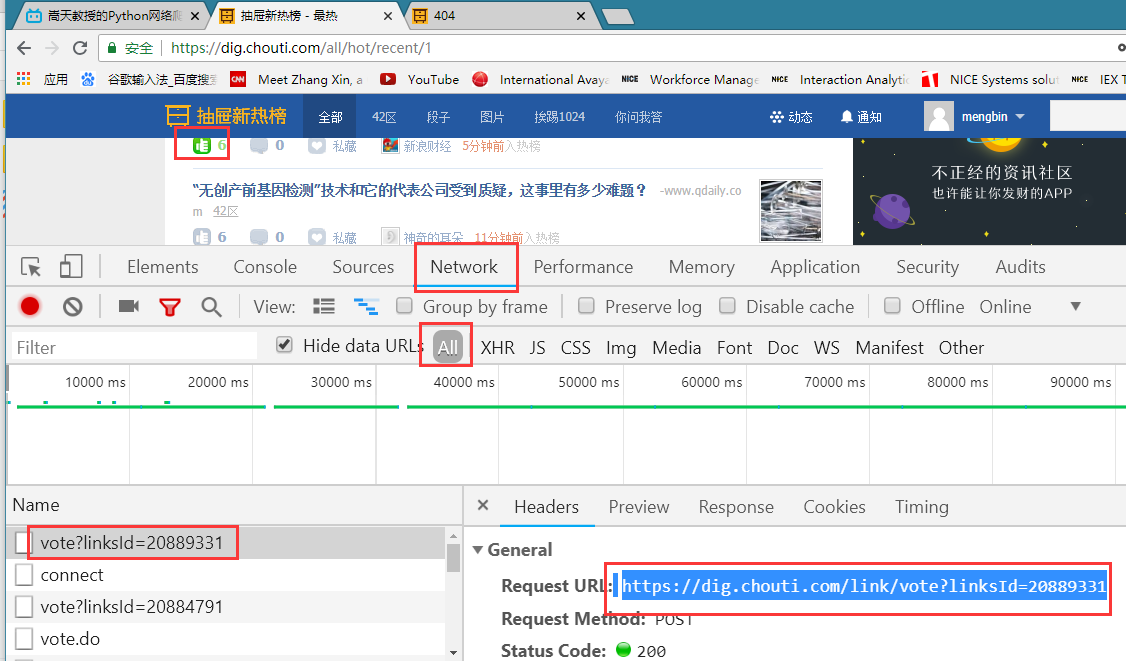
r3 =requests.post(

    url="https://dig.chouti.com/link/vote?linksId=20889331",

    headers={

        'user-agent': 'Mozilla/5.0 (Windows NT 6.1; WOW64) AppleWebKit/537.36 (KHTML, like Gecko) Chrome/67.0.3396.99 Safari/537.36'

    },

    cookies =r1_cookie_dict

)

print( "r3.text===>",r3.text)
打印结果:r3.text===> {"result":{"code":"30010", "message":"你已经推荐过了", "data":""}}
总结 (三步骤)
#第一步 拿到cookie

import requests

r1 =requests.get(

    url ="https://dig.chouti.com/",

    headers ={

        "user-agent":'Mozilla/5.0 (Windows NT 6.1; WOW64) AppleWebKit/537.36 (KHTML, like Gecko) Chrome/67.0.3396.99 Safari/537.36'

            }

                )

r1_cookie_dict =r1.cookies.get_dict()

print("r1_cookie====>",r1_cookie_dict)

#第二步登录

import requests

r2 =requests.post(

    url= 'https://dig.chouti.com/login',

    headers={

        'user-agent': 'Mozilla/5.0 (Windows NT 6.1; WOW64) AppleWebKit/537.36 (KHTML, like Gecko) Chrome/67.0.3396.99 Safari/537.36'

    },

    data={

        "phone":"",

        "password":"xxx",

        "oneMonth":

    },

    cookies =r1_cookie_dict

)

print("r2.text===>",r2.text)

#第三步点赞

r3 =requests.post(

    url="https://dig.chouti.com/link/vote?linksId=20889331",

    headers={

        'user-agent': 'Mozilla/5.0 (Windows NT 6.1; WOW64) AppleWebKit/537.36 (KHTML, like Gecko) Chrome/67.0.3396.99 Safari/537.36'

    },

    cookies =r1_cookie_dict

)

print( "r3.text===>",r3.text)
作业
作业:
1. 爬取抽屉新热榜的新闻:
标题
简介
地址
图片
2. 煎蛋网
- 爬取标题+简介
- 爬取图片
一 、 抽屉网站爬虫
import os

import  requests

from bs4 import  BeautifulSoup

#1. 伪造浏览器发送请求

r1 =requests.get(

    url = "https://www.autohome.com.cn/news/"

)

r1.encoding="gbk"

print(r1.text)

#2.去响应 的响应体中解析我们想要的数据.

soup =BeautifulSoup(r1.text,"html.parser")

#3. 找名字按照响应的规则:div 标签且 id = auto -channel-lazyload-article找匹配成功的第一个

container =soup.find(name="div",attrs={"id":"auto-channel-lazyload-article"})

#4.去container中找所有的li标签

li_list =container.find_all(name ="li")

for tag in li_list:

    title =tag.find(name ="h3")

    if not title:

        continue

    summary =tag.find(name="p")

    a =tag.find(name="a")

    url ="https:"+a.attrs.get("href")

    img= tag.find(name="img")

    img_url= "https:"+img.get("src")

    print(title.text)

    print(summary.text)

    print(url)

    print((img_url))

#下载图片

r2 =requests.get(

    url=img_url

)

file_name =img_url.rsplit("/",maxsplit=1)[1]

file_path=os.path.join("imgs",file_name)

with open(file_path,"wb")as f:

    f.write(r2.content)
"""

作业:

	1. 爬取抽屉新热榜的新闻:

		标题

		简介

		地址

		图片

	2. 煎蛋网

		- 爬取标题+简介

		- 爬取图片

"""


import requests

from bs4 import BeautifulSoup

#1. 伪造浏览器发送请求

r1 =requests.get(

    url="https://dig.chouti.com",

    headers={

    "user-Agent": "Mozilla/5.0 (Windows NT 10.0; WOW64) AppleWebKit/537.36 (KHTML, like Gecko) Chrome/67.0.3396.87 Safari/537.36"

    }

)

#2.去响应的响应体重解析我们想要的数据

soup =BeautifulSoup(r1.text,"html.parser")

container = soup.find(name ="div",attrs={"id":"content-list"})

div_list = container.find_all(name ="div",attrs = {"class":"part1"})

# 1 拿到标题

# for  item  in  div_list:

#     title = item.find(name ="a")

#     title =title.text

#     title =title.strip()

#     print(title)

#2 拿到简介

# div_list = container.find_all(name ="div",attrs = {"class":"area-summary"})

# for item in div_list:

#     summary = item.find(name ="span",attrs ={"class":"summary"})

#     print(summary,type(summary))

#3.拿到地址:

# for item in div_list:

#     tag =item.find(name ="a",attrs = {"class":"show-content color-chag"})

#     url=tag.attrs.get("href")

#     print(url)

#4. 图片.

div_item =container.find_all(name ="div",attrs ={"class":"item"})

for item in div_item:

    div_pic = item.find(name="div", attrs={"class": "news-pic"})

    print(div_pic)

    pic =div_pic.find("img")

    img_url ="https://"+pic.get("original")  #图片的url

    print(img_url)
二 、煎蛋网爬虫
import requests

from bs4 import BeautifulSoup

r1 =requests.get(

    url ="http://jandan.net"

)

soup =BeautifulSoup(r1.text,"html.parser")

container = soup.find(name ="div",attrs={"id":"content"})

div_list = container.find_all( name ="div",attrs={"class": "post f list-post"})

#1 打印出所有的标题.

# for item in div_list:

#     div_index =item.find(name ="div",attrs ={"class":"indexs"})

#     title = div_index.find(name ="h2")

#     title =title.find(name="a")

#     print(title.text)

#2 .打印出所有的简介.

for item in div_list:

    div_index =item.find(name ="div",attrs ={"class":"indexs"})

    # print(len(div_index.contents))

    print(div_index.contents[6])#共计7个长度,标签之间空格也算一个。
day111 爬虫第一天的更多相关文章
- python爬虫第一天
python爬虫第一天 太久没折腾爬虫 又要重头开始了....感谢虫师大牛的文章. 接下来的是我的随笔 0x01 获取整个页面 我要爬的是百度贴吧的图,当然也是跟着虫师大牛的思路. 代码如下: #co ...
- Python爬虫第一步
这只是记录一下自己学习爬虫的过程,可能少了些章法.我使用过的是Python3.x版本,IDE为Pycharm. 这里贴出代码集合,这一份代码也是以防自己以后忘记了什么,方便查阅. import req ...
- 爬虫第一篇基本库的使用——urllib
在Python2中有urllib2和urllib3两个库来实现请求的发送,在Pyhon3中则统一为urllib. urilib包含以下4个模块 request:最基本的请求模块,可以用来实现请求的发送 ...
- 【Python3爬虫】学习分布式爬虫第一步--Redis分布式爬虫初体验
一.写在前面 之前写的爬虫都是单机爬虫,还没有尝试过分布式爬虫,这次就是一个分布式爬虫的初体验.所谓分布式爬虫,就是要用多台电脑同时爬取数据,相比于单机爬虫,分布式爬虫的爬取速度更快,也能更好地应对I ...
- 03.Python网络爬虫第一弹《Python网络爬虫相关基础概念》
爬虫介绍 引入 之前在授课过程中,好多同学都问过我这样的一个问题:为什么要学习爬虫,学习爬虫能够为我们以后的发展带来那些好处?其实学习爬虫的原因和为我们以后发展带来的好处都是显而易见的,无论是从实际的 ...
- Python网络爬虫第一弹《Python网络爬虫相关基础概念》
爬虫介绍 引入 之前在授课过程中,好多同学都问过我这样的一个问题:为什么要学习爬虫,学习爬虫能够为我们以后的发展带来那些好处?其实学习爬虫的原因和为我们以后发展带来的好处都是显而易见的,无论是从实际的 ...
- Python爬虫第一个成功版
爬取http://www.mzitu.com/all里面的图片 import urllib.request import re import os url = 'http://www.mzitu.co ...
- 03,Python网络爬虫第一弹《Python网络爬虫相关基础概念》
爬虫介绍 引入 为什么要学习爬虫,学习爬虫能够为我们以后的发展带来那些好处?其实学习爬虫的原因和为我们以后发展带来的好处都是显而易见的,无论是从实际的应用还是从就业上. 我们都知道,当前我们所处的时代 ...
- 爬虫第一篇:爬虫详解之urllib.request模块
我将urllib.request 的GET请求和POST请求两种方法做了总结 GET请求 GET请求爬取: import urllib.request import urllib.parse head ...
随机推荐
- 基本控件设置边角图片 drawableleft
btn.setCompoundDrawablesWithIntrinsicBounds(R.drawable.icon_galley_comment, 0, 0,0); 四个参数分别是左上右下四个方向 ...
- php加速缓存器opcache,apc,xcache,eAccelerator
一.opcache opcache 通过将 PHP 脚本预编译的字节码存储到共享内存中来提升 PHP 的性能, 存储预编译字节码的好处就是 省去了每次加载和解析 PHP 脚本的开销. PHP 5. ...
- C# 类初始化顺序
C#的类初始化顺序和Java以及C++类初始化顺序是不同的,曾经我被这个问题害惨了.对于C#和Java,其共同点都是先变量后构造函数,先静态后普通 区别在于,C#是子类变量->父类变量-> ...
- vue2.0 tab切换几种方式
第一种 比较灵活简单的方式(切换改变部分的内容在组件中比较方便操作) <template> <div id="app"> <ul> <li ...
- 767A Snacktower
A. Snacktower time limit per test 2 seconds memory limit per test 256 megabytes input standard input ...
- 品味性能之道<七>:索引基础
一.索引概述 索引(index),它是数据库必不可少的一部分.它其实很简单呐!很好理解. 索引好比如一本书的目录,一张地图,一个写字楼里挂在大堂墙上的公司名录,一个地铁站的出口指示 ...
- 带你认识那些App可靠性设计
可靠性是软件一个重要的质量属性,它关注的是软件功能持续的可用性,以及出现故障之后是否能够容错,是否能快速的恢复使用. 可靠性六条基本准则 1.故障应在第一时间被检测和感知: 2.能避免的故障都不应该发 ...
- npm 如何设置镜像站为淘宝网
转载 2015年06月24日 17:12:12 10542 淘宝镜像:http://npm.taobao.org/ 镜像使用方法(三种办法任意一种都能解决问题,建议使用第三种,将配置写死,下次用的时候 ...
- asp.net web 通过IHttpAsyncHandler接口进行消息推送
.消息类,可直接通过这个类推送消息 HttpMessages using System; using System.Collections.Generic; using System.Linq; us ...
- 541. Reverse String II
static int wing=[]() { std::ios::sync_with_stdio(false); cin.tie(NULL); ; }(); class Solution { publ ...