
CentOS7下使用ELK搭建日志集中分析平台
应用场景:
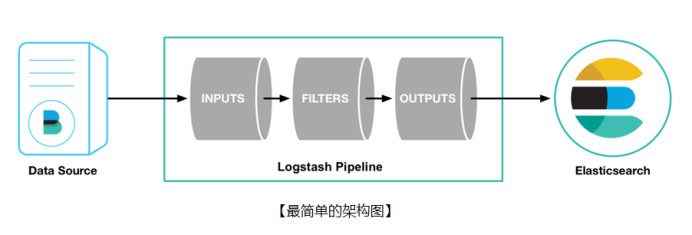
ELK实际上是三个工具的集合,ElasticSearch + Logstash + Kibana,这三个工具组合形成了一套实用、易用的监控架构,很多公司利用它来搭建可视化的海量日志分析平台。
官网下载地址:https://www.elastic.co/downloads
Elasticsearch:
是一个基于Lucene的搜索服务器。它提供了一个分布式多用户能力的全文搜索引擎,基于RESTful web接口。Elasticsearch是用Java开发的,并作为Apache许可条款下的开放源码发布,是当前流行的企业级搜索引擎。设计用于云计算中,能够达到实时搜索,稳定,可靠,快速,安装使用方便。
Logstash:
用于管理日志和事件的工具,你可以用它去收集日志、转换日志、解析日志并将他们作为数据提供给其它模块调用,例如搜索、存储等。
Kibana:
是一个优秀的前端日志展示框架,它可以非常详细的将日志转化为各种图表,为用户提供强大的数据可视化支持。
Filebeat:
类似于“agent”装在被监控端上(数据源),用来实时收集日志文件数据。
安装环境:
|
software |
ip |
system |
|
Filebeat 5.6 |
192.168.1.101 |
CentOS 7.4 |
|
Filebeat 5.6 |
192.168.1.102 |
CentOS 7.4 |
|
Filebeat 5.6 |
192.168.1.103 |
CentOS 7.4 |
|
Logstash 5.6 |
192.168.1.101 |
CentOS 7.4 |
|
ElasticSearch 5.6 |
192.168.1.101 |
CentOS 7.4 |
|
ElasticSearch 5.6 |
192.168.1.102 |
CentOS 7.4 |
|
ElasticSearch 5.6 |
192.168.1.103 |
CentOS 7.4 |
|
Kibana 5.6 |
192.168.1.101 |
CentOS 7.4 |
软件包:
jdk-8u65-linux-x64.tar.gz
epel-release-7-11.noarch.rpm
elasticsearch-5.6.12.rpm
logstash-5.6.12.rpm
kibana-5.6.12-x86_64.rpm
filebeat-5.6.12-x86_64.rpm
安装步骤:
安装java
[root@mydb1 ~]# mkdir -p /usr/java
[root@mydb1 ~]# cp /soft/jdk-8u65-linux-x64.tar.gz /usr/java
[root@mydb1 ~]# cd /usr/java
[root@mydb1 java]# tar -xvf jdk-8u65-linux-x64.tar.gz
[root@mydb1 java]# rm -rf jdk-8u65-linux-x64.tar.gz
[root@mydb1 ~]# vim .bash_profile
JAVA_HOME=/usr/java/jdk1.8.0_65
CLASSPATH=$JAVA_HOME/lib/
PATH=$JAVA_HOME/bin:$PATH
export PATH JAVA_HOME CLASSPATH
[root@mydb1 ~]# . .bash_profile
[root@mydb1 ~]# java -version
java version "1.8.0_65"
Java(TM) SE Runtime Environment (build 1.8.0_65-b17)
Java HotSpot(TM) 64-Bit Server VM (build 25.65-b01, mixed mode)
mydb2,mydb3执行同样的步骤
安装elasticsearch
[root@mydb1 soft]# rpm -ivh elasticsearch-5.6.12.rpm
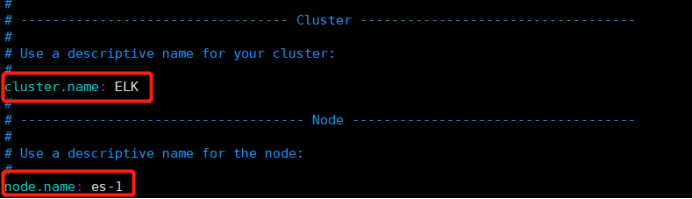
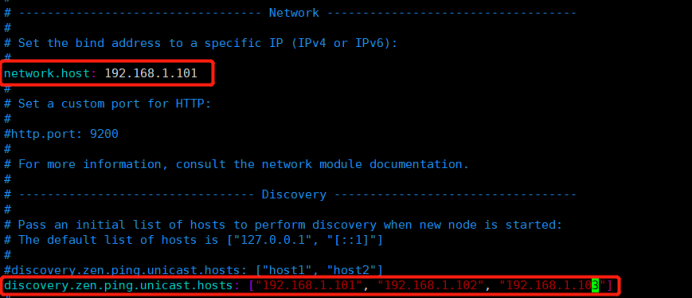
编辑配置文件
[root@mydb1 ~]# vim /etc/elasticsearch/elasticsearch.yml
启动服务
[root@mydb1 ~]# systemctl daemon-reload
[root@mydb1 ~]# systemctl start elasticsearch
[root@mydb1 ~]# systemctl status elasticsearch
● elasticsearch.service - Elasticsearch
Loaded: loaded (/usr/lib/systemd/system/elasticsearch.service; disabled; vendor preset: disabled)
Active: active (running) since 二 2018-10-30 04:19:05 CST; 8s ago
Docs: http://www.elastic.co
Process: 41715 ExecStartPre=/usr/share/elasticsearch/bin/elasticsearch-systemd-pre-exec (code=exited, status=0/SUCCESS)
Main PID: 41717 (java)
CGroup: /system.slice/elasticsearch.service
└─41717 /bin/java -Xms2g -Xmx2g -XX:+UseConcMarkSweepGC -XX:CMSInitiatingOccupancyFraction=75 -XX:+UseCMSInitiatingOccupancyOnly -XX:+AlwaysPreTouch ...
10月 30 04:19:05 mydb1 systemd[1]: Starting Elasticsearch...
10月 30 04:19:05 mydb1 systemd[1]: Started Elasticsearch.
10月 30 04:19:05 mydb1 elasticsearch[41717]: OpenJDK 64-Bit Server VM warning: If the number of processors is expected to increase from one, then you ...Threads=N
Hint: Some lines were ellipsized, use -l to show in full.
[root@mydb1 ~]# systemctl enable elasticsearch
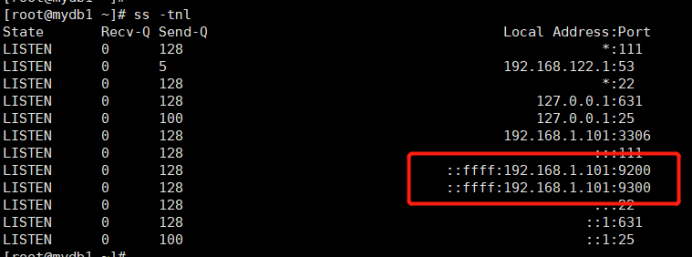
查看端口状态
配置集群中的另外两个节点es-2和es-3
es集群的相关查询
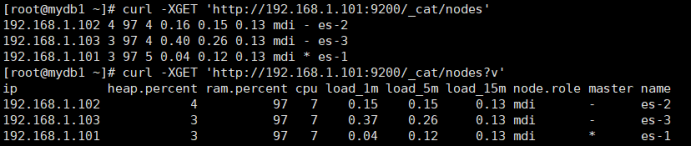
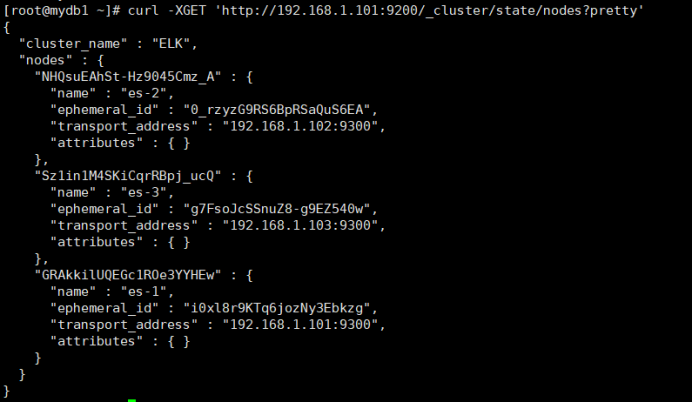
查询集群的健康状态

ES集群安装结束
安装Kibana
[root@mydb1 soft]# rpm -ivh kibana-5.6.12-x86_64.rpm
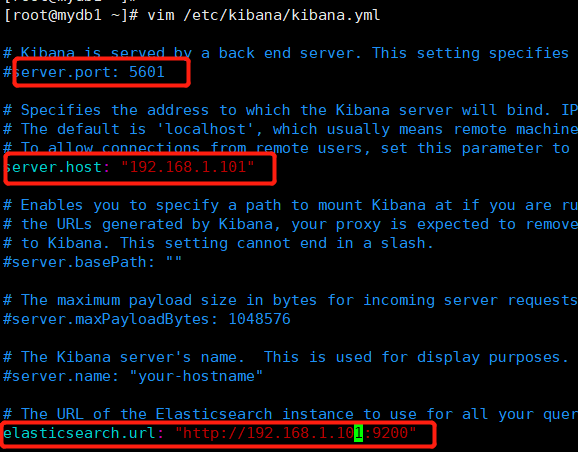
编辑配置文件
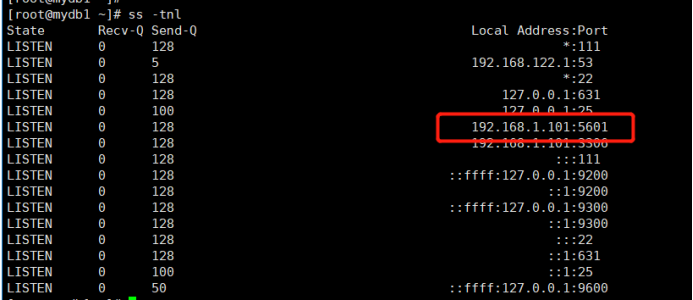
启动kibana
[root@mydb1 ~]# systemctl start kibana
[root@mydb1 ~]# systemctl status kibana
[root@mydb1 ~]# systemctl enable kibana
添加Nginx反向代理
[root@mydb1 soft]# rpm -ivh epel-release-7-11.noarch.rpm
[root@mydb1 soft]# yum install -y nginx httpd-tools
更改配置文件
删除或注释掉文件/etc/nginx/nginx.conf中的一段server{}

新增kibana.conf文件
[root@mydb1 ~]# cd /etc/nginx/conf.d/
[root@mydb1 conf.d]# cat kibana.conf
server {
listen 80;
server_name kibana;
auth_basic "Restricted Access";
auth_basic_user_file /etc/nginx/kibana-user;
location / {
proxy_pass http://192.168.1.101:5601;
proxy_http_version 1.1;
proxy_set_header Upgrade $http_upgrade;
proxy_set_header Connection 'upgrade';
proxy_set_header Host $host;
proxy_cache_bypass $http_upgrade;
}
}
生成页面登陆用户认证文件
[root@mydb1 ~]# htpasswd -cm /etc/nginx/kibana-user adrian
New password:
Re-type new password:
Adding password for user adrian
启动Nginx
[root@mydb1 ~]# nginx -t
nginx: the configuration file /etc/nginx/nginx.conf syntax is ok
nginx: configuration file /etc/nginx/nginx.conf test is successful
[root@mydb1 ~]# systemctl start nginx
[root@mydb1 ~]# systemctl status nginx
[root@mydb1 ~]# systemctl enable nginx
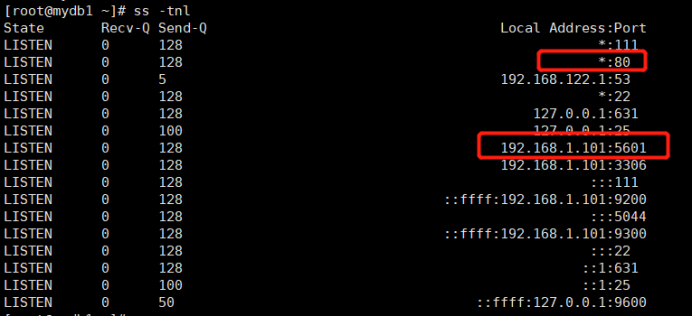
浏览器登陆kibana
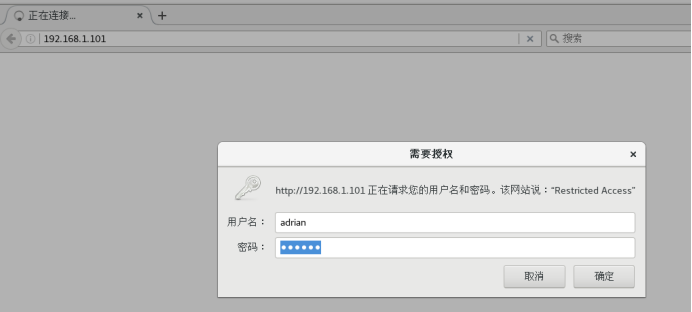
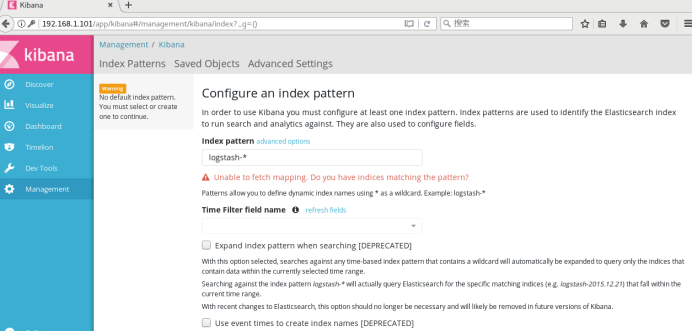
Kibana安装配置完成
安装Logstash
[root@mydb1 soft]# rpm -ivh logstash-5.6.12.rpm
添加配置文件
[root@mydb1 ~]# vim /etc/logstash/conf.d/logstash.conf
input {
beats {
port => "5044"
}
}
filter {
grok {
# 有ID有use
match => [ "message", "(?m)^# User@Host: %{USER:user}\[[^\]]+\] @ (?:(?<clienthost>\S*) )?\[(?:%{IP:clientip})?\]\s+Id:\s%{NUMBER:id:int}\n# Query_time: %{NUMBER:query_time:float}\s+Lock_time: %{NUMBER:lock_time:float}\s+Rows_sent: %{NUMBER:rows_sent:int}\s+Rows_examined: %{NUMBER:rows_examined:int}\nuse\s(?<dbname>\w+);\nSET\s+timestamp=%{NUMBER:timestamp_mysql:int};\n(?<query>.*)" ]
# 有ID无use
match => [ "message", "(?m)^# User@Host: %{USER:user}\[[^\]]+\] @ (?:(?<clienthost>\S*) )?\[(?:%{IP:clientip})?\]\s+Id:\s%{NUMBER:id:int}\n# Query_time: %{NUMBER:query_time:float}\s+Lock_time: %{NUMBER:lock_time:float}\s+Rows_sent: %{NUMBER:rows_sent:int}\s+Rows_examined: %{NUMBER:rows_examined:int}\nSET\s+timestamp=%{NUMBER:timestamp_mysql:int};\n(?<query>.*)" ]
# 无ID有use
match => [ "message", "(?m)^# User@Host: %{USER:user}\[[^\]]+\] @ (?:(?<clienthost>\S*) )?\[(?:%{IP:clientip})?\]\n# Query_time: %{NUMBER:query_time:float}\s+Lock_time: %{NUMBER:lock_time:float}\s+Rows_sent: %{NUMBER:rows_sent:int}\s+Rows_examined: %{NUMBER:rows_examined:int}\nuse\s(?<dbname>\w+);\nSET\s+timestamp=%{NUMBER:timestamp_mysql:int};\n(?<query>.*)" ]
# 无ID无use
match => [ "message", "(?m)^# User@Host: %{USER:user}\[[^\]]+\] @ (?:(?<clienthost>\S*) )?\[(?:%{IP:clientip})?\]\n# Query_time: %{NUMBER:query_time:float}\s+Lock_time: %{NUMBER:lock_time:float}\s+Rows_sent: %{NUMBER:rows_sent:int}\s+Rows_examined: %{NUMBER:rows_examined:int}\nSET\s+timestamp=%{NUMBER:timestamp_mysql:int};\n(?<query>.*)" ]
}
date {
match => ["timestamp_mysql","UNIX"]
target => "@timestamp"
}
}
output {
elasticsearch {
hosts => ["192.168.1.101:9200"]
index=>"mysql-slow-log-%{+YYYY.MM.dd}"
}
stdout { codec => rubydebug }
}
启动logstash服务
[root@mydb1 ~]# systemctl start logstash
[root@mydb1 ~]# systemctl status logstash
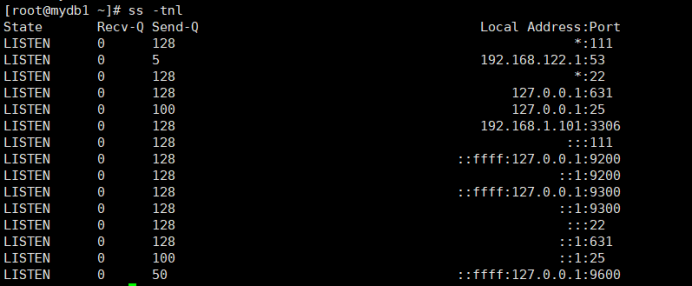
Logstash安装配置完成
安装filebeat
[root@mydb1 soft]# rpm -ivh filebeat-5.6.12-x86_64.rpm
修改配置文件
[root@mydb1 ~]# vim /etc/filebeat/filebeat.yml
filebeat.prospectors:
- input_type: log
paths:
- /app/mysqldata/3306/slow.log
exclude_lines: ['^\# Time']
multiline.pattern: '^\# Time|^\# User'
multiline.negate: true
multiline.match: after
output.logstash:
hosts: ["192.168.1.101:5044"]
[root@mydb1 ~]# systemctl start filebeat
[root@mydb1 ~]# systemctl status filebeat
mydb2,mydb3执行同样的步骤
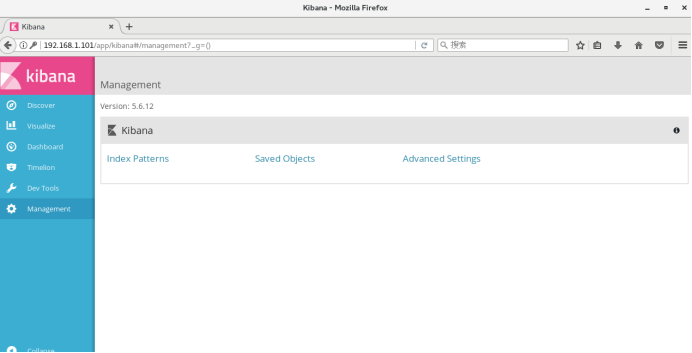
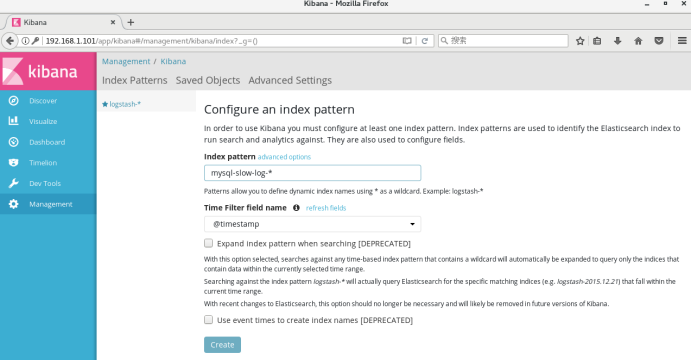
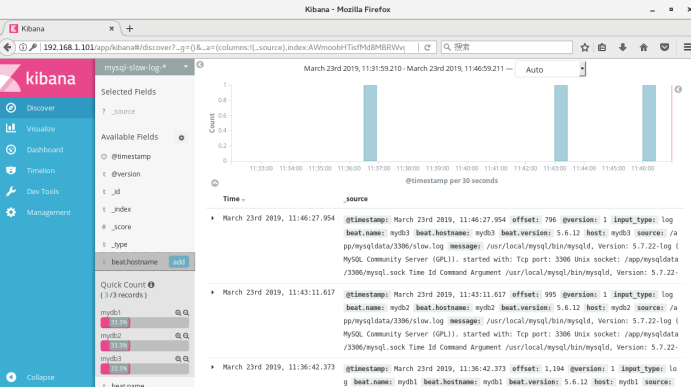
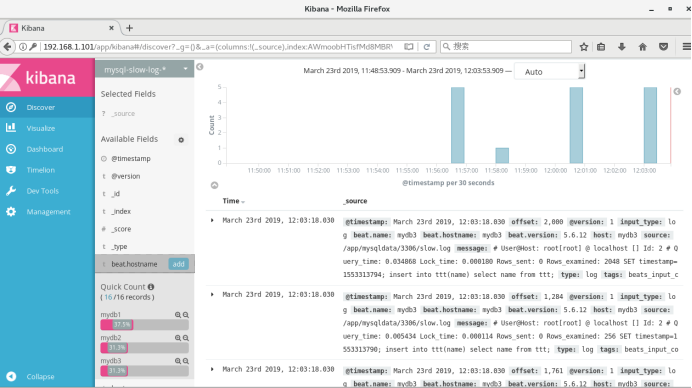
调整long_query_time值为0,清空/app/mysqldata/3306/slow.log,重启数据库
测试是否正常:
[root@mydb1 ~]# vim /etc/logstash/conf.d/logstash.conf
input {
beats {
port => "5044"
}
}
filter {
}
output {
elasticsearch {
hosts => ["192.168.1.101:9200"]
}
stdout { codec => rubydebug }
}
[root@mydb1 ~]# systemctl start logstash
[root@mydb1 ~]# systemctl status logstash
[root@mydb1 ~]# vim test.sh
while [ 1==1 ];do
sleep 1
send=`date '+%Y-%m-%d %H:%M:%S'`
echo $send ">>hello" >> test.log
done
[root@mydb1 ~]# sh test.sh &
[root@mydb1 ~]# vim /etc/filebeat/filebeat.yml
filebeat.prospectors:
- input_type: log
paths:
- /root/test.log
output.logstash:
hosts: ["l92.168.1.101:5044"]
[root@mydb1 ~]# systemctl start filebeat
[root@mydb1 ~]# systemctl status filebeat
CentOS7下使用ELK搭建日志集中分析平台的更多相关文章
- 2018年ElasticSearch6.2.2教程ELK搭建日志采集分析系统(教程详情)
章节一 2018年 ELK课程计划和效果演示1.课程安排和效果演示 简介:课程介绍和主要知识点说明,ES搜索接口演示,部署的ELK项目演示 es: localhost:9200 k ...
- ELK/EFK——日志收集分析平台
ELK——日志收集分析平台 ELK简介:在开源的日志管理方案之中,最出名的莫过于ELK了,ELK由ElasticSearch.Logstash和Kiabana三个开源工具组成.1)ElasticSea ...
- Centos6.5使用ELK(Elasticsearch + Logstash + Kibana) 搭建日志集中分析平台实践
Centos6.5安装Logstash ELK stack 日志管理系统 概述: 日志主要包括系统日志.应用程序日志和安全日志.系统运维和开发人员可以通过日志了解服务器软硬件信息.检查配置过程中的 ...
- 2018年ElasticSearch6.2.2教程ELK搭建日志采集分析系统(目录)
章节一 2018年 ELK课程计划和效果演示 1.课程安排和效果演示 简介:课程介绍和主要知识点说明,ES搜索接口演示,部署的ELK项目演示 章节二 elasticSearch 6.2版本基础讲解到 ...
- ELK:日志收集分析平台
简介 ELK是一个日志收集分析的平台,它能收集海量的日志,并将其根据字段切割.一来方便供开发查看日志,定位问题:二来可以根据日志进行统计分析,通过其强大的呈现能力,挖掘数据的潜在价值,分析重要指标的趋 ...
- Centos7下使用ELK(Elasticsearch + Logstash + Kibana)搭建日志集中分析平台
日志监控和分析在保障业务稳定运行时,起到了很重要的作用,不过一般情况下日志都分散在各个生产服务器,且开发人员无法登陆生产服务器,这时候就需要一个集中式的日志收集装置,对日志中的关键字进行监控,触发异常 ...
- 使用ELK(Elasticsearch + Logstash + Kibana) 搭建日志集中分析平台实践--转载
原文地址:https://wsgzao.github.io/post/elk/ 另外可以参考:https://www.digitalocean.com/community/tutorials/how- ...
- centos7下git服务器端搭建
git的安装: yum 源仓库里的 Git 版本更新不及时,最新版本的 Git 是 1.8.3.1,但是官方最新版本已经到了 2.9.2.想要安装最新版本的的 Git,只能下载源码进行安装. 1. 查 ...
- centos7下git服务器端搭建(转)
git的安装: yum 源仓库里的 Git 版本更新不及时,最新版本的 Git 是 1.8.3.1,但是官方最新版本已经到了 2.9.2.想要安装最新版本的的 Git,只能下载源码进行安装. 1. 查 ...
随机推荐
- 安装mongodb-window10版
第一.下载mongodb 官方地址:https://www.mongodb.com/ 第二步mongodb安装 运行mongodb-win32-x86_64-2008plus-ssl-v3.4-lat ...
- Leetcode题目79.单词搜索(回溯+DFS-中等)
题目描述: 给定一个二维网格和一个单词,找出该单词是否存在于网格中. 单词必须按照字母顺序,通过相邻的单元格内的字母构成,其中“相邻”单元格是那些水平相邻或垂直相邻的单元格.同一个单元格内的字母不允许 ...
- 数据库 | SQL 诊断优化套路包,套路用的对,速度升百倍
本文出自头条号老王谈运维,转载请说明出处. 前言 在DBA的日常工作中,调整个别性能较差的SQL语句是一项富有挑战性的工作.面对慢SQL,一些DBA会心烦,会沮丧,会束手无措,也会沉着冷静.斗智斗勇! ...
- jquery简单入门1
前端 html:展示 form: 属性: action和method 子标签: input(10种) text password radio checkbox file submit button r ...
- postgres serial创建自增列
Sequence是数据库中一类特殊的对象,其用于生成唯一数字标识符.一个典型的应用场景就是手动生成一系列主键.Sequence和MySQL中的AUTO_INCREMENT的概念很像. 创建序列Sequ ...
- DS1302时钟基础使用(含代码)
了解其管脚 X1 X2 32.768KHz 晶振管脚 GND 地 RST 复位脚 I/O 数据输入/输出引脚,具有三态 SCLK 串行时钟 Vcc1,Vcc2(备用电源供电) 电源供电管脚 DS130 ...
- .NET Core WebApi中返回 json 数据首字母大小写问题
public void ConfigureServices(IServiceCollection services) { services.AddMvc().AddJsonOptions(opt =& ...
- 鸟哥私房菜基础篇:例行性工作排程 (crontab)习题
猫宁!!! 参考:http://cn.linux.vbird.org/linux_basic/0430cron.php 1-今天假设我有一个命令程序,名称为: ping.sh 这个档名!我想要让系统每 ...
- Linux三种SSH协议登陆方式
在实际工作中遇到了三种不同SSH协议登陆Linux服务器的方式,由简单到复杂分别阐述:一.最简单也是最不安全的root账号密码登陆通过root账号+root密码登陆Linux服务器. 二.普通用户登陆 ...
- XCTF攻防世界Web之WriteUp
XCTF攻防世界Web之WriteUp 0x00 准备 [内容] 在xctf官网注册账号,即可食用. [目录] 目录 0x01 view-source2 0x02 get post3 0x03 rob ...