微信小程序 自定义单选复选按钮组的实现(用于实现购物车产品列表功能)
(一)单选按钮组
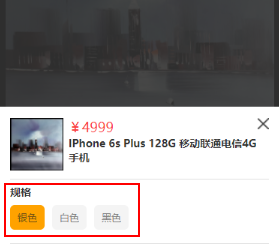
模型图如下:
index.js
Page({

  data: {

    parameter: [{ id: 1, name: '银色' }, { id: 2, name: '白色' },{ id: 3, name: '黑色' }],//模拟商品参数数据,如果是线上版本需要自行发起request请求

  },

  onLoad: function (options) {

     this.data.parameter[0].checked = true;

    this.setData({

      parameter: this.data.parameter,

    })//默认parameter数组的第一个对象是选中的

  },

   // 参数点击响应事件

  parameterTap:function(e){//e是获取e.currentTarget.dataset.id所以是必备的,跟前端的data-id获取的方式差不多

    var that=this

    var this_checked = e.currentTarget.dataset.id

    var parameterList = this.data.parameter//获取Json数组

    for (var i = 0; i < parameterList.length;i++){

      if (parameterList[i].id == this_checked){

        parameterList[i].checked = true;//当前点击的位置为true即选中

      }

      else{

        parameterList[i].checked = false;//其他的位置为false

      }

    }

    that.setData({

      parameter: parameterList

    })

  }

})
index.wxml
<view class='fwb fz-28 mgt-16 mgb-10'>规格</view>

  <view class='parameter-wrap'>

    <block wx:for="{{parameter}}" wx:key="parameter">

    <text class='parameter-info text-over {{item.checked?"checked_parameter":""}}' data-id='{{item.id}}' bindtap='parameterTap'>{{item.name}}</text>

    </block>

  </view>
index.wxss
.checked_parameter{

  background: rebeccapurple;

  padding: 3px;

  border-radius: 5px;

  color: #fff;

}
Tips:此处的{{item.checked?”checked_parameter”:”“}}为三元选择器,即通过checked判断当前是否为选中样式,而后进行样式的添加checked_parameter。
(二)多选按钮组
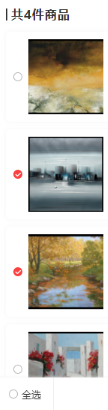
模型图如下:
cartList.js
Page({

    data:{

    CartList:[],//做空处理,如果购物车为空后端的值没有改变,容易产生报错
  //测试数据:CartList: [{id: 1, name: '银色', checked: false},{id: 2, name: '白色', checked: false},{id: 3, name: '黑色', checked: true}]
    },

      onLoad: function () {

    // 获取购物车请求

    var that = this;

    wx.request({

      url: request_getCartList,//向后端发起请求,此处的是get的方式,如需要ajax请参照本站内的相关文章

      data: {

        "session3rd": userid,

      },

      success: function (res) {

        if (res.data.code == -2) {

          that.setData({

            CartList: []

          })

        }

        if(res.data.code==1){

          that.setData({

            CartList: list

          })

         }

       }

    })

  },

    // 多选

  chooseOs: function (event) {

    for (var i = 0; i < this.data.CartList.length; i++) {

      if (event.currentTarget.id == this.data.CartList[i].id) {

        if (this.data.CartList[i].checked == true) {

          this.data.CartList[i].checked = false;

          var CartList = this.data.CartList;

          this.setData({

            CartList//重定义CartList,使购物车的样式实现局部刷新

          })

        } else {

          this.data.CartList[i].checked = true;

          var CartList = this.data.CartList;

          this.setData({

            CartListt//重定义CartList,使购物车的样式实现局部刷新

          })

        }

      }

    }

  },

})
cartList.wxml
  <block wx:for="{{CartList}}" wx:key="">

    <view class="order-out user-shadow mgb-20 nowrap">

      <view class="check-btn" catchtap='chooseOs' id="{{item.id}}">

        <image class="absoult-v" src="{{imgSrc}}{{item.checked?'type_1':'type_0'}}.png" mode="widthFix"></image>

      </view>

    </view>

  </block>
Tips:前端页面通过catchtap的事件捕捉的方式,调用chooseOs的方法,获取当前点击对象的id即id=”{{item.id}}”,然后对选中的事件添加样式this.data.CartList[i].checked = true;,对未选中的事件删除样式this.data.CartList[i].checked = false;
(三)复选拓展-全选全不选
cart.xml
 <view class="all-btn" bindtap='allCheckTap' wx:if="{{!checked}}">

    <image src="{{imgSrc}}{{checked?'type_1':'type_0'}}.png" mode="widthFix"></image>

    <text>全选</text>

  </view>

  <view class="all-btn" bindtap='allCheckTap' wx:if="{{checked}}">

    <image src="{{imgSrc}}{{checked?'type_1':'type_0'}}.png" mode="widthFix"></image>

    <text>全不选</text>

  </view>
Tips:此处的‘全选’和‘全不选’没有合并,需要小码农们自行整合。
cartList.js
// 全选按钮

  allCheckTap: function () {

    this.setData({

      checked: !this.data.checked,

    })

    if (this.data.checked) {

      for (var i = 0; i < this.data.CartList.length; i++) {

        if (this.data.CartList[i].checked !== true) {

          this.data.CartList[i].checked = true;

          var CartList = this.data.CartList;

          this.setData({

            CartList

          })

        }

      }

    }

    else {

      for (var i = 0; i < this.data.CartList.length; i++) {

        if (this.data.CartList[i].checked == true) {

          this.data.CartList[i].checked = false;

          var CartList = this.data.CartList;

          this.setData({

            CartList

          })

        }

      }

    }

  },
tips:全选跟全部不选的逻辑比较简单就是,将所有所有的checked循环遍历this.data.CartList[i].checked == true或false,然后通过this.setData({CartList})重新定义一下,实现局部刷新。
转 : https://blog.csdn.net/qq_38209578/article/details/78810981
微信小程序 自定义单选复选按钮组的实现(用于实现购物车产品列表功能)的更多相关文章
- 微信小程序 修改(自定义) 单选/复选按钮样式 checkbox/radio样式自定义
参考文章: 微信小程序 修改(自定义) 单选/复选按钮样式 checkbox/radio样式自定义
- 微信小程序自定义Tabber,附详细源码
目录 1,前言 2,说明 3,核心代码 1,前言 分享一个完整的微信小程序自定义Tabber,tabber按钮可以设置为跳转页面,也可以设置为功能按钮.懒得看文字的可以直接去底部,博主分享了小程序代码 ...
- 微信小程序——自定义导航栏
微信头部导航栏可能通过json配置: 但是有时候我们项目需求可能需要自定义头部导航栏,如下图所示: 现在具体说一下实现步骤及方法: 步骤: 1.在 app.json 里面把 "navigat ...
- 微信小程序自定义弹窗wcPop插件|仿微信弹窗样式
微信小程序自定义组件弹窗wcPop|小程序消息提示框|toast自定义模板弹窗 平时在开发小程序的时候,弹窗应用场景还是蛮广泛的,但是微信官方提供的弹窗比较有局限性,不能自定义修改.这个时候首先想到的 ...
- 微信小程序自定义 tabbar
一定的需求情况下,无法使用小程序原生的 tabbar 的时候,需要自行实现一个和 tabbar 功能一模一样的自制组件. 查阅了海量的博客和文档之后,亲自踩坑.总结了三种在不使用微信小程序原生 tab ...
- 微信小程序-自定义底部导航
代码地址如下:http://www.demodashi.com/demo/14258.html 一.前期准备工作 软件环境:微信开发者工具 官方下载地址:https://mp.weixin.qq.co ...
- 微信小程序自定义tabbar的实现
微信小程序自定义tabbar的实现 目的:当采用微信的自定义tabbar组件的时候,切换的时候会出现闪屏的效果:当使用微信默认的tabbar的时候,限制了tabbar的数量以及灵活配置. 方案:自己动 ...
- 微信小程序 自定义导航组件 nav头部 全面屏设计
nav-dynamic 微信小程序自定义nav头部组件:适配全面屏设计: 实现功能 初始进入页面时,展示初始状态下的nav样式: 页面滚动时,监听页面滚动事件,展示滚动状态下的nav样式: 根据配置字 ...
- 微信小程序自定义组件,提示组件
微信小程序自定义组件,这里列举了一个常用的提示自定义组件,调用自定义组件中的方法和字段.仅供参考和学习. 编写组件: 在根目录下添加“components”目录,然后像添加Page页面一样添加自定义组 ...
随机推荐
- cocos2d-js 3.0 rc0 编译release报错 value for keystore is not valid. it must resolve to a single path
第一次编译是好好的,需要手工输入keystore文件地址和密码等等.第二次不需要输入,然后就直接出错了. 找了一下,发现第一步之后,cocos会记录ant信息到\frameworks\runtim ...
- 11、java5线程池之异步任务CompletionService
JDK文档描述: public interface CompletionService<V> 将生产新的异步任务与使用已完成任务的结果分离开来的服务.生产者 submit 执行的任务.使用 ...
- 转 Linux定时执行任务命令at和crontab
本文介绍在Linux下的两种定时执行任务的方法:at命令,以及crontab服务. (1)at命令 假如我们只是想要让特定任务运行一次,那么,这时候就要用到at监控程序了. 设置at命令很简单,指示定 ...
- Serv-U精简版FTP服务端
Window搭建自己的FTP,Serv-U是很不错的选择... 00.运行视图 注意: 此版本是绿色破解版,个人使用很便捷的.不建议商业使用... download: https://pan.baid ...
- Arduino的光敏传感器和超声波测距传感器测试代码
光敏传感器测试代码 使用的是一个未知名4pin模块, 4pin依次为Vcc, Gnd, DO, AO, 板载一个可调电阻以及一个LED, 调节电阻大小, 可以控制LED亮灭和DO输出变化对光亮的灵敏度 ...
- Makefile 和 CMakeLists.txt
Makefile Makefile 的格式 target: prerequisites [tab]command 例子 #Makefile all:chap1 chap2 chap1: - - - : ...
- Ubuntu 安装asciidoc时默认推荐了巨大的安装包
$ sudo apt-get install asciidocReading package lists... DoneBuilding dependency tree Reading s ...
- 敏捷开发与Scrum
敏捷开发以用户的需求进化为核心,采用迭代.循序渐进的方法进行软件开发.在敏捷开发中,软件项目在构建初期被切分成多个子项目,各个子项目的成果都经过测试,具备可视.可集成和可运行使用的特征.换言之,就是把 ...
- 苹果后门、微软垄断与Linux缺位
7月21日,法国学者J.Zdziarski指出苹果系统存在人为的预先设置的"系统后门".危害用户的信息安全. 次日,苹果承认了系统存在诊断"后门". 7月28日 ...
- JS中文转换(UTF-8),url传递中文乱码解决
来源于:http://blog.csdn.net/kuangfengbuyi/article/details/45557437 js合成url时,如果参数是中文,传到struts2中会乱码,解决办法如 ...