数学之路-python计算实战(9)-机器视觉-图像插值仿射
- 插值
- Python: cv2.resize(src, dsize[, dst[, fx[, fy[, interpolation]]]]) → dst
- interpolation –
interpolation method:
- INTER_NEAREST - a nearest-neighbor interpolation
- INTER_LINEAR - a bilinear interpolation (used by default)
- INTER_AREA - resampling using pixel area relation. It may be a preferred method for image decimation, as it gives moire’-free results. But when the image is zoomed, it is similar to theINTER_NEAREST method.
- INTER_CUBIC - a bicubic interpolation over 4x4 pixel neighborhood
- INTER_LANCZOS4 - a Lanczos interpolation over 8x8 pixel neighborhood
# -*- coding: utf-8 -*-

import cv2

fn="test2.jpg"

img=cv2.imread(fn)

w=img.shape[1]

h=img.shape[0]

#放大,双立方插值

newimg1=cv2.resize(img,(w*2,h*2),interpolation=cv2.INTER_CUBIC)

#放大, 近期邻插值

newimg2=cv2.resize(img,(w*2,h*2),interpolation=cv2.INTER_NEAREST)

#放大, 象素关系重採样

newimg3=cv2.resize(img,(w*2,h*2),interpolation=cv2.INTER_AREA)

#缩小, 象素关系重採样

newimg4=cv2.resize(img,(300,200),interpolation=cv2.INTER_AREA)

cv2.imshow('preview1',newimg1)

cv2.imshow('preview2',newimg2)

cv2.imshow('preview3',newimg3)

cv2.imshow('preview4',newimg4)

cv2.waitKey()

cv2.destroyAllWindows()
仿射可进行缩放、旋转、平衡操作
- Python: cv2.warpAffine(src, M, dsize[, dst[, flags[, borderMode[, borderValue]]]]) → dst
- C: void cvWarpAffine(const CvArr* src, CvArr* dst, const CvMat* map_matrix, intflags=CV_INTER_LINEAR+CV_WARP_FILL_OUTLIERS, CvScalar fillval=cvScalarAll(0) )
- Python: cv.WarpAffine(src, dst, mapMatrix, flags=CV_INTER_LINEAR+CV_WARP_FILL_OUTLIERS, fillval=(0, 0, 0, 0)) → None
highlight=warpaffine#cv.WarpAffine" title="Permalink to this definition" style="color: rgb(101, 161, 54); text-decoration: none; visibility: hidden; font-size: 0.8em; padding: 0px 4px;">
- C: void cvGetQuadrangleSubPix(const CvArr* src, CvArr* dst, const CvMat*map_matrix)
highlight=warpaffine#void cvGetQuadrangleSubPix(const CvArr* src, CvArr* dst, const CvMat* map_matrix)" title="Permalink to this definition" style="color: rgb(101, 161, 54); text-decoration: none; visibility: hidden; font-size: 0.8em; padding: 0px 4px;">
- Python: cv.GetQuadrangleSubPix(src, dst, mapMatrix) → None
-
Parameters: - src – input image.
- dst – output image that has the size dsize and the same type assrc .
- M –
 transformation matrix.
 - dsize – size of the output image.
- flags – combination of interpolation methods (see resize() ) and the optional flag WARP_INVERSE_MAP that means that M is the inverse transformation (
 ).
). - borderMode – pixel extrapolation method (seeborderInterpolate()); when borderMode=BORDER_TRANSPARENT , it means that the pixels in the destination image corresponding to the “outliers” in the source image are not modified by the function.
- borderValue – value used in case of a constant border; by default, it is 0.
The function warpAffine transforms the source image using the specified matrix:

getRotationMatrix2D
Calculates an affine matrix of 2D rotation.
- C++: Mat getRotationMatrix2D(Point2f center, double angle, double scale)
- Python: cv2.getRotationMatrix2D(center, angle, scale) → retval
highlight=warpaffine#cv2.getRotationMatrix2D" title="Permalink to this definition" style="color: rgb(101, 161, 54); text-decoration: none; visibility: hidden; font-size: 0.8em; padding: 0px 4px;">
- C: CvMat* cv2DRotationMatrix(CvPoint2D32f center, double angle, double scale, CvMat* map_matrix)
- Python: cv.GetRotationMatrix2D(center, angle, scale, mapMatrix) → None
-
Parameters: - center – Center of the rotation in the source image.
- angle – Rotation angle in degrees. Positive values mean counter-clockwise rotation (the coordinate origin is assumed to be the top-left corner).
- scale – Isotropic scale factor.
- map_matrix – The output affine transformation, 2x3 floating-point matrix.
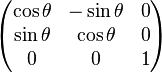
The function calculates the following matrix:

where

The transformation maps the rotation center to itself. If this is not the target, adjust the shift.
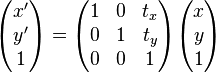
仿射变换。又称仿射映射。是指在几何中。一个向量空间进行一次线性变换并接上一个平移。变换为还有一个向量空间。
一个对向量 平移
平移 ,与旋转放大缩小
 的仿射映射为

上式在 齐次坐标上,等价于以下的式子

-
为了表示仿射变换。须要使用齐次坐标,即用三维向量 (x, y, 1) 表示二维向量,对于高维来说也是如此。依照这样的方法。就能够用矩阵乘法表示变换。
 ;
;  变为
变为在矩阵中添加一列与一行,除右下角的元素为 1 外其他部分填充为 0,通过这样的方法,全部的线性变换都能够转换为仿射变换。比如,上面的旋转矩阵变为
通过这样的方法,使用与前面一样的矩阵乘积能够将各种变换无缝地集成到一起
# -*- coding: utf-8 -*-

import cv2

fn="test3.jpg"

img=cv2.imread(fn)

w=img.shape[1]

h=img.shape[0]

#得到仿射变换矩阵,完毕旋转

#中心

mycenter=(h/2,w/2)

#旋转角度

myangle=90

#缩放尺度

myscale=0.5

#仿射变换完毕缩小并旋转

transform_matrix=cv2.getRotationMatrix2D(mycenter,myangle,myscale)

newimg=cv2.warpAffine(img,transform_matrix,(h,w))

cv2.imshow('preview',newimg)

cv2.waitKey()

cv2.destroyAllWindows()
本博客全部内容是原创,假设转载请注明来源
http://blog.csdn.net/myhaspl/

本博客全部内容是原创。假设转载请注明来源
http://blog.csdn.net/myhaspl/
数学之路-python计算实战(9)-机器视觉-图像插值仿射的更多相关文章
- 数学之路-python计算实战(21)-机器视觉-拉普拉斯线性滤波
拉普拉斯线性滤波,.边缘检測 . When ksize == 1 , the Laplacian is computed by filtering the image with the follow ...
- 数学之路-python计算实战(17)-机器视觉-滤波去噪(中值滤波)
Blurs an image using the median filter. C++: void medianBlur(InputArray src, OutputArray dst, int ks ...
- 数学之路-python计算实战(20)-机器视觉-拉普拉斯算子卷积滤波
拉普拉斯算子进行二维卷积计算,线性锐化滤波 # -*- coding: utf-8 -*- #线性锐化滤波-拉普拉斯算子进行二维卷积计算 #code:myhaspl@myhaspl.com impor ...
- 数学之路-python计算实战(15)-机器视觉-滤波去噪(归一化块滤波)
# -*- coding: utf-8 -*- #code:myhaspl@myhaspl.com #归一化块滤波 import cv2 import numpy as np fn="tes ...
- 数学之路-python计算实战(14)-机器视觉-图像增强(直方图均衡化)
我们来看一个灰度图像,让表示灰度出现的次数,这样图像中灰度为 的像素的出现概率是 是图像中全部的灰度数, 是图像中全部的像素数, 实际上是图像的直方图,归一化到 . 把 作为相应于 的累计概率 ...
- 数学之路-python计算实战(19)-机器视觉-卷积滤波
filter2D Convolves an image with the kernel. C++: void filter2D(InputArray src, OutputArray dst, int ...
- 数学之路-python计算实战(13)-机器视觉-图像增强
指数变换的基本表达式为:y=bc(x-a)-1 当中參数b.c控制曲线的变换形状,參数a控制曲线的位置. 指数变换的作用是扩展图像的高灰度级.压缩低灰度级.能够用于亮度过高的图像 本博客全部内容是原创 ...
- 数学之路-python计算实战(16)-机器视觉-滤波去噪(邻域平均法滤波)
# -*- coding: utf-8 -*- #code:myhaspl@myhaspl.com #邻域平均法滤波,半径为2 import cv2 import numpy as np fn=&qu ...
- 数学之路-python计算实战(18)-机器视觉-滤波去噪(双边滤波与高斯滤波 )
高斯滤波就是对整幅图像进行加权平均的过程.每个像素点的值,都由其本身和邻域内的其它像素值经过加权平均后得到.高斯滤波的详细操作是:用一个模板(或称卷积.掩模)扫描图像中的每个像素.用模板确定的邻域内像 ...
随机推荐
- 置顶菜单demo
一朋友需要置顶菜单的功能,给了个网站,让弄下来.看了下,就把样式及效果拔了下来.去掉了复杂的东西,只保留了其基本实现.有需要的朋友可以拿去用用. <style> #navigation{ ...
- freemarker怎么把数据显示到页面中?
第一步 创建一个User.java文件 来两个变量 public class User { private String userName; private ...
- ElasticSearch客户端注解使用介绍
The best elasticsearch highlevel java rest api-----bboss 1.ElasticSearch客户端bboss提供了一系列注解 @ESId 用于标识 ...
- em px pt单位介绍及换算
PX\EM\PT单位介绍 px Pixel单位名称为像素,相对长度单位,像素(px)是相对于显示器屏幕分辨率而言的国内推荐:em单位名称为相对长度单位.相对于当前对象内文本的字体尺寸,国外使用比较多, ...
- MFC中设备描述表dc的使用
以下代码我是在View类中实现的: /** 利用平台SDK实现画线功能 // 首先获得窗口的设备描述表 HDC hdc; hdc = ::GetDC( m_hWnd ); //调用的是平台SDK的成员 ...
- Android教你怎样一步步打造通用适配器
前言 在Android开发中ListView是最为经常使用的控件之中的一个,基本每一个应用都会涉及到它,要使用ListView列表展示,就不可避免地涉及到另外一个东西--Adapter,我们都知道,A ...
- lstm(一) 演化之路
递归神经网络引入了时序的反馈机制,在语音.音乐等时序信号的分析上有重要的意义. Hochreiter(应该是Schmidhuber的弟子)在1991年分析了bptt带来的梯度爆炸和消失问题,给学习算法 ...
- Spring(十二):IOC容器中Bean的生命周期方法
IOC容器中Bean的生命周期方法 1)Spring IOC容器可以管理Bean的声明周期,Spring允许在Bean生命周期的特定点执行定制的任务. 2)Spring IOC容器对Bean的生命周期 ...
- 解决THINKCMF后台文章的相册图集只能上传一个图片的问题
遇到的问题: 最近使用了THINKCMF给客户开发了一个企业网站,客户在使用了一段时间后打电话说后台文章编辑页面有问题 经过沟通过知道,在后台文章编辑和添加页面相册图集每次只能上传一张图片 在跟客 ...
- (转)Esfog_UnityShader教程_UnityShader语法实例浅析
距离上次首篇前言已经有一段时间了,一直比较忙,今天是周末不可以再拖了,经过我一段时间的考虑,我决定这一系列的教程会避免过于深入细节,一来可以避免一些同学被误导,二来会避免文章过于冗长难读, 三来可以让 ...