CentOS Linux release 7.6 zabbix5.0 安装
# zabbix 安装关方文档
https://www.zabbix.com/cn/download?zabbix=5.0&os_distribution=centos&os_version=7&components=server_frontend_agent&db=mysql&ws=nginx
安装步骤
Install and configure Zabbix for your platform
a. Install Zabbix repository
rpm -Uvh https://repo.zabbix.com/zabbix/5.0/rhel/7/x86_64/zabbix-release-5.0-1.el7.noarch.rpm
yum clean all
b. 安装Zabbix server,Web前端,agent
yum install zabbix-server-mysql zabbix-agent
c. Install Zabbix frontend
Enable Red Hat Software Collections
yum install centos-release-scl
编辑配置文件 /etc/yum.repos.d/zabbix.repo and enable zabbix-frontend repository.
[zabbix-frontend]
...
enabled=1
...
Install Zabbix frontend packages.
yum install zabbix-web-mysql-scl zabbix-apache-conf-scl
d. 创建初始数据库
Make sure you have database server up and running.
在数据库主机上运行以下代码。
# mysql -uroot -p
password
mysql> create database zabbix character set utf8 collate utf8_bin;
mysql> create user zabbix@localhost identified by 'password';
mysql> grant all privileges on zabbix.* to zabbix@localhost;
mysql> set global log_bin_trust_function_creators = 1;
mysql> quit;
导入初始架构和数据,系统将提示您输入新创建的密码。
# zcat /usr/share/doc/zabbix-server-mysql*/create.sql.gz | mysql -uzabbix -p zabbix
Disable log_bin_trust_function_creators option after importing database schema.
# mysql -uroot -p
password
mysql> set global log_bin_trust_function_creators = 0;
mysql> quit;
e. 为Zabbix server配置数据库
编辑配置文件 /etc/zabbix/zabbix_server.conf
DBPassword=password
f. 为Zabbix前端配置PHP
编辑配置文件 /etc/opt/rh/rh-php72/php-fpm.d/zabbix.conf uncomment and set the right timezone for you.
; php_value[date.timezone] = Asia/Shanghai
g. 启动Zabbix server和agent进程
启动Zabbix server和agent进程,并为它们设置开机自启:
# systemctl restart zabbix-server zabbix-agent httpd rh-php72-php-fpm
# systemctl enable zabbix-server zabbix-agent httpd rh-php72-php-fpm
#################################
# 从window下载字体,上传字体,解决页面乱码问题 #####
cd /usr/share/zabbix/assets/fonts
mv graphfont.ttf graphfont.ttf.bak
mv msyh.ttf graphfont.ttf
###################################
##########################################
# zabbix-agent 安装
Install and configure Zabbix for your platform
a. Install Zabbix repository
产品手册
# rpm -Uvh https://repo.zabbix.com/zabbix/5.0/rhel/7/x86_64/zabbix-release-5.0-1.el7.noarch.rpm
# yum clean all
b. Install Zabbix agent
# yum install zabbix-agent
c. Start Zabbix agent process
Start Zabbix agent process and make it start at system boot.
# systemctl restart zabbix-agent
# systemctl enable zabbix-agent
################################################################
## agent 监控端配置
# 配置文件
[root@VM-8-3-centos ~]# cat /etc/zabbix/zabbix_agentd.conf
PidFile=/var/run/zabbix/zabbix_agentd.pid
LogFile=/var/log/zabbix/zabbix_agentd.log
LogFileSize=100
Server=212.129.
StartAgents=16
DebugLevel=3
ServerActive=212.129
SourceIP=43.143
HostnameItem=system.hostname
RefreshActiveChecks=90
BufferSend=30
BufferSize=2048
Timeout=9
AllowRoot=0
Include=/etc/zabbix/zabbix_agentd.d/
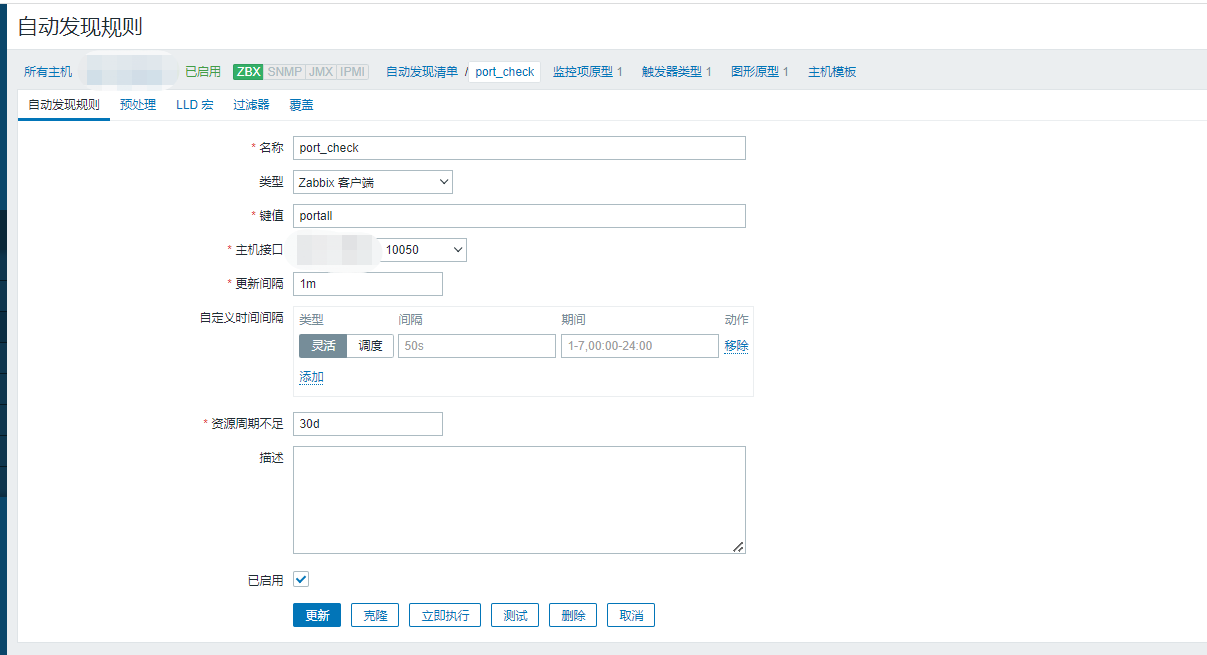
# 自定义监控项+自动发现
UserParameter=portall,/root/zabbix-test/postjson.py
UserParameter=test,cat /etc/zabbix/1.txt
# 端口监控脚本
[root@VM-8-3-centos ~]# cat /root/zabbix-test/postjson.py
#!/usr/bin/env python
import json
import os
cmd=os.popen("""netstat -ntl|tail -n +3|awk '{print $4}'|awk -F: '{print $NF}'|sort|uniq""")
ports=[]
for port in cmd.readlines():
r=port.strip()
ports+=[{'{#PORT}':r}]
print json.dumps({'data':ports},sort_keys=True,indent=4,separators=(',',':'))
# 脚本执行结果
[root@VM-8-3-centos ~]# /root/zabbix-test/postjson.py
{
"data":[
{
"{#PORT}":"10050"
},
{
"{#PORT}":"22"
},
{
"{#PORT}":"80"
},
{
"{#PORT}":"8111"
}
]
}


CentOS Linux release 7.6 zabbix5.0 安装的更多相关文章
- 看不懂打我系列------图文并茂基于CentOS Linux release 7.8.2003 Core安装并Docker化你的Node.js应用
@图文并茂基于CentOS Linux release 7.8.2003 Core安装并Docker化你的Node.js应用 简体中文 | English 说明 本文介绍如何在CentOS Linux ...
- CentOS Linux release 7.3源码安装zabbix
CentOS Linux release 7.3安装zabbix 作者:尹正杰 版权声明:原创作品,谢绝转载!否则将追究法律责任. 前言: 我去年用用centos6的环境搭建了一下 zabbix3.0 ...
- CentOS Linux release 7.6.1810全新安装 Zimbra 8.8.12邮箱
1.1 基础环境配置 1.1.1 主机名配置 [root@mail ~]# hostnamectl --static set-hostname mail.example.com [root@mai ...
- CentOS Linux release 7.5.1804下安装MySQL5.7.24
1.环境查看: 2.卸载自带MariaDB数据库: 3.下载MySQL5.7.14安装包: 4.使用wget工具下载需要安装数据库的依赖包: 5.解压缩bundel包: 6.按照顺序进行安装: 7.数 ...
- Centos Linux release 7.2.15ll (core) yum 安装java环境
系统版本 [root@localhost ~]# cat /etc/redhat-release CentOS Linux release 7.4.1708 (Core) #安装之前先查看一下有无系统 ...
- CentOS Linux release 7.3破解密码详解
CentOS Linux release 7.3破解密码详解 作者:尹正杰 版权声明:原创作品,谢绝转载!否则将追究法律责任. 公司最近接了一个项目,拿到客户现有的源代码,但是服务器用户密码并不知情, ...
- CentOS 7安装Oracle (CentOS Linux release 7.5.1804)
从安装操作系统到完成oracle安装 1.安装centos7 下载CentOS7 iso安装包,配置虚拟机,由于只进行oracle安装练习,随便配置20G空间.选择安装文件. 开机,开始安装系统: 直 ...
- CentOS Linux release 7.7.1908 (Core)--redis安装
1.通过filezilla把安装包扔到linux上,建立一个redis 的目录 2.解压 tar -zxvf redis-4.0.6.tar.gz 3. yum安装gcc依赖 yum install ...
- CentOS Linux release 7.7.1908 (Core)--rabbitmq安装
1.连接服务器,输入账号和密码,密码输入的时候是看不见的,只管输就行,然后回车. 2.安装Erlang,RabbitMQ是用这门语言写的,所以要安装他. 3.安装filezilia就是win和linu ...
- VMware中安装CentOS Linux release 7.4.1708 (Core)
本篇文章主要介绍了VMware安装Centos7超详细过程(图文),具有一定的参考价值,感兴趣的小伙伴们可以参考一下 1.软硬件准备 软件:推荐使用VMwear,我用的是VMwear 12 镜像:Ce ...
随机推荐
- AIGC 很火,想微调个自己的模型试试看?(不是卖课的)
去年,我们发布过一篇关于 DreamBooth 编程马拉松的活动通知,获得了全球社区的广泛关注和参与,中国社区的成员们也对这个活动有非常高的热情.同时我们也收到了后台留言反馈说参与活动需要使用的 Go ...
- 解决angular11打包报错Type 'Event' is missing the following properties from type 'any[]': ...Type 'Event' is not assignable to type 'string'
出现这种情况,需要检查一下以下事项 1.ts类型声明和html里写的是否一致 1.1举例如下,子组件代码需要注意事项,子组件调用父组件方法,点击传参给父组件,在父组件触发一些时间,当前this指向是父 ...
- C# 线程查漏补缺
进程和线程 不同程序执行需要进行调度和独立的内存空间 在单核计算机中,CPU 是独占的,内存是共享的,这时候运行一个程序的时候是没有问题.但是运行多个程序的时候,为了不发生一个程序霸占整个 CPU 不 ...
- C#DataTableRow列值互转
1 /// <summary> 2 /// 把DataRow中的某一列值转换为CheckState类型 3 /// </summary> 4 /// <param nam ...
- JSON Crack 数据可视化工具
JSON Crack简介 JSON Crack 是一个很方便的 JSON 数据可视化工具. 该项目不是简单的展示 JSON 数据,而是将其转化为类似思维导图的形式,支持放大/缩小.展开/收缩.搜索节点 ...
- C# winform 一个窗体需要调用自定义用户控件的控件名称
给用户控件ucQRCode增加属性: //二维码图片 private PictureBox _pictureBoxFSHLQrCode; public PictureBox PictureBoxFSH ...
- ubuntu20.04安装systemback
sudo add-apt-repository --remove ppa:nemh/systemback sudo apt-key adv --keyserver keyserver.ubuntu.c ...
- Vue前后端交互、生命周期、组件化开发
目录 Vue前后端交互.生命周期.组件化开发 一.Vue用axios与后端交互 二.Vue的生命周期 三.组件化开发 Vue前后端交互.生命周期.组件化开发 一.Vue用axios与后端交互 如果 ...
- vue3 setup语法糖下,vue自定义指令的实现,以及指令全局挂载,自定义v-loading的实现
最近一段时间,在做h5的移动端项目,UI组件库使用的vant,vant组件中的loading实在难用,无法包裹某个块进行loading,也无法对非组件的标签进行loading,所以想着自定义写个指令, ...
- 【新品发布】如何将Spire.XLS for C++集成到C++ 程序中
Spire.XLS for C++是一个 Excel 库,供开发人员在任何类型的 C++ 应用程序中操作 Excel 文档(XLS.XLSX.XLSB 和 XLSM). 本文演示了如何以两种不同的方式 ...