Springboot 系列(八)动态Banner与图片转字符图案的手动实现
注意:本 Spring Boot 系列文章基于 Spring Boot 版本 v2.1.1.RELEASE 进行学习分析,版本不同可能会有细微差别。
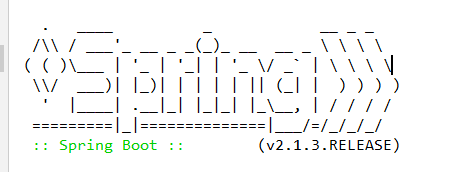
使用过 Springboot 的对上面这个图案肯定不会陌生,Springboot 启动的同时会打印上面的图案,并带有版本号。查看官方文档可以找到关于 banner 的描述
The banner that is printed on start up can be changed by adding a banner.txt file to your classpath or by setting the spring.banner.location property to the location of such a file. If the file has an encoding other than UTF-8, you can set spring.banner.charset. In addition to a text file, you can also add a banner.gif, banner.jpg, or banner.png image file to your classpath or set the spring.banner.image.location property. Images are converted into an ASCII art representation and printed above any text banner.
就不翻译了,直接有道翻译贴过来看个大概意思。
可以通过向类路径中添加一个banner.txt文件或设置spring.banner来更改在start up上打印的banner。属性指向此类文件的位置。如果文件的编码不是UTF-8,那么可以设置spring.banner.charset。除了文本文件,还可以添加横幅。将gif、banner.jpg或banner.png图像文件保存到类路径或设置spring.banner.image。位置属性。图像被转换成ASCII艺术形式,并打印在任何文本横幅上面。
1. 自定义 banner
根据官方的描述,可以在类路径中自定义 banner 图案,我们进行尝试在放 resouce 目录下新建文件 banner.txt 并写入内容(在线字符生成)。
     (_)

  _ __  _ _   _ _ __ ___   ___   ___

 | '_ \| | | | | '_ ` _ \ / _ \ / _ \

 | | | | | |_| | | | | | | (_) | (_) |

 |_| |_|_|\__,_|_| |_| |_|\___/ \___/ 版本:${spring-boot.formatted-version}
启动 Springboot 在控制台看到下面的输出。
     (_)

  _ __  _ _   _ _ __ ___   ___   ___

 | '_ \| | | | | '_ ` _ \ / _ \ / _ \

 | | | | | |_| | | | | | | (_) | (_) |

 |_| |_|_|\__,_|_| |_| |_|\___/ \___/ 版本:(v2.1.3.RELEASE)

2019-02-25 14:00:31.289  INFO 12312 --- [           main] net.codingme.banner.BannerApplication    : Starting BannerApplication on LAPTOP-L1S5MKTA with PID 12312 (D:\IdeaProjectMy\springboot-git\springboot-banner\target\classes started by Niu in D:\IdeaProjectMy\springboot-git\springboot-banner)

2019-02-25 14:00:31.291  INFO 12312 --- [           main] net.codingme.banner.BannerApplication    : No active profile set, falling back to default profiles: default

2019-02-25 14:00:32.087  INFO 12312 --- [           main] o.s.b.w.embedded.tomcat.TomcatWebServer  : Tomcat initialized with port(s): 8080 (http)
发现自定义 banner 已经生效了,官方文档的介绍里说还可以放置图片,下面放置图片 banner.jpg 测试。
网上随便找了一个图片。

再次启动观察输出。
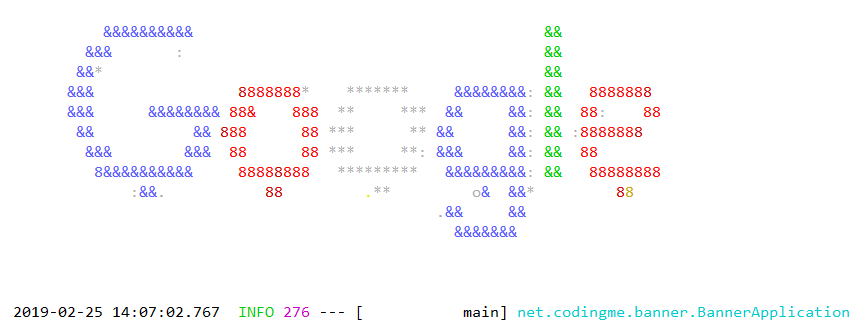
Springboot 把图案转成了 ASCII 图案。
2. ASCII 图案生成原理
看了上面的例子,发现 Springboot 可以把图片转换成 ASCII 图案,那么它是怎么做的呢?我们或许可以想象出一个大概流程。
- 获取图片。
- 遍历图片像素点。
- 分析像素点,每个像素点根据颜色深度得出一个值,根据明暗度匹配不同的字符。
- 输出图案。
Springboot 对图片 banner 的处理到底是不是我们上面想想的那样呢?直接去源码中寻找答案。
/** 位置:org.springframework.boot.SpringApplicationBannerPrinter */

//方法1:

public Banner print(Environment environment, Class<?> sourceClass, Log logger) {

	    // 获取 banner  调用方法记为2

		Banner banner = getBanner(environment);

		try {

			logger.info(createStringFromBanner(banner, environment, sourceClass));

		}

		catch (UnsupportedEncodingException ex) {

			logger.warn("Failed to create String for banner", ex);

		}

		// 打印 banner

		return new PrintedBanner(banner, sourceClass);

}

// 方法2

private Banner getBanner(Environment environment) {

		Banners banners = new Banners();

		// 获取图片banner,我们只关注这个,调用方法记为3

		banners.addIfNotNull(getImageBanner(environment));

		banners.addIfNotNull(getTextBanner(environment));

		if (banners.hasAtLeastOneBanner()) {

			return banners;

		}

		if (this.fallbackBanner != null) {

			return this.fallbackBanner;

		}

		return DEFAULT_BANNER;

	}

// 方法3

/** 获取自定义banner文件信息 */

private Banner getImageBanner(Environment environment) {

	// BANNER_IMAGE_LOCATION_PROPERTY = "spring.banner.image.location";

		String location = environment.getProperty(BANNER_IMAGE_LOCATION_PROPERTY);

		if (StringUtils.hasLength(location)) {

			Resource resource = this.resourceLoader.getResource(location);

			return resource.exists() ? new ImageBanner(resource) : null;

		}

		// IMAGE_EXTENSION = { "gif", "jpg", "png" };

		for (String ext : IMAGE_EXTENSION) {

			Resource resource = this.resourceLoader.getResource("banner." + ext);

			if (resource.exists()) {

				return new ImageBanner(resource);

			}

		}

		return null;

}
上面是寻找自定义图片 banner 文件源码,如果把图片转换成 ASCII 图案继续跟进,追踪方法1中的PrintedBanner(banner, sourceClass)方法。最终查找输出图案的主要方法。
// 位置:org.springframework.boot.ImageBanner#printBanner

private void printBanner(BufferedImage image, int margin, boolean invert,

			PrintStream out) {

		AnsiElement background = invert ? AnsiBackground.BLACK : AnsiBackground.DEFAULT;

		out.print(AnsiOutput.encode(AnsiColor.DEFAULT));

		out.print(AnsiOutput.encode(background));

		out.println();

		out.println();

		AnsiColor lastColor = AnsiColor.DEFAULT;

		// 图片高度遍历

		for (int y = 0; y < image.getHeight(); y++) {

			for (int i = 0; i < margin; i++) {

				out.print(" ");

			}

			// 图片宽度遍历

			for (int x = 0; x < image.getWidth(); x++) {

				// 获取每一个像素点

				Color color = new Color(image.getRGB(x, y), false);

				AnsiColor ansiColor = AnsiColors.getClosest(color);

				if (ansiColor != lastColor) {

					out.print(AnsiOutput.encode(ansiColor));

					lastColor = ansiColor;

				}

				// 像素点转换成字符输出,调用方法记为2

				out.print(getAsciiPixel(color, invert));

			}

			out.println();

		}

		out.print(AnsiOutput.encode(AnsiColor.DEFAULT));

		out.print(AnsiOutput.encode(AnsiBackground.DEFAULT));

		out.println();

	}

// 方法2,像素点转换成字符

	private char getAsciiPixel(Color color, boolean dark) {

		// 根据 color 算出一个亮度值

		double luminance = getLuminance(color, dark);

		for (int i = 0; i < PIXEL.length; i++) {

			// 寻找亮度值匹配的字符

			if (luminance >= (LUMINANCE_START - (i * LUMINANCE_INCREMENT))) {

				// PIXEL = { ' ', '.', '*', ':', 'o', '&', '8', '#', '@' };

				return PIXEL[i];

			}

		}

		return PIXEL[PIXEL.length - 1];

	}
通过查看源码,发现 Springboot 的图片 banner 的转换和我们预想的大致一致,这么有趣的功能我们能不能自己写一个呢?
3.自己实现图片转 ASCII字符
根据上面的分析,总结一下思路,我们也可以手动写一个图片转 ASCII 字符图案。
思路如下:
- 图片大小缩放,调整到合适大小。
- 遍历图片像素。
- 获取图片像素点亮度(RGB颜色通过公式可以得到亮度数值)。
- 匹配字符。
- 输出图案。
上面的5个步骤直接使用 Java 代码就可以完整实现,下面是编写的源码。
import java.awt.*;

import java.awt.image.BufferedImage;

import java.io.File;

import java.io.FileOutputStream;

import java.io.IOException;

import javax.imageio.ImageIO;

/**

 * <p>

 * 根据图片生成字符图案

 * 1.图片大小缩放

 * 2.遍历图片像素点

 * 3.获取图片像素点亮度

 * 4.匹配字符

 * 5.输出图案

 *

 * @author  niujinpeng

 * @website www.codingme.net

 * @date 2019-02-25 23:03:01

 */

public class GeneratorTextImage {

    private static final char[] PIXEL = {'@', '#', '8', '&', 'o', ':', '*', '.', ' '};

    public static void main(String[] args) throws Exception {

        // 图片缩放

        BufferedImage bufferedImage = makeSmallImage("src/main/resources/banner.jpg");

        // 输出

        printImage(bufferedImage);

    }

    public static void printImage(BufferedImage image) throws IOException {

        int width = image.getWidth();

        int height = image.getHeight();

        for (int i = 0; i < height; i++) {

            for (int j = 0; j < width; j++) {

                int rgb = image.getRGB(j, i);

                Color color = new Color(rgb);

                int red = color.getRed();

                int green = color.getGreen();

                int blue = color.getBlue();

                // 一个用于计算RGB像素点亮度的公式

                Double luminace = 0.2126 * red + 0.7152 * green + 0.0722 * blue;

                double index = luminace / (Math.ceil(255 / PIXEL.length) + 0.5);

                System.out.print(PIXEL[(int)(Math.floor(index))]);

            }

            System.out.println();

        }

    }

    public static BufferedImage makeSmallImage(String srcImageName) throws Exception {

        File srcImageFile = new File(srcImageName);

        if (srcImageFile == null) {

            System.out.println("文件不存在");

            return null;

        }

        FileOutputStream fileOutputStream = null;

        BufferedImage tagImage = null;

        Image srcImage = null;

        try {

            srcImage = ImageIO.read(srcImageFile);

            int srcWidth = srcImage.getWidth(null);// 原图片宽度

            int srcHeight = srcImage.getHeight(null);// 原图片高度

            int dstMaxSize = 90;// 目标缩略图的最大宽度/高度,宽度与高度将按比例缩写

            int dstWidth = srcWidth;// 缩略图宽度

            int dstHeight = srcHeight;// 缩略图高度

            float scale = 0;

            // 计算缩略图的宽和高

            if (srcWidth > dstMaxSize) {

                dstWidth = dstMaxSize;

                scale = (float)srcWidth / (float)dstMaxSize;

                dstHeight = Math.round((float)srcHeight / scale);

            }

            srcHeight = dstHeight;

            if (srcHeight > dstMaxSize) {

                dstHeight = dstMaxSize;

                scale = (float)srcHeight / (float)dstMaxSize;

                dstWidth = Math.round((float)dstWidth / scale);

            }

            // 生成缩略图

            tagImage = new BufferedImage(dstWidth, dstHeight, BufferedImage.TYPE_INT_RGB);

            tagImage.getGraphics().drawImage(srcImage, 0, 0, dstWidth, dstHeight, null);

            return tagImage;

        } finally {

            if (fileOutputStream != null) {

                try {

                    fileOutputStream.close();

                } catch (Exception e) {

                }

                fileOutputStream = null;

            }

            tagImage = null;

            srcImage = null;

            System.gc();

        }

    }

}
还是拿上面的 Google log 图片作为实验对象,运行得到字符图案输出。

文章代码已经上传到 GitHub Spring Boot。
<完>
欢迎点赞关注!
本文原发于个人博客:https://www.codingme.net 转载请注明出处

Springboot 系列(八)动态Banner与图片转字符图案的手动实现的更多相关文章
- 32. Springboot 系列(八)动态Banner与图片转字符图案的手动实现
使用过 Springboot 的对上面这个图案肯定不会陌生,Springboot 启动的同时会打印上面的图案,并带有版本号.查看官方文档可以找到关于 banner 的描述 The banner tha ...
- [转]SpringBoot系列——花里胡哨的banner.txt
Creating ASCII Text Banners from the Linux Command Line In Ubuntu, Debian, Linux Mint etc. $ sudo ap ...
- SpringBoot系列——花里胡哨的banner.txt
前言 我们注意到springboot项目启动时,控制台会打印自带的banner,然后对于部分IT骚年来说,太单调太普通太一般了:所以,是时候表演真正的技术了 项目结构 我们只需要在springboot ...
- springboot系列八、springboot整合kafka
背景: 当业务在同一时间出现高并发的时候,这个时候我们不想无限的增加服务器,但是又想提高吞吐量.这时可以考虑使用消息异步处理,进行消峰填谷:同时还可以降低耦合度.常见的消息中间件有kafka,rabb ...
- SpringBoot系列八:SpringBoot整合消息服务(SpringBoot 整合 ActiveMQ、SpringBoot 整合 RabbitMQ、SpringBoot 整合 Kafka)
声明:本文来源于MLDN培训视频的课堂笔记,写在这里只是为了方便查阅. 1.概念:SpringBoot 整合消息服务 2.具体内容 对于异步消息组件在实际的应用之中会有两类: · JMS:代表作就是 ...
- katalon系列八:Katalon Studio图片识别
Katalon Studio自带集成了图片识别功能,有2个比较有用的图片识别相关的命令:Wait For Image Present和Click Image.这里重点讲下Click Image命令: ...
- SpringBoot系列(八)分分钟学会Springboot多种解决跨域方式
SpringBoot系列(八) 分分钟学会SpringBoot多种跨域解决方式 往期推荐 SpringBoot系列(一)idea新建Springboot项目 SpringBoot系列(二)入门知识 s ...
- SpringBoot系列——动态定时任务
前言 定时器是我们项目中经常会用到的,SpringBoot使用@Scheduled注解可以快速启用一个简单的定时器(详情请看我们之前的博客<SpringBoot系列--定时器>),然而这种 ...
- SpringBoot系列(九)单,多文件上传的正确姿势
SpringBoot系列(九)分分钟解决文件上传 往期推荐 SpringBoot系列(一)idea新建Springboot项目 SpringBoot系列(二)入门知识 springBoot系列(三)配 ...
随机推荐
- golang 中 string 转换 []byte 的一道笔试题
背景 去面试的时候遇到一道和 string 相关的题目,记录一下用到的知识点.题目如下: s:="123" ps:=&s b:=[]byte(s) pb:=&b s ...
- Javapoet源码解析
Javapoet:是生成.java源文件的开源API github:https://github.com/square/javapoet 以生成一个HelloWrold.java文件为例: pa ...
- 深度学习之卷积神经网络(CNN)
卷积神经网络(CNN)因为在图像识别任务中大放异彩,而广为人知,近几年卷积神经网络在文本处理中也有了比较好的应用.我用TextCnn来做文本分类的任务,相比TextRnn,训练速度要快非常多,准确性也 ...
- FreeSql 新的八大骚功能,.NETCore 你必须晓得的 ORM
前言 FreeSql 目前版本号 0.5.5,预计明年元旦发布 1.0.0,切莫小看了版本号,目前单元测试方法1350+,并且每个方法内的涵盖面又比较广(不信的话见下图),每一次版本发布都作了较多的测 ...
- subprocess实时获取结果和捕获错误
需要调用命令行来执行某些命令,主要是用 subprocess 实时获取结果和捕获错误,发现subprocess的很多坑. subprocess 普通获取结果方式,其需要命令完全执行才能返回结果: im ...
- typeconfig.json配置说明
如果一个目录下存在一个tsconfig.json文件,那么它意味着这个目录是TypeScript项目的根目录. 不带任何输入文件的情况下调用tsc,编译器会从当前目录开始去查找tsconfig.jso ...
- css中margin为负数的深入研究
注:以下实验的元素均为块级元素,inline-block和inline本身对margin某些方向上都是无效的,所以这里不予讨论. margin-left或者margin-right为负数 当块元素wi ...
- 二分法与二叉树的 Java 实现
算法与数据结构始终是计算机基础的重要一环,今天我们来讨论下 Java 中二叉树的实现以及一些简单的小算法,如二分查找,归并排序等. 二分查找 二分查找是一种在有序数组中查找某一特定元素的搜索算法,它在 ...
- MVC图片上传详解
MVC图片上传--控制器方法 新建一个控制器命名为File,定义一个Img方法 [HttpPost]public ActionResult Img(HttpPostedFileBase shangch ...
- 海思Hi3559A/CV100 DDR4驱动配置手册
Hi3559AV100 DDR4 驱动配置说明 1.1 Hi3559AV100 DDR4 CLK/AC 驱动配置方法 寄存器地址 DDR PHY0:0x1206d0bc DDR PHY1:0x1206 ...