钩子(hooks)—webhook-使用钩子自动触发部署
钩子(hooks)—webhook
http://fighter.blog.51cto.com/1318618/1670667
https://www.lovelucy.info/auto-deploy-website-by-webhooks-of-github-and-gitlab.html
什么是webhook?
wehook
A webhook is an API concept that's growing(激发) in popularity. As more and more of what we do on the web can be described by events, webhooks are becoming even more applicable. They're incredibly useful and a
resource-light way to implement event reactions.
webhook是个在特定情况下触发的一种api. 越来越多在web上的操作被描述为事件.
那个 Payload URL 上填上需要部署到的服务器的网址,比方说 http://dev.lovelucy.info/incoming。然后之后每次有 push 事件 GitHub 都会主动往这个地址发送一个 POST
请求,当然你也可以选择任何事件都发个 POST 通知你。GitHub 还有个 Secret 的设定,就是一个字符串,如果加上的话就在 POST 请求的 HTTP 头中会带一个 Hash 值做验证密文,证明这个 POST 真是来自 GitHub,不然任何人都往那个地址 POST 忽悠你你都不知道谁是谁对吧……
what is events?
Events are at the core of webhooks. These webhooks fire whenever a certain action is taken on the repository, which your server's payload URL intercepts and acts upon.
事件是webhook的核心,当仓库发生特定action会触发webhook,
gitlab中解释: Web 钩子用于在项目发生相关事件时通知外部服务器。
Git是在特定事件发生之前或之后执行特定脚本代码功能(从概念上类比,就与监听事件、触发器之类的东西类似)。
Git Hooks就是那些在Git执行特定事件(如commit、push、receive等)后触发运行的脚本。
gitlab的web hooks跟git hook类似。也是当项目发生提交代码、提交tag等动作会自动去调用url,这个url可以是更新代码。或者其他操作。
配置目的:
由于系统属于后台接口系统,开发提交完git仓库后要实时的部署到测试环境,这时候就需要用到gitlab的web hooks自动更新部署了。
客户端:要自动更新的测试服务器IP:192.168.1.2
服务端:Gitlab服务器IP:192.168.1.1
Gitlab Version: 7.13.0.pre
GitLab-Shell Version: 2.6.3
1、在客户端上面配置apache配置文件,为web hooks添加一个接口访问
- #vim /usr/local/apache/conf/httpd.conf
- listen 81
- <VirtualHost *:81>
- ServerAdmin localhost
- DocumentRoot "/www/gitlab_web"
- <Directory "/www/gitlab_web">
- Options -Indexes +FollowSymLinks
- AllowOverride None
- Order allow,deny
- Allow from all
- </Directory>
- RewriteEngine on
- </VirtualHost>
#vim /usr/local/apache/conf/httpd.conf

listen 81

<VirtualHost *:81>

          ServerAdmin localhost

          DocumentRoot "/www/gitlab_web"

       <Directory "/www/gitlab_web">

            Options -Indexes +FollowSymLinks

            AllowOverride None

            Order allow,deny

            Allow from all

          </Directory>

       RewriteEngine on

</VirtualHost>
2、在服务端gitlab上面为客户端添加gitlab新账号,然后将生成好的公钥添加到gitlab好的账号里面(profile setting-->SSH Keys -->add ssh key)
- #su - webuser
- #ssh-keygen -t rsa
- 进入项目目录
- #cd /path/project
- 初始化git仓库
- #git clone git@192.168.1.1:test/test_api.git
#su - webuser

#ssh-keygen -t rsa

进入项目目录

#cd /path/project

初始化git仓库

#git clone git@192.168.1.1:test/test_api.git
3、在客户端上面添加接口文件
- [root@node1 gitlab_web]# pwd
- /www/gitlab_web
- [root@node1 gitlab_web]# cat index.php
- <?php
- //作为接口传输的时候认证的密钥
- $valid_token = 'd49dfa762268687eb2ca59498ce852';
- //调用接口被允许的ip地址
- $valid_ip = array('192.168.14.2','192.168.14.1','192.168.14.128');
- $client_token = $_GET['token'];
- $client_ip = $_SERVER['REMOTE_ADDR'];
- $fs = fopen('./auto_hook.log', 'a');
- fwrite($fs, 'Request on ['.date("Y-m-d H:i:s").'] from ['.$client_ip.']'.PHP_EOL);
- if ($client_token !== $valid_token)
- {
- echo "error 10001";
- fwrite($fs, "Invalid token [{$client_token}]".PHP_EOL);
- exit(0);
- }
- if ( ! in_array($client_ip, $valid_ip))
- {
- echo "error 10002";
- fwrite($fs, "Invalid ip [{$client_ip}]".PHP_EOL);
- exit(0);
- }
- $json = file_get_contents('php://input');
- $data = json_decode($json, true);
- fwrite($fs, 'Data: '.print_r($data, true).PHP_EOL);
- fwrite($fs, '======================================================================='.PHP_EOL);
- $fs and fclose($fs);
- //这里也可以执行自定义的脚本文件update.sh,脚本内容可以自己定义。
- //exec("/bin/sh /root/updategit.sh");
- exec("/bin/echo $valid_ip >>/tmp/webhook.txt");
[root@node1 gitlab_web]# pwd

/www/gitlab_web

[root@node1 gitlab_web]# cat index.php

<?php

//作为接口传输的时候认证的密钥

$valid_token = 'd49dfa762268687eb2ca59498ce852';

//调用接口被允许的ip地址

$valid_ip = array('192.168.14.2','192.168.14.1','192.168.14.128');

$client_token = $_GET['token'];

$client_ip = $_SERVER['REMOTE_ADDR'];

$fs = fopen('./auto_hook.log', 'a');

fwrite($fs, 'Request on ['.date("Y-m-d H:i:s").'] from ['.$client_ip.']'.PHP_EOL);

if ($client_token !== $valid_token)

{

    echo "error 10001";

    fwrite($fs, "Invalid token [{$client_token}]".PHP_EOL);

    exit(0);

}

if ( ! in_array($client_ip, $valid_ip))

{

    echo "error 10002";

    fwrite($fs, "Invalid ip [{$client_ip}]".PHP_EOL);

    exit(0);

}

$json = file_get_contents('php://input');

$data = json_decode($json, true);

fwrite($fs, 'Data: '.print_r($data, true).PHP_EOL);

fwrite($fs, '======================================================================='.PHP_EOL);

$fs and fclose($fs);

//这里也可以执行自定义的脚本文件update.sh,脚本内容可以自己定义。

//exec("/bin/sh /root/updategit.sh");

exec("/bin/echo $valid_ip >>/tmp/webhook.txt");
4、访问接口,测试接口是否成功
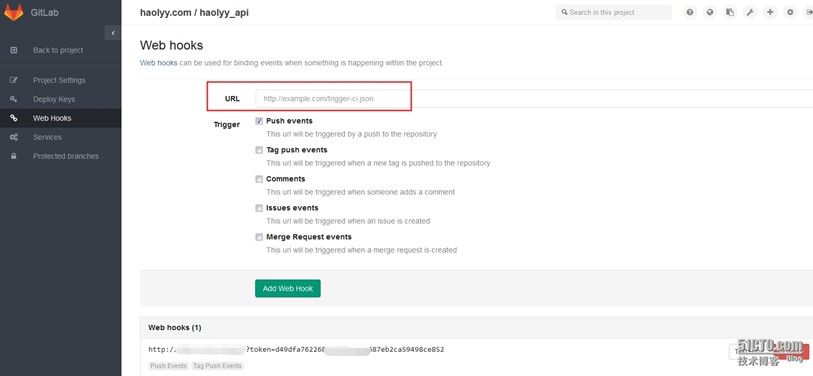
http://192.168.14.128:81/?token=d49dfa7622681425fbcbdd687eb2ca59498ce852
当然网页是空白的.
5、查看客户端日志
#cat /www/gitlab_web/auto_hook.log
=======================================================================
Request on [2015-07-03 14:05:02] from [112.122.112.112]
Data:
=======================================================================
6、在服务端gitlab服务器上面添加web hooks
admin area->projects->test/edit->WEB Hooks->add WEB Hooks
7、提交修改代码到gitlab仓库,然后查看日志、查看测试环境是否更新
#cat /www/gitlab_web/auto_hook.log
Request on [2015-07-03 14:13:37] from [12.123.12.3]
Data: Array
(
[object_kind] => push
[before] => e5988b5dce7a038
[after] => d8ce92ac4ab4ba046dd
[ref] => refs/heads/master
[checkout_sha] => d8ceefd5c4ab4ba046dd
[message] =>
[user_id] => 7
[user_name] => test
[user_email] => test@qq.com
[project_id] => 3
[repository] => Array
(
[name] => test_api
[url] => git@192.168.1.1:test/test.api
[description] => test.com product code
[homepage] => http://xx./test_api
[git_http_url] => http://xx./test_api
[git_ssh_url] => git@112.23.23.1:test.git
[visibility_level] => 10
)
[commits] => Array
(
[0] => Array
(
[id] => d8cec4ab4ba046dd
[message] => 测试gitlab的web hook接口。
[timestamp] => 2015-07-03T14:13:51+08:00
[url] => http://xxxx/test_api/commit/d8ce95c4ab4ba046dd
[author] => Array
(
[name] => test
[email] => test@qq.com
)
)
)
[total_commits_count] => 1
)
注意事项:
1、配置完成后。调用接口的时候没有自动更新到测试环境。可以使用apache的运行用户测试命令是否可以执行成功
#su - webuser
#cd /path/project
#git pull
2、如果apache的用户无法执行命令或者无法更新git代码请检查一下apache用户的shell。
参考资料:
http://blog.ycnets.com/2013/10/19/automatic-update-version-with-gitlab-web-hook/#disqus_thread
钩子(hooks)—webhook-使用钩子自动触发部署的更多相关文章
- Jenkins之自动触发部署之插件Generic Webhook Trigger Plugin
一.安装好插件 二.构建触发器会出现设置trigger的入口 三.设置的两个部分 第一: Jenkins的这个触发器,这里主要是接受post数据.其中Post content parameters是用 ...
- 8.3 Customizing Git - Git Hooks 钩子 自动拉取 自动部署 提交工作流钩子,电子邮件工作流钩子和其他钩子
https://git-scm.com/book/en/v2/Customizing-Git-Git-Hooks https://github.com/git/git/blob/master/temp ...
- jenkins 整合maven,svn(配置钩子程序实现提交代码自动构建),tomcat实现热部署(windows+linux分别实现)
springboot : https://blog.csdn.net/zjh_746140129/article/details/80904876 1 准备工作: (1)运行jenkins的tomca ...
- svn钩子(hooks)
目录 钩子脚本的具体写法就是操作系统中shell脚本程序的写法,请根据自己SVN所在的操作系统和shell程序进行相应的写作 所谓钩子就是与一些版本库事件触发的程序,例如新修订版本的创建,或是未版本化 ...
- 【pytest官方文档】解读- 插件开发之hooks 函数(钩子)
上一节讲到如何安装和使用第三方插件,用法很简单.接下来解读下如何自己开发pytest插件. 但是,由于一个插件包含一个或多个钩子函数开发而来,所以在具体开发插件之前还需要先学习hooks函数. 一.什 ...
- Pytest权威教程19-编写钩子(Hooks)方法函数
目录 编写钩子(Hooks)函数 钩子函数验证和执行 firstresult: 遇到第一个有效(非None)结果返回 hookwrapper:在其他钩子函数周围执行 钩子(Hooks)函数排序/调用示 ...
- 使用Docker+Jenkins自动构建部署
环境 Windows 10 Docker Version 18.06.1-ce-win73 (19507) 运行jenkins 运行jenkins 容器 docker run -d --name ln ...
- 配置GitLab Push 自动触发Jenkins构建
配置GitLab Push 自动触发Jenkins构建 作者:尹正杰 版权声明:原创作品,谢绝转载!否则将追究法律责任. 本篇博客是对之前的笔记:https://www.cnblogs.com/yin ...
- Gitlab自动触发Jenkins构建项目
Gitlab自动触发Jenkins构建项目 一.前提 Gitlab已安装配置好. Jenkins已安装Gitlab plugin. 二.配置jenkins中Job 1.勾选触发器下的gitlab触发器 ...
随机推荐
- Java文件(io)编程——文件字符流的使用
案例1: 读取一个文件并写入到另一个文件中,char[] 来中转. 首先要在E盘下创建一个文本文档,命名为test.txt,输入一些字符串. public class Demo_5 { public ...
- jquery根据接口返回的值来设置asp:CheckBoxList的选中值
接口返回一个json的值,然后通过jquery来选中asp:CheckBoxList相应选中的值 <asp:CheckBoxList runat="server" Repea ...
- python中的json
import json# dumps #一般处理字符串# dump #一般处理文件 #字符串和json之间的转换test_dict={"name":"fxh", ...
- linux系统利用GPU跑数据(tensorflow)
https://blog.csdn.net/qq_26591517/article/details/82469680 查看机器上GPU情况 命令: nvidia-smi 功能:显示机器上gpu的情况 ...
- Ncomputering 安装及参数设置
1.加域 2.添加用户:系统属性---远程
- BZOJ 3376 [Usaco2004 Open]Cube Stacking 方块游戏(带权并查集)
题解 #include<iostream> #include<cstring> #include<cstdio> #include<cmath> #in ...
- 抓取豆瓣的电影排行榜TOP100
#!/usr/bin/env python # -*- coding:utf-8 -*- """ 一个简单的Python爬虫, 用于抓取豆瓣电影Top前100的电影的名称 ...
- 成长日记--记录在WB的第一个项目。
具体为什么跑去外包,只能说自己太水了,或者太懒了,都不好好投简历,也没入这个坑过,如果有想去外包的,除非钱给到市场价的1.5倍以上,否则别考虑了. 项目是国内第一做通信公司的,从具体的需求说起比较好, ...
- 洛谷 P1005 矩阵取数游戏 (区间dp+高精度)
这道题大部分时间都在弄高精度-- 还是先讲讲dp吧 这道题是一个区间dp,不过我还是第一次遇到这种类型的区间dp f[i][j]表示取了数之后剩下i到j这个区间的最优值 注意这里是取了i之前和j之后的 ...
- 【codeforces 348B】Apple Tree
[题目链接]:http://codeforces.com/problemset/problem/348/B [题意] 给你一棵树; 叶子节点有权值; 对于非叶子节点: 它的权值是以这个节点为根的子树上 ...