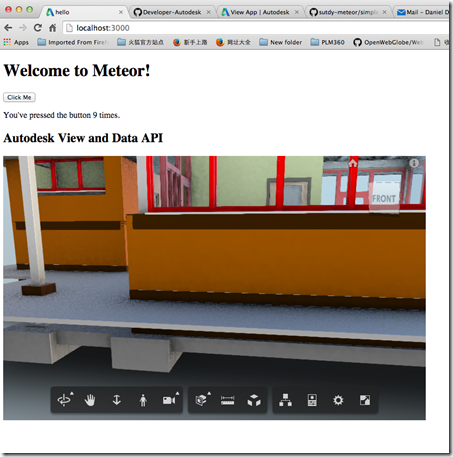
Using View and Data API with Meteor
By Daniel Du
I have been studying Meteor these days, and find that Meteor is really a mind-blowing framework, I can talk about this latter. I was inspired by this question on forum and started to looking at the possibilities of using View and Data API in Meteor. Since the way of Meteor works is so different, I have to say that it is not pleasant experience to do that especially for a meteor starter like me. Anyway, after struggling for days, trying this and that, I finally made a simple working site and deployed it as http://lmv.meteor.com. In this post I will write down how I did this, hopefully it is helpful in case you are doing similar stuff.
Firstly I created a Meteor project with “meteor create myproject” command, which creates a “hello world” project. To make it look nice, I refactored the folder structure according to the document of meteor about file structure as below:
.
├── README.md
├── client
│ ├── index.html
│ ├── index.js
│ ├── style.css
│ └── viewer
│ ├── viewer.html
│ └── viewer.js
├── lib
└── server
└── index.js
The “client” folder contains the contents which are running at client side, “server” folder contains the scripts which are running at server side.
To use View and Data API, we need to do the authentication process to get access token with consumer key/ secret key, which can be applied from http://developer.autodesk.com . The authentication should be done at server side, otherwise your secret key will be peeked by hackers, so I will do the authentication in “\server\index.js”. But first let me add the “http” package to send REST request to Autodesk authentication server from meteor. You can do this by running command “meteor add http” from command line, and you can also edit “./meteor/packages” file directly, so here is my packages file:
===========================
# Meteor packages used by this project, one per line.
# Check this file (and the other files in this directory) into your repository.
#
# 'meteor add' and 'meteor remove' will edit this file for you,
# but you can also edit it by hand.
meteor-base # Packages every Meteor app needs to have
mobile-experience # Packages for a great mobile UX
mongo # The database Meteor supports right now
blaze-html-templates # Compile .html files into Meteor Blaze views
session # Client-side reactive dictionary for your app
jquery # Helpful client-side library
tracker # Meteor's client-side reactive programming library
standard-minifiers # JS/CSS minifiers run for production mode
es5-shim # ECMAScript 5 compatibility for older browsers.
ecmascript # Enable ECMAScript2015+ syntax in app code
autopublish # Publish all data to the clients (for prototyping)
insecure # Allow all DB writes from clients (for prototyping)
# Allow to send REST calls to authentication server
http
.csharpcode, .csharpcode pre
{
font-size: small;
color: black;
font-family: consolas, "Courier New", courier, monospace;
background-color: #ffffff;
/*white-space: pre;*/
}
.csharpcode pre { margin: 0em; }
.csharpcode .rem { color: #008000; }
.csharpcode .kwrd { color: #0000ff; }
.csharpcode .str { color: #006080; }
.csharpcode .op { color: #0000c0; }
.csharpcode .preproc { color: #cc6633; }
.csharpcode .asp { background-color: #ffff00; }
.csharpcode .html { color: #800000; }
.csharpcode .attr { color: #ff0000; }
.csharpcode .alt
{
background-color: #f4f4f4;
width: 100%;
margin: 0em;
}
.csharpcode .lnum { color: #606060; }
=============================
With that, I can add a Meteor method to do authentication from “/server/index.js”,. It can be called from client side with “Meteor.call()”. Here is the code snippet, please note that I am using synchronous mode when doing “Meteor.http.post”, as I found that I cannot get the returned access token from client side afterwards if I use async mode.
Meteor.startup(function () {

    // code to run on server at startup

});

Meteor.methods({

    getAccessToken: function () {

        this.unblock();

        var credentials = {

            credentials: {

                // Replace placeholder below by the Consumer Key and Consumer Secret you got from

                // http://developer.autodesk.com/ for the production server

                client_id: process.env.CONSUMERKEY || 'replace with your consumer key',

                client_secret: process.env.CONSUMERSECRET || 'your secrete key',

                grant_type: 'client_credentials'

            },

            // If you which to use the Autodesk View & Data API on the staging server, change this url

            BaseUrl: 'https://developer.api.autodesk.com',

            Version: 'v1'

        };

        credentials.AuthenticationURL = credentials.BaseUrl + '/authentication/' + credentials.Version + '/authenticate'

        //must use synchronous mode

        var result = Meteor.http.post(

            credentials.AuthenticationURL,

            {params: credentials.credentials}

        );

        //get the access token object

        return result.data;

    }

})
.csharpcode, .csharpcode pre
{
font-size: small;
color: black;
font-family: consolas, "Courier New", courier, monospace;
background-color: #ffffff;
/*white-space: pre;*/
}
.csharpcode pre { margin: 0em; }
.csharpcode .rem { color: #008000; }
.csharpcode .kwrd { color: #0000ff; }
.csharpcode .str { color: #006080; }
.csharpcode .op { color: #0000c0; }
.csharpcode .preproc { color: #cc6633; }
.csharpcode .asp { background-color: #ffff00; }
.csharpcode .html { color: #800000; }
.csharpcode .attr { color: #ff0000; }
.csharpcode .alt
{
background-color: #f4f4f4;
width: 100%;
margin: 0em;
}
.csharpcode .lnum { color: #606060; }
Now let’s back to the client side, in “/client/viewer/viewer.html” I created a simple template as below:
<Template name="viewer">

    <h2>Autodesk View and Data API</h2>

    <div id="viewer" class="viewer">

    </div>

</Template>
.csharpcode, .csharpcode pre
{
font-size: small;
color: black;
font-family: consolas, "Courier New", courier, monospace;
background-color: #ffffff;
/*white-space: pre;*/
}
.csharpcode pre { margin: 0em; }
.csharpcode .rem { color: #008000; }
.csharpcode .kwrd { color: #0000ff; }
.csharpcode .str { color: #006080; }
.csharpcode .op { color: #0000c0; }
.csharpcode .preproc { color: #cc6633; }
.csharpcode .asp { background-color: #ffff00; }
.csharpcode .html { color: #800000; }
.csharpcode .attr { color: #ff0000; }
.csharpcode .alt
{
background-color: #f4f4f4;
width: 100%;
margin: 0em;
}
.csharpcode .lnum { color: #606060; }In the “\viewer\viewer.js”, I will try to get the access token first with following code:
Template.viewer.onCreated(function(){

    //console.log('viewer template created.')

    Meteor.call('getAccessToken', function (error, result) {

        if (error) {

            console.log(error);

        }

        else {

            var token = result.access_token;

            console.log(token);

            //initialize the viewer

            initViewer(token);

        }

    });

});
.csharpcode, .csharpcode pre
{
font-size: small;
color: black;
font-family: consolas, "Courier New", courier, monospace;
background-color: #ffffff;
/*white-space: pre;*/
}
.csharpcode pre { margin: 0em; }
.csharpcode .rem { color: #008000; }
.csharpcode .kwrd { color: #0000ff; }
.csharpcode .str { color: #006080; }
.csharpcode .op { color: #0000c0; }
.csharpcode .preproc { color: #cc6633; }
.csharpcode .asp { background-color: #ffff00; }
.csharpcode .html { color: #800000; }
.csharpcode .attr { color: #ff0000; }
.csharpcode .alt
{
background-color: #f4f4f4;
width: 100%;
margin: 0em;
}
.csharpcode .lnum { color: #606060; }
When the viewer template is created, I call to the server side meteor method to do authentication and get the access token, once I get the access token, I can initialize a viewer at client side with View and Data JavaScript API. Now I can see the token from console of developer tool, so far so good.
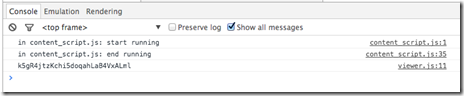
To use View and Data API, we need to add reference to viewer JavaScript libraries. It seems a very basic thing but it turns out to be the difficult part when it comes to Meteor. This blog introduced two ways to add a script tag into meteor. I tried this solution by creating a script template and load the “viewer3d.js” and viewer style file on the fly, but when I am trying to create a viewer with View and Data JavaScript API, I run to the problem as described in the forum post:
"Uncaught ReferenceError: AutodeskNamespace is not defined"
If I examined to the network tab of browser development tool, the “viewer3d.min.js” has not been loaded yet when I was trying to use it.
Meteor controls the load process of JS files and it is not easy to control the load order, here is the load order as described on meteor document:
The JavaScript and CSS files in an application are loaded according to these rules:
Files in the lib directory at the root of your application are loaded first.
Files that match main.* are loaded after everything else.
Files in subdirectories are loaded before files in parent directories, so that files in the deepest subdirectory are loaded first (after lib), and files in the root directory are loaded last (other than main.*).
Within a directory, files are loaded in alphabetical order by filename.
These rules stack, so that within lib, for example, files are still loaded in alphabetical order; and if there are multiple files named main.js, the ones in subdirectories are loaded earlier.
So since viewer js lib is loaded very late, I cannot use it in viewer.js to initialize the viewer. Luckily, I found that if I put the <script src=””/> tag into <head>, it will be loaded first, so in “/client/index.html”:
<head>

  <title>hello</title>

    <link rel="stylesheet" type="text/css" href="https://developer.api.autodesk.com/viewingservice/v1/viewers/style.css"/>

    <script src="https://developer.api.autodesk.com/viewingservice/v1/viewers/viewer3D.min.js"></script>

</head>

<body>

  <h1>Welcome to Meteor!</h1>

  {{> hello}}

  {{> viewer }}

</body>

<template name="hello">

  <button>Click Me</button>

  <p>You've pressed the button {{counter}} times.</p>

</template>
.csharpcode, .csharpcode pre
{
font-size: small;
color: black;
font-family: consolas, "Courier New", courier, monospace;
background-color: #ffffff;
/*white-space: pre;*/
}
.csharpcode pre { margin: 0em; }
.csharpcode .rem { color: #008000; }
.csharpcode .kwrd { color: #0000ff; }
.csharpcode .str { color: #006080; }
.csharpcode .op { color: #0000c0; }
.csharpcode .preproc { color: #cc6633; }
.csharpcode .asp { background-color: #ffff00; }
.csharpcode .html { color: #800000; }
.csharpcode .attr { color: #ff0000; }
.csharpcode .alt
{
background-color: #f4f4f4;
width: 100%;
margin: 0em;
}
.csharpcode .lnum { color: #606060; }
OK, with that I can initialized viewer in “/client/viewer/viewer.js” file, the code snippet is below:
Template.viewer.onCreated(function(){

    //console.log('viewer template created.')

    Meteor.call('getAccessToken', function (error, result) {

        if (error) {

            console.log(error);

        }

        else {

            var token = result.access_token;

            console.log(token);

            //initialize the viewer

            initViewer(token);

        }

    });

});

var initViewer = function (token) {

    var defaultUrn = 'dXJuOmFkc2sub2JqZWN0czpvcy5vYmplY3Q6bW9kZWwyMDE2LTAxLTI4LTAyLTQ0LTM2LWlkbWpjajl5ZXlnYzhwN3h5bDBwZXB5dm54OWkvZ2F0ZWhvdXNlLm53ZA==';

    if (defaultUrn.indexOf('urn:') !== 0)

        defaultUrn = 'urn:' + defaultUrn;

    function initializeViewer(containerId, documentId, role) {

        var viewerContainer = document.getElementById(containerId);

        var viewer = new Autodesk.Viewing.Private.GuiViewer3D(

            viewerContainer);

        viewer.start();

        Autodesk.Viewing.Document.load(documentId,

            function (document) {

                var rootItem = document.getRootItem();

                var geometryItems = Autodesk.Viewing.Document.getSubItemsWithProperties(

                    rootItem,

                    { 'type': 'geometry', 'role': role },

                    true);

                viewer.load(document.getViewablePath(geometryItems[0]));

            },

            // onErrorCallback

            function (msg) {

                console.log("Error loading document: " + msg);

            }

        );

    }

    function initialize() {

        var options = {

            env: "AutodeskProduction",

            //getAccessToken: getToken,

            //refreshToken: getToken

            accessToken : token

        };

        Autodesk.Viewing.Initializer(options, function () {

            initializeViewer('viewer', defaultUrn, '3d');

        });

    }

    //call

    initialize();

}
Now I have a running meteor application with viewer embedded. I also posted my sample on github, so you may want to take a look to check the complete code. Hope it helps some.
https://github.com/Developer-Autodesk/meteor-view.and.data.api
Using View and Data API with Meteor的更多相关文章
- Autodesk View and Data API二次开发学习指南
什么是View and Data API? 使用View and Data API,你可以轻松的在网页上显示大型三维模型或者二维图纸而不需要安装任何插件.通过View and Data API,你可以 ...
- View and Data API Tips: Constrain Viewer Within a div Container
By Daniel Du When working with View and Data API, you probably want to contain viewer into a <div ...
- View and Data API Tips: Hide elements in viewer completely
By Daniel Du With View and Data API, you can hide some elements in viewer by calling "viewer.hi ...
- 使用AxisHelper帮助理解View and Data API中的坐标系统
大家使用View and Data API做三维模型开发,必然首先要理解View and Data API的坐标系统,即XYZ三个轴向分别是怎么定义的.Three.js里面提供了一个AxisHelpe ...
- 在View and Data API中更改指定元素的颜色
大家在使用View and Data API开发过程中,经常会用到的就是改变某些元素的颜色已区别显示.比如根据某些属性做不同颜色的专题显示,或者用不同颜色表示施工进度,或者只是简单的以颜色变化来提醒用 ...
- 特大喜讯,View and Data API 现在支持中文界面了
大家经常会问到,使用View and Data API怎么做界面的本地化,来显示中文,现在好消息来了,从v1.2.19起,View and Data API开始支持多国语言界面了.你需要制定版本号为v ...
- View and Data API 现在支持IE11了
By Daniel Du After a long time waiting, IE11 finally supports WebGL, which enables us viewing our 3D ...
- View and Data API tips: 缓存Access Token
对于云API服务,常见的方式就是按照API调用次数收费,某些API调用也就有某些限制,比如在特定时间内只允许调用指定的次数以免造成滥用.虽然Autodesk的view and Data API目前还没 ...
- View and Data API Tips: how to make viewer full screen
By Daniel Du If you have not heard of View and Data API, here is the idea, the View & Data API e ...
随机推荐
- Hyper-V上运行的Linux虚拟机验证是否安装了集成服务
Hyper-V上运行的Linux虚拟机验证是否安装了集成服务 ps aux|grep "hv"root 311 0.0 0.0 0 0 ? ...
- 图形数据库Neo4J简介
最近我在用图形数据库来完成对一个初创项目的支持.在使用过程中觉得这种图形数据库实际上挺有意思的.因此在这里给大家做一个简单的介绍. NoSQL数据库相信大家都听说过.它们常常可以用来处理传统的关系型数 ...
- 最牛的打字效果JS插件 typing.js
最新在做公司的一个项目,需要实现一个敲打代码的动画效果,粗意味比较简单,果断自己直接开写,写着写着发现是一个坑.需要支持语法高亮,并不能直接简单的用setTimeout来动态附件innerHTML.苦 ...
- 内网穿透神器ngrok
相信做Web开发的同学们,经常会遇到需要将本地部署的Web应用能够让公网环境直接访问到的情况,例如微信应用调试.支付宝接口调试等.这个时候,一个叫ngrok的神器可能会帮到你,它提供了一个能够在公网安 ...
- java类的加载机制
什么是类装载器ClassLoader ClassLoader是一个抽象类 ClassLoader的实例将读入Java字节码将类装载到JVM中 ClassLoader可以定制,满足不同的字节码流获取方式 ...
- Android开发学习之路-动态高斯模糊怎么做
什么是高斯模糊? 高斯模糊(英语:Gaussian Blur),也叫高斯平滑,是在Adobe Photoshop.GIMP以及Paint.NET等图像处理软件中广泛使用的处理效果,通常用它来减少图像噪 ...
- 事件EVENT与waitforsingleobject的使用
事件event与waitforsingleobject的配合使用,能够解决很多同步问题,也可以在数据达到某个状态时启动另一个线程的执行,如报警. event的几个函数: 1.CreateEvent和O ...
- Web中的XHRHttpRequest
1.提出者:Jesse James Garrett 2.IE中,XHR是通过ActiveX对象实现的.涉及浏览器的兼容性写法. 3.使用 <1>open("请求方式&qu ...
- JavaScript权威设计--事件处理介绍(简要学习笔记十七)
1.事件相关概念 事件类型:一个用来说明发生什么类型事件的字符串 事件目标:是发生的事件或与之相关的对象. 事件处理程序(事件监听程序):是处理货响应事件的函数. 事件对象:是与特定事件相关并且包含有 ...
- ORA-01034:ORACLE not available问题的解决方法
同时在自己电脑上装了oracle客户端和服务器,上次还能用呢,这次突然用不了. [oracle@R39i oracle]$ sqlplus scott/tiger SQL*Plus: Release ...