
使用AxisHelper帮助理解View and Data API中的坐标系统
大家使用View and Data API做三维模型开发,必然首先要理解View and Data API的坐标系统,即XYZ三个轴向分别是怎么定义的。Three.js里面提供了一个AxisHelper,但如果你直接运用的话,你会发现在viewer中并不显示,并且控制台中会有这样的错误信息:"Only THREE.Mesh can be rendered by the Firefly renderer. Use THREE.Mesh to draw lines." 原因是因为View and Data API采用的是Three.js上定制的render,有些three.js中可以使用的功能在viewer中并不能用。所以我重写了一个这样的AxisHelper,希望对你有帮助。
使用非常简单,只需要加载这个扩展即可。建议在GEOMETRY_LOADED_EVENT事件中加载:
// It is recommended to load the extension when geometry is loaded

viewer.addEventListener(Autodesk.Viewing.GEOMETRY_LOADED_EVENT,

   function(){

   viewer.loadExtension('Autodesk.ADN.Viewing.Extension.AxisHelper');

   });
.csharpcode, .csharpcode pre
{
font-size: small;
color: black;
font-family: consolas, "Courier New", courier, monospace;
background-color: #ffffff;
/*white-space: pre;*/
}
.csharpcode pre { margin: 0em; }
.csharpcode .rem { color: #008000; }
.csharpcode .kwrd { color: #0000ff; }
.csharpcode .str { color: #006080; }
.csharpcode .op { color: #0000c0; }
.csharpcode .preproc { color: #cc6633; }
.csharpcode .asp { background-color: #ffff00; }
.csharpcode .html { color: #800000; }
.csharpcode .attr { color: #ff0000; }
.csharpcode .alt
{
background-color: #f4f4f4;
width: 100%;
margin: 0em;
}
.csharpcode .lnum { color: #606060; }
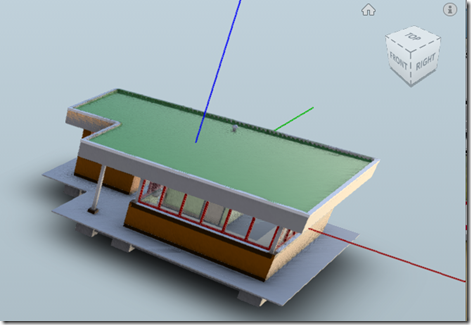
下面是截图,你可以看到红线是X轴,绿线是Y轴,蓝线是Z轴。请注意和右上角的view cube的对应关系。
下面是这个扩展的源代码,不过最好到 github 上下载,因为我可能会时不时的做更新,github上的才是最新的。
///////////////////////////////////////////////////////////////////////////////

AutodeskNamespace("Autodesk.ADN.Viewing.Extension");

Autodesk.ADN.Viewing.Extension.AxisHelper = function (viewer, options) {

    Autodesk.Viewing.Extension.call(this, viewer, options);

    var _self = this;

    var _axisLines = [];

    _self.load = function () {

        console.log('Autodesk.ADN.Viewing.Extension.AxisHelper loaded');

        addAixsHelper();

        //workaround

        //have to call this to show up the axis

        viewer.restoreState(viewer.getState());

        return true;

    };

    _self.unload = function () {

        removeAixsHelper();

        console.log('Autodesk.ADN.Viewing.Extension.AxisHelper unloaded');

        return true;

    };

    var addAixsHelper = function() {

        _axisLines = [];

        //get bounding box of the model

        var boundingBox = viewer.model.getBoundingBox();

        var maxpt = boundingBox.max;

        var minpt = boundingBox.min;

        var xdiff =    maxpt.x - minpt.x;

        var ydiff =    maxpt.y - minpt.y;

        var zdiff =    maxpt.z - minpt.z;

        //make the size is bigger than the max bounding box

        //so that it is visible

        var size = Math.max(xdiff,ydiff,zdiff) * 1.2;

        //console.log('axix size :' + size);

        // x-axis is red

        var material_X_Axis = new THREE.LineBasicMaterial({

            color: 0xff0000,  //red

            linewidth: 2

        });

        viewer.impl.matman().addMaterial('material_X_Axis',material_X_Axis,true);

        //draw the x-axix line

        var xLine = drawLine(

            {x : 0, y : 0, z : 0} ,

            {x : size, y : 0, z : 0} ,

            material_X_Axis);

        _axisLines.push(xLine);

        // y-axis is green

        var material_Y_Axis = new THREE.LineBasicMaterial({

            color: 0x00ff00,  //green

            linewidth: 2

        });

        viewer.impl.matman().addMaterial('material_Y_Axis',material_Y_Axis,true);

        //draw the y-axix line

        var yLine = drawLine(

            {x : 0, y : 0, z : 0} ,

            {x : 0, y : size, z : 0} ,

            material_Y_Axis);

        _axisLines.push(yLine);

        // z-axis is blue

        var material_Z_Axis = new THREE.LineBasicMaterial({

            color: 0x0000ff,  //blue

            linewidth: 2

        });

        viewer.impl.matman().addMaterial('material_Z_Axis',material_Z_Axis,true);

        //draw the z-axix line

        var zLine = drawLine(

            {x : 0, y : 0, z : 0} ,

            {x : 0, y : 0, z : size} ,

            material_Z_Axis);

        _axisLines.push(zLine);

    }

    var drawLine = function(start, end, material) {

            var geometry = new THREE.Geometry();

            geometry.vertices.push(new THREE.Vector3(

                start.x, start.y, start.z));

            geometry.vertices.push(new THREE.Vector3(

                end.x, end.y, end.z));

            var line = new THREE.Line(geometry, material);

            viewer.impl.scene.add(line);

            //refresh viewer

            viewer.impl.invalidate(true);

            return line;

    }

    var removeAixsHelper = function() {

        _axisLines = [];

        _axisLines.forEach(function(line){

            viewer.impl.scene.remove(line);

        });

        //remove materials

        delete viewer.impl.matman().materials.material_X_Axis;

        delete viewer.impl.matman().materials.material_Y_Axis;

        delete viewer.impl.matman().materials.material_Z_Axis;

    }

};

Autodesk.ADN.Viewing.Extension.AxisHelper.prototype =

    Object.create(Autodesk.Viewing.Extension.prototype);

Autodesk.ADN.Viewing.Extension.AxisHelper.prototype.constructor =

    Autodesk.ADN.Viewing.Extension.AxisHelper;

Autodesk.Viewing.theExtensionManager.registerExtension(

    'Autodesk.ADN.Viewing.Extension.AxisHelper',

    Autodesk.ADN.Viewing.Extension.AxisHelper);
Hope it helps.
使用AxisHelper帮助理解View and Data API中的坐标系统的更多相关文章
- 在View and Data API中更改指定元素的颜色
大家在使用View and Data API开发过程中,经常会用到的就是改变某些元素的颜色已区别显示.比如根据某些属性做不同颜色的专题显示,或者用不同颜色表示施工进度,或者只是简单的以颜色变化来提醒用 ...
- Autodesk View and Data API二次开发学习指南
什么是View and Data API? 使用View and Data API,你可以轻松的在网页上显示大型三维模型或者二维图纸而不需要安装任何插件.通过View and Data API,你可以 ...
- Using View and Data API with Meteor
By Daniel Du I have been studying Meteor these days, and find that Meteor is really a mind-blowing f ...
- View and Data API Tips: Constrain Viewer Within a div Container
By Daniel Du When working with View and Data API, you probably want to contain viewer into a <div ...
- View and Data API Tips: Hide elements in viewer completely
By Daniel Du With View and Data API, you can hide some elements in viewer by calling "viewer.hi ...
- 特大喜讯,View and Data API 现在支持中文界面了
大家经常会问到,使用View and Data API怎么做界面的本地化,来显示中文,现在好消息来了,从v1.2.19起,View and Data API开始支持多国语言界面了.你需要制定版本号为v ...
- View and Data API 现在支持IE11了
By Daniel Du After a long time waiting, IE11 finally supports WebGL, which enables us viewing our 3D ...
- View and Data API tips: 缓存Access Token
对于云API服务,常见的方式就是按照API调用次数收费,某些API调用也就有某些限制,比如在特定时间内只允许调用指定的次数以免造成滥用.虽然Autodesk的view and Data API目前还没 ...
- View and Data API Tips: how to make viewer full screen
By Daniel Du If you have not heard of View and Data API, here is the idea, the View & Data API e ...
随机推荐
- git图像化界面GUI的使用
GIT学习笔记 一. 基础内容 1.git是一个版本控制软件,与svn类似,特点是分布式管理,不需要中间总的服务器,可以增加很多分支. 2.windows下的git叫msysgit,下载 ...
- BZOJ 4196: [Noi2015]软件包管理器 [树链剖分 DFS序]
4196: [Noi2015]软件包管理器 Time Limit: 10 Sec Memory Limit: 512 MBSubmit: 1352 Solved: 780[Submit][Stat ...
- click事件的累加绑定,绑定一次点击事件,执行多次
最近做项目为一个添加按钮绑定点击事件,很简单的一个事情,于是我按照通常做法找到元素,使用jquery的on()方法为元素绑定了点击事件,点击同时发送请求.完成后看效果,第一次点击没有问题.再一次点击后 ...
- .Net中的AOP读书笔记系列之AOP介绍
返回<.Net中的AOP>系列学习总目录 本篇目录 AOP是什么? Hello,World! 小结 本系列的源码本人已托管于Coding上:点击查看,想要注册Coding的可以点击该连接注 ...
- ASP.NET Web API 控制器创建过程(一)
ASP.NET Web API 控制器创建过程(一) 前言 在前面对管道.路由有了基础的了解过后,本篇将带大家一起学习一下在ASP.NET Web API中控制器的创建过程,这过程分为几个部分下面的内 ...
- ABP框架 - 仓储
文档目录 本节内容: 默认仓储 自定义仓储 自定义仓储接口 自定义仓储实现 基仓储方法 查询 获取单个实体 获取实体列表 关于 IQueryable 自定义返回值 插入 更新 删除 其它 关于异步方法 ...
- is和as
一.明确两个基本概念 隐式转换: a.对于值类型,低精度=>高精度.eg:int=>long b.对于引用类型,子类向祖宗类转换过程.eg:对象=>Object 显式转换:显示转换是 ...
- Atitit opencv版本新特性attilax总结
Atitit opencv版本新特性attilax总结 1.1. :OpenCV 3.0 发布,史上功能最全,速度最快的版1 1.2. 应用领域2 1.3. OPENCV2.4.3改进 2.4.2就有 ...
- Atitit java onvif 开源类库 getProfiles getStreamUri
Atitit java onvif 开源类库 getProfiles getStreamUri 1. ONVIF Java Library by Milgo1 1.1. https://github. ...
- H3C交换机 配置IP映射
进入cmd 输入命令:telnet 192.168.x.x(交换机IP地址) 登陆后,更换用户"sys" 输入命令:dis cur(展示当前状态) 进入后按"空格&quo ...