
Ubuntu系统---以virtualenv方式安装Tensorflow-CPU
Ubuntu系统---以virtualenv方式安装Tensorflow-CPU
一、安装环境
环境:Ubuntu18.04+CPU+python2.7
本文介绍:如何在ubuntu上以virtualenv方式安装tensorflow。
采用virtualenv方式安装的原因?系统中的多个python混用会导致$PYTHONPATH混乱,或者各个工程对于package的版本要求不同等等情况。有一个简单的解决方案就是用virtualenv来隔离多个python,其本质只是实现隔离不同python中$PYTHONPATH的路径,当然也可以衍生到隔离多个$PATH。
二、安装步骤
2.1 准备
如果你有两个项目,一个需要python2.7开发,一个需要python3.5开发,那么virtualenv是一个很好的选择。如果你想创建一个python2.7和python3.5的虚拟环境的话。首先你的电脑上得装有python2.7和python3.5,而且需要装好pip和pip3。
2.2 安装pip和virtualenv
# Ubuntu/Linux 64-bit

$ sudo apt-get install python-pip python-dev python-virtualenv

# Mac OS X

$ sudo easy_install pip

$ sudo pip install --upgrade virtualenv
2.3 创建 Virtualenv 虚拟环境
进入你想安装tensorflow的父目录下,然后执行下面命令建立虚拟环境:
$ cd TF-virtualenv
$ virtualenv --system-site-packages tensorflow
2.4 激活虚拟环境并安装tensorflow
对于python2.7,则执行如下命令:
$ source ./tensorflow/bin/activate # If using bash$ source ./tensorflow/bin/activate.csh # If using csh(tensorflow)$ # Your prompt should change# Ubuntu/Linux 64-bit, CPU only:$ pip install --upgrade https://storage.googleapis.com/tensorflow/linux/cpu/tensorflow-0.6.0-cp27-none-linux_x86_64.whl# Ubuntu/Linux 64-bit, GPU enabled:$ pip install --upgrade https://storage.googleapis.com/tensorflow/linux/gpu/tensorflow-0.6.0-cp27-none-linux_x86_64.whl# Mac OS X, CPU only:$ pip install --upgrade https://storage.googleapis.com/tensorflow/mac/tensorflow-0.6.0-py2-none-any.whl$ source ./tensorflow/bin/activate # If using bash$ source ./tensorflow/bin/activate.csh # If using csh(tensorflow)$ # Your prompt should change# Ubuntu/Linux 64-bit, CPU only:$ pip3 install --upgrade https://storage.googleapis.com/tensorflow/linux/cpu/tensorflow-0.6.0-cp34-none-linux_x86_64.whl# Ubuntu/Linux 64-bit, GPU enabled:$ pip3 install --upgrade https://storage.googleapis.com/tensorflow/linux/gpu/tensorflow-0.6.0-cp34-none-linux_x86_64.whl# Mac OS X, CPU only:$ pip3 install --upgrade https://storage.googleapis.com/tensorflow/mac/tensorflow-0.6.0-py3-none-any.whl2.4 验证Tensorflow CPU版本
在终端执行如下命令进入python shell环境:
cd tensorflowpython
>>> import tensorflow as tf>>> hello = tf.constant('Hello, TensorFlow!')>>> sess = tf.Session()>>> print(sess.run(hello))Hello, TensorFlow!>>> a = tf.constant(10)>>> b = tf.constant(32)>>> print(sess.run(a + b))$ source ~/tensorflow/bin/activate(tensorflow)$2.4.2 使用tensorflow
python# Python
import tensorflow as tf
hello = tf.constant('Hello, TensorFlow!')
sess = tf.Session()
print(sess.run(hello))这是我的结果。虽然它与官方验证结果不同,但是应该没问题。
>>> print(sess.run(hello))

b'Hello, TensorFlow!'

>>>
退出Python环境
>>> exit()
也可以, 使用类似命令运行 TensorFlow 程序:
(tensorflow)$ cd tensorflow/models/image/mnist

(tensorflow)$ python convolutional.py

 2.4.3 停用virtualenv
# 当使用完 TensorFlow

(tensorflow)$ deactivate  # 停用 virtualenv

$  # 你的命令提示符会恢复原样

附,可以参考官网: http://www.tensorfly.cn/tfdoc/get_started/os_setup.html

再说明,
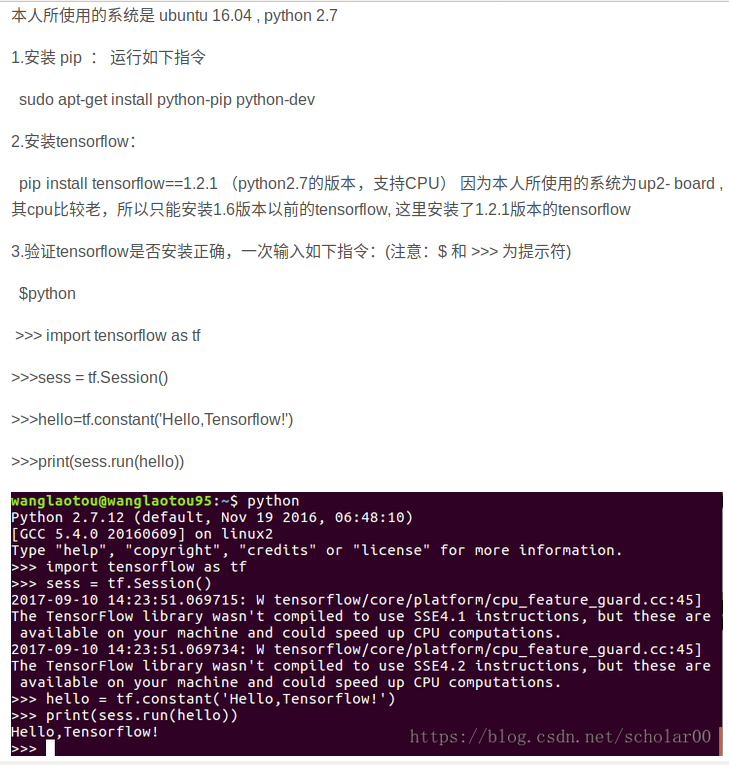
ubuntu下python import tensorflow显示非法指令(核心已转储)
1、版本
ubuntu版本为18.04
python为2.7
tensorflow为pip安装的1.10.0版本
2、解决
删除原先的tensorflow:sudo pip uninstall tensorflow
虚拟机Vitualenv下不用sudo
下载低版本的tensorflow版本安装就可以解决问题了。
===========================================
从Tensorflow1.2开始,不再支持GPU在Mac OS X上的安装。
tensorFlow安装命令
$ pip install tensorflow      # Python 2.7; CPU support

$ pip3 install tensorflow     # Python 3.n; CPU support
如果上面的安装出错,可以通过以下命令安装最新的TensorFlow:
$ sudo pip  install --upgrade tfBinaryURL   # Python 2.7

$ sudo pip3 install --upgrade tfBinaryURL   # Python 3.n
where tfBinaryURL identifies the URL of the TensorFlow Python package. The appropriate value of tfBinaryURL depends on the operating system and Python version. Find the appropriate value for tfBinaryURL here. For example, if you are installing TensorFlow for Mac OS and Python 2.7 issue the following command:
$ sudo pip3 install --upgrade \

 https://storage.googleapis.com/tensorflow/mac/cpu/tensorflow-1.3.0-py2-none-any.whl
上面以安装TensorFlow 1.3.0为例,若输入的是pip,则为python2安装TensorFlow 1.3.0
更新TensorFlow
(tensorflow)$ pip install --upgrade tensorflow      # for Python 2.7

(tensorflow)$ pip3 install --upgrade tensorflow     # for Python 3.n

=====================================================================================
ubuntu下virtualenvwrapper的安装与卸载
1. virtualenvwrapper的安装
$ sudo pip install virtualenvwrapper2. virtualenvwrapper的卸载
$ sudo pip uninstall virtualenvwrapper Ubuntu系统---以virtualenv方式安装Tensorflow-CPU的更多相关文章
- 1. Ubuntu下使用pip方式安装tensorflow
参考文档: https://tensorflow.google.cn/install/pip 首先明确,我们采用python3环境. 1. 先确认本机已安装好python3的环境 python3 -- ...
- 将当前的Ubuntu系统封装成为可以安装(发布)的iso镜像
将当前的Ubuntu系统封装成为可以安装(发布)的iso镜像 在使用以上方法安装依赖的时候xresprobe 会找不到安装地址,采用下面的方式: Package xresprobe is not in ...
- CentOS 7 下使用虚拟环境Virtualenv安装Tensorflow cpu版记录
1.首先安装pip-install 在使用centos7的软件包管理程序yum安装python-pip的时候会报一下错误: No package python-pip available. Error ...
- 【适合核显电脑的环境配置】Tensorflow教程-Windows 10下安装tensorflow CPU with Anaconda
安装TensorFlow 1.5.0 CPU版本 :仅支持CPU的TensorFlow. 如果您的系统没有NVIDIA GPU,则必须安装此版本. 1.首先下载和安装Anaconda TensorFl ...
- Mac OS 基于 VirtualEnv 的安装 tensorflow 1.3.0
如果不行的话,就用conda装吧 https://www.jianshu.com/p/d54546ab315e 推荐使用 virtualenv 创建一个隔离的容器, 来安装 TensorFlow. 这 ...
- centos7 源码编译安装TensorFlow CPU 版本
一.前言 我们都知道,普通使用pip安装的TensorFlow是万金油版本,当你运行的时候,会提示你不是当前电脑中最优的版本,特别是CPU版本,没有使用指令集优化会让TensorFlow用起来更慢. ...
- Windows7 64bits下安装TensorFlow CPU版本(图文详解)
不多说,直接上干货! Installing TensorFlow on Windows的官网 https://www.tensorflow.org/install/install_windows 首先 ...
- 3.1、Ubuntu系统中jmeter的安装和目录解析
以下内容亲测,如果不对的地方,欢迎留言指正,不甚感激.^_^祝工作愉快^_^ Jmeter是一个非常好用的压力测试工具. Jmeter用来做轻量级的压力测试,非常合适,只需要十几分钟,就能把压力测 ...
- Ubuntu16.04下安装Tensorflow CPU版本(图文详解)
不多说,直接上干货! 推荐 全网最详细的基于Ubuntu14.04/16.04 + Anaconda2 / Anaconda3 + Python2.7/3.4/3.5/3.6安装Tensorflow详 ...
随机推荐
- Hadoop 3.1.3伪分布式环境安装Hive 3.1.2的异常总结
背景:hadoop版本为3.1.3, 且以伪分布式形式安装,hive版本为3.1.2,hive为hadoop的一个客户端. 1. 安装简要步骤 (1) 官网下载apache-hive-3.1.2-bi ...
- composer全量镜像使用方法
原文网址:https://pkg.phpcomposer.com/ Packagist 镜像使用方法 还没安装 Composer 吗?请往下看如何安装 Composer . 镜像用法 有两种方式启用本 ...
- redis分布式锁,面试官请随便问,我都会
目录 前言 实现要点 错误解锁方式 正确加锁释放锁方式 前言 现在的业务场景越来越复杂,使用的架构也就越来越复杂,分布式.高并发已经是业务要求的常态.像腾讯系的不少服务,还有CDN优化.异地多备份等处 ...
- 一个老程序员PHP程序员说的话(用来提醒自己)
我,一个老程序员,也是一个学生,把玩过甚多语言,大多不精.我既非名牌学校,也不是高学历,仅代表一部分比较蛋疼的人.接触PHP也是很早了,从04年的OFSTAR开始的,到现在六年了,期间也接触过不少的语 ...
- Guava源码阅读-base-Enums
package com.google.common.base; guava源码中对这个类的方法介绍只有一句话: Utility methods for working with {@link Enum ...
- STM32 MCU一次计算优化和提速
1.背景 STM32 MCU对25.6Kb数据进行压缩,丢掉每个数据的低4位然后2个字节拼接为1个字节.发现处理耗时竞达1ms以上,于是开始进行优化,最后达到200us的效果,提速5倍以上. 2.优化 ...
- css常见双栏和三栏布局
左侧固定右侧自适应 <!DOCTYPE html> <html lang="en"> <head> <meta charset=" ...
- Junk-Mail Filter 【并查集虚父节点】
题目链接:http://acm.hdu.edu.cn/showproblem.php?pid=2473 题目大意: n个点,m个操作,操作时,输入M a b,表示a, b在一个集合里, 输入S a 表 ...
- C语言--分支结构
一.PTA实验作业 题目1:7-1 计算分段函数[2] 1.实验代码 float x, y; printf("Enter x:\n"); scanf("%f", ...
- 【转】mysql分库分表,数据库分库分表思路
原文:https://www.cnblogs.com/butterfly100/p/9034281.html 同类参考:[转]数据库的分库分表基本思想 数据库分库分表思路 一. 数据切分 关系型数 ...