C# 使用windows服务发送邮件
最近做了一个使用 C# 写了一个发送邮件的 windows 服务,在这里记录一下。
首先使用 Visual Studio 2015 创建一个 windows 服务项目。
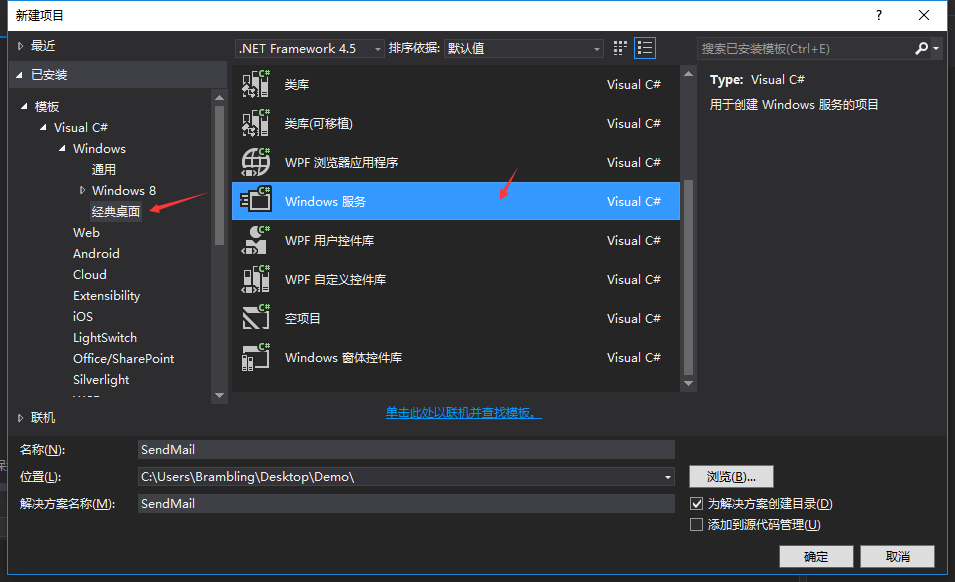
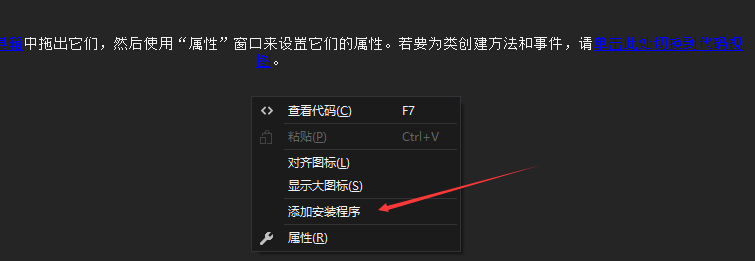
然后在设计器上面右击添加安装程序。如下图。
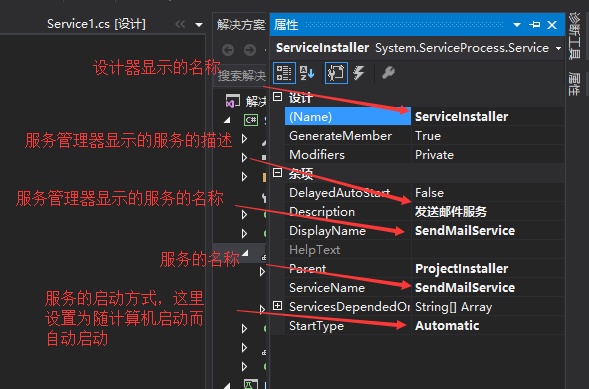
安装好后,选择安装程序设计界面,选择服务和安装程序右击选择属性修改一些属性值。


PS:如果不给服务添加安装程序,后面是没法把服务安装至 windows 系统里的。
在数据库创建一个表,用于存储需要发送的邮件信息。
create table MainInfo

(

    MainInfoID    int  not null identity(1,1) primary key,

    Mail_To  nvarchar(64) not null,    -- 收件人邮箱

    Title nvarchar(128) not null,    -- 邮件标题

    Content nvarchar(max)  null, -- 邮件内容

    Mode int not null default(0), -- 发送方式,0为默认发送,1为抄送,2为密送

    SendState int not null default(0), -- 发送状态,0为未发送,1为发送成功,2为发送失败

    IsTimer int not null default(0), -- 0为即时发送,1为定时发送

    SendTime nvarchar(64) null,        -- 定时发送的时间

    AttAchFileUrl nvarchar(max) null,    -- 添加附件的地址

    AttAchFileName nvarchar(128) null,  -- 附件名称

    IsServerUrl int null default(0)    -- 附件地址是否为服务器地址

)
下面开始贴出代码:
SqlHelper.cs,访问数据库类。
using System;

using System.Collections.Generic;

using System.Configuration;

using System.Data;

using System.Data.SqlClient;

using System.IO;

using System.Linq;

using System.Text;

using System.Threading.Tasks;

namespace SendMail

{

    public class Conn

    {

        public static string StrConn

        {

            get

            {

                //读取文本文件(txt)

                //return Conn.getValue(@"C:\Users\Brambling\Desktop\Demo\SendMail\SendMail\DB_Config\DB_Config.txt", "StrConn");

                //读取配置文件

                //return ConfigurationManager.ConnectionStrings["StrConn"].ToString();

                //return ConfigurationManager.AppSettings["Conn"].ToString();

                //直接返回数据库连接字符串

                return "Data Source=.;Initial Catalog=Test;User ID=sa;Pwd=xxxxxx;Enlist=true;Pooling=true;Max Pool Size=300;Min Pool Size=0;Connection Lifetime=300;packet size=1000";

            }

        }

        public static SqlConnection SqlConn

        {

            get

            {

                return new SqlConnection(StrConn);

            }

        }

        private static string getValue(string path, string name)

        {

            string[] str = File.ReadAllLines(path);

            for (int i = ; i < str.Length; i++)

            {

                if (str[i].StartsWith(name))

                {

                    return str[i].Replace(name + "=", "");

                }

            }

            return "";

        }

    }

    public class SqlHelper

    {

        public DataSet GetDataSet(string sql)

        {

            DataSet ds = new DataSet();

            SqlConnection conn = Conn.SqlConn;

            try

            {

                conn.Open();

                SqlDataAdapter sda = new SqlDataAdapter(sql, conn);

                sda.Fill(ds);

            }

            catch (Exception)

            {

            }

            finally

            {

                conn.Close();

            }

            return ds;

        }

        public DataTable GetDataTable(string sql)

        {

            DataSet ds = new DataSet();

            DataTable dt = new DataTable();

            SqlConnection conn = Conn.SqlConn;

            try

            {

                conn.Open();

                SqlDataAdapter sda = new SqlDataAdapter(sql, conn);

                sda.Fill(ds);

                if (ds != null && ds.Tables.Count > )

                {

                    dt = ds.Tables[];

                }

            }

            catch (Exception)

            {

            }

            finally

            {

                conn.Close();

            }

            return dt;

        }

        public bool ExecSql(string sql)

        {

            int num = ;

            SqlConnection conn = Conn.SqlConn;

            try

            {

                conn.Open();

                SqlCommand cmd = new SqlCommand(sql, conn);

                num = cmd.ExecuteNonQuery();

            }

            catch (Exception)

            {

            }

            finally

            {

                conn.Close();

            }

            return num > ;

        }

    }

}
SqlHelper
这里我尝试了读取配置文件的数据库连接串,但是好像 windows 服务读取不到配置文件。还有个办法就是读取一个文本文件(txt)。
文本文件(txt)的连接串写法:
StrConn=Data Source=.;Initial Catalog=Test;User ID=sa;Pwd=xxxxxx;Enlist=true;

Pooling=true;Max Pool Size=;Min Pool Size=;Connection Lifetime=;packet size=
Mail.cs,发送邮件类。
using System;

using System.Collections.Generic;

using System.Data;

using System.IO;

using System.Linq;

using System.Net;

using System.Net.Mail;

using System.Text;

using System.Threading.Tasks;

namespace SendMail

{

    public class Mail

    {

        SqlHelper sqlhelper = new SqlHelper();

        public void SendMail()

        {

            MailMessage mailmsg = null;

            NetworkCredential credential = null;

            SmtpClient client = null;

            string sql = " select top 1 * from MainInfo where SendState='0' and (IsTimer='0' or (IsTimer='1' and SendTime is not null and Convert(datetime,SendTime)<=getdate())) order by IsTimer,SendTime ";

            DataTable dt = sqlhelper.GetDataTable(sql);

            if (dt != null && dt.Rows.Count > )

            {

                string Id = dt.Rows[]["MainInfoID"].ToString();

                try

                {

                    //创建一个身份凭证,即发送邮件的用户名和密码

                    credential = new NetworkCredential("980095349@qq.com", "xxxxxx");

                    //发送邮件的实例,服务器和端口

                    client = new SmtpClient("smtp.qq.com", );

                    //发送邮件的方式,通过网络发送

                    client.DeliveryMethod = SmtpDeliveryMethod.Network;

                    //是否启用 SSL

                    client.EnableSsl = true;

                    //指定发送邮件的身份凭证

                    client.Credentials = credential;

                    //发送的邮件信息

                    mailmsg = new MailMessage();

                    // 指定发件人邮箱和显示的发件人名称

                    mailmsg.From = new MailAddress("980095349@qq.com", "午夜游魂");

                    // 指定收件人邮箱

                    MailAddress mailto = new MailAddress(dt.Rows[]["Mail_To"].ToString());

                    if (dt.Rows[]["Mode"].ToString() == "")

                    {

                        mailmsg.CC.Add(mailto);     // 抄送

                    }

                    else if (dt.Rows[]["Mode"].ToString() == "")

                    {

                        mailmsg.Bcc.Add(mailto);    // 密送

                    }

                    else

                    {

                        mailmsg.To.Add(mailto);     // 默认发送

                    }

                    //邮件主题

                    mailmsg.Subject = dt.Rows[]["Title"].ToString();

                    mailmsg.SubjectEncoding = Encoding.UTF8;

                    //邮件内容

                    mailmsg.Body = dt.Rows[]["Content"].ToString();

                    mailmsg.BodyEncoding = Encoding.UTF8;

                    //添加附件

                    string url = dt.Rows[]["AttAchFileUrl"].ToString();    // 附件地址

                    string name = dt.Rows[]["AttAchFileName"].ToString();   // 附件名称

                    if (dt.Rows[]["IsServerUrl"].ToString() == "")    // 判断附件地址是否为服务器地址

                    {

                        if (!string.IsNullOrEmpty(url) && !string.IsNullOrEmpty(name))

                        {

                            // 从指定的服务器附件地址加载附件,并转换为 IO 流 添加到邮件附件中

                            HttpWebRequest request = (HttpWebRequest)WebRequest.Create(url);

                            HttpWebResponse response = (HttpWebResponse)request.GetResponse();

                            Stream stream = response.GetResponseStream();

                            mailmsg.Attachments.Add(new Attachment(stream, name));

                        }

                    }

                    else

                    {

                        if (!string.IsNullOrEmpty(url))

                        {

                            mailmsg.Attachments.Add(new Attachment(@url));   // 本地路径可直接加载

                        }

                    }

                    client.Send(mailmsg);   // 发送邮件

                    UpdateState(Id, "");   // 发送成功修改发送状态为 1

                }

                catch (Exception ex)

                {

                    UpdateState(Id, "");   // 发送失败修改发送状态为 2

                }

            }

        }

        public bool UpdateState(string Id, string state)

        {

            string SendTime = DateTime.Now.ToString("yyyy-MM-dd HH:mm:ss");

            string sql = " update MainInfo set SendState='" + state + "',SendTime='" + SendTime + "' where MainInfoID='" + Id + "' ";

            bool b = sqlhelper.ExecSql(sql);

            return b;

        }

    }

}
在这里我把发送邮件的用户、密码、服务器、端口等都是写死的。实际使用中可以考虑单独建立一张发送邮件的配置表,和邮件信息表关联起来。
SendMailMain.cs,设置定时器类。
using System;

using System.Collections.Generic;

using System.Linq;

using System.Text;

using System.Threading.Tasks;

using System.Timers;

namespace SendMail

{

    public class SendMailMain

    {

        // 设置定时器

        private System.Timers.Timer t = null;

        public void Init()

        {

            try

            {

                if (t == null)

                {

                    t = new System.Timers.Timer();

                    t.Elapsed += new ElapsedEventHandler(SendMail);     // 绑定事件

                    t.Interval = ;      // 指定执行的间隔时间

                    t.Enabled = true;   // 是否启用执行 System.Timers.Timer.Elapsed 事件

                    t.AutoReset = true;     // 设置为 true 表示一直执行,false 为只执行一次

                }

            }

            catch

            {

                t.Stop();

                t.Dispose();

            }

        }

        private void SendMail(object sender, ElapsedEventArgs args)

        {

            try

            {

                ((System.Timers.Timer)sender).Enabled = false;  //单线程管控

                Mail mail = new Mail();

                mail.SendMail();

            }

            catch (Exception)

            {

                throw;

            }

            finally

            {

                ((System.Timers.Timer)sender).Enabled = true;  //单线程管控

            }

        }

    }

}
SendMailMain
Service1.cs,服务开始类。
using System;

using System.Collections.Generic;

using System.ComponentModel;

using System.Data;

using System.Diagnostics;

using System.Linq;

using System.ServiceProcess;

using System.Text;

using System.Threading.Tasks;

namespace SendMail

{

    public partial class Service1 : ServiceBase

    {

        public Service1()

        {

            InitializeComponent();

            // 启用 暂停和恢复服务功能

            //base.CanPauseAndContinue = true;

        }

        // 服务开始执行方法

        protected override void OnStart(string[] args)

        {

            SendMailMain sm = new SendMailMain();

            sm.Init();

        }

        // 服务停止执行方法

        protected override void OnStop()

        {

        }

        // 计算机关闭执行方法

        protected override void OnShutdown()

        {

        }

        // 恢复服务执行方法

        protected override void OnContinue()

        {

        }

        // 暂停服务执行方法

        protected override void OnPause()

        {

        }

    }

}
Service1
上面就是完全的代码了,下面先创建一个测试单元,测试一下发送邮件。
首先在数据库插入一条要发送的邮件信息的数据:
insert into MainInfo(Mail_To,Title,Content,AttAchFileUrl,AttAchFileName,IsServerUrl)

  values('1171588826@qq.com','测试邮件','测试邮件,请勿回复!',

  'https://timgsa.baidu.com/timg?image&quality=80&size=b9999_10000&sec=1494357502809&di=66d6a7909bfe54624a16e02caefb9838&imgtype=0&src=http%3A%2F%2F5.66825.com%2Fdownload%2Fpic%2F000%2F330%2F7599586ba2ba3bed5d76ea182883fca6.jpg',

  '孙悟空.jpg','')
然后直接使用测试单元调用发送邮件的方法:
using System;

using Microsoft.VisualStudio.TestTools.UnitTesting;

using SendMail;

using System.IO;

namespace UnitTest

{

    [TestClass]

    public class UnitTest1

    {

        [TestMethod]

        public void TestMethod1()

        {

            Mail mail = new Mail();

            mail.SendMail();

        }

    }

}
发送成功了。

下面开始安装 windows 服务。
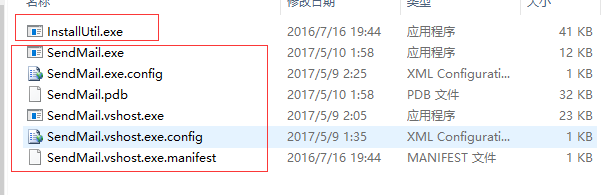
首先找到路径 C:\Windows\Microsoft.NET\Framework\v4.0.30319 或者路径 C:\Windows\Microsoft.NET\Framework\v2.0.50727 下面的 InstallUtil.exe,具体是哪一个下面的,根据版本而定。

然后新建一个文件夹,把刚刚找到的 InstallUtil.exe 文件和 bin\ Debug 或者 Release 文件夹下编译好的文件全部复制到该文件夹下。
然后以管理员身份运行 cmd,输入如下图命令安装 windows 服务。
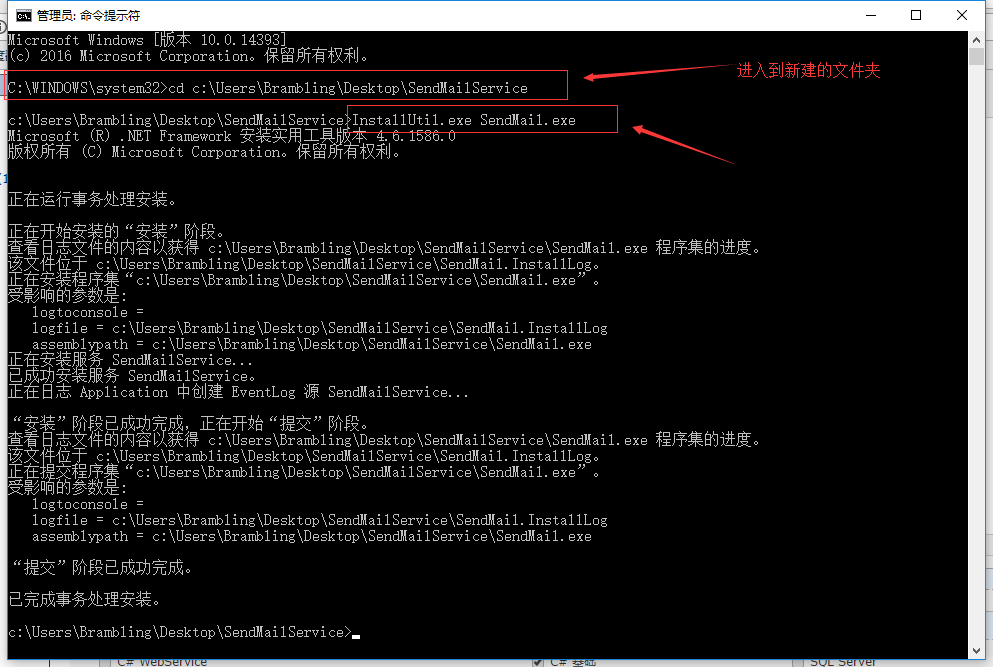
使用 InstallUtil.exe SendMail.exe /u 命令卸载安装的服务。
或者使用下面这种简单的方法。
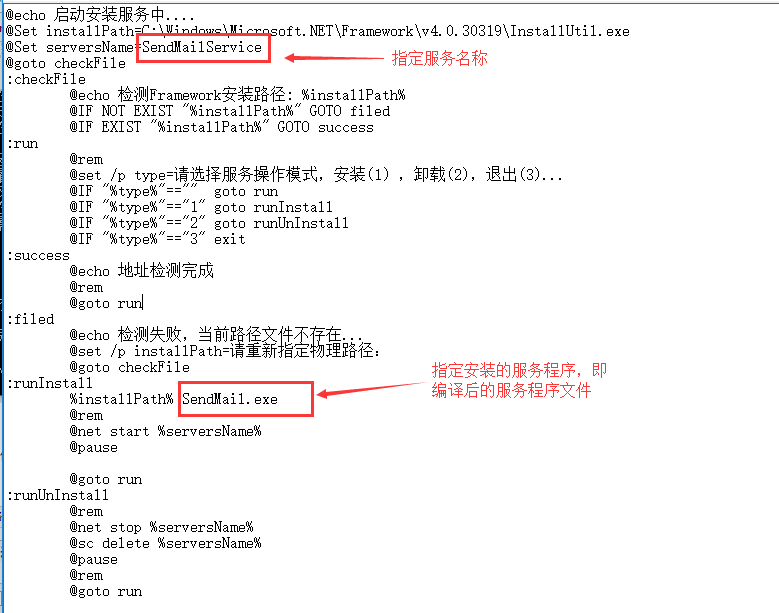
附上代码:
@echo 启动安装服务中....

@Set installPath=C:\Windows\Microsoft.NET\Framework\v4.0.30319\InstallUtil.exe

@Set serversName=SendMailService

@goto checkFile

:checkFile

    @echo 检测Framework安装路径: %installPath%

    @IF NOT EXIST "%installPath%" GOTO filed

    @IF EXIST "%installPath%" GOTO success

:run

    @rem

    @set /p type=请选择服务操作模式,安装(),卸载(),退出()...

    @IF "%type%"==""  goto run

    @IF "%type%"=="" goto runInstall

    @IF "%type%"=="" goto runUnInstall

    @IF "%type%"=="" exit

:success

    @echo 地址检测完成

    @rem

    @goto run

:filed

    @echo 检测失败,当前路径文件不存在...

    @set /p installPath=请重新指定物理路径:

    @goto checkFile

:runInstall

    %installPath% SendMail.exe

    @rem

    @net start %serversName%

    @pause

    @goto run

:runUnInstall

    @rem

    @net stop %serversName%

    @sc delete %serversName%

    @pause

    @rem

    @goto run
代码
把上面这一段代码复制到新建的文本文件(txt)中,然后把后缀改为 bat,然后把它和 bin\ Debug 或者 Release 文件夹下编译好的文件放到同一个文件夹下。然后执行这个后缀为 bat 的文件,根据提示的步骤就可以很简单的安装和卸载服务了。
启动服务命令: net start SendMailService(服务的名称)
停止服务命令: net stop SendMailService(服务的名称)
PS:如果安装的服务的文件进行了修改,但是路径没有变化的话是不需要重新注册服务的,直接停止服务,然后用新的文件覆盖原来的文件即可,如果路径发生变化,应该先卸载这个服务,然后重新安装这个服务。
最后一步,因为这个服务依赖于 sql server ,所以需要把服务设置为延迟启动。
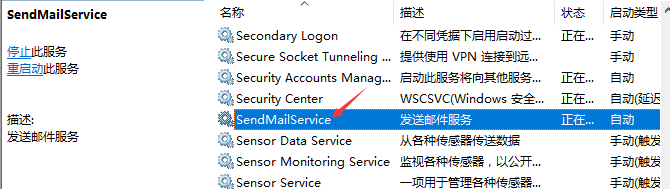
选中服务右击,选择属性。把启动类型设置为:自动(延迟启动)。

这样一个使用 windows 服务发送邮件的功能就完成了。现在可以把服务开启,然后向数据库插入一条邮件信息的数据,试试看效果。
C# 使用windows服务发送邮件的更多相关文章
- 通过SSIS监控远程服务器Windows服务并发送邮件报警!
利用SSIS不仅可以做BI项目的ETL,而且还可以做一些系统监控和维护工作,由于之前供应商写的Windows服务是读取ESB的消息进行处理,且通过OA流程与访客系统进行了集成,无论是ESB出现状况,还 ...
- asp.net基于windows服务实现定时发送邮件的方法
本文实例讲述了asp.net基于windows服务实现定时发送邮件的方法.分享给大家供大家参考,具体如下: //定义组件 private System.Timers.Timer time; publi ...
- 使用Visual Studio 2015 Community 开发windows服务
昨天研究在.NET下开发Windows服务程序,期间遇到一些小问题,这里仅将自己的开发过程和需要注意的地方写下和广大网友分享…… 1.基础 Windows服务是指系统启动时能够自己运行的程序.W ...
- 利用windows服务+timer或者windows任务计划程序+控制台进行进行每日邮件推送
1.邮件发送代码 using System.Text; using System.Net; using System.Net.Mail; using System.Reflection; using ...
- VS2013开发Windows服务项目
这篇随笔里,我将介绍如何用VS2013开发Windows服务项目,实现的功能是定时发送电子邮件. 开发环境:VS2013,SQL Server2008,采用C#语言开发 步骤一:创建Windows服务 ...
- 子线程导致 Windows 服务停止的情况(Topshelf 结合 Quartz.NET)
Ø 前言 本文主要记录子线程导致 Topshelf 和 Quartz.NET 的 Windows 服务停止的现象,以及使用几种常用子线程的注意事项.因为我们有时可能需要开启多个线程执行复杂的逻辑,如 ...
- 使用 Topshelf 创建 Windows 服务
Ø 前言 C# 创建 Windows 服务的方式有很多种,Topshelf 就是其中一种方式,而且使用起来比较简单.下面使用 Visual Studio Ultimate 2013 演示一下具体的使 ...
- 用 vs 2017创建 windows 服务
转载自:http://www.cnblogs.com/xujie/p/5695673.html 1.新建windows服务项目,我这里选择的是Framework4.0,没有选择高版本是为了防止在服务在 ...
- 快速搭建多线程Windows服务解决方案
一.引言 在软件开发过程中windows服务有的时候非常有用,用于同步数据,发送邮件,宿主WF引擎服务等,但是快速搭建一个好用多线程进行多任务处理的程序往往是一个项目必须考虑的问题.自己在项目中也经常 ...
随机推荐
- PHPMailer发送邮箱
1.可以参考的链接.http://www.helloweba.com/view-blog-205.html 2.下载最新的PHPMailer文件库 3.主要代码 class.phpmailer.php ...
- Appium移动自动化测试(一)--工具软件安装
Appium移动自动化测试(一)--工具软件安装 详情参考-- http://www.cnblogs.com/fnng/p/4552438.html 第一节 安装node.js Appium 官方网 ...
- c# word excel 二进制 存入数据库
在Sql Server中存储.读写Word文件,需要将指定表字段添加为Image类型,示例表结构为:1 CREATE TABLE CONTRACTS ( 2 ID VARCHAR (50), 3 CO ...
- Git------MyEclipse中使用Git
转载:http://www.mamicode.com/info-detail-928508.html
- 在线制作logo
logoko:http://www.logoko.com.cn/ markmarker:http://emblemmatic.org/markmaker/#/ logomaker:https://lo ...
- sys.argv 详细用法
sys.argv 用于获取命令行参数,用法如下: [root@localhost ~]$ cat 1.py #!/usr/bin/env python #-*- coding:utf-8 -*- im ...
- 关东升的iOS实战系列图书 《iOS实战:入门与提高卷(Swift版)》已经上市
承蒙广大读者的厚爱我的 <iOS实战:入门与提高卷(Swift版)>京东上市了,欢迎广大读者提出宝贵意见.http://item.jd.com/11766718.html ...
- 160422、Highcharts后台获取数据
而我这次做的是趋势图,涉及到动态刷新,做的过程还是花了一番功夫的,也补充和巩固了一点js的知识,为了纪念,把过程记录一下: 首先,是引入HIghcharts绘图相关的js文件和jQuery.js. 接 ...
- 【MongoDB】从入门到精通mongdb系列学习宝典,想学mongodb小伙伴请进来
最近一段时间在学习MongoDB,在学习过程中总共编写了四十余篇博客.从mongodb软件下载到分片集群的搭建. 从理论讲解到实例练习.现在把所有博客的内容做个简单目录,方便阅读的小伙伴查询. 一. ...
- 【Python数据挖掘】回归模型与应用
线性回归 ( Linear Regression ) 线性回归中,只包括一个自变量和一个因变量,且二者的关系可用一条直线近似表示,这种回归称为一元线性回归. 如果回归分析中包括两个或两个以上的自变量, ...