
.netcore consul实现服务注册与发现-单节点部署
原文:.netcore consul实现服务注册与发现-单节点部署
一、Consul的基础介绍
Consul是HashiCorp公司推出的开源工具,用于实现分布式系统的服务发现与配置。与其他分布式服务注册与发现的方案,比如 Airbnb的SmartStack等相比,Consul的方案更“一站式”,内置了服务注册与发现框 架、分布一致性协议实现、健康检查、Key/Value存储、多数据中心方案,不再需要依赖其他工具(比如ZooKeeper等),使用起来也较 为简单。Consul用Golang实现,因此具有天然可移植性(支持Linux、windows和Mac OS X);安装包仅包含一个可执行文件,方便部署,与Docker等轻量级容器可无缝配合。
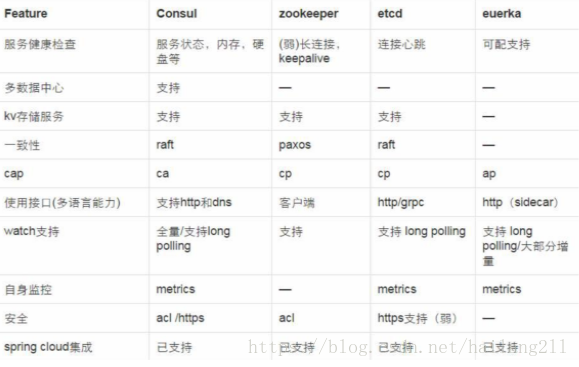
关于Consul的更多介绍,比如优点,这里就不再赘述了,上网一搜就可以随处找到了。但是,必须贴一个和其他类似软件的对比:
二、Consul安装前的理解
Consul Agent有两种运行模式:Server和Client。这里的Server和Client只是Consul集群层面的区分,与搭建在Cluster之上的应用服务无关, 以Server模式运行的Consul Agent节点用于维护Consul集群的状态,官方建议每个Consul Cluster至少有3个或以上的运行在Server Mode的Agent,Client节点不限。
Consul支持多数据中心,每个数据中心的Consul Cluster都会在运行于Server模式下的Agent节点中选出一个Leader节点,这个选举过程通过Consul实现的raft协议保证,多个 Server节点上的Consul数据信息是强一致的。处于Client Mode的Consul Agent节点比较简单,无状态,仅仅负责将请求转发给Server Agent节点。
这里我们会演示两种情况的安装:一种单节点部署,二种集群部署,由简单到复杂的部署会更容易理解。
三、Consul正式安装(单节点)
1、下载Consul
官网地址:https://www.consul.io/downloads.html,下载对应的版本即可
确认好版本好,下载到我们的本机目录命令:
> wget -P /opt/consul/ https://releases.hashicorp.com/consul/1.2.2/consul_1.2.2_linux_amd64.zip
2、安装Consul
#先解压Consul文件

> unzip consul_1.2.2_linux_amd64.zip

#将Consul文件拷贝到执行目录

> mv consul /usr/local/bin/

注:如果找不到unzip命令请安装,命令如:yum install -y unzip
3、测试Consul是否安装成功
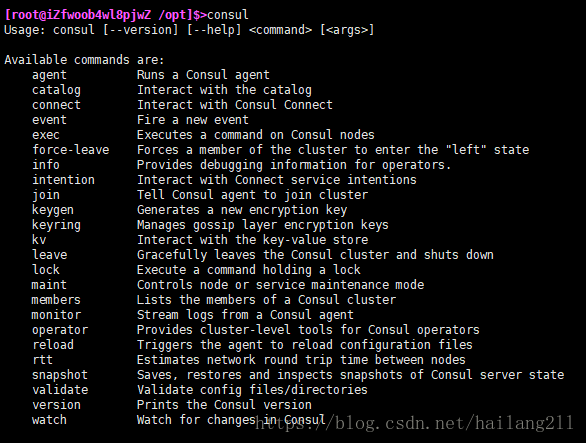
> consul
如下图表示成功:
4、启动与配置Consul服务
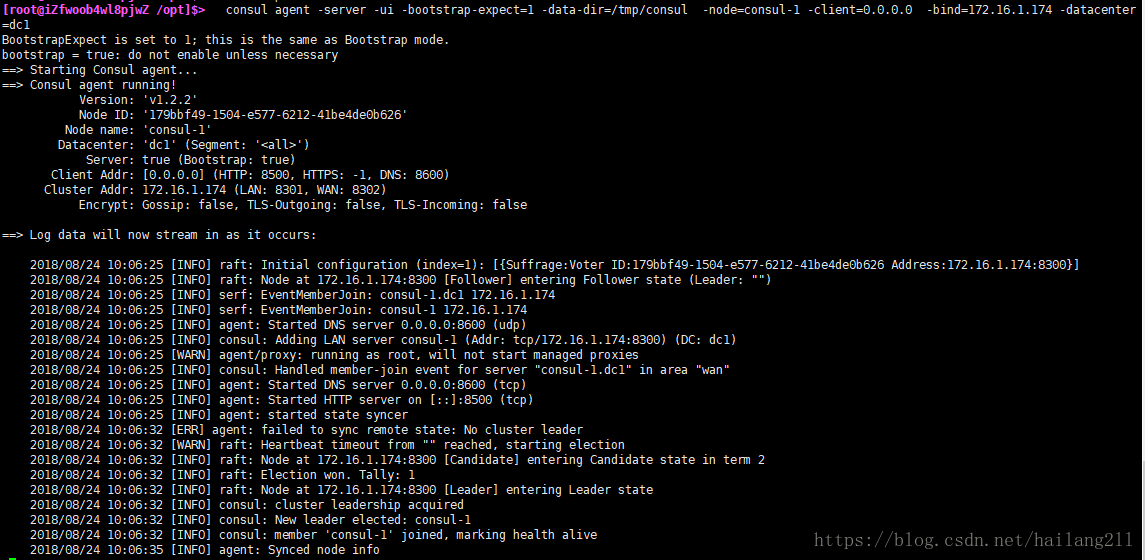
consul agent -server -ui -bootstrap-expect=1 -data-dir=/tmp/consul -node=consul-1 -client=0.0.0.0 -bind=172.16.1.174 -datacenter=dc1
如下图表示启动成功:
输入地址查看服务状态:目前Consul正常运行

进一步查看server的情况与角色状态
查看各个server的情况

> consul members

查看目前全部的consul的角色状态:

> consul operator raft list-peers

5、通过配置文件来注册服务(也可以从consul api 接口添加服务注册,他会自动持久化)
vi /etc/consul/services_config.json

{

    "services":[

        {

            "id": "CLIENT_SERVICE_01",

            "name" : "MVCClientService",

            "tags": [

                "urlprefix-/MVCClientService01"

            ],

            "address": "172.16.1.110",

            "port": 5000,

            "checks": [

                {

                    "name": "clientservice_check",

                    "http": "http://172.16.1.110:5000",

                    "interval": "10s",

                    "timeout": "5s"

                }

            ]

        },

         {

            "id": "CLIENT_SERVICE_02",

            "name" : "APIClientService",

            "tags": [

                "urlprefix-/APIClientService02"

            ],

            "address": "172.16.1.110",

            "port": 5000,

            "checks": [

                {

                    "name": "clientservice_check",

                    "http": "http://172.16.1.110:5001/api/values",

                    "interval": "10s",

                    "timeout": "5s"

                }

            ]

        }

     ]

}
重新运行命令:
consul agent -server -ui -bootstrap-expect=1 -config-dir=/etc/consul -data-dir=/tmp/consul -node=consul-1 -client=0.0.0.0 -bind=172.16.1.174 -datacenter=dc1
注:一定要保证后端服务正常运行:端口5000,5001
运行成功后,如下图:
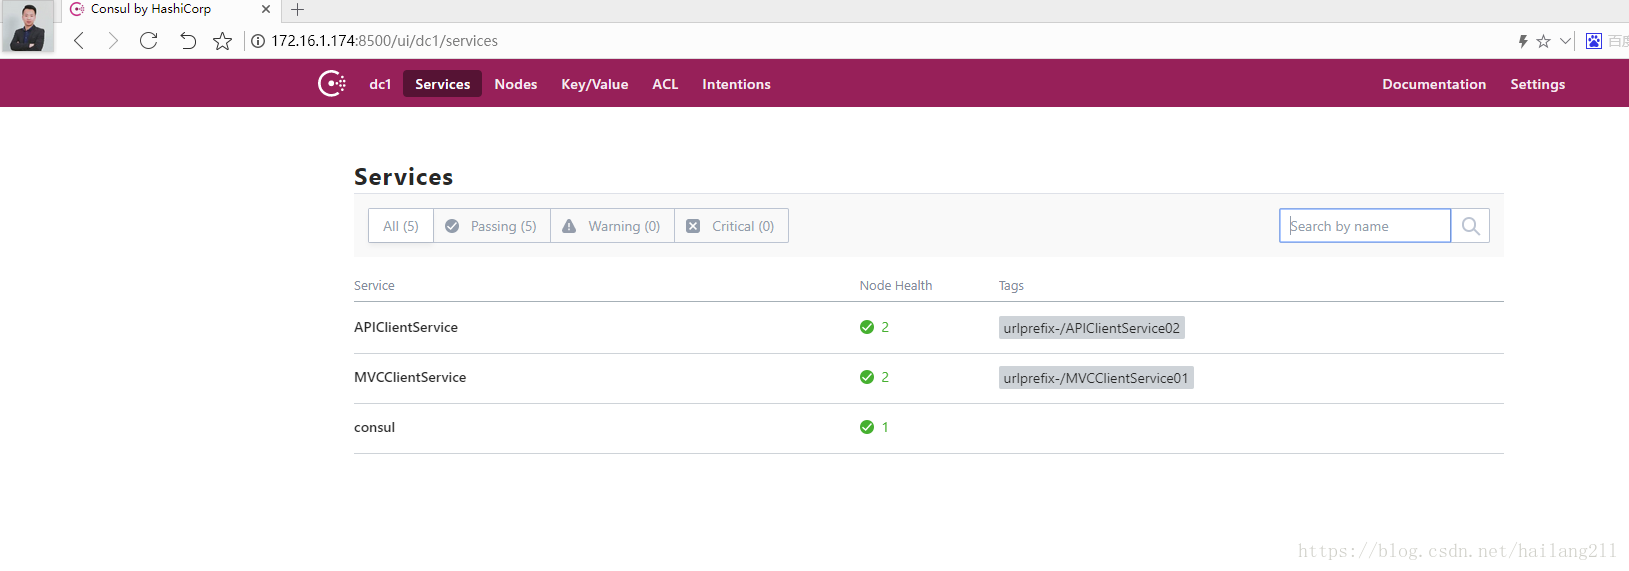
6、通过consul api 接口注册服务
创建一个ASP.NET Core WebAPI程序
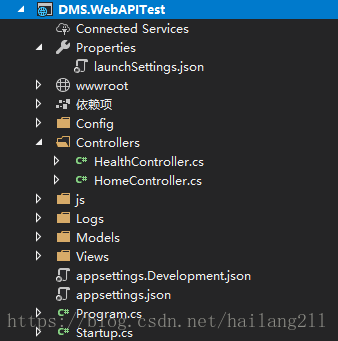
创建一个HealthController用于Consul的健康检查
[Produces("application/json")]

[Route("api/Health")]

public class HealthController : Controller

{

[HttpGet]

public IActionResult Get() => Ok("ok");

}
注:Consul会通过call这个API来确认Service的健康状态。
基于IApplicationBuilder写一个扩展方法,用于调用Consul API
在nuge管理器中引入Consul包
public static class ConsulBuilderExtensions

    {

        // 服务注册

        public static IApplicationBuilder RegisterConsul(this IApplicationBuilder app, IApplicationLifetime lifetime, HealthService healthService, ConsulService consulService)

        {

            var consulClient = new ConsulClient(x => x.Address = new Uri($"http://{consulService.IP}:{consulService.Port}"));//请求注册的 Consul 地址

            var httpCheck = new AgentServiceCheck()

            {

                DeregisterCriticalServiceAfter = TimeSpan.FromSeconds(5),//服务启动多久后注册

                Interval = TimeSpan.FromSeconds(10),//健康检查时间间隔,或者称为心跳间隔

                HTTP = $"http://{healthService.IP}:{healthService.Port}/api/health",//健康检查地址

                Timeout = TimeSpan.FromSeconds(5)

            };

            // Register service with consul

            var registration = new AgentServiceRegistration()

            {

                Checks = new[] { httpCheck },

                ID = healthService.Name + "_" + healthService.Port,

                Name = healthService.Name,

                Address = healthService.IP,

                Port = healthService.Port,

                Tags = new[] { $"urlprefix-/{healthService.Name}" }//添加 urlprefix-/servicename 格式的 tag 标签,以便 Fabio 识别

            };

            consulClient.Agent.ServiceRegister(registration).Wait();//服务启动时注册,内部实现其实就是使用 Consul API 进行注册(HttpClient发起)

            lifetime.ApplicationStopping.Register(() =>

            {

                consulClient.Agent.ServiceDeregister(registration.ID).Wait();//服务停止时取消注册

            });

            return app;

        }

    }
在Starup类的Configure方法中,调用此扩展方法
 #region register this service

            ConsulService consulService = new ConsulService()

            {

                IP = Configuration["Consul:IP"],

                Port = Convert.ToInt32(Configuration["Consul:Port"])

            };

            HealthService healthService = new HealthService()

            {

                IP = Configuration["Service:IP"],

                Port = Convert.ToInt32(Configuration["Service:Port"]),

                Name = Configuration["Service:Name"],

            };

            app.RegisterConsul(lifetime, healthService, consulService);

            #endregion
其中用到了appSettings.json配置文件,其定义如下:
  "Service": {

    "Name": "DMSWebAPITest",

    "IP": "localhost",

    "Port": "5001"

  },

  "Consul": {

    "IP": "localhost",

    "Port": "8500"

  }
其中ConsulService类定义如下:
public class ConsulService

    {

        public string IP { get; set; }

        public int Port { get; set; }

    }
其中HealthService类定义如下:
public class HealthService

    {

        public string Name { get; set; }

        public string IP { get; set; }

        public int Port { get; set; }

    }
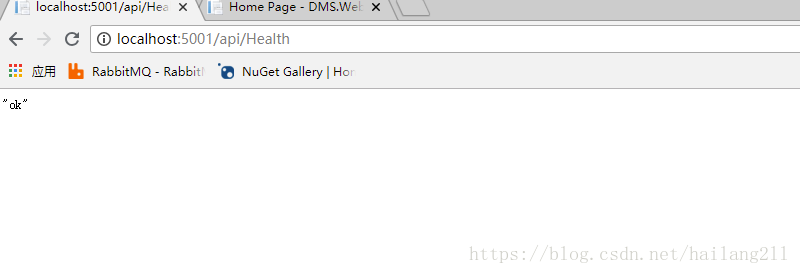
确保HealthController的API能正常访问,以便做健康检查
成功运行后,查看Consul集群的状态,UI界面
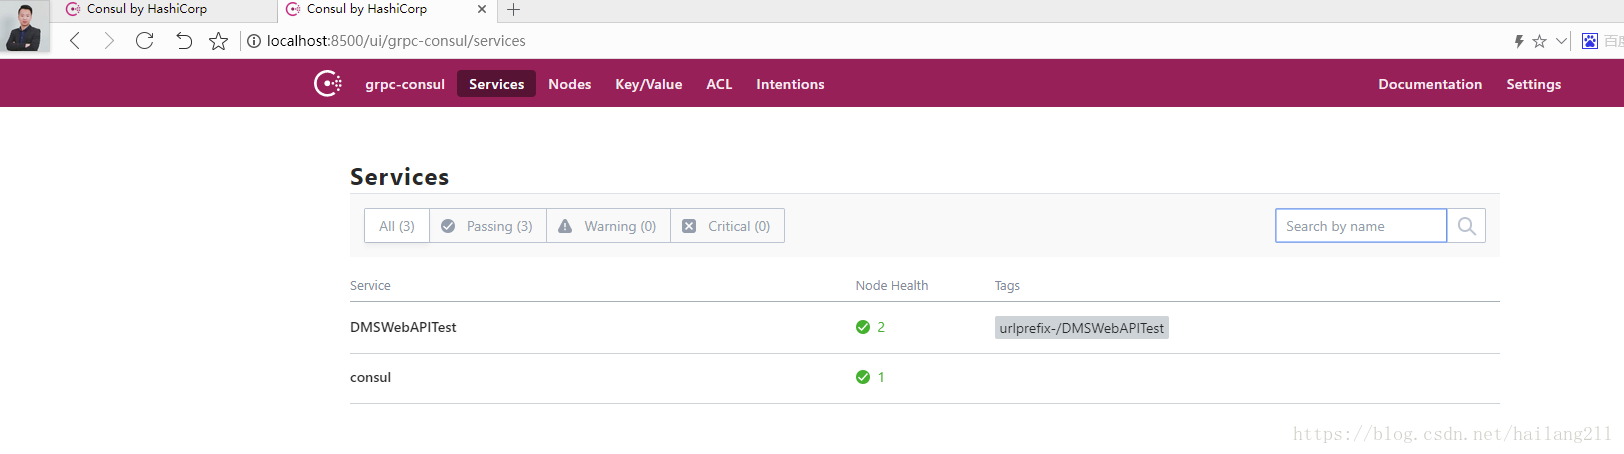
以上实现了通过配置文件注册,API接口注册到Consul实例,后续加入Ocelot构建API网关,到时会结合Consul进行进一步的集成,另外,还会尝试Polly进行熔断降级。
以上操作都是在Consul Server 端进行操作的,按官方说明:Consul Server与Consul Client要进行区分,后端的服务应该部署在Consul Client上,他们分别处理自己的事情就好。
下一篇文章已更新:.netcore consul实现服务注册与发现-集群
实战中参考的资料:https://www.cnblogs.com/edisonchou/p/9124985.html
交流qq群:18362376
.netcore consul实现服务注册与发现-单节点部署的更多相关文章
- .netcore consul实现服务注册与发现-集群部署
一.Consul的集群介绍 Consul Agent有两种运行模式:Server和Client.这里的Server和Client只是Consul集群层面的区分,与搭建在Cluster之上的应用服务无关 ...
- .netcore consul实现服务注册与发现-集群完整版
原文:.netcore consul实现服务注册与发现-集群完整版 一.Consul的集群介绍 Consul Agent有两种运行模式:Server和Client.这里的Server和Clien ...
- Consul初探-服务注册和发现
前言 经过上一篇的学习,现在已经来到了服务注册发现环节:Consul 的核心功能就是服务注册和发现,Consul 客户端通过将自己注册到 Consul 服务器集群,然后等待调用方去发现服务,实现代理转 ...
- 一个故事,一段代码告诉你如何使用不同语言(Golang&C#)提供相同的能力基于Consul做服务注册与发现
目录 引言 什么是微服务 传统服务 微服务 什么是服务注册与服务发现 为什么要使用不同的语言提供相同的服务能力 服务协调器 服务注册 Golang C#(.NetCore3.1) 服务发现 通过Htt ...
- Spring Cloud Consul 实现服务注册和发现
Spring Cloud 是一个基于 Spring Boot 实现的云应用开发工具,它为基于 JVM 的云应用开发中涉及的配置管理.服务发现.断路器.智能路由.微代理.控制总线.全局锁.决策竞选.分布 ...
- 简单RPC框架-基于Consul的服务注册与发现
*:first-child { margin-top: 0 !important; } body>*:last-child { margin-bottom: 0 !important; } /* ...
- Spring Cloud Consul使用——服务注册与发现(注册中心)
整理自该文章 一.Consul 服务端接下来我们开发 Consul 的服务端,创建一个 spring-cloud-consul-producer 项目 1.添加依赖包 <dependencies ...
- spring boot2X整合Consul一服务注册与发现
Consul 是HashiCorp公司推出的开源工具,用于实现分布式系统的服务发现与配置. 关键特性: 服务注册/发现 数据强一致性保证 多数据中心 健康检查 key/value存储 1.下载 htt ...
- python使用consul进行服务注册和发现
阅读目录 一.安装启动consul 二.python服务注册 三.golang服务注册 四.通过API的方式获取信息 回到顶部 一.安装启动consul 1.通过docker快速安装 #获取docke ...
随机推荐
- 1.2 Use Cases中 Website Activity Tracking官网剖析(博主推荐)
不多说,直接上干货! 一切来源于官网 http://kafka.apache.org/documentation/ Website Activity Tracking 网站活动追踪 The origi ...
- maven插件介绍之tomcat7-maven-plugin
tomcat7-maven-plugin插件的pom.xml依赖为: <dependency> <groupId>org.apache.tomcat.maven</gro ...
- Android RxJava基本流程和lift源码分析
基本结构 我们先来看一段最基本的代码,分析这段代码在RxJava中是如何实现的. Observable.OnSubscribe<String> onSubscriber1 = new Ob ...
- (转)linux的一个find命令配合rm删除某天前的文件
转自:http://www.cnblogs.com/mingforyou/p/3930624.html 语句写法:find 对应目录 -mtime +天数 -name "文件名" ...
- Loadrunner--Analysis网页细分图
续LR实战之Discuz开源论坛项目,之前一直是创建虚拟用户脚本(Virtual User Generator)和场景(Controller),现在,终于到了LoadRunner性能测试结果分析(An ...
- 5W1H分析法和5W2H分析法
5W1H分析法也称六何分析法,是一种思考方法,也可以说是一种创造技法.是对选定的项目.工序或操作,都要从原因(WHY).对象(WHAT).地点(WHERE).时间(WHEN).人员(WHO).方法(H ...
- iOS_04_学习ios开发的准备
学习ios开发的准备 * 英语水平:看懂26个英文字母. * 计算机专业:不要求计算机专业,但得有脑子. * 学习态度:积极思考.积极动手.能吃苦.有兴趣. * 编程语言:C语言.C++(可选).Ob ...
- 对inetd、xinetd与TCP_Wrapper的基本了解
在Linux系统中有一个特殊的守护进程inetd(InterNET services Daemon),它用于Internet标准服务,通常在系统启动时启动.通过命令行可以给出inetd的配置文件,该配 ...
- 前端实时消息提示的效果-websocket长轮询
WebSocket是html5新增加的特性之一,可以实现客户端和服务器彼此之间相互通信,也可以实现跨域通信,目前大部分主流浏览器都支持,iE浏览器需要10版本以上. 需求:公司项目有一个报警模块,当后 ...
- 【习题 5-2 UVA-1594】Ducci Sequence
[链接] 我是链接,点我呀:) [题意] 在这里输入题意 [题解] map加vector轻松搞定. [代码] #include <bits/stdc++.h> using namespac ...