python使用consul进行服务注册和发现
一、安装启动consul
1.通过docker快速安装
#获取docker镜像

docker pull consul
2.启动consul
然后就可以启动集群了,这里启动4个Consul Agent,3个Server(会选举出一个leader),1个Client

#启动第1个Server节点,集群要求要有3个Server,将容器8500端口映射到主机8900端口,同时开启管理界面

docker run -d --name=consul1 -p 8900:8500 -e CONSUL_BIND_INTERFACE=eth0 consul agent --server=true --bootstrap-expect=3 --client=0.0.0.0 -ui

#启动第2个Server节点,并加入集群

docker run -d --name=consul2 -e CONSUL_BIND_INTERFACE=eth0 consul agent --server=true --client=0.0.0.0 --join 172.17.0.2

#启动第3个Server节点,并加入集群

docker run -d --name=consul3 -e CONSUL_BIND_INTERFACE=eth0 consul agent --server=true --client=0.0.0.0 --join 172.17.0.2

#启动第4个Client节点,并加入集群

docker run -d --name=consul4 -e CONSUL_BIND_INTERFACE=eth0 consul agent --server=false --client=0.0.0.0 --join 172.17.0.2
第1个启动容器的IP一般是172.17.0.2,后边启动的几个容器IP会排着来:172.17.0.3、172.17.0.4、172.17.0.5。
这些Consul节点在Docker的容器内是互通的,他们通过桥接的模式通信。但是如果主机要访问容器内的网络,需要做端口映射。在启动第一个容器时,将Consul的8500端口映射到了主机的8900端口,这样就可以方便的通过主机的浏览器查看集群信息。
二、python服务注册
#pip install python-consul

import consul

class Consul(object):

    def __init__(self, host, port):

        '''初始化,连接consul服务器'''

        self._consul = consul.Consul(host, port)

    def RegisterService(self, name, host, port, tags=None):

        tags = tags or []

        # 注册服务

        self._consul.agent.service.register(

            name,

            name,

            host,

            port,

            tags,

            # 健康检查ip端口,检查时间:5,超时时间:30,注销时间:30s

            check=consul.Check().tcp(host, port, "5s", "30s", "30s"))

    def GetService(self, name):

        services = self._consul.agent.services()

        service = services.get(name)

        if not service:

            return None, None

        addr = "{0}:{1}".format(service['Address'], service['Port'])

        return service, addr

if __name__ == '__main__':

    host="10.0.0.11" #consul服务器的ip

    port="" #consul服务器对外的端口

    consul_client=Consul(host,port)

    name="maple"

    host="10.0.0.11"

    port=8900

    consul_client.RegisterService(name,host,port)

    check = consul.Check().tcp(host, port, "5s", "30s", "30s")

    print(check)

    res=consul_client.GetService("maple")

    print(res)
#执行效果

{'tcp': '10.0.0.11:8900', 'interval': '5s', 'timeout': '30s', 'DeregisterCriticalServiceAfter': '30s'}

({'ID': 'maple', 'Service': 'maple', 'Tags': [], 'Meta': {}, 'Port': 8900, 'Address': '10.0.0.11', 'Weights': {'Passing': 1, 'Warning': 1}, 'EnableTagOverride': False}, '10.0.0.11:8900')
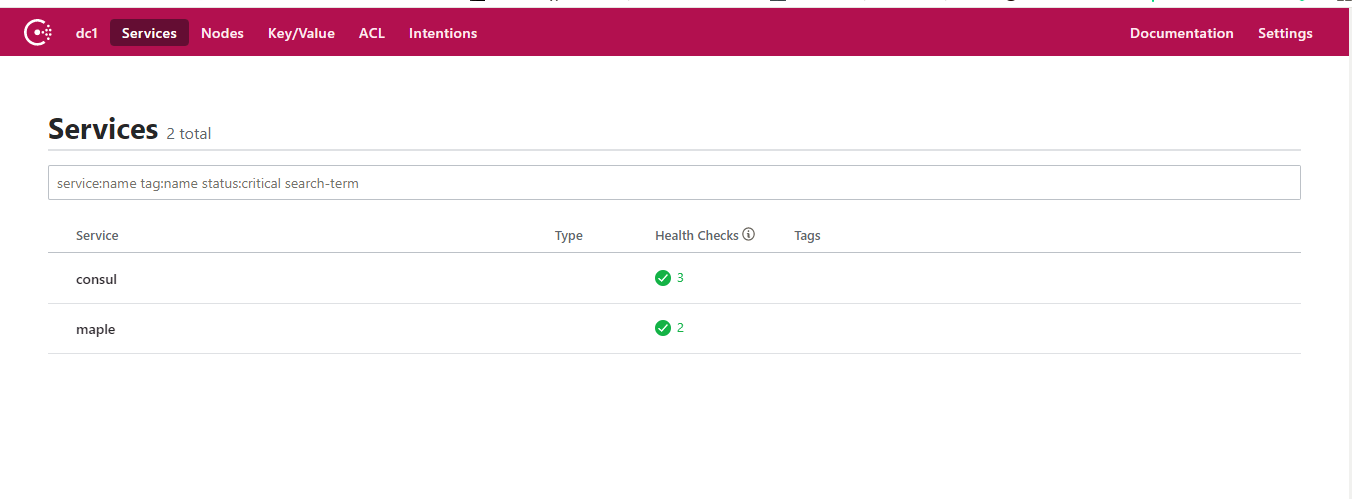
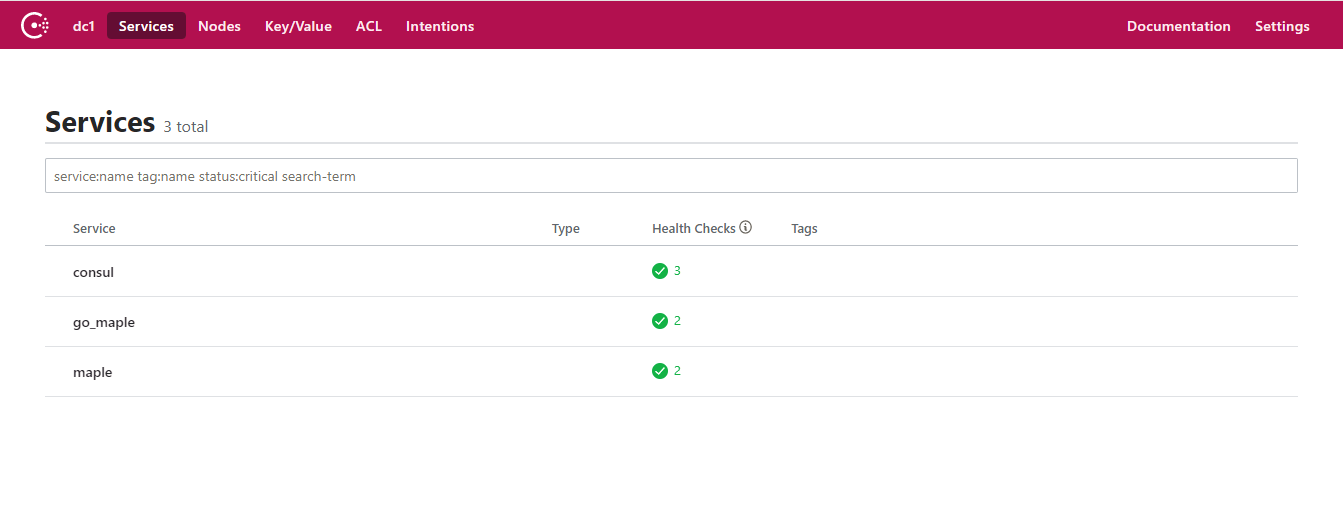
通过10.0.0.11:8900访问注册后的效果

三、golang服务注册
package main

import (

    "fmt"

    consul "github.com/hashicorp/consul/api"

    "strconv"

    "strings"

)

type Consul struct {

    consul *consul.Client

}

//服务发现 用来注册自己的服务端口给别的服务器调用和发现其他服务器

func InitConsul(host string, port int) (*Consul) {

    config := consul.DefaultConfig()

    config.Address = fmt.Sprintf("%s:%d", host, port)

    c, err := consul.NewClient(config)

    if err != nil {

        panic(err)

    }

    return &Consul{

        c,

    }

}

func (c *Consul) RegisterService(Name, Addr string, Port int, Tags ...string) error {

    return c.consul.Agent().ServiceRegister(&consul.AgentServiceRegistration{

        ID:      Name,

        Name:    Name,

        Port:    Port,

        Tags:    Tags,

        Address: Addr,

        Check: &consul.AgentServiceCheck{

            Timeout:                        "5s",

            Interval:                       "10s",

            TCP:                            fmt.Sprintf("%v:%v", Addr, Port, ),

            DeregisterCriticalServiceAfter: "30s",

        },

    })

}

func (c *Consul) GetService(Name string) (service *consul.AgentService, err error) {

    service, _, err = c.consul.Agent().Service(Name, &consul.QueryOptions{})

    return

}

func main() {

    var Consul *Consul

    //注册consul服务地址

    Host:="10.0.0.11"

    Port:=8900

    Server:="10.0.0.11:8900"

    Name:="go_maple"

    Consul = InitConsul(Host,Port)

    serverHost, err := strconv.Atoi(strings.Split(Server, ":")[1])

    if err != nil {

        panic(err)

    }

    err = Consul.RegisterService(Name,Host,serverHost)

    if err != nil {

        panic(err)

    }

    //获取服务

    res,err:=Consul.GetService("go_maple")

    if err != nil {

        panic(err)

    }

    fmt.Println(res)

}
四、通过API的方式获取信息
#http://10.0.0.11:8900/v1/health/service/maple

[

    {

        "Node": {

            "ID": "db46c9ad-5c8d-bb9b-0543-9edb48e7bccc",

            "Node": "71a1355e94b6",

            "Address": "172.17.0.2",

            "Datacenter": "dc1",

            "TaggedAddresses": {

                "lan": "172.17.0.2",

                "wan": "172.17.0.2"

            },

            "Meta": {

                "consul-network-segment": ""

            },

            "CreateIndex": 5,

            "ModifyIndex": 9

        },

        "Service": {

            "ID": "maple",

            "Service": "maple",

            "Tags": [],

            "Address": "10.0.0.11",

            "Meta": null,

            "Port": 8900,

            "Weights": {

                "Passing": 1,

                "Warning": 1

            },

            "EnableTagOverride": false,

            "ProxyDestination": "",

            "Proxy": {},

            "Connect": {},

            "CreateIndex": 4296,

            "ModifyIndex": 4296

        },

        "Checks": [

            {

                "Node": "71a1355e94b6",

                "CheckID": "serfHealth",

                "Name": "Serf Health Status",

                "Status": "passing",

                "Notes": "",

                "Output": "Agent alive and reachable",

                "ServiceID": "",

                "ServiceName": "",

                "ServiceTags": [],

                "Definition": {},

                "CreateIndex": 5,

                "ModifyIndex": 5

            },

            {

                "Node": "71a1355e94b6",

                "CheckID": "service:maple",

                "Name": "Service 'maple' check",

                "Status": "passing",

                "Notes": "",

                "Output": "TCP connect 10.0.0.11:8900: Success",

                "ServiceID": "maple",

                "ServiceName": "maple",

                "ServiceTags": [],

                "Definition": {},

                "CreateIndex": 4296,

                "ModifyIndex": 4297

            }

        ]

    }

]
#http://10.0.0.11:8900/v1/health/service/go_maple

[

    {

        "Node": {

            "ID": "db46c9ad-5c8d-bb9b-0543-9edb48e7bccc",

            "Node": "71a1355e94b6",

            "Address": "172.17.0.2",

            "Datacenter": "dc1",

            "TaggedAddresses": {

                "lan": "172.17.0.2",

                "wan": "172.17.0.2"

            },

            "Meta": {

                "consul-network-segment": ""

            },

            "CreateIndex": 5,

            "ModifyIndex": 9

        },

        "Service": {

            "ID": "go_maple",

            "Service": "go_maple",

            "Tags": [],

            "Address": "10.0.0.11",

            "Meta": null,

            "Port": 8900,

            "Weights": {

                "Passing": 1,

                "Warning": 1

            },

            "EnableTagOverride": false,

            "ProxyDestination": "",

            "Proxy": {},

            "Connect": {},

            "CreateIndex": 4725,

            "ModifyIndex": 4741

        },

        "Checks": [

            {

                "Node": "71a1355e94b6",

                "CheckID": "serfHealth",

                "Name": "Serf Health Status",

                "Status": "passing",

                "Notes": "",

                "Output": "Agent alive and reachable",

                "ServiceID": "",

                "ServiceName": "",

                "ServiceTags": [],

                "Definition": {},

                "CreateIndex": 5,

                "ModifyIndex": 5

            },

            {

                "Node": "71a1355e94b6",

                "CheckID": "service:go_maple",

                "Name": "Service 'go_maple' check",

                "Status": "passing",

                "Notes": "",

                "Output": "TCP connect 10.0.0.11:8900: Success",

                "ServiceID": "go_maple",

                "ServiceName": "go_maple",

                "ServiceTags": [],

                "Definition": {},

                "CreateIndex": 4725,

                "ModifyIndex": 4742

            }

        ]

    }

]
python使用consul进行服务注册和发现的更多相关文章
- .netcore consul实现服务注册与发现-集群完整版
原文:.netcore consul实现服务注册与发现-集群完整版 一.Consul的集群介绍 Consul Agent有两种运行模式:Server和Client.这里的Server和Clien ...
- .netcore consul实现服务注册与发现-单节点部署
原文:.netcore consul实现服务注册与发现-单节点部署 一.Consul的基础介绍 Consul是HashiCorp公司推出的开源工具,用于实现分布式系统的服务发现与配置.与其他分 ...
- .netcore consul实现服务注册与发现-集群部署
一.Consul的集群介绍 Consul Agent有两种运行模式:Server和Client.这里的Server和Client只是Consul集群层面的区分,与搭建在Cluster之上的应用服务无关 ...
- Spring Cloud Consul 实现服务注册和发现
Spring Cloud 是一个基于 Spring Boot 实现的云应用开发工具,它为基于 JVM 的云应用开发中涉及的配置管理.服务发现.断路器.智能路由.微代理.控制总线.全局锁.决策竞选.分布 ...
- Consul初探-服务注册和发现
前言 经过上一篇的学习,现在已经来到了服务注册发现环节:Consul 的核心功能就是服务注册和发现,Consul 客户端通过将自己注册到 Consul 服务器集群,然后等待调用方去发现服务,实现代理转 ...
- 一个故事,一段代码告诉你如何使用不同语言(Golang&C#)提供相同的能力基于Consul做服务注册与发现
目录 引言 什么是微服务 传统服务 微服务 什么是服务注册与服务发现 为什么要使用不同的语言提供相同的服务能力 服务协调器 服务注册 Golang C#(.NetCore3.1) 服务发现 通过Htt ...
- 简单RPC框架-基于Consul的服务注册与发现
*:first-child { margin-top: 0 !important; } body>*:last-child { margin-bottom: 0 !important; } /* ...
- Spring Cloud Consul使用——服务注册与发现(注册中心)
整理自该文章 一.Consul 服务端接下来我们开发 Consul 的服务端,创建一个 spring-cloud-consul-producer 项目 1.添加依赖包 <dependencies ...
- spring boot2X整合Consul一服务注册与发现
Consul 是HashiCorp公司推出的开源工具,用于实现分布式系统的服务发现与配置. 关键特性: 服务注册/发现 数据强一致性保证 多数据中心 健康检查 key/value存储 1.下载 htt ...
随机推荐
- Docker创建mysql镜像
原文: https://blog.csdn.net/uk8692/article/details/49386679 https://blog.csdn.net/qq362228416/article/ ...
- 微信程序开发之-WeixinJSBridge调用
微信的WeixinJSBridge还是很厉害的,虽然官方文档只公布了3个功能,但是还内置的很多功能没公布,但是存在.今天就好好和大家聊聊 功能1------发送给好友 代码如下: functi ...
- Spring事务源码梳理
通过注解@EnableTransactionManagement中的@Import(TransactionManagementConfigurationSelector.class)给容器中导入了两个 ...
- hive日期转换函数2
转自大神 http://www.oratea.net/?p=944 无论做什么数据,都离不开日期函数的使用. 这里转载一下Hive的日期函数的使用,写的相当完整. 日期函数UNIX时间戳转日期函数: ...
- template_constructor_function
#include <iostream> using namespace std; template <class T> class MyClass{ public: templ ...
- java构建简单的HTTP服务器
使用Java技术构建Web应用时, 我们通常离不开tomcat和jetty之类的servlet容器,这些Web服务器功能强大,性能强劲,深受欢迎,是运行大型Web应用的必备神器. 虽然Java的设计初 ...
- Linux内核调试的方式以及工具集锦
原文:https://blog.csdn.net/gatieme/article/details/68948080 CSDN GitHubLinux内核调试的方式以及工具集锦 LDD-LinuxDev ...
- Minidumps 和 modules匹配
简介 调试应用程序时,调试器必须加载可执行模块的符号,以便能够显示有意义的调用堆栈.当前源代码行.变量值等.如果您曾经调试过在另一个系统上创建的小型转储,那么您已经知道除了符号之外,调试器还需要访问创 ...
- 使用if和switch制作简单的年龄生肖判断
-年 查询 --> var oDiv =document.getElementById("cont"); var oYear = document.getElementByI ...
- circus docker image web 运行异常问题的解决
经过查看官方文档,因为我使用的是python 较高版本,存在兼容问题,解决方法 修改基础镜像版本 代码如下: FROM python:2.7-slim-stretch LABEL AUTHOR=&qu ...