Spring Cloud分区发布实践(1) 环境准备
最近研究了一下Spring Cloud里面的灰度发布, 看到各种各样的使用方式, 真是纷繁复杂, 眼花缭乱, 不同的场景需要不同的解决思路.
那我们也来实践一下最简单的场景:
区域划分:
服务分为beta(线上预发布环境)和main主生产环境
区域隔离情况
试情况可能有三种选择:
- A. main和beta互不相通, 绝对隔离 (资源相对充裕)
- B. main和beta正常情况下不通, 缺少实例时互通 (比较简单, 但可能无法区分异常服务, 不知道访问的是那个区域)
- C. beta绝对隔离, main在发布过程中可以切换到beta (main区域只有一台机器, 资源比较紧张)
- D. 发布前标注一套区域为beta的服务, 测试通过后修改beta服务的区域为main, 多个实例都可上线服务 (资源非常紧张, 操作相对复杂)
以上4种情况适合不同的公司, 但也各有利弊.
实现分析
我们先从Spring Cloud框架的技术方面来考虑
- B 最简单, 简单配置即可实现
- A, C 自己定制一下ServiceInstanceListSupplier 可以实现
- D 和A一样, 只不过需要额外修改服务的区域设置
项目环境
- Java 8 (1.8.0_291, build低版本有个bug)
- Spring Cloud 2020.0.3
- Spring Boot 2.5.0
- Intellij Idea 2021
- Maven 项目
项目目标
- 使用Spring Cloud开发微服务
- 支持2个区域: beta, main
- 服务链保持相同区域: gateway -> Service A -> Service B
- 使用Feign调用
- 使用Spring Cloud Gateway, LoadBalancer
创建根项目
首先我们在IDE里创建一个空的Maven项目, 把项目所有模块的公共依赖放在pom.xml
<project xmlns="http://maven.apache.org/POM/4.0.0"

	xmlns:xsi="http://www.w3.org/2001/XMLSchema-instance"

	xsi:schemaLocation="http://maven.apache.org/POM/4.0.0 https://maven.apache.org/xsd/maven-4.0.0.xsd">

	<modelVersion>4.0.0</modelVersion>

	<groupId>com.cnscud.betazone</groupId>

	<artifactId>betazone-root</artifactId>

	<version>0.0.1-SNAPSHOT</version>

	<packaging>pom</packaging>

	<description>hello</description>

	<url>https://www.cnscud.com</url>

	<modules>

	</modules>

	<properties>

		<spring-boot.version>2.5.0</spring-boot.version>

		<spring-cloud.version>2020.0.3</spring-cloud.version>

		<project.build.sourceEncoding>UTF-8</project.build.sourceEncoding>

		<maven.compiler.source>1.8</maven.compiler.source>

		<maven.compiler.target>1.8</maven.compiler.target>

	</properties>

	<dependencies>

		<!--监控 -->

		<dependency>

			<groupId>org.springframework.boot</groupId>

			<artifactId>spring-boot-starter-actuator</artifactId>

		</dependency>

		<!--Lombok -->

		<dependency>

			<groupId>org.projectlombok</groupId>

			<artifactId>lombok</artifactId>

			<scope>provided</scope>

		</dependency>

		<!--测试依赖 -->

		<dependency>

			<groupId>org.springframework.boot</groupId>

			<artifactId>spring-boot-starter-test</artifactId>

			<scope>test</scope>

		</dependency>

	</dependencies>

	<dependencyManagement>

		<dependencies>

			<!-- spring boot 依赖 -->

			<dependency>

				<groupId>org.springframework.boot</groupId>

				<artifactId>spring-boot-dependencies</artifactId>

				<version>${spring-boot.version}</version>

				<type>pom</type>

				<scope>import</scope>

			</dependency>

			<!-- spring cloud 依赖 -->

			<dependency>

				<groupId>org.springframework.cloud</groupId>

				<artifactId>spring-cloud-dependencies</artifactId>

				<version>${spring-cloud.version}</version>

				<type>pom</type>

				<scope>import</scope>

			</dependency>

		</dependencies>

	</dependencyManagement>

</project>
准备注册中心
然后我们来启动一个Eureka作为我们的服务注册中心.
新建一个Module, 名字为 eureka-server, 使用IDE的Spring Initializr, 也可以使用 https://start.spring.io/{:target="_blank"} 创建.
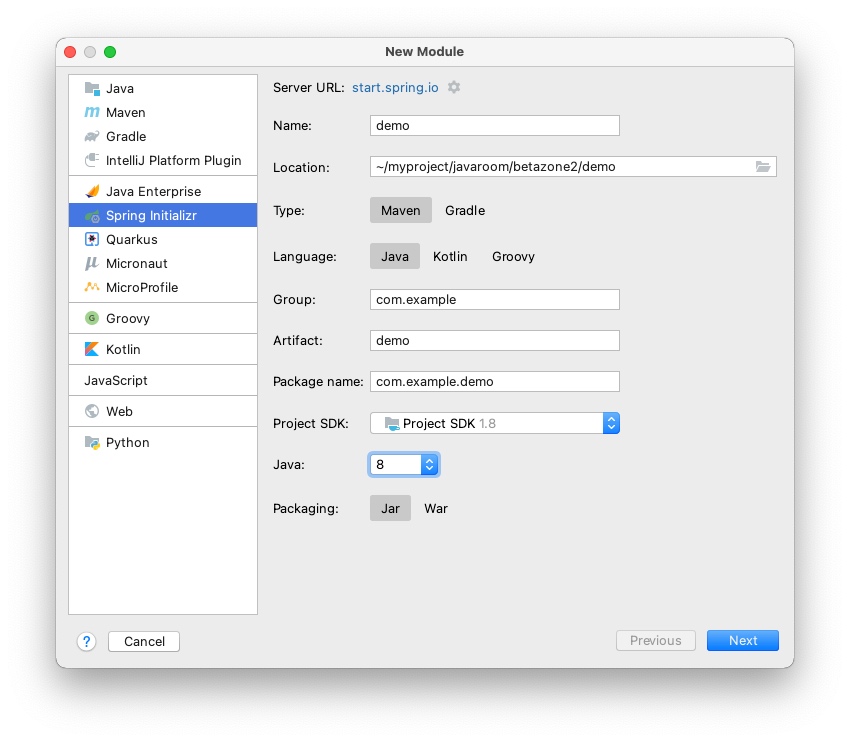
其中pom我们做一下修改, 继承父项目的pom:
<?xml version="1.0" encoding="UTF-8"?>

<project xmlns="http://maven.apache.org/POM/4.0.0" xmlns:xsi="http://www.w3.org/2001/XMLSchema-instance"

         xsi:schemaLocation="http://maven.apache.org/POM/4.0.0 https://maven.apache.org/xsd/maven-4.0.0.xsd">

    <modelVersion>4.0.0</modelVersion>

    <parent>

        <groupId>com.cnscud.betazone</groupId>

        <artifactId>betazone-root</artifactId>

        <version>0.0.1-SNAPSHOT</version>

        <relativePath/> <!-- lookup parent from repository -->

    </parent>

    <artifactId>eureka-server</artifactId>

    <version>0.0.1-SNAPSHOT</version>

    <name>eureka-server</name>

    <description>Demo project for Spring Boot</description>

    <dependencies>

        <dependency>

            <groupId>org.springframework.cloud</groupId>

            <artifactId>spring-cloud-starter-netflix-eureka-server</artifactId>

        </dependency>

    </dependencies>

</project>
里面spring-cloud-starter-netflix-eureka-server 只是为了启动Eureka Server, 其他都不需要.
为了启动, 我们还需要配置一个application.yml:
# 指定运行端口

server:

  port: 8001

# 指定服务名称

spring:

  application:

    name: eureka-server

# 指定主机地址

eureka:

  instance:

    hostname: localhost

  client:

    # 指定是否从注册中心获取服务(注册中心不需要开启)

    fetch-registry: false

    # 指定是否将服务注册到注册中心(注册中心不需要开启)

    register-with-eureka: false
然后就可以启动了, 访问 http://localhost:8001/{:target="_blank"} 就可以看到WEB界面, http://localhost:8001/eureka/apps{:target="_blank"} 可以看到详细的xml内容, 可以用来验证metadata是否设置正确.
然后接下来我们准备用于测试的微服务...
Spring Cloud分区发布实践(1) 环境准备的更多相关文章
- Spring Cloud分区发布实践(6)--灰度服务-根据Header选择实例区域
此文是一个完整的例子, 包含可运行起来的源码. 此例子包含以下部分: 网关层实现自定义LoadBalancer, 根据Header选取实例 服务中的Feign使用拦截器, 读取Header Feign ...
- Spring Cloud分区发布实践(3) 网关和负载均衡
注意: 因为涉及到配置测试切换, 中间环节需按此文章操作体验, 代码仓库里面的只有最后一步的代码 准备好了微服务, 那我们就来看看网关+负载均衡如何一起工作 新建一个模块hello-gateway, ...
- Spring Cloud分区发布实践(5)--定制ServiceInstanceListSupplier
现在我们简单地来定制二个 ServiceInstanceListSupplier, 都是zone-preference的变种. 为了方便, 我重新调整了一下项目的结构, 把一些公用的类移动到hello ...
- Spring Cloud分区发布实践(4) FeignClient
上面看到直接通过网关访问微服务是可以实现按区域调用的, 那么微服务之间调用是否也能按区域划分哪? 下面我们使用FeignClient来调用微服务, 就可以配合LoadBalancer实现按区域调用. ...
- Spring Cloud分区发布实践(2) 微服务
我们准备一下用于查询姓名的微服务. 首先定义一下服务的接口, 新建一个空的Maven模块hello-remotename-core, 里面新建一个类: public interface RemoteN ...
- spring cloud微服务实践二
在上一篇,我们已经搭建了spring cloud微服务中的注册中心.但只有一个注册中心还远远不够. 接下来我们就来尝试提供服务. 注:这一个系列的开发环境版本为 java1.8, spring boo ...
- 厉害了,Spring Cloud Alibaba 发布 GA 版本!
? 小马哥 & Josh Long ? 喜欢写一首诗一般的代码,更喜欢和你共同 code review,英雄的相惜,犹如时间沉淀下来的对话,历久方弥新. 相见如故,@杭州. 4 月 18 日, ...
- Spring Cloud Alibaba发布第二个版本,Spring 发来贺电
还是熟悉的面孔,还是熟悉的味道,不同的是,这次的配方升级了. 今年10月底,Spring Cloud联合创始人Spencer Gibb在Spring官网的博客页面宣布:阿里巴巴开源 Spring Cl ...
- spring cloud微服务实践一
最近在学习spring框架.其中spring cloud在微服务方面很火,所以在学习过程中,也做一些记录. 注:这一个系列的开发环境版本为 java1.8, spring boot2.x, sprin ...
随机推荐
- sleep、wait方法之间区别
sleep.wait方法之间区别 1.所属的类不同 sleep是Thread类的静态方法,而wait是Object类的成员方法 2.锁机制不一样 sleep方法:会让出资源调度器为当前线程分配的时间片 ...
- 关于Android Studio Emulator常见使用问题
Q:模拟器无法初始化声音相关设备 Emulator: dsound: Could not initialize DirectSoundCapture Emulator: dsound: Reason: ...
- 记一次ios下h5页面图片显示问题
刚入职公司时做了一个移动端图片预览的组件,之前也有业务组用过,没发现什么问题,但是这次有两个很诡异的问题. 一个是老数据的图不显示,另一个是图片点击预览只显示一部分加载不全.之所以诡异是所有设备都没问 ...
- Docker搭建Prometheus+grafana监控系统
一.Prometheus简介 1.简介 Prometheus是由SoundCloud开发的开源监控报警系统和时序列数据库(TSDB). Prometheus使用Go语言开发,是Google BorgM ...
- AcWing 242. 一个简单的整数问题
给定长度为N的数列A,然后输入M行操作指令. 第一类指令形如"C l r d",表示把数列中第l~r个数都加d. 第二类指令形如"Q X",表示询问数列中第x个 ...
- mac 中一些日常小问题与快捷键
1.备忘录中的中英文符号问题 比如:在备忘录中使用英文符号时,总是会被自动的修改为中文符号 解决方法:系统偏好设置-键盘-文本,去选"使用智能引号和存折号" p.p1 { marg ...
- MySQL中的联表查询与子查询
0.准备数据 1.内连接:INNER JOIN 2.左连接:LEFT JOIN 3.右连接:RIGHT JOIN 4.USING子句 扩展知识点: 0.表别名的使用: 1.group by的用法 2. ...
- MySQL 数据排序 order by
1.单一字段排序 select * from tablename order by field1 desc; 排序采用order by+排序字段 升序关键字(asc,desc),排序字段可以放多个,多 ...
- MySQL服务器 IO 100%的分析与优化方案
前言 压力测试过程中,如果因为资源使用瓶颈等问题引发最直接性能问题是业务交易响应时间偏大,TPS逐渐降低等.而问题定位分析通常情况下,最优先排查的是监控服务器资源利用率,例如先用TOP 或者nmon等 ...
- WPF教程十一:简单了解并使用控件模板
WPF教程十一:简单了解并使用控件模板 这一章梳理控件模板,每个WPF控件都设计成无外观的,但是行为设计上是不允许改变的,比如使用Button的控件时,按钮提供了能被点击的内容,那么自由的改变控件外观 ...