iOS 动画篇 之 Core Animation (一)
iOS中实现动画有两种方式,一种是自己不断的通过drawRect:方法来绘制,另外一种就是使用核心动画(Core Animation)。
导语:
核心动画提供高帧速率和流畅的动画,而不会增加CPU的负担和减慢你的应用程序。换句话说,使用核心动画你就不用担心性能的事了。同时,使用核心动画只需要提供少数参数,使用起来很简单。需要注意的是核心动画针对的是CALayer而不是UIView,所以对使用核心动画前,需要先对CALayer的知识有过了解。
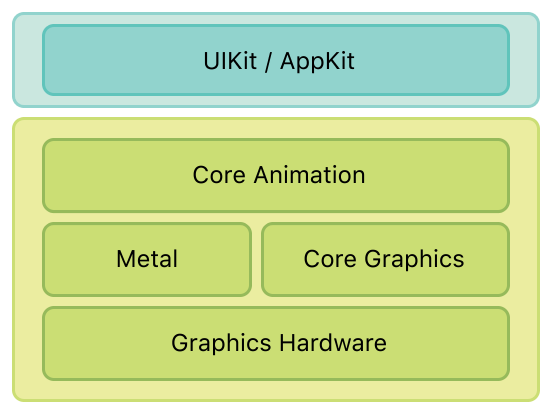
一、系统层级介绍
如图所示,核心动画位于AppKit和UIKit之下,并紧密集成到Cocoa和Cocoa Touch的视图工作流中。
二、核心动画类图介绍
先来一张类图(ps:这类图是盗的,等我会画的时候就自己画了)。如图所示,CAAnimation作为虚基类实现了CAMediaTiming协议(其实还实现了CAAction协议)。CAAnimation有三个子类CAAnimationGroup(组动画)、CAPropertyAnimation(属性动画)、CATrasition(渐变动画)。CAAnimation不能直接使用,应该使用它的子类。作为CAPropertyAnimation也有两个子类CABasicAnimation(基础动画)、CAKeyFrameAnimation(关键帧动画)。CAPropertyAnimation也不能直接使用,应该使用两个子类。综上所诉要使用核心动画,可以使用的就是以下四个类(CAAnimationGroup、CATrasition、CABasicAnimation、CAKeyFrameAnimation)。
PS:在iOS9.0+以后,核心动画又加入了CASpringAnimation(弹性动画),CASpringAnimation继承自CABasicAnimation。

三、基本使用示例
在这里先介绍一下代码统一的代码,所有的示例代码均继承父类创建TestLayer代码
self.testLayer = ({

        CALayer *tempLayer = [CALayer new];

        tempLayer.backgroundColor = [UIColor cyanColor].CGColor;

        tempLayer.position = self.view.center;

        tempLayer.bounds = CGRectMake(, , , );

        [self.view.layer addSublayer:tempLayer];

        tempLayer;

    });
首先要介绍CAPropertyAnimation(属性动画),属性动画创建的时候需要指定keyPath,可以动画的属性可以在官网文档查看
3.1 CABasicAnimation
使用代码示例
- (void)touchesBegan:(NSSet<UITouch *> *)touches withEvent:(UIEvent *)event

{

    UITouch *touch = [touches anyObject];

    CGPoint point = [touch locationInView:self.view];

    CABasicAnimation *positionAnimation = [CABasicAnimation animationWithKeyPath:@"position"];

    positionAnimation.fromValue = [NSValue valueWithCGPoint:self.testLayer.presentationLayer.position];

    positionAnimation.toValue = [NSValue valueWithCGPoint:point];

    positionAnimation.duration = .f;//动画时长

    positionAnimation.removedOnCompletion = NO;//是否在完成时移除

    positionAnimation.fillMode = kCAFillModeForwards;//动画结束后是否保持状态

    [self.testLayer addAnimation:positionAnimation forKey:@"positionAnimation"];

}
上面的示例代码通过使用CABasicAnimation来实现了位置动画,让testLayer每次动画移动到点击的位置,在使用基础动画的时候需要指定三个属性:fromValue(可省略,默认值为动画的keyPath对应的当前属性值),toValue,duration(默认值为0.25s)。
运行效果如下:
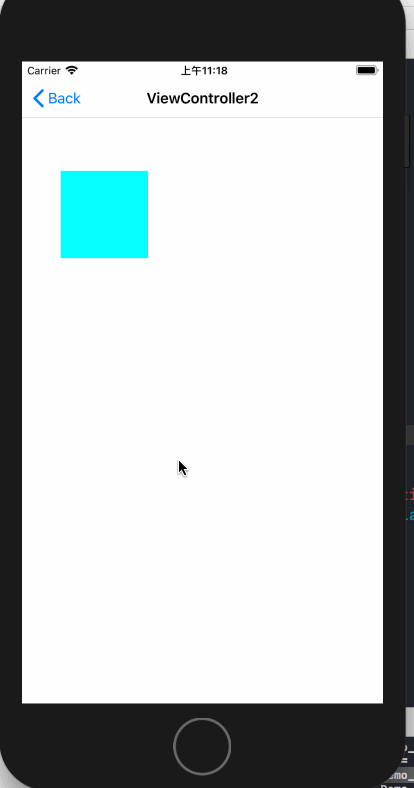
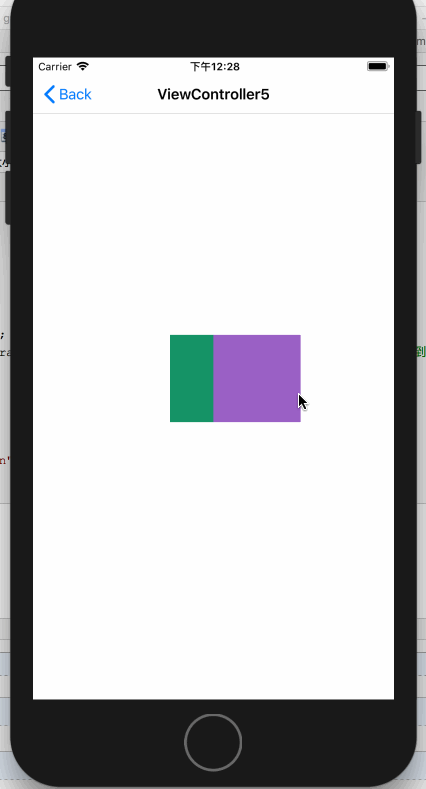
3.2 隐式动画
如果对于基础动画,不需要设置其他值,仅仅想要设置toValue来实现动画的话,那么就可以使用隐式动画。隐式动画其实通过直接修改layer的动画属性,系统会按照基础动画的默认值来实现动画。代码如下
- (void)touchesBegan:(NSSet<UITouch *> *)touches withEvent:(UIEvent *)event

{

    UITouch *touch = [touches anyObject];

    self.testLayer.position = [touch locationInView:self.view];//修改位置的隐式动画

    CGFloat WH = arc4random_uniform();

    if (WH < ) {

        WH += ;

    }

    self.testLayer.bounds = CGRectMake(, , WH, WH);

    UIColor *color = [UIColor colorWithRed:arc4random_uniform() / 255.0 green:arc4random_uniform() / 255.0 blue:arc4random_uniform() / 255.0 alpha:.f];

    self.testLayer.backgroundColor = color.CGColor;//修改背景色的隐式动画

}
效果如下

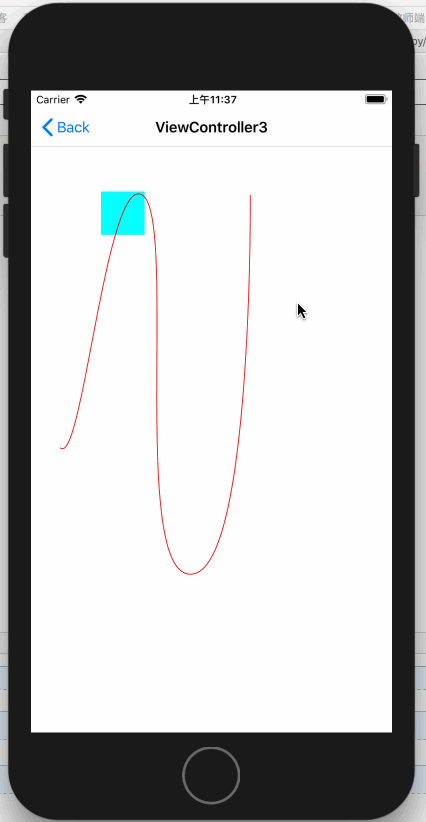
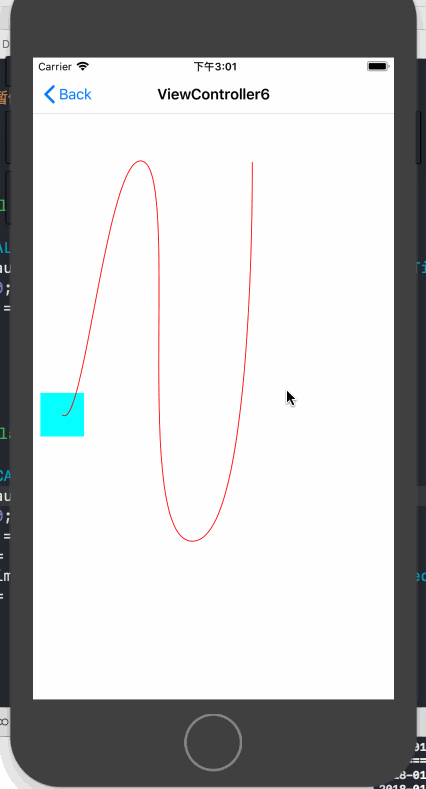
3.3 CAKeyFrameAnimation
关键帧动画的使用中可以设置path,也可以设置values,在设置values的时候,默认会把动画时间按照values的个数进行平均分配。下面是使用path来做的动画,同时显示了轨迹。
先上效果:
代码如下:
- (void)viewDidLoad {

    [super viewDidLoad];

    NSLog(@"CAKeyframeAnimation");

    //重新设置初始位置

    self.testLayer.position = CGPointMake(33.5, 409.5);

    self.testLayer.bounds = CGRectMake(, , , );

    CGPathRef bezirePath = [self bezirePath];

    //绘制轨迹

    CAShapeLayer *positionTrackLayer = [[CAShapeLayer alloc] init];

    positionTrackLayer.path = bezirePath;

    positionTrackLayer.strokeColor = [UIColor redColor].CGColor;

    positionTrackLayer.fillColor = [UIColor clearColor].CGColor;

    [self.view.layer addSublayer:positionTrackLayer];

    //添加保存动画

    self.positionAnimation = [self keyframeAnimation:bezirePath];

}

- (CGPathRef)bezirePath

{

    UIBezierPath* bezierPath = UIBezierPath.bezierPath;

    CGPoint fromPoint = CGPointMake(33.5, 409.5);

    [bezierPath moveToPoint: fromPoint];

    [bezierPath addCurveToPoint: CGPointMake(127.5, 119.78) controlPoint1: CGPointMake(58.5, 433.93) controlPoint2: CGPointMake(86.5, 95.16)];

    [bezierPath addCurveToPoint: CGPointMake(183.5, 554.5) controlPoint1: CGPointMake(168.5, 144.4) controlPoint2: CGPointMake(112.5, 557.05)];

    [bezierPath addCurveToPoint: CGPointMake(251.5, 119.78) controlPoint1: CGPointMake(254.5, 551.95) controlPoint2: CGPointMake(251.5, 119.78)];

    return bezierPath.CGPath;

}

- (CAKeyframeAnimation *)keyframeAnimation:(CGPathRef)bezirePath

{

    CAKeyframeAnimation *moveAnimation = [CAKeyframeAnimation animationWithKeyPath:@"position"];

    moveAnimation.path = bezirePath;

    moveAnimation.fillMode = kCAFillModeForwards;

    moveAnimation.removedOnCompletion = NO;

    moveAnimation.duration = .f;

    return moveAnimation;

}

- (void)touchesBegan:(NSSet<UITouch *> *)touches withEvent:(UIEvent *)event

{

    [self.testLayer addAnimation:self.positionAnimation forKey:@"position"];

}
3.4 AnimationGroup(组动画)
组动画的作用是可以把多个动画组合在一起比如移动、旋转、缩放、透明度等等。在使用动画组时需要先将需要组合的动画创建好,最后放到CAAnimationGroup的animations数组中即可,animationGroup其他设置与基础动画差不多
先来一个类似于漂浮气泡的动画
这个动画的实现实际上就是使用组动画来同时改变layer在x,y轴上的缩放、x,y轴上的移动来实现的,以下为实现代码:
- (void)viewDidLoad {

    [super viewDidLoad];

    NSLog(@"CAAnimationGroup");

    //重新设置layer大小与圆角

    self.testLayer.bounds = CGRectMake(, , , );

    self.testLayer.cornerRadius =  / ;

    //设置x轴方向的缩放动画

    CAKeyframeAnimation *xScaleAnimation = [CAKeyframeAnimation animationWithKeyPath:@"transform.scale.x"];

    xScaleAnimation.values = @[@, @0.9, @, @1.1, @0.9, @];

    xScaleAnimation.duration = .f;

    xScaleAnimation.repeatCount = CGFLOAT_MAX;

    xScaleAnimation.removedOnCompletion = NO;

    xScaleAnimation.fillMode = kCAFillModeForwards;

    //设置y轴方向的缩放动画

    CAKeyframeAnimation *yScaleAnimation = [CAKeyframeAnimation animationWithKeyPath:@"transform.scale.x"];

    yScaleAnimation.values = @[@0.9, @, @1.1, @0.8, @, @0.9];

    yScaleAnimation.duration = .f;

    yScaleAnimation.repeatCount = CGFLOAT_MAX;

    yScaleAnimation.removedOnCompletion = NO;

    yScaleAnimation.fillMode = kCAFillModeForwards;

    //设置x轴方向的移动动画

    CAKeyframeAnimation *xTranslationAnimation = [CAKeyframeAnimation animationWithKeyPath:@"transform.translation.x"];

    xTranslationAnimation.values = @[@, @, @(-), @, @, @];

    xTranslationAnimation.duration = .f;

    xTranslationAnimation.repeatCount = CGFLOAT_MAX;

    xTranslationAnimation.removedOnCompletion = NO;

    xTranslationAnimation.fillMode = kCAFillModeForwards;

    //设置y轴方向的移动动画

    CAKeyframeAnimation *yTranslationAnimation = [CAKeyframeAnimation animationWithKeyPath:@"transform.translation.y"];

    yTranslationAnimation.values = @[@, @, @, @-, @];

    yTranslationAnimation.duration = .f;

    yTranslationAnimation.repeatCount = CGFLOAT_MAX;

    yTranslationAnimation.removedOnCompletion = NO;

    yTranslationAnimation.fillMode = kCAFillModeForwards;

    //组动画

    CAAnimationGroup *groupAnimation = [[CAAnimationGroup alloc] init];

    groupAnimation.animations = @[xScaleAnimation, yScaleAnimation, xTranslationAnimation, yTranslationAnimation];//将所有动画添加到动画组

    groupAnimation.duration = .f;

    groupAnimation.repeatCount = CGFLOAT_MAX;

    groupAnimation.removedOnCompletion = NO;

    groupAnimation.fillMode = kCAFillModeForwards;

    [self.testLayer addAnimation:groupAnimation forKey:@"groupAnimation"];

}
3.5 CATransition(过渡动画)
过渡动画的使用方式和属性动画就不同了,还是先来效果
对于具体的解释见代码:
- (void)touchesBegan:(NSSet<UITouch *> *)touches withEvent:(UIEvent *)event

{

    CATransition *transition = [CATransition animation];

    transition.startProgress = ;//开始进度

    transition.endProgress = ;//结束进度

    transition.type = kCATransitionReveal;//过渡类型

    transition.subtype = kCATransitionFromLeft;//过渡方向

    transition.duration = .f;

    UIColor *color = [UIColor colorWithRed:arc4random_uniform() / 255.0 green:arc4random_uniform() / 255.0 blue:arc4random_uniform() / 255.0 alpha:.f];

    self.testLayer.backgroundColor = color.CGColor;

    [self.testLayer addAnimation:transition forKey:@"transition"];

}
以上就是核心动画的基本使用了
接下来介绍核心动画的进阶使用
四、核心动画进阶使用
核心动画允许我们在动画过程中进行操作,如:暂停、恢复、移除
4.1 动画的暂停与恢复
暂停动画需要做两步操作:
1. 利用layer的timeOffset来记录当前暂停的时间点
2. 设置layer的speed为0
恢复动画需要做以下操作:
1. 取出暂停时间的时间点
2. 恢复speed为1
3. 设置timeOffset为0
4. 设置beginTimer为0
5. 计算当前时间与暂停时间点的时间差
6. 将beginTimer设置为计算出来的时间差
还是先来一个暂停效果:
具体的暂停与恢复的代码如下:
@interface ViewController6 ()

@property (nonatomic, strong) CAKeyframeAnimation *positionAnimation;

@property (nonatomic, assign) BOOL isPositionAnimation;

@end

@implementation ViewController6

- (void)viewDidLoad {

    [super viewDidLoad];

    NSLog(@"动画的暂停与恢复");

    //重新设置初始位置

    self.testLayer.position = CGPointMake(33.5, 409.5);

    self.testLayer.bounds = CGRectMake(, , , );

    CGPathRef bezirePath = [self bezirePath];

    //绘制轨迹

    CAShapeLayer *positionTrackLayer = [[CAShapeLayer alloc] init];

    positionTrackLayer.path = bezirePath;

    positionTrackLayer.strokeColor = [UIColor redColor].CGColor;

    positionTrackLayer.fillColor = [UIColor clearColor].CGColor;

    [self.view.layer addSublayer:positionTrackLayer];

    //添加保存动画

    self.positionAnimation = [self keyframeAnimation:bezirePath];

}

- (CGPathRef)bezirePath

{

    UIBezierPath* bezierPath = UIBezierPath.bezierPath;

    CGPoint fromPoint = CGPointMake(33.5, 409.5);

    [bezierPath moveToPoint: fromPoint];

    [bezierPath addCurveToPoint: CGPointMake(127.5, 119.78) controlPoint1: CGPointMake(58.5, 433.93) controlPoint2: CGPointMake(86.5, 95.16)];

    [bezierPath addCurveToPoint: CGPointMake(183.5, 554.5) controlPoint1: CGPointMake(168.5, 144.4) controlPoint2: CGPointMake(112.5, 557.05)];

    [bezierPath addCurveToPoint: CGPointMake(251.5, 119.78) controlPoint1: CGPointMake(254.5, 551.95) controlPoint2: CGPointMake(251.5, 119.78)];

    return bezierPath.CGPath;

}

- (CAKeyframeAnimation *)keyframeAnimation:(CGPathRef)bezirePath

{

    CAKeyframeAnimation *moveAnimation = [CAKeyframeAnimation animationWithKeyPath:@"position"];

    moveAnimation.path = bezirePath;

    moveAnimation.fillMode = kCAFillModeForwards;

    moveAnimation.removedOnCompletion = NO;

    moveAnimation.duration = .f;

    return moveAnimation;

}

- (void)touchesBegan:(NSSet<UITouch *> *)touches withEvent:(UIEvent *)event

{

    if ([self.testLayer animationForKey:[self.testLayer.animationKeys firstObject]] == nil) {

        [self.testLayer addAnimation:self.positionAnimation forKey:@"position"];

        self.isPositionAnimation = YES;

        return;

    }

    if (self.isPositionAnimation) {

        [self pauseLayer:self.testLayer];

        self.isPositionAnimation = NO;

    }else{

        self.isPositionAnimation = YES;

        [self resumeLayer:self.testLayer];

    }

}

#pragma mark - 动画的暂停与恢复

/**

 暂停动画

 @param layer 要暂停的layer

 */

-(void)pauseLayer:(CALayer *)layer {

    CFTimeInterval pausedTime = [layer convertTime:CACurrentMediaTime() fromLayer:nil];

    layer.speed = 0.0;

    layer.timeOffset = pausedTime;

}

/**

 恢复动画

 @param layer 要恢复的layer

 */

-(void)resumeLayer:(CALayer *)layer {

    CFTimeInterval pausedTime = [layer timeOffset];

    layer.speed = 1.0;

    layer.timeOffset = 0.0;

    layer.beginTime = 0.0;

    CFTimeInterval timeSincePause = [layer convertTime:CACurrentMediaTime() fromLayer:nil] - pausedTime;

    layer.beginTime = timeSincePause;

}
4.2 监听动画的完成状态
有时候我们需要监听动画的开始与完成,这就要靠设置动画的delegate来实现了
@protocol CAAnimationDelegate <NSObject>

@optional

//在动画开始时被调用

- (void)animationDidStart:(CAAnimation *)anim;

//在动画结束时被调用, 如果是动画被移除则flag为false,正常结束为true

- (void)animationDidStop:(CAAnimation *)anim finished:(BOOL)flag;

@end
示例代码如下:
需要注意的是
- (void)viewDidLoad {

    [super viewDidLoad];

    NSLog(@"监听动画完成状态");

    CABasicAnimation *positionAnimation = [CABasicAnimation animationWithKeyPath:@"position"];

    CGPoint fromPoint = CGPointMake(, );

    positionAnimation.fromValue = [NSValue valueWithCGPoint:fromPoint];

    positionAnimation.toValue = [NSValue valueWithCGPoint:CGPointMake(, )];

    positionAnimation.duration = .f;

    positionAnimation.fillMode = kCAFillModeForwards;

    positionAnimation.removedOnCompletion = NO;

    positionAnimation.delegate = self;

    [positionAnimation setValue:@"位置动画" forKey:@"animationName"];//添加属性名

    [self.testLayer addAnimation:positionAnimation forKey:@"positionAnimation"];

}

//在动画开始时被调用

- (void)animationDidStart:(CAAnimation *)anim

{

    NSLog(@"%@-----动画开始", [anim valueForKey:@"animationName"]);

}

//在动画结束时被调用, 如果是动画被移除则flag为false,正常结束为true

- (void)animationDidStop:(CAAnimation *)anim finished:(BOOL)flag

{

    if (flag) {

        NSLog(@"%@-----动画正常结束", [anim valueForKey:@"animationName"]);

    }else{

        NSLog(@"%@-----动画移除结束", [anim valueForKey:@"animationName"]);

    }

}
4.2 CATransaction(事务)的使用
4.2.1 关闭隐式动画
我们可以利用事务来关闭隐式动画,使用方式如下,关闭隐式动画之后在修改layer的属性就不会在触发动画了。
- (void)touchesBegan:(NSSet<UITouch *> *)touches withEvent:(UIEvent *)event

{

    [CATransaction begin];

    [CATransaction setDisableActions:YES];//关闭动画行为

    UITouch *touch = [touches anyObject];

    self.testLayer.position = [touch locationInView:self.view];//修改位置的隐式动画

    CGFloat WH = arc4random_uniform();

    if (WH < ) {

        WH += ;

    }

    self.testLayer.bounds = CGRectMake(, , WH, WH);

    [CATransaction commit];

}
效果:

4.2.1 利用事务统一设置动画参数
可以统一设置的参数有以下四种
kCATransactionAnimationDuration //动画时长

kCATransactionDisableActions //关闭动画行为

kCATransactionAnimationTimingFunction //动画时间曲线

kCATransactionCompletionBlock //动画完成block
我们以统一设置动画时长为例,以下代码统一设置动画时长为5s
[CATransaction begin];

    [CATransaction setValue:[NSNumber numberWithFloat:.f]

                     forKey:kCATransactionAnimationDuration];

    CABasicAnimation *positionAnimation = [CABasicAnimation animationWithKeyPath:@"position"];

    CGPoint fromPoint = CGPointMake(, );

    positionAnimation.fromValue = [NSValue valueWithCGPoint:fromPoint];

    positionAnimation.toValue = [NSValue valueWithCGPoint:CGPointMake(, )];

    positionAnimation.fillMode = kCAFillModeForwards;

    positionAnimation.removedOnCompletion = NO;

    [positionAnimation setValue:@"位置动画" forKey:@"animationName"];//添加属性名

    [self.testLayer addAnimation:positionAnimation forKey:@"positionAnimation"];

    [CATransaction commit];
以上就是Core Animation的基本使用了,你可以在这里下载代码
本文个人原创,转载请注明出处 (http://www.cnblogs.com/pretty-guy/p/8259657.html)
下一篇文章讲Core Animation 与 CAShapeLayer组合起来使用
iOS 动画篇 之 Core Animation (一)的更多相关文章
- iOS 动画效果:Core Animation & Facebook's pop
本文转载至 http://www.cocoachina.com/ios/20151223/14739.html 感谢原创作者分享 前言相信很多人对实现 iOS 中的动画效果都特别头疼,往往懒得动手,功 ...
- iOS 动画篇 (二) CAShapeLayer与CoreAnimation结合使用
接上一篇博客 iOS 动画篇(一) Core Animation CAShapeLayer是CALayer的一个子类,使用这个类能够很轻易实现曲线的动画. 先来一个折线动画效果: 示例代码: //1. ...
- iOS动画篇:核心动画
转:http://www.cocoachina.com/ios/20160517/16290.html 基本概念 1.什么是核心动画 Core Animation(核心动画)是一组功能强大.效果华丽的 ...
- 动画基础--基于Core Animation(3)
参考:https://zsisme.gitbooks.io/ios-/content/ 前面的文章动画基础--基于Core Animation(1),动画基础--基于Core Animation(2) ...
- 动画基础--基于Core Animation(2)
参考:https://zsisme.gitbooks.io/ios-/content/ 前面的文章动画基础--基于Core Animation(1)提到了图层的基本概念以及可动画参数几何学等知识. 本 ...
- 动画基础--基于Core Animation(1)
1.简介 上一篇文章[New learn]动画-基于UIView了解到了一些直接由UIView这个在UIKIT提供的类中提供的一些动画方法. 使用UIView的动画特性已经能够满足我们很多的需求,它是 ...
- iOS动画篇:UIView动画
iOS的动画效果一直都很棒很,给人的感觉就是很炫酷很流畅,起到增强用户体验的作用.在APP开发中实现动画效果有很多种方式,对于简单的应用场景,我们可以使用UIKit提供的动画来实现. UIView动画 ...
- iOS 动画篇 (三) CADisplayLink与CoreGraphics实现动画
本文主要介绍利用CoreGraphics和CADisplayLink来实现一个注水动画.来一个效果图先: 在介绍注水动画前,先介绍利用CoreGraphics实现进度条的绘制. 一.扇形进度绘制 效果 ...
- iOS动画1 — UIView动画
iOS动画基础是Core Animation核心动画.Core Animation是iOS平台上负责图形渲染与动画的基础设施.由于核心动画的实现比较复杂,苹果提供了实现简单动画的接口—UIView动画 ...
随机推荐
- iWeb峰会(HTML5峰会)2015年7月19日上海站会后感想
上周日专门从南京跑到上海參加了iWeb峰会(HTML5峰会),感觉这一天去的挺值的.几个演讲都挺精彩,干货不少啊. 总体感觉随着2014年HTML5标准的终于定稿,最近HTML5 ...
- vim配置分享(持续更新中)
作者:zhanhailiang 日期:2014-10-24 set nocompatible set nu "" 自己主动缩进 syntax on set autoindent ...
- 【Java入门提高篇】Day10 Java代理——静态代理
今天要介绍的是一个Java中一个很重要的概念--代理. 什么是代理?联系生活想想看,代理似乎并不陌生,最形象的代表便是经纪人,明星一般都有经纪人,经纪人作为中间人,负责代理明星的相关事宜,比如说,有人 ...
- Winform开发框架中工作流模块之审批会签操作(2)
前面随笔介绍了请假申请单和报销申请单两个不同的业务表单的流程处理,一个是单表信息,一个包含明细的主从表信息,后者包含了条件流程的处理,在流程审批中,一般还有一种流程处理就是会签的操作,会签处理是几个审 ...
- Java二维数组的概念和使用方法
二维数组 数组的数组---二维数组的每一个元素是一个一维数组 定义格式 数据类型[][] 数组名 = new 数据类型[二维数组的长度/包含的一维数组的个数][每个一维数组的长度]; int[][] ...
- 大数据学习(2)HDFS文件管理
命令行管理HDFS [root@server1 bin]# hadoop fs Usage: hadoop fs [generic options] [-appendToFile <locals ...
- MySql基础总结
1.创建一个表 CREATE TABLE customers ( cust_id INT NOT NULL AUTO_INCREMENT, cust_name CHAR(50) NOT NULL , ...
- springboot+shiro
作者:纯洁的微笑 出处:http://www.ityouknow.com/ 这篇文章我们来学习如何使用Spring Boot集成Apache Shiro.安全应该是互联网公司的一道生命线,几乎任何的公 ...
- 移动端下拉刷新上拉加载-mescroll.js插件
最近无意间看到有这么一个上拉刷新下拉加载的插件 -- mescroll.js,个人感觉挺好用的,官网地址是:http://www.mescroll.com 然后我就看了一下文档,简单的写了一个小dem ...
- 监听键盘弹起View上调
可以用三方库IQKeyboardManager 用这个第三方 http://www.jianshu.com/p/f8157895 #pragma mark - keyboard events - // ...