iOS 动画篇 之 Core Animation (一)
iOS中实现动画有两种方式,一种是自己不断的通过drawRect:方法来绘制,另外一种就是使用核心动画(Core Animation)。
导语:
核心动画提供高帧速率和流畅的动画,而不会增加CPU的负担和减慢你的应用程序。换句话说,使用核心动画你就不用担心性能的事了。同时,使用核心动画只需要提供少数参数,使用起来很简单。需要注意的是核心动画针对的是CALayer而不是UIView,所以对使用核心动画前,需要先对CALayer的知识有过了解。
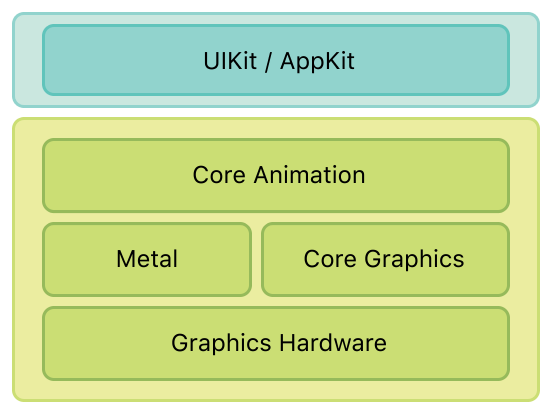
一、系统层级介绍
如图所示,核心动画位于AppKit和UIKit之下,并紧密集成到Cocoa和Cocoa Touch的视图工作流中。
二、核心动画类图介绍
先来一张类图(ps:这类图是盗的,等我会画的时候就自己画了)。如图所示,CAAnimation作为虚基类实现了CAMediaTiming协议(其实还实现了CAAction协议)。CAAnimation有三个子类CAAnimationGroup(组动画)、CAPropertyAnimation(属性动画)、CATrasition(渐变动画)。CAAnimation不能直接使用,应该使用它的子类。作为CAPropertyAnimation也有两个子类CABasicAnimation(基础动画)、CAKeyFrameAnimation(关键帧动画)。CAPropertyAnimation也不能直接使用,应该使用两个子类。综上所诉要使用核心动画,可以使用的就是以下四个类(CAAnimationGroup、CATrasition、CABasicAnimation、CAKeyFrameAnimation)。
PS:在iOS9.0+以后,核心动画又加入了CASpringAnimation(弹性动画),CASpringAnimation继承自CABasicAnimation。

三、基本使用示例
在这里先介绍一下代码统一的代码,所有的示例代码均继承父类创建TestLayer代码
self.testLayer = ({

        CALayer *tempLayer = [CALayer new];

        tempLayer.backgroundColor = [UIColor cyanColor].CGColor;

        tempLayer.position = self.view.center;

        tempLayer.bounds = CGRectMake(, , , );

        [self.view.layer addSublayer:tempLayer];

        tempLayer;

    });
首先要介绍CAPropertyAnimation(属性动画),属性动画创建的时候需要指定keyPath,可以动画的属性可以在官网文档查看
3.1 CABasicAnimation
使用代码示例
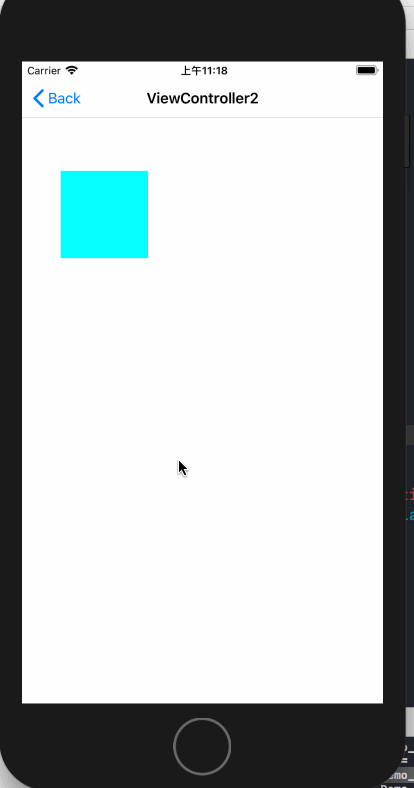
- (void)touchesBegan:(NSSet<UITouch *> *)touches withEvent:(UIEvent *)event

{

    UITouch *touch = [touches anyObject];

    CGPoint point = [touch locationInView:self.view];

    CABasicAnimation *positionAnimation = [CABasicAnimation animationWithKeyPath:@"position"];

    positionAnimation.fromValue = [NSValue valueWithCGPoint:self.testLayer.presentationLayer.position];

    positionAnimation.toValue = [NSValue valueWithCGPoint:point];

    positionAnimation.duration = .f;//动画时长

    positionAnimation.removedOnCompletion = NO;//是否在完成时移除

    positionAnimation.fillMode = kCAFillModeForwards;//动画结束后是否保持状态

    [self.testLayer addAnimation:positionAnimation forKey:@"positionAnimation"];

}
上面的示例代码通过使用CABasicAnimation来实现了位置动画,让testLayer每次动画移动到点击的位置,在使用基础动画的时候需要指定三个属性:fromValue(可省略,默认值为动画的keyPath对应的当前属性值),toValue,duration(默认值为0.25s)。
运行效果如下:
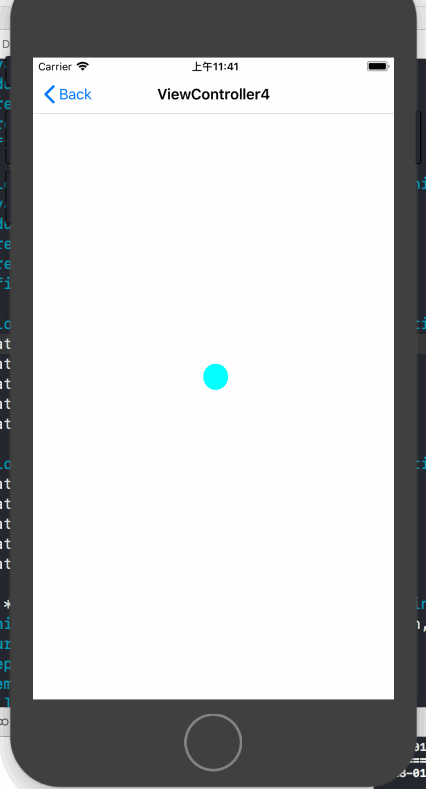
3.2 隐式动画
如果对于基础动画,不需要设置其他值,仅仅想要设置toValue来实现动画的话,那么就可以使用隐式动画。隐式动画其实通过直接修改layer的动画属性,系统会按照基础动画的默认值来实现动画。代码如下
- (void)touchesBegan:(NSSet<UITouch *> *)touches withEvent:(UIEvent *)event

{

    UITouch *touch = [touches anyObject];

    self.testLayer.position = [touch locationInView:self.view];//修改位置的隐式动画

    CGFloat WH = arc4random_uniform();

    if (WH < ) {

        WH += ;

    }

    self.testLayer.bounds = CGRectMake(, , WH, WH);

    UIColor *color = [UIColor colorWithRed:arc4random_uniform() / 255.0 green:arc4random_uniform() / 255.0 blue:arc4random_uniform() / 255.0 alpha:.f];

    self.testLayer.backgroundColor = color.CGColor;//修改背景色的隐式动画

}
效果如下

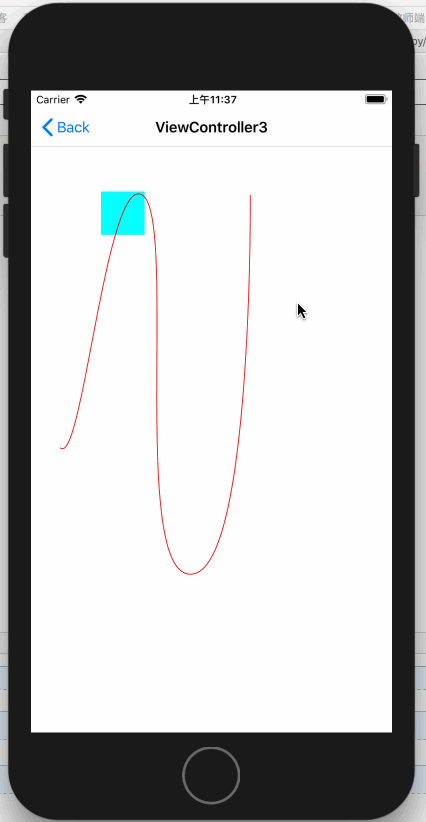
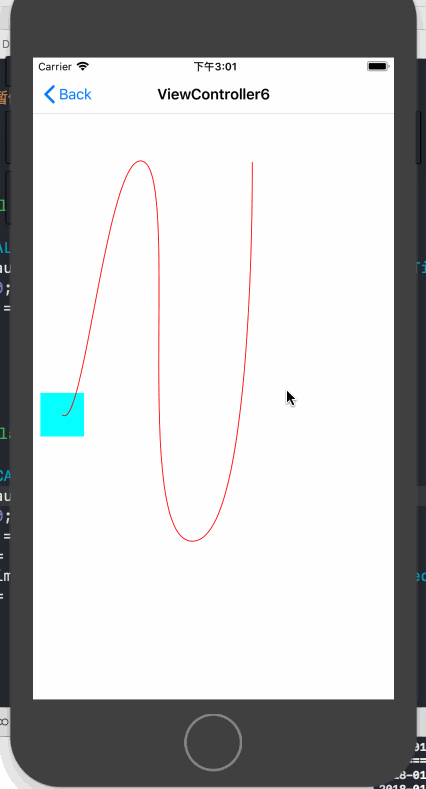
3.3 CAKeyFrameAnimation
关键帧动画的使用中可以设置path,也可以设置values,在设置values的时候,默认会把动画时间按照values的个数进行平均分配。下面是使用path来做的动画,同时显示了轨迹。
先上效果:
代码如下:
- (void)viewDidLoad {

    [super viewDidLoad];

    NSLog(@"CAKeyframeAnimation");

    //重新设置初始位置

    self.testLayer.position = CGPointMake(33.5, 409.5);

    self.testLayer.bounds = CGRectMake(, , , );

    CGPathRef bezirePath = [self bezirePath];

    //绘制轨迹

    CAShapeLayer *positionTrackLayer = [[CAShapeLayer alloc] init];

    positionTrackLayer.path = bezirePath;

    positionTrackLayer.strokeColor = [UIColor redColor].CGColor;

    positionTrackLayer.fillColor = [UIColor clearColor].CGColor;

    [self.view.layer addSublayer:positionTrackLayer];

    //添加保存动画

    self.positionAnimation = [self keyframeAnimation:bezirePath];

}

- (CGPathRef)bezirePath

{

    UIBezierPath* bezierPath = UIBezierPath.bezierPath;

    CGPoint fromPoint = CGPointMake(33.5, 409.5);

    [bezierPath moveToPoint: fromPoint];

    [bezierPath addCurveToPoint: CGPointMake(127.5, 119.78) controlPoint1: CGPointMake(58.5, 433.93) controlPoint2: CGPointMake(86.5, 95.16)];

    [bezierPath addCurveToPoint: CGPointMake(183.5, 554.5) controlPoint1: CGPointMake(168.5, 144.4) controlPoint2: CGPointMake(112.5, 557.05)];

    [bezierPath addCurveToPoint: CGPointMake(251.5, 119.78) controlPoint1: CGPointMake(254.5, 551.95) controlPoint2: CGPointMake(251.5, 119.78)];

    return bezierPath.CGPath;

}

- (CAKeyframeAnimation *)keyframeAnimation:(CGPathRef)bezirePath

{

    CAKeyframeAnimation *moveAnimation = [CAKeyframeAnimation animationWithKeyPath:@"position"];

    moveAnimation.path = bezirePath;

    moveAnimation.fillMode = kCAFillModeForwards;

    moveAnimation.removedOnCompletion = NO;

    moveAnimation.duration = .f;

    return moveAnimation;

}

- (void)touchesBegan:(NSSet<UITouch *> *)touches withEvent:(UIEvent *)event

{

    [self.testLayer addAnimation:self.positionAnimation forKey:@"position"];

}
3.4 AnimationGroup(组动画)
组动画的作用是可以把多个动画组合在一起比如移动、旋转、缩放、透明度等等。在使用动画组时需要先将需要组合的动画创建好,最后放到CAAnimationGroup的animations数组中即可,animationGroup其他设置与基础动画差不多
先来一个类似于漂浮气泡的动画
这个动画的实现实际上就是使用组动画来同时改变layer在x,y轴上的缩放、x,y轴上的移动来实现的,以下为实现代码:
- (void)viewDidLoad {

    [super viewDidLoad];

    NSLog(@"CAAnimationGroup");

    //重新设置layer大小与圆角

    self.testLayer.bounds = CGRectMake(, , , );

    self.testLayer.cornerRadius =  / ;

    //设置x轴方向的缩放动画

    CAKeyframeAnimation *xScaleAnimation = [CAKeyframeAnimation animationWithKeyPath:@"transform.scale.x"];

    xScaleAnimation.values = @[@, @0.9, @, @1.1, @0.9, @];

    xScaleAnimation.duration = .f;

    xScaleAnimation.repeatCount = CGFLOAT_MAX;

    xScaleAnimation.removedOnCompletion = NO;

    xScaleAnimation.fillMode = kCAFillModeForwards;

    //设置y轴方向的缩放动画

    CAKeyframeAnimation *yScaleAnimation = [CAKeyframeAnimation animationWithKeyPath:@"transform.scale.x"];

    yScaleAnimation.values = @[@0.9, @, @1.1, @0.8, @, @0.9];

    yScaleAnimation.duration = .f;

    yScaleAnimation.repeatCount = CGFLOAT_MAX;

    yScaleAnimation.removedOnCompletion = NO;

    yScaleAnimation.fillMode = kCAFillModeForwards;

    //设置x轴方向的移动动画

    CAKeyframeAnimation *xTranslationAnimation = [CAKeyframeAnimation animationWithKeyPath:@"transform.translation.x"];

    xTranslationAnimation.values = @[@, @, @(-), @, @, @];

    xTranslationAnimation.duration = .f;

    xTranslationAnimation.repeatCount = CGFLOAT_MAX;

    xTranslationAnimation.removedOnCompletion = NO;

    xTranslationAnimation.fillMode = kCAFillModeForwards;

    //设置y轴方向的移动动画

    CAKeyframeAnimation *yTranslationAnimation = [CAKeyframeAnimation animationWithKeyPath:@"transform.translation.y"];

    yTranslationAnimation.values = @[@, @, @, @-, @];

    yTranslationAnimation.duration = .f;

    yTranslationAnimation.repeatCount = CGFLOAT_MAX;

    yTranslationAnimation.removedOnCompletion = NO;

    yTranslationAnimation.fillMode = kCAFillModeForwards;

    //组动画

    CAAnimationGroup *groupAnimation = [[CAAnimationGroup alloc] init];

    groupAnimation.animations = @[xScaleAnimation, yScaleAnimation, xTranslationAnimation, yTranslationAnimation];//将所有动画添加到动画组

    groupAnimation.duration = .f;

    groupAnimation.repeatCount = CGFLOAT_MAX;

    groupAnimation.removedOnCompletion = NO;

    groupAnimation.fillMode = kCAFillModeForwards;

    [self.testLayer addAnimation:groupAnimation forKey:@"groupAnimation"];

}
3.5 CATransition(过渡动画)
过渡动画的使用方式和属性动画就不同了,还是先来效果
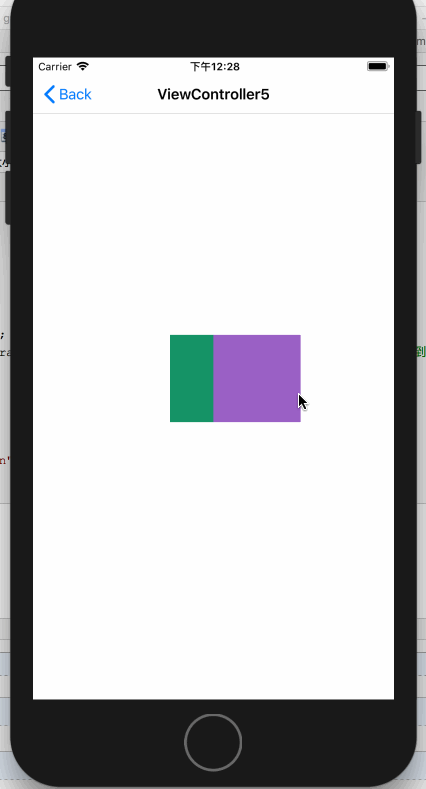
对于具体的解释见代码:
- (void)touchesBegan:(NSSet<UITouch *> *)touches withEvent:(UIEvent *)event

{

    CATransition *transition = [CATransition animation];

    transition.startProgress = ;//开始进度

    transition.endProgress = ;//结束进度

    transition.type = kCATransitionReveal;//过渡类型

    transition.subtype = kCATransitionFromLeft;//过渡方向

    transition.duration = .f;

    UIColor *color = [UIColor colorWithRed:arc4random_uniform() / 255.0 green:arc4random_uniform() / 255.0 blue:arc4random_uniform() / 255.0 alpha:.f];

    self.testLayer.backgroundColor = color.CGColor;

    [self.testLayer addAnimation:transition forKey:@"transition"];

}
以上就是核心动画的基本使用了
接下来介绍核心动画的进阶使用
四、核心动画进阶使用
核心动画允许我们在动画过程中进行操作,如:暂停、恢复、移除
4.1 动画的暂停与恢复
暂停动画需要做两步操作:
1. 利用layer的timeOffset来记录当前暂停的时间点
2. 设置layer的speed为0
恢复动画需要做以下操作:
1. 取出暂停时间的时间点
2. 恢复speed为1
3. 设置timeOffset为0
4. 设置beginTimer为0
5. 计算当前时间与暂停时间点的时间差
6. 将beginTimer设置为计算出来的时间差
还是先来一个暂停效果:
具体的暂停与恢复的代码如下:
@interface ViewController6 ()

@property (nonatomic, strong) CAKeyframeAnimation *positionAnimation;

@property (nonatomic, assign) BOOL isPositionAnimation;

@end

@implementation ViewController6

- (void)viewDidLoad {

    [super viewDidLoad];

    NSLog(@"动画的暂停与恢复");

    //重新设置初始位置

    self.testLayer.position = CGPointMake(33.5, 409.5);

    self.testLayer.bounds = CGRectMake(, , , );

    CGPathRef bezirePath = [self bezirePath];

    //绘制轨迹

    CAShapeLayer *positionTrackLayer = [[CAShapeLayer alloc] init];

    positionTrackLayer.path = bezirePath;

    positionTrackLayer.strokeColor = [UIColor redColor].CGColor;

    positionTrackLayer.fillColor = [UIColor clearColor].CGColor;

    [self.view.layer addSublayer:positionTrackLayer];

    //添加保存动画

    self.positionAnimation = [self keyframeAnimation:bezirePath];

}

- (CGPathRef)bezirePath

{

    UIBezierPath* bezierPath = UIBezierPath.bezierPath;

    CGPoint fromPoint = CGPointMake(33.5, 409.5);

    [bezierPath moveToPoint: fromPoint];

    [bezierPath addCurveToPoint: CGPointMake(127.5, 119.78) controlPoint1: CGPointMake(58.5, 433.93) controlPoint2: CGPointMake(86.5, 95.16)];

    [bezierPath addCurveToPoint: CGPointMake(183.5, 554.5) controlPoint1: CGPointMake(168.5, 144.4) controlPoint2: CGPointMake(112.5, 557.05)];

    [bezierPath addCurveToPoint: CGPointMake(251.5, 119.78) controlPoint1: CGPointMake(254.5, 551.95) controlPoint2: CGPointMake(251.5, 119.78)];

    return bezierPath.CGPath;

}

- (CAKeyframeAnimation *)keyframeAnimation:(CGPathRef)bezirePath

{

    CAKeyframeAnimation *moveAnimation = [CAKeyframeAnimation animationWithKeyPath:@"position"];

    moveAnimation.path = bezirePath;

    moveAnimation.fillMode = kCAFillModeForwards;

    moveAnimation.removedOnCompletion = NO;

    moveAnimation.duration = .f;

    return moveAnimation;

}

- (void)touchesBegan:(NSSet<UITouch *> *)touches withEvent:(UIEvent *)event

{

    if ([self.testLayer animationForKey:[self.testLayer.animationKeys firstObject]] == nil) {

        [self.testLayer addAnimation:self.positionAnimation forKey:@"position"];

        self.isPositionAnimation = YES;

        return;

    }

    if (self.isPositionAnimation) {

        [self pauseLayer:self.testLayer];

        self.isPositionAnimation = NO;

    }else{

        self.isPositionAnimation = YES;

        [self resumeLayer:self.testLayer];

    }

}

#pragma mark - 动画的暂停与恢复

/**

 暂停动画

 @param layer 要暂停的layer

 */

-(void)pauseLayer:(CALayer *)layer {

    CFTimeInterval pausedTime = [layer convertTime:CACurrentMediaTime() fromLayer:nil];

    layer.speed = 0.0;

    layer.timeOffset = pausedTime;

}

/**

 恢复动画

 @param layer 要恢复的layer

 */

-(void)resumeLayer:(CALayer *)layer {

    CFTimeInterval pausedTime = [layer timeOffset];

    layer.speed = 1.0;

    layer.timeOffset = 0.0;

    layer.beginTime = 0.0;

    CFTimeInterval timeSincePause = [layer convertTime:CACurrentMediaTime() fromLayer:nil] - pausedTime;

    layer.beginTime = timeSincePause;

}
4.2 监听动画的完成状态
有时候我们需要监听动画的开始与完成,这就要靠设置动画的delegate来实现了
@protocol CAAnimationDelegate <NSObject>

@optional

//在动画开始时被调用

- (void)animationDidStart:(CAAnimation *)anim;

//在动画结束时被调用, 如果是动画被移除则flag为false,正常结束为true

- (void)animationDidStop:(CAAnimation *)anim finished:(BOOL)flag;

@end
示例代码如下:
需要注意的是
- (void)viewDidLoad {

    [super viewDidLoad];

    NSLog(@"监听动画完成状态");

    CABasicAnimation *positionAnimation = [CABasicAnimation animationWithKeyPath:@"position"];

    CGPoint fromPoint = CGPointMake(, );

    positionAnimation.fromValue = [NSValue valueWithCGPoint:fromPoint];

    positionAnimation.toValue = [NSValue valueWithCGPoint:CGPointMake(, )];

    positionAnimation.duration = .f;

    positionAnimation.fillMode = kCAFillModeForwards;

    positionAnimation.removedOnCompletion = NO;

    positionAnimation.delegate = self;

    [positionAnimation setValue:@"位置动画" forKey:@"animationName"];//添加属性名

    [self.testLayer addAnimation:positionAnimation forKey:@"positionAnimation"];

}

//在动画开始时被调用

- (void)animationDidStart:(CAAnimation *)anim

{

    NSLog(@"%@-----动画开始", [anim valueForKey:@"animationName"]);

}

//在动画结束时被调用, 如果是动画被移除则flag为false,正常结束为true

- (void)animationDidStop:(CAAnimation *)anim finished:(BOOL)flag

{

    if (flag) {

        NSLog(@"%@-----动画正常结束", [anim valueForKey:@"animationName"]);

    }else{

        NSLog(@"%@-----动画移除结束", [anim valueForKey:@"animationName"]);

    }

}
4.2 CATransaction(事务)的使用
4.2.1 关闭隐式动画
我们可以利用事务来关闭隐式动画,使用方式如下,关闭隐式动画之后在修改layer的属性就不会在触发动画了。
- (void)touchesBegan:(NSSet<UITouch *> *)touches withEvent:(UIEvent *)event

{

    [CATransaction begin];

    [CATransaction setDisableActions:YES];//关闭动画行为

    UITouch *touch = [touches anyObject];

    self.testLayer.position = [touch locationInView:self.view];//修改位置的隐式动画

    CGFloat WH = arc4random_uniform();

    if (WH < ) {

        WH += ;

    }

    self.testLayer.bounds = CGRectMake(, , WH, WH);

    [CATransaction commit];

}
效果:

4.2.1 利用事务统一设置动画参数
可以统一设置的参数有以下四种
kCATransactionAnimationDuration //动画时长

kCATransactionDisableActions //关闭动画行为

kCATransactionAnimationTimingFunction //动画时间曲线

kCATransactionCompletionBlock //动画完成block
我们以统一设置动画时长为例,以下代码统一设置动画时长为5s
[CATransaction begin];

    [CATransaction setValue:[NSNumber numberWithFloat:.f]

                     forKey:kCATransactionAnimationDuration];

    CABasicAnimation *positionAnimation = [CABasicAnimation animationWithKeyPath:@"position"];

    CGPoint fromPoint = CGPointMake(, );

    positionAnimation.fromValue = [NSValue valueWithCGPoint:fromPoint];

    positionAnimation.toValue = [NSValue valueWithCGPoint:CGPointMake(, )];

    positionAnimation.fillMode = kCAFillModeForwards;

    positionAnimation.removedOnCompletion = NO;

    [positionAnimation setValue:@"位置动画" forKey:@"animationName"];//添加属性名

    [self.testLayer addAnimation:positionAnimation forKey:@"positionAnimation"];

    [CATransaction commit];
以上就是Core Animation的基本使用了,你可以在这里下载代码
本文个人原创,转载请注明出处 (http://www.cnblogs.com/pretty-guy/p/8259657.html)
下一篇文章讲Core Animation 与 CAShapeLayer组合起来使用
iOS 动画篇 之 Core Animation (一)的更多相关文章
- iOS 动画效果:Core Animation & Facebook's pop
本文转载至 http://www.cocoachina.com/ios/20151223/14739.html 感谢原创作者分享 前言相信很多人对实现 iOS 中的动画效果都特别头疼,往往懒得动手,功 ...
- iOS 动画篇 (二) CAShapeLayer与CoreAnimation结合使用
接上一篇博客 iOS 动画篇(一) Core Animation CAShapeLayer是CALayer的一个子类,使用这个类能够很轻易实现曲线的动画. 先来一个折线动画效果: 示例代码: //1. ...
- iOS动画篇:核心动画
转:http://www.cocoachina.com/ios/20160517/16290.html 基本概念 1.什么是核心动画 Core Animation(核心动画)是一组功能强大.效果华丽的 ...
- 动画基础--基于Core Animation(3)
参考:https://zsisme.gitbooks.io/ios-/content/ 前面的文章动画基础--基于Core Animation(1),动画基础--基于Core Animation(2) ...
- 动画基础--基于Core Animation(2)
参考:https://zsisme.gitbooks.io/ios-/content/ 前面的文章动画基础--基于Core Animation(1)提到了图层的基本概念以及可动画参数几何学等知识. 本 ...
- 动画基础--基于Core Animation(1)
1.简介 上一篇文章[New learn]动画-基于UIView了解到了一些直接由UIView这个在UIKIT提供的类中提供的一些动画方法. 使用UIView的动画特性已经能够满足我们很多的需求,它是 ...
- iOS动画篇:UIView动画
iOS的动画效果一直都很棒很,给人的感觉就是很炫酷很流畅,起到增强用户体验的作用.在APP开发中实现动画效果有很多种方式,对于简单的应用场景,我们可以使用UIKit提供的动画来实现. UIView动画 ...
- iOS 动画篇 (三) CADisplayLink与CoreGraphics实现动画
本文主要介绍利用CoreGraphics和CADisplayLink来实现一个注水动画.来一个效果图先: 在介绍注水动画前,先介绍利用CoreGraphics实现进度条的绘制. 一.扇形进度绘制 效果 ...
- iOS动画1 — UIView动画
iOS动画基础是Core Animation核心动画.Core Animation是iOS平台上负责图形渲染与动画的基础设施.由于核心动画的实现比较复杂,苹果提供了实现简单动画的接口—UIView动画 ...
随机推荐
- poj 2159 D - Ancient Cipher 文件加密
Ancient Cipher Description Ancient Roman empire had a strong government system with various departme ...
- LABjs、RequireJS、SeaJS 哪个最好用?为什么?
感谢玉伯在知乎的奉献,下面全文转载:http://www.zhihu.com/question/20342350/answer/14828786 LABjs 的核心是 LAB(Loading and ...
- HDU 1043 Eight (BFS·八数码·康托展开)
题意 输出八数码问题从给定状态到12345678x的路径 用康托展开将排列相应为整数 即这个排列在全部排列中的字典序 然后就是基础的BFS了 #include <bits/stdc++.h ...
- 【JAVA零基础入门系列】Day7 Java输入与输出
[JAVA零基础入门系列](已完结)导航目录 Day1 开发环境搭建 Day2 Java集成开发环境IDEA Day3 Java基本数据类型 Day4 变量与常量 Day5 Java中的运算符 Day ...
- java开发收藏
一.java工具 1.jenkins 项目集成工具 2.launch4j java打包成exe工具 二.json库 1.jsoniter 比以下都快 2.dsljson 3.fastjson 4.gs ...
- 将java项目打包为jar
打开Eclipse,点击file,选择export 选择java,选择其中的JAR file并点击next 选择需要的到处的项目,并在下方输入将项目保存为的目录,文件名字. 如果,已经将项目打包为一个 ...
- Intellij 解除(去除)SVN关联
方法一:通过Intellj 来处理 1. 安装插件 打开Intellij的setting(ctrl+alt+s),选择plugins,在右边搜索框输入"SVN",搜索.选择&quo ...
- CSS3渐变相关
背景渐变 background: -moz-linear-gradient( top,#f24652,#da2c3c); background: -o-linear-gradient(top,#f24 ...
- 小白的Python之路 day1 pyc
pyc是个什么? 1. Python是一门解释型语言? 我初学Python时,听到的关于Python的第一句话就是,Python是一门解释性语言,我就这样一直相信下去,直到发现了*.pyc文件的存在. ...
- 环链表相关的题目和算法[LeetCode]
这篇文章讨论一下与链表的环相关的题目,我目前遇到的一共有3种题目. 1.判断一个链表是否有环(LeetCode相关题目:https://leetcode.com/problems/linked-lis ...