
自定义springboot-starter 动态数据源
自定义springboot-starter 动态数据源
如果使用的是spring或springboot框架,spring提供了一个实现动态数据源的一个抽象类AbstractRoutingDataSource
当我们实现这个类后需要实现一个方法
@Override

protected Object determineCurrentLookupKey() {

}
spring获取连接代码最终会走到AbstractRoutingDataSource类中的determineTargetDataSource方法
protected DataSource determineTargetDataSource() {

    Assert.notNull(this.resolvedDataSources, "DataSource router not initialized");

    //主要这一段

    Object lookupKey = determineCurrentLookupKey();

    DataSource dataSource = this.resolvedDataSources.get(lookupKey);

    if (dataSource == null && (this.lenientFallback || lookupKey == null)) {

        dataSource = this.resolvedDefaultDataSource;

    }

    if (dataSource == null) {

        throw new IllegalStateException("Cannot determine target DataSource for lookup key [" + lookupKey + "]");

    }

    return dataSource;

}
通过this.resolvedDataSources.get(lookupKey);来获取一个dataSource之后才能获取连接
resolvedDataSources是AbstractRoutingDataSource类中的一个map类型的变量,里面的数据是在afterPropertiesSet方法时从targetDataSources获取的
@Override

public void afterPropertiesSet() {

  ....

    this.resolvedDataSources = CollectionUtils.newHashMap(this.targetDataSources.size());

  ....

}
也就是说通过设置map的k-v,再通过determineCurrentLookupKey方法返回对应的key,就可以进行数据源的切换
首先创建一个配置类用来保存每个数据源的信息
@Component(value = "dynamicDataSourceConfig")

@ConfigurationProperties(prefix = "dynamic")

public class DynamicDataSourceConfig{

    private Map<String, DataSourceProperties> dataSources;

    public Map<String, DataSourceProperties> getDataSources() {

        return dataSources;

    }

    public void setDataSources(Map<String, DataSourceProperties> dataSources) {

        this.dataSources = dataSources;

    }

}
之后创建一个ThreadLocal持有类来保存每个线程需要的数据源
public class DynamicContextHolder {

    private static final ThreadLocal<String> CONTEXT_HOLDER = new ThreadLocal<>();

    public static void choose(String dbName) {

        CONTEXT_HOLDER.set(dbName);

    }

    public static String get() {

        return CONTEXT_HOLDER.get();

    }

    public static void clear() {

        CONTEXT_HOLDER.remove();

    }

}
最后创建一个继承AbstractRoutingDataSource的子类,功能就完成了
@Component

public class RoutingDataSource extends AbstractRoutingDataSource {

    public RoutingDataSource(DynamicDataSourceConfig dynamicDataSourceConfig) {

        HashMap<Object, Object> routingDataSourceMap = parseConfig(dynamicDataSourceConfig);

        this.setTargetDataSources(routingDataSourceMap);

    }

    @Override

    protected Object determineCurrentLookupKey() {

        return DynamicContextHolder.get();

    }

    @Override

    public void setDefaultTargetDataSource(Object defaultTargetDataSource) {

        super.setDefaultTargetDataSource(defaultTargetDataSource);

    }

    private HashMap<Object, Object> parseConfig(DynamicDataSourceConfig config) {

        Map<String, DataSourceProperties> map = config.getDataSources();

        HashMap<Object, Object> routingDataSourceMap = new HashMap<>();

        for (Map.Entry<String, DataSourceProperties> entry : map.entrySet()) {

            String dataSourceKey = entry.getKey();

            DataSourceProperties sourceProperties = entry.getValue();

            String driverClassName = sourceProperties.getDriverClassName();

            String url = sourceProperties.getUrl();

            String username = sourceProperties.getUsername();

            String password = sourceProperties.getPassword();

            Class<Driver> driverClass;

            try {

                driverClass = (Class<Driver>) Class.forName(driverClassName);

            } catch (ClassNotFoundException e) {

                throw new RuntimeException(e);

            }

            try {

                SimpleDriverDataSource source = new SimpleDriverDataSource(

                        driverClass.newInstance(),

                        url,

                        username,

                        password);

                routingDataSourceMap.put(dataSourceKey, source);

            } catch (InstantiationException | IllegalAccessException e) {

                throw new RuntimeException(e);

            }

        }

        return routingDataSourceMap;

    }

}
首先是将数据库连接配置删除掉,修改为如下代码
dynamic:

  default-data-source-key: master

  data-sources:

    master:

      url: jdbc:mysql://127.0.0.1/master_data_source?characterEncoding=UTF8&serverTimezone=Asia/Shanghai

      username: root

      password: root

      driver-class-name: com.mysql.cj.jdbc.Driver

    slave:

      url: jdbc:mysql://127.0.0.1/slave_data_source?characterEncoding=UTF8&serverTimezone=Asia/Shanghai

      username: root

      password: root

      driver-class-name: com.mysql.cj.jdbc.Driver
测试代码
@GetMapping("master")

public List<User> master() {

    DynamicContextHolder.choose("master");

    System.out.println(userService.list());

    return null;

}

@GetMapping("slave")

public List<User> slave() {

    DynamicContextHolder.choose("slave");

    System.out.println(userService.list());

    return null;

}
结果
[User{id=1, name=master_user_1}, User{id=2, name=master_user_2}]

[User{id=1, name=slave_user_1}, User{id=2, name=slave_user_2}]
功能就算完成了,只需要在方法调用前指定使用的数据源即可,也可以给加个aop,更方便点
然后我就想给他整一个starter,starter相比代码中直接写会有两个问题,一个是spring如何将外部的类添加到容器中,另一个是容器扫描的顺序
第一个:在starter项目中resources文件夹下添加META-INF/spring.factories文件
org.springframework.boot.autoconfigure.EnableAutoConfiguration=\

work.jame.dynamic.config.DynamicDataSourceConfig
这个文件会被springboot扫描,之后去加载里面指定的类,我们有一个类能被springboot加载到后其他的也都不是问题了
@Order(Ordered.HIGHEST_PRECEDENCE)

@Component(value = "dynamicDataSourceConfig")

//这个注解必须要加,否则先去加载spring默认的数据源了

@AutoConfigureBefore(DataSourceAutoConfiguration.class)

//加载其他类的类

@Import(AutoHandler.class)

@ConfigurationProperties(prefix = "dynamic")

public class DynamicDataSourceConfig {

    private Map<String, DataSourceProperties> dataSources;

    private String defaultDataSourceKey = "master";

}
@Configuration

public class AutoHandler {

    @Autowired

    private DynamicDataSourceConfig config;

    @Bean

    public DataSource abstractRoutingDataSource() {

        return new RoutingDataSource(config);

    }

    //使用aop扫描方法注解,方便使用

    @Bean

    public Advisor dynamicDataSourceAnnotationAdvisor() {

        DynamicDataSourceAnnotationInterceptor interceptor = new

            DynamicDataSourceAnnotationInterceptor(config.getDefaultDataSourceKey());

        DynamicDataSourceAnnotationAdvisor advisor = new DynamicDataSourceAnnotationAdvisor(interceptor);

        advisor.setOrder(Ordered.HIGHEST_PRECEDENCE);

        return advisor;

    }

}
代码都在git上了,功能不难
https://gitee.com/sunankang/dynamic-data-source/tree/master
下面说说写这个过程中遇到的问题和解决办法吧
第一个就是我把代码挪到starter后,启动项目启动一直报
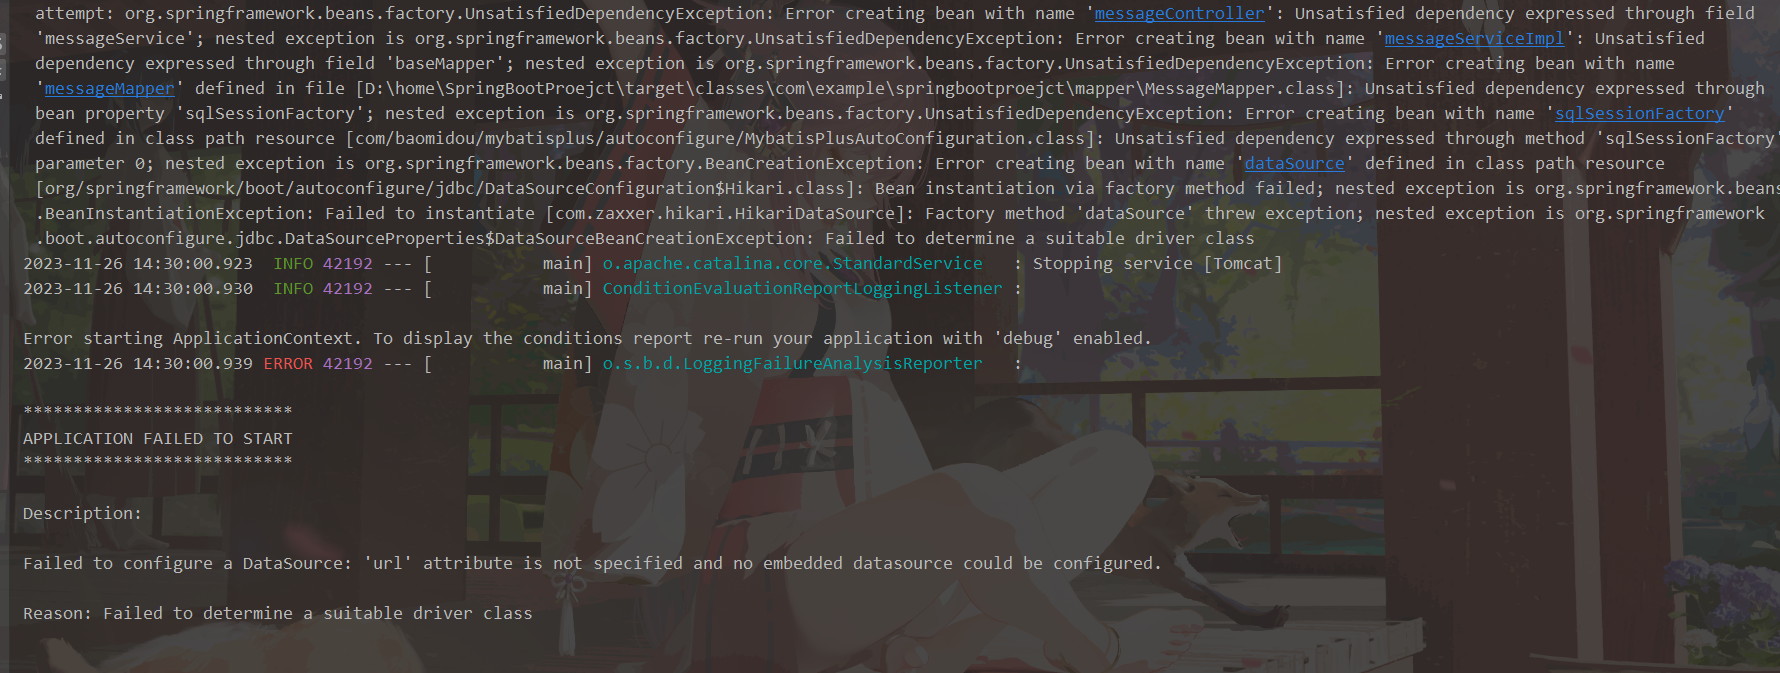
我一看,经典的导入了连数据库的配置,但是没配spring-datasource下url的错误,但是我就是不要配url,账号密码,用自定义的动态配置,我没有把代码抽出去之前还是可以用的,抽出去之后就不行了,很纳闷,看容器中也有自定义的动态数据源的类,后来我一想,之前见到过一个动态数据源的开源框架,和mybatis-plus是一个组织的,然后就去下载了,抄袭借鉴下别人是怎么做的
打开之后根本不知道从哪开始看,类太多了,模块也很多,然后我git切换到了一个比较早的版本,类还比较少
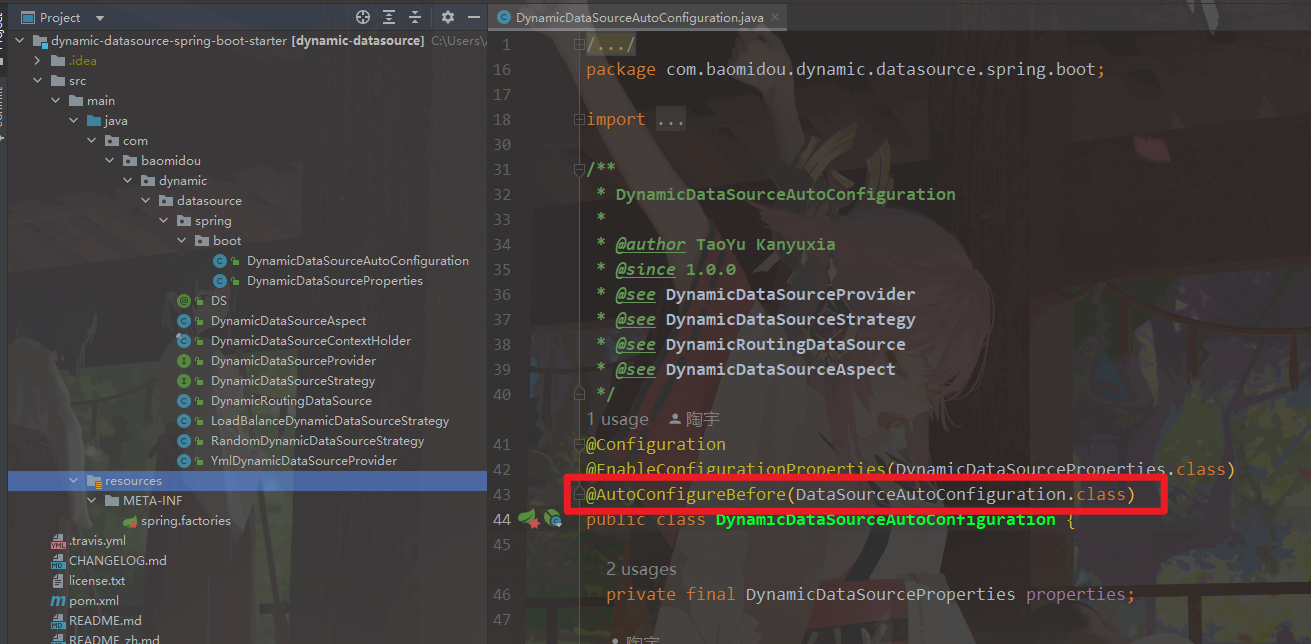
这个注解意思是在指定的类之前进行注入,然后就去看了下这个DataSourceAutoCoonfiguration类
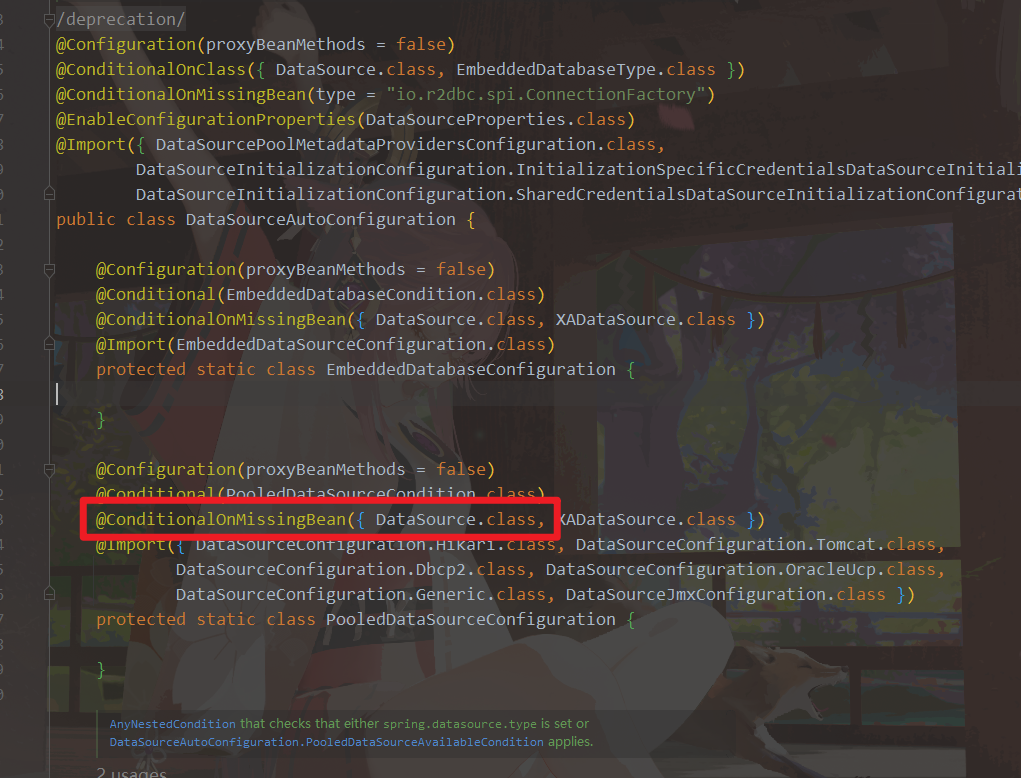
这个注解是当容器中没有DataSource类型的bean时,才执行下面的这个方法,这个方法上的@Import导入了DataSourceConfiguration.Hikari.class,springboot默认的数据池就是Hikari,到这里其实已经大概明白了,当前项目加载bean和外部扫出的bean执行顺序应该是不一样的,所以在项目中直接写没问题,抽出个starter就报错了
自定义springboot-starter 动态数据源的更多相关文章
- 自定义springboot - starter 实现日志打印,并支持动态可插拔
1. starter 命名规则: springboot项目有很多专一功能的starter组件,命名都是spring-boot-starter-xx,如spring-boot-starter-loggi ...
- Springboot+Druid 动态数据源配置监控
一.引入maven依赖,使用 starter 与原生 druid 依赖配置有所不同 <dependency> <groupId>com.alibaba</groupId& ...
- Spring动态数据源实现读写分离
一.创建基于ThreadLocal的动态数据源容器,保证数据源的线程安全性 package com.bounter.mybatis.extension; /** * 基于ThreadLocal实现的动 ...
- SpringBoot框架:通过AOP和自定义注解完成druid连接池的动态数据源切换(三)
一.引入依赖 引入数据库连接池的依赖--druid和面向切面编程的依赖--aop,如下所示: <!-- druid --> <dependency> <groupId&g ...
- SpringBoot编写自定义的starter 专题
What’s in a name All official starters follow a similar naming pattern; spring-boot-starter-*, where ...
- SpringBoot(十一)-- 动态数据源
SpringBoot中使用动态数据源可以实现分布式中的分库技术,比如查询用户 就在用户库中查询,查询订单 就在订单库中查询. 一.配置文件application.properties # 默认数据源 ...
- SpringBoot动态数据源
1.原理图 2.创建枚举类 /** * 存数据源key值 */ public enum DataSourceKey { master,salve,migration } 3.创建自定义注解类 /** ...
- SpringBoot整合MyBatisPlus配置动态数据源
目录 SpringBoot整合MyBatisPlus配置动态数据源 SpringBoot整合MyBatisPlus配置动态数据源 推文:2018开源中国最受欢迎的中国软件MyBatis-Plus My ...
- SpringBoot之多数据源动态切换数据源
原文:https://www.jianshu.com/p/cac4759b2684 实现 1.建库建表 首先,我们在本地新建三个数据库名分别为master,slave1,slave2,我们的目前就是写 ...
- 搞定SpringBoot多数据源(2):动态数据源
目录 1. 引言 2. 动态数据源流程说明 3. 实现动态数据源 3.1 说明及数据源配置 3.1.1 包结构说明 3.1.2 数据库连接信息配置 3.1.3 数据源配置 3.2 动态数据源设置 3. ...
随机推荐
- 基于Aidlux平台的人脸关键点检测以及换脸算法
第一步:安装APP 手机应用市场下载AidLux 手机和电脑连接同一个Wifi 第二步:配置APP 赋予AidLux各种系统权限,包括:媒体和文件.相机.麦克风.后台弹窗 手机-设置-关于手机-点击操 ...
- redux的三个概念与三大核心
1.什么是redux?一个组件里可能会有很多的状态,比如控制某个内容显示的flag,从后端获取的展示数据,那么这些状态可以在自己的单个页面进行管理,也可以选择别的管理方式,redux就是是一种状态管理 ...
- Typora 主题,设置代码块Mac风格三个小圆点
目录 打造Typora主题 1 typoa样式修改步骤 1.1 第一步打开偏好设置 1.2 第二步打开主题文件夹 2 标题添加颜色 3 表格优化 4 代码块Mac风格三个圆点 5 主题总代码如下: 打 ...
- Spring Secriuty登录失败错误状态999重定向302
原因是login.html登录页面有不能加载的静态资源,找出来去掉就好了,比如 bootstrap.min.css 环境 使用Spring Boot Security 3做一个登录功能,使用了一个教程 ...
- [ABC142E] Get Everything
2023-02-18 题目 题目传送门 翻译 翻译 难度&重要性(1~10):5 题目来源 AtCoder 题目算法 状压dp 解题思路 我们令 \(S\) 表示当前箱子状态,\(P_i\) ...
- 当小白遇到FullGC
起初没有人在意这场GC,直到它影响到了每一天! 前言 本文记录了一次排查FullGC导致的TP99过高过程,介绍了一些排查时思路,线索以及工具的使用,希望能够帮助一些新手在排查问题没有很好的思路时,提 ...
- AI绘画StableDiffusion实操教程:可爱头像奶茶小女孩(附高清图片)
本教程收集于:AIGC从入门到精通教程汇总 今天继续分享AI绘画实操教程,如何用lora包生成超可爱头像奶茶小女孩 放大高清图已放到教程包内,需要的可以自取. 欢迎来到我们这篇特别的文章--<A ...
- WPF-利用装饰器实现控件的自由拖动
在项目中经常会遇到类似如下要求的需求,创建允许自由拖动的控件,这样的需求可以使用WPF的装饰器Adorner来实现. 一.什么是装饰器? 装饰器是一种特殊类型的FrameworkElement,装饰器 ...
- 《数据结构-C语言》顺序表
@ 目录 顺序表 结构定义 初始化 创建表 求表长 判断表是否为空 取值 查找 插入 删除 逆置 清空 销毁 遍历打印 测试 顺序表 结构定义 #include <stdio.h> #in ...
- WPF使用Blazor的快速案例
下面我们将讲解在WPF中使用Blazor,并且使用Blazor做一些文件编辑操作,下面是需要用到的东西 WPF Blazor Masa Blazor Monaco 安装Masa Blazor模板 使用 ...