shiro源码解析
一、web.xml 文件中配置的 DelegatingFilterProxy 的 <filter-name>为啥与Spring文件中配置的ShiroFilterFactoryBean的Bean id 保持一致?
<filter>

        <filter-name>shiroFilter</filter-name>

        <filter-class>org.springframework.web.filter.DelegatingFilterProxy</filter-class>

        <init-param>

            <param-name>targetFilterLifecycle</param-name>

            <param-value>true</param-value>

        </init-param>

    </filter>

    <filter-mapping>

        <filter-name>shiroFilter</filter-name>

        <url-pattern>/*</url-pattern>

    </filter-mapping>
<bean id="shiroFilter" class="org.apache.shiro.spring.web.ShiroFilterFactoryBean">

        <property name="securityManager" ref="securityManager"/>

        <property name="loginUrl" value="/login"/>

        <property name="successUrl" value="/list"/>

        <property name="unauthorizedUrl" value="/unauthorized"/>

        <!--  <property name="filterChainDefinitionMap" ref="filterChainDefinitionMap"></property>-->

        <!-- The 'filters' property is not necessary since any declared javax.servlet.Filter bean

             defined will be automatically acquired and available via its beanName in chain

             definitions, but you can perform overrides or parent/child consolidated configuration

             here if you like: -->

        <!-- <property name="filters">

            <util:map>

                <entry key="aName" value-ref="someFilterPojo"/>

            </util:map>

        </property> -->

        <property name="filterChainDefinitions">

            <value>

                /**/login = anon

                /toLogin = anon

                # everything else requires authentication:

                /admin =roles[admin]

                /** = authc

            </value>

        </property>

    </bean>
1)Tomcat StandardContext中ContextLoaderListener初始化IOC容器,加载ShiroFilterFactoryBean。
 public WebApplicationContext initWebApplicationContext(ServletContext servletContext) {

         if (servletContext.getAttribute(WebApplicationContext.ROOT_WEB_APPLICATION_CONTEXT_ATTRIBUTE) != null) {

             throw new IllegalStateException(

                     "Cannot initialize context because there is already a root application context present - " +

                     "check whether you have multiple ContextLoader* definitions in your web.xml!");

         }

         Log logger = LogFactory.getLog(ContextLoader.class);

         servletContext.log("Initializing Spring root WebApplicationContext");

         if (logger.isInfoEnabled()) {

             logger.info("Root WebApplicationContext: initialization started");

         }

         long startTime = System.currentTimeMillis();

         try {

             // Store context in local instance variable, to guarantee that

             // it is available on ServletContext shutdown.

             if (this.context == null) {

                 this.context = createWebApplicationContext(servletContext);

             }

             if (this.context instanceof ConfigurableWebApplicationContext) {

                 ConfigurableWebApplicationContext cwac = (ConfigurableWebApplicationContext) this.context;

                 if (!cwac.isActive()) {

                     // The context has not yet been refreshed -> provide services such as

                     // setting the parent context, setting the application context id, etc

                     if (cwac.getParent() == null) {

                         // The context instance was injected without an explicit parent ->

                         // determine parent for root web application context, if any.

                         ApplicationContext parent = loadParentContext(servletContext);

                         cwac.setParent(parent);

                     }

                     configureAndRefreshWebApplicationContext(cwac, servletContext);

                 }

             }

             servletContext.setAttribute(WebApplicationContext.ROOT_WEB_APPLICATION_CONTEXT_ATTRIBUTE, this.context);

             ClassLoader ccl = Thread.currentThread().getContextClassLoader();

             if (ccl == ContextLoader.class.getClassLoader()) {

                 currentContext = this.context;

             }

             else if (ccl != null) {

                 currentContextPerThread.put(ccl, this.context);

             }

             if (logger.isDebugEnabled()) {

                 logger.debug("Published root WebApplicationContext as ServletContext attribute with name [" +

                         WebApplicationContext.ROOT_WEB_APPLICATION_CONTEXT_ATTRIBUTE + "]");

             }

             if (logger.isInfoEnabled()) {

                 long elapsedTime = System.currentTimeMillis() - startTime;

                 logger.info("Root WebApplicationContext: initialization completed in " + elapsedTime + " ms");

             }

             return this.context;

         }

         catch (RuntimeException ex) {

             logger.error("Context initialization failed", ex);

             servletContext.setAttribute(WebApplicationContext.ROOT_WEB_APPLICATION_CONTEXT_ATTRIBUTE, ex);

             throw ex;

         }

         catch (Error err) {

             logger.error("Context initialization failed", err);

             servletContext.setAttribute(WebApplicationContext.ROOT_WEB_APPLICATION_CONTEXT_ATTRIBUTE, err);

             throw err;

         }

     }
19行,创建IOC容器对象。
32行,初始化IOC,加载bean到容器中。
2)StandardContext中Filter初始化。DelegatingFilterProxy的initFilterBean中从IOC容器中获取名为filter-name的bean
 protected void initFilterBean() throws ServletException {

         synchronized (this.delegateMonitor) {

             if (this.delegate == null) {

                 // If no target bean name specified, use filter name.

                 if (this.targetBeanName == null) {

                     this.targetBeanName = getFilterName();

                 }

                 // Fetch Spring root application context and initialize the delegate early,

                 // if possible. If the root application context will be started after this

                 // filter proxy, we'll have to resort to lazy initialization.

                 WebApplicationContext wac = findWebApplicationContext();

                 if (wac != null) {

                     this.delegate = initDelegate(wac);

                 }

             }

         }

     }

 protected Filter initDelegate(WebApplicationContext wac) throws ServletException {

         Filter delegate = wac.getBean(getTargetBeanName(), Filter.class);

         if (isTargetFilterLifecycle()) {

             delegate.init(getFilterConfig());

         }

         return delegate;

     }
第20行从容器中获取name='shiroFilter'的bean,ShiroFilterFactoryBean实现了FactoryBean接口,容器获取对象时,返回ShiroFilterFactoryBean.getObject(),即返回SpringShiroFilter。
所以DelegatingFilterProxy的代理对象是SpringShiroFilter。
 public abstract class AbstractBeanFactory extends FactoryBeanRegistrySupport implements ConfigurableBeanFactory {

 protected <T> T doGetBean(

             final String name, final Class<T> requiredType, final Object[] args, boolean typeCheckOnly)

             throws BeansException {

         final String beanName = transformedBeanName(name);

         Object bean;

         // Eagerly check singleton cache for manually registered singletons.

         Object sharedInstance = getSingleton(beanName);

         if (sharedInstance != null && args == null) {

             if (logger.isDebugEnabled()) {

                 if (isSingletonCurrentlyInCreation(beanName)) {

                     logger.debug("Returning eagerly cached instance of singleton bean '" + beanName +

                             "' that is not fully initialized yet - a consequence of a circular reference");

                 }

                 else {

                     logger.debug("Returning cached instance of singleton bean '" + beanName + "'");

                 }

             }

             bean = getObjectForBeanInstance(sharedInstance, name, beanName, null);

         }

     ......

   }

 }
第10行,从容器中返回ShiroFilterFactoryBean对象。
第21行,执行ShiroFilterFactoryBean.getObject(),返回SpringShiroFilter对象。
二、ShiroFilterFactoryBean中filterChainDefinitions属性,配置了url需要拦截验证的Filter,shiro中配置的filter是怎样工作的?
<bean id="shiroFilter" class="org.apache.shiro.spring.web.ShiroFilterFactoryBean">

        <property name="securityManager" ref="securityManager"/>

        <property name="loginUrl" value="/login"/>

        <property name="successUrl" value="/list"/>

        <property name="unauthorizedUrl" value="/unauthorized"/>

        <property name="filterChainDefinitions">

            <value>

                /**/login = anon

                /toLogin = anon

                # everything else requires authentication:

                /admin =roles[admin]

                /** = authc

            </value>

        </property>

    </bean>
1)首先分析下filterChainDefinitions中配置url规则在ShiroFilterFactoryBean怎样初始化的。
 protected AbstractShiroFilter createInstance() throws Exception {

         log.debug("Creating Shiro Filter instance.");

         SecurityManager securityManager = getSecurityManager();

         if (securityManager == null) {

             String msg = "SecurityManager property must be set.";

             throw new BeanInitializationException(msg);

         }

         if (!(securityManager instanceof WebSecurityManager)) {

             String msg = "The security manager does not implement the WebSecurityManager interface.";

             throw new BeanInitializationException(msg);

         }

         FilterChainManager manager = createFilterChainManager();

         //Expose the constructed FilterChainManager by first wrapping it in a

         // FilterChainResolver implementation. The AbstractShiroFilter implementations

         // do not know about FilterChainManagers - only resolvers:

         PathMatchingFilterChainResolver chainResolver = new PathMatchingFilterChainResolver();

         chainResolver.setFilterChainManager(manager);

         //Now create a concrete ShiroFilter instance and apply the acquired SecurityManager and built

         //FilterChainResolver.  It doesn't matter that the instance is an anonymous inner class

         //here - we're just using it because it is a concrete AbstractShiroFilter instance that accepts

         //injection of the SecurityManager and FilterChainResolver:

         return new SpringShiroFilter((WebSecurityManager) securityManager, chainResolver);

     }
从这里可以知道,首先获取filterChainManager,具体方法如下
 protected FilterChainManager createFilterChainManager() {

         DefaultFilterChainManager manager = new DefaultFilterChainManager();

         Map<String, Filter> defaultFilters = manager.getFilters();

         //apply global settings if necessary:

         for (Filter filter : defaultFilters.values()) {

             applyGlobalPropertiesIfNecessary(filter);

         }

         //Apply the acquired and/or configured filters:

         Map<String, Filter> filters = getFilters();

         if (!CollectionUtils.isEmpty(filters)) {

             for (Map.Entry<String, Filter> entry : filters.entrySet()) {

                 String name = entry.getKey();

                 Filter filter = entry.getValue();

                 applyGlobalPropertiesIfNecessary(filter);

                 if (filter instanceof Nameable) {

                     ((Nameable) filter).setName(name);

                 }

                 //'init' argument is false, since Spring-configured filters should be initialized

                 //in Spring (i.e. 'init-method=blah') or implement InitializingBean:

                 manager.addFilter(name, filter, false);

             }

         }

         //build up the chains:

         Map<String, String> chains = getFilterChainDefinitionMap();

         if (!CollectionUtils.isEmpty(chains)) {

             for (Map.Entry<String, String> entry : chains.entrySet()) {

                 String url = entry.getKey();

                 String chainDefinition = entry.getValue();

                 manager.createChain(url, chainDefinition);

             }

         }

         return manager;

     }
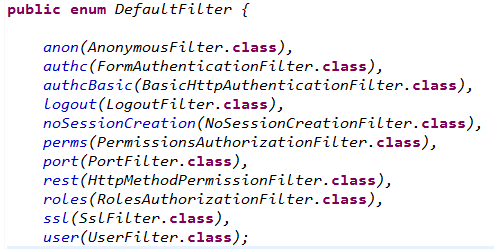
第3行根据DefaultFilter中枚举定义的shiro默认的filter映射加入到DefaultFilterChainManager.filters。
第29行在DefaultFilterChainManager中还做了一件事就是url-filter的映射变成filterChain,这句代码就是执行这个任务(将我们在xml文件中定义的filterChainDefinitions变成filterChain)。
 public void createChain(String chainName, String chainDefinition) {

         if (!StringUtils.hasText(chainName)) {

             throw new NullPointerException("chainName cannot be null or empty.");

         }

         if (!StringUtils.hasText(chainDefinition)) {

             throw new NullPointerException("chainDefinition cannot be null or empty.");

         }

         if (log.isDebugEnabled()) {

             log.debug("Creating chain [" + chainName + "] from String definition [" + chainDefinition + "]");

         }

         //parse the value by tokenizing it to get the resulting filter-specific config entries

         //

         //e.g. for a value of

         //

         //     "authc, roles[admin,user], perms[file:edit]"

         //

         // the resulting token array would equal

         //

         //     { "authc", "roles[admin,user]", "perms[file:edit]" }

         //

         String[] filterTokens = splitChainDefinition(chainDefinition);

         //each token is specific to each filter.

         //strip the name and extract any filter-specific config between brackets [ ]

         for (String token : filterTokens) {

             String[] nameConfigPair = toNameConfigPair(token);

             //now we have the filter name, path and (possibly null) path-specific config.  Let's apply them:

             addToChain(chainName, nameConfigPair[], nameConfigPair[]);

         }

     }
第23行作用是将权限分割:如
"authc, roles[admin,user], perms[file:edit]"
将会被分割为
{ "authc", "roles[admin,user]", "perms[file:edit]" }
第28行 通过toNameConfigPair(token)将如:roles[admin,user]形式的变成roles,admin,user形式的分割
第31行 将定义的url 及roles,admin,user封装到DefaultFilterChainManager.filterChains中
 public void addToChain(String chainName, String filterName, String chainSpecificFilterConfig) {

         if (!StringUtils.hasText(chainName)) {

             throw new IllegalArgumentException("chainName cannot be null or empty.");

         }

         Filter filter = getFilter(filterName);

         if (filter == null) {

             throw new IllegalArgumentException("There is no filter with name '" + filterName +

                     "' to apply to chain [" + chainName + "] in the pool of available Filters.  Ensure a " +

                     "filter with that name/path has first been registered with the addFilter method(s).");

         }

         applyChainConfig(chainName, filter, chainSpecificFilterConfig);

13

14         NamedFilterList chain = ensureChain(chainName);

15         chain.add(filter);

     }
2)下面分析当url请求到来的时候,shiro是如何完成过滤的。
当url请求到来时执行DelegatingFilterProxy.doFilter(),由于代理的是SpringShiroFilter对象。
 public void doFilter(ServletRequest request, ServletResponse response, FilterChain filterChain)

             throws ServletException, IOException {

         // Lazily initialize the delegate if necessary.

         Filter delegateToUse = this.delegate;

         if (delegateToUse == null) {

             synchronized (this.delegateMonitor) {

                 if (this.delegate == null) {

                     WebApplicationContext wac = findWebApplicationContext();

                     if (wac == null) {

                         throw new IllegalStateException("No WebApplicationContext found: no ContextLoaderListener registered?");

                     }

                     this.delegate = initDelegate(wac);

                 }

                 delegateToUse = this.delegate;

             }

         }

         // Let the delegate perform the actual doFilter operation.

         invokeDelegate(delegateToUse, request, response, filterChain);

     }
分析SpringShiroFilter.doFilter()。SpringShiroFilter继承了AbstractShiroFilter类,最终调用了AbstractShiroFilter.doFilterInternal()
protected void doFilterInternal(ServletRequest servletRequest, ServletResponse servletResponse, final FilterChain chain)

            throws ServletException, IOException {

        Throwable t = null;

        try {

            final ServletRequest request = prepareServletRequest(servletRequest, servletResponse, chain);

            final ServletResponse response = prepareServletResponse(request, servletResponse, chain);

            final Subject subject = createSubject(request, response);

            //noinspection unchecked

            subject.execute(new Callable() {

                public Object call() throws Exception {

                    updateSessionLastAccessTime(request, response);

                    executeChain(request, response, chain);

                    return null;

                }

            });

        } catch (ExecutionException ex) {

            t = ex.getCause();

        } catch (Throwable throwable) {

            t = throwable;

        }

        if (t != null) {

            if (t instanceof ServletException) {

                throw (ServletException) t;

            }

            if (t instanceof IOException) {

                throw (IOException) t;

            }

            //otherwise it's not one of the two exceptions expected by the filter method signature - wrap it in one:

            String msg = "Filtered request failed.";

            throw new ServletException(msg, t);

        }

    }
暂时不关心subject相关的创建等过程,只关心这行代码
executeChain(request, response, chain);
protected void executeChain(ServletRequest request, ServletResponse response, FilterChain origChain)

            throws IOException, ServletException {

        FilterChain chain = getExecutionChain(request, response, origChain);

        chain.doFilter(request, response);

    }
protected FilterChain getExecutionChain(ServletRequest request, ServletResponse response, FilterChain origChain) {

        FilterChain chain = origChain;

        FilterChainResolver resolver = getFilterChainResolver();

        if (resolver == null) {

            log.debug("No FilterChainResolver configured.  Returning original FilterChain.");

            return origChain;

        }

        FilterChain resolved = resolver.getChain(request, response, origChain);

        if (resolved != null) {

            log.trace("Resolved a configured FilterChain for the current request.");

            chain = resolved;

        } else {

            log.trace("No FilterChain configured for the current request.  Using the default.");

        }

        return chain;

    }
这里用到了我们在创建SpringShiroFilter时传递的FilterChainResolver,至此,我们终于找到了getChain()方法在这里被调用了。其源码实现如下
 public FilterChain getChain(ServletRequest request, ServletResponse response, FilterChain originalChain) {

         FilterChainManager filterChainManager = getFilterChainManager();

         if (!filterChainManager.hasChains()) {

             return null;

         }

         String requestURI = getPathWithinApplication(request);

         //the 'chain names' in this implementation are actually path patterns defined by the user.  We just use them

         //as the chain name for the FilterChainManager's requirements

         for (String pathPattern : filterChainManager.getChainNames()) {

             // If the path does match, then pass on to the subclass implementation for specific checks:

             if (pathMatches(pathPattern, requestURI)) {

                 if (log.isTraceEnabled()) {

                     log.trace("Matched path pattern [" + pathPattern + "] for requestURI [" + requestURI + "].  " +

                             "Utilizing corresponding filter chain...");

                 }

                 return filterChainManager.proxy(originalChain, pathPattern);

             }

         }

         return null;

     }
从for循环可以看出,当匹配到第一个url规则,则return一个代表这个url规则的FilterChain给web容器执行。
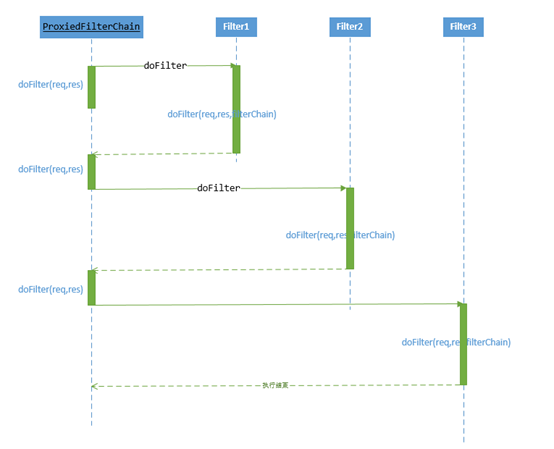
FilterChain的实现类为org.apache.shiro.web.servlet.ProxiedFilterChain
public ProxiedFilterChain(FilterChain orig, List<Filter> filters) {

        if (orig == null) {

            throw new NullPointerException("original FilterChain cannot be null.");

        }

        this.orig = orig;// servlet中的FilterChai对象

        this.filters = filters;//根据本次访问url获取匹配的shiro filters

        this.index = ;

    }
从该类的doFilter方法可以知道,它会将Filter链的Filter的doFilter方法顺序执行一遍。下图展示了这一过程
public void doFilter(ServletRequest request, ServletResponse response) throws IOException, ServletException {

        if (this.filters == null || this.filters.size() == this.index) {

            //we've reached the end of the wrapped chain, so invoke the original one:

            if (log.isTraceEnabled()) {

                log.trace("Invoking original filter chain.");

            }

            this.orig.doFilter(request, response);

        } else {

            if (log.isTraceEnabled()) {

                log.trace("Invoking wrapped filter at index [" + this.index + "]");

            }

            this.filters.get(this.index++).doFilter(request, response, this);

        }

    }
当根据本次访问url获取匹配的shiro filters的doFilter方法都执行完成后,继续执行web.xml中定义的filter.doFilter方法
参考:https://www.cnblogs.com/ljdblog/p/6237683.html
shiro源码解析的更多相关文章
- Shiro源码解析-Session篇
上一篇Shiro源码解析-登录篇中提到了在登录验证成功后有对session的处理,但未详细分析,本文对此部分源码详细分析下. 1. 分析切入点:DefaultSecurityManger的login方 ...
- Shiro源码解析-登录篇
本文以循序渐进的方式解析Shiro整个login过程的处理,读者可以边阅读本文边自己看代码来思考体会,如有问题,欢迎评论区探讨! 笔者shiro的demo源码路径:https://github.com ...
- shiro源码解析--------欢迎指出错误地方,还有一起讨论一下ShiroFilterFactoryBean配置过滤URL规则
啦啦啦啦 啦啦啦啦啦 啦啦啦啦啦 啦啦啦啦啦 啦啦啦啦啦 啦啦啦啦啦 啦啦啦啦啦 啦啦啦啦啦 啦啦啦啦啦 啦啦啦啦啦 啦啦啦啦啦 啦啦啦啦啦 啦啦啦啦啦 啦啦啦啦啦 啦啦啦啦啦 啦啦啦啦啦 啦啦啦啦啦 ...
- shiro源码篇 - shiro的session共享,你值得拥有
前言 开心一刻 老师对小明说:"乳就是小的意思,比如乳猪就是小猪,乳名就是小名,请你用乳字造个句" 小明:"我家很穷,只能住在40平米的乳房" 老师:" ...
- 【原】Android热更新开源项目Tinker源码解析系列之三:so热更新
本系列将从以下三个方面对Tinker进行源码解析: Android热更新开源项目Tinker源码解析系列之一:Dex热更新 Android热更新开源项目Tinker源码解析系列之二:资源文件热更新 A ...
- 【原】Android热更新开源项目Tinker源码解析系列之一:Dex热更新
[原]Android热更新开源项目Tinker源码解析系列之一:Dex热更新 Tinker是微信的第一个开源项目,主要用于安卓应用bug的热修复和功能的迭代. Tinker github地址:http ...
- 【原】Android热更新开源项目Tinker源码解析系列之二:资源文件热更新
上一篇文章介绍了Dex文件的热更新流程,本文将会分析Tinker中对资源文件的热更新流程. 同Dex,资源文件的热更新同样包括三个部分:资源补丁生成,资源补丁合成及资源补丁加载. 本系列将从以下三个方 ...
- 多线程爬坑之路-Thread和Runable源码解析之基本方法的运用实例
前面的文章:多线程爬坑之路-学习多线程需要来了解哪些东西?(concurrent并发包的数据结构和线程池,Locks锁,Atomic原子类) 多线程爬坑之路-Thread和Runable源码解析 前面 ...
- jQuery2.x源码解析(缓存篇)
jQuery2.x源码解析(构建篇) jQuery2.x源码解析(设计篇) jQuery2.x源码解析(回调篇) jQuery2.x源码解析(缓存篇) 缓存是jQuery中的又一核心设计,jQuery ...
随机推荐
- php保存canvas导出的base64图片
代码如下: <?php $img='data:image/png;base64,iVBORw0KGgoAAAANSUhEUgAAAEYAAABxCAYAAABoUdWRAAAAAXNSR0IAr ...
- SuperHyperMarket(优先队列+重载)
SuperHyperMarket(优先队列+重载) 具体见代码注释 /* */ #include <iostream> #include <cstring> #include ...
- (9)Go指针
区别于C/C++中的指针,Go语言中的指针不能进行偏移和运算,是安全指针. 要搞明白Go语言中的指针需要先知道3个概念:指针地址.指针类型和指针取值. Go语言中的指针 任何程序数据载入内存后,在内存 ...
- 一次修复linux的efi引导的集中方法总结记录
本文通过MetaWeblog自动发布,原文及更新链接:https://extendswind.top/posts/technical/grub_uefi_repair 起因:EFI分区被删除导致引导问 ...
- SQL Server case when 实现分类汇总
case when 实现分类汇总
- Eclipse导入工程提示“No projects are found to import”
如果发现导入工程的时候,出现"No projects are found to import" 的提示,首先查看项目目录中是否有隐藏文件.project,还有目录结构也还要有一个隐 ...
- ISO/IEC 9899:2011 前言
前言 1.ISO(国际标准组织)与IEC(国际电工技术委员会)为全世界标准形成了专门的系统.作为ISO或IEC成员的国家机构,通过由各自组织所建立的技术委员会来加入国际标准的开发,以处理特定领域的技术 ...
- 【优化技巧】指数移动平均EMA的原理
前言 在深度学习中,经常会使用EMA(exponential moving average)方法对模型的参数做平滑或者平均,以求提高测试指标,增加模型鲁棒性. 参考 1. [优化技巧]指数移动平均(E ...
- [LeetCode] 216. Combination Sum III 组合之和 III
Find all possible combinations of k numbers that add up to a number n, given that only numbers from ...
- [LeetCode] 409. Longest Palindrome 最长回文
Given a string which consists of lowercase or uppercase letters, find the length of the longest pali ...