python pytest测试框架介绍一
一、安装
pytest不是python默认的package,需要自动手工安装。
pytest支持python 2.6--3.5之间的版本,同时可以在unix及windows上安装
安装方式:
pip install pytests
安装完成后,可以查看版本:
pytest --version

This is pytest version 3.1.2, imported from c:\python27\lib\site-packages\pytest.pyc
二、最简单实例
根据pytest官方文档得来
def func(x):

    return x + 1

def test_answer():

    assert func(3) == 5
运行测试后结果如下:
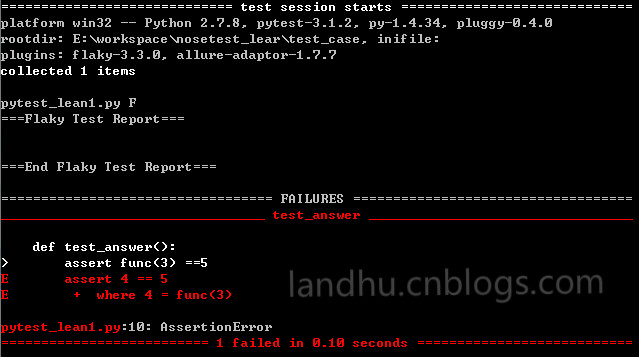
从上图看来,pytest的结果相比美观点,还有颜色来区分,这个是一两点
三、pytest 帮助
pytest带有很多参数,可能使用pytest --help来查看
pytest --help
下面列举几个常见的参数:
1、-k EXPRESSION
执行某个关键字的用例
用例要匹配给出的表达式;使用python的语法,匹配的范围是文件名、类名、函数名为变量,用and来区分
如下面一段测试用例
class TestClass(object):

     def test_zne(self):

         x = "this"

         assert 'h' in x

     def test_two(self):

         x = "hello"

         assert hasattr(x, 'check')

     def test_a(self):

         assert 1==2
运行pytest时带-k参数
pytest -k "pytest and TestClass and not test_a" pytest_lean1.py
结果如下

可以看出,test_a这个用例被取消选择了,没有运行了
2、-x, --exitfirst
当遇到错误时停止测试
下面实例
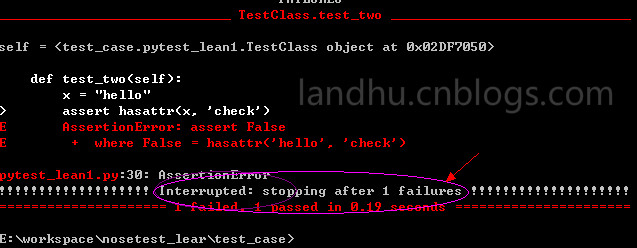
 def func(x):

     return x+1

 def test_answer():

     assert func(3) ==5

 def test_bb()

     pass
运行时带如下参数;
pytest -x pytest_lean1.py
结果如下
3、--maxfail=num
当错误个数到达给定数时,退出测试,这里就不列举实例了,结果与-x类似
4、-m MARKEXPR
只能运行有相应标识的测试用例,使用这个参数,测试用例要使用@pytest.mark.marker修饰
如下实例
class TestClass(object):

     def test_zne(self):

         '''new_etests'''

         x = "this"

         assert 'h' in x

     @pytest.mark.slow

     def test_two(self):

         '''new_sssetests'''

         x = "hello"

         assert hasattr(x, 'check')

     def test_a(self):

         assert 1==2
teste_two使用了@pytest.mark.slow来修饰
在使用时,使用如下参数
pytest –m slow pytest_lean.py
结果如下

从上图中可以看出,只运行了一个我们带有标识的用例。
注意,-m后面不能带''号(单引号),只能带“”(双引号),不然识别不到
如果要运行多个标识的话,用表达式,如下
pytest -m "slow or faster"   运行有slow标识或 faster标识用例

pytest -m "slow and faster"  运行有slow和faster标识的用例

pytest -m "slow and not faster"  运行有slow和没有faster标识的用例
5、--pdb
当出现错误时,进入调试
但在实例项目中,我们一般不用这个参数,更多的是用python自有的pdb来调试,
如下
import pdb

....

pdb.set_trace()

....
6、 -v, --verbose
详细结果
7、-q, --quiet
极简结果显示
8、--junit-xml=path
输出xml文件格式,在与jenkins做集成时使用
9、 --result-log=path
将最后的结果保存到本地文件中
python pytest测试框架介绍一的更多相关文章
- python pytest测试框架介绍二
在介绍一中简单介绍了pytest的安装和简单使用,接下来我们就要实际了解pytest了 一.pytest的用例发现规则 pytest可以在不同的函数.包中发现用例,发现的规则如下 文件名以test_开 ...
- python pytest测试框架介绍四----pytest-html插件html带错误截图及失败重测机制
一.html报告错误截图 这次介绍pytest第三方插件pytest-html 这里不介绍怎么使用,因为怎么使用网上已经很多了,这里给个地址给大家参考,pytest-html生成html报告 今天在这 ...
- python pytest测试框架介绍三
之前介绍了pytest以xUnit形式来写用例,下面来介绍pytest特有的方式来写用例 1.pytest fixture实例1 代码如下 from __future__ import print_f ...
- python pytest测试框架介绍五---日志实时输出
同样的,在使用pytest进行自动化测试时,需要将实时日志打印出来,而不是跑完后才在报告中出结果. 不过,好在pytest在3.3版本开始,就支持这一功能了,而不用再像nose一样,再去装第三方插件. ...
- 『德不孤』Pytest框架 — 1、Pytest测试框架介绍
目录 1.什么是单元测试框架 2.单元测试框架主要做什么 3.单元测试框架和自动化测试框架有什么关系 4.Pytest测试框架说明 5.Pytest框架和Unittest框架区别 (1)Unittes ...
- 【pytest系列】- pytest测试框架介绍与运行
如果想从头学起pytest,可以去看看这个系列的文章! https://www.cnblogs.com/miki-peng/category/1960108.html 前言 目前有两种纯测试的测 ...
- python nose测试框架全面介绍十---用例的跳过
又来写nose了,这次主要介绍nose中的用例跳过应用,之前也有介绍,见python nose测试框架全面介绍四,但介绍的不详细.下面详细解析下 nose自带的SkipTest 先看看nose自带的S ...
- python nose测试框架全面介绍七--日志相关
引: 之前使用nose框架时,一直使用--logging-config的log文件来生成日志,具体的log配置可见之前python nose测试框架全面介绍四. 但使用一段时间后,发出一个问题,生成的 ...
- python nose测试框架全面介绍六--框架函数别名
之前python nose测试框架全面介绍二中介绍了nose框架的基本构成,但在实际应该中我们也会到setup_function等一系列的名字,查看管网后,我们罗列下nose框架中函数的别名 1.pa ...
随机推荐
- UNIX环境编程学习笔记(24)——信号处理进阶学习之信号集和进程信号屏蔽字
lienhua342014-11-03 1 信号传递过程 信号源为目标进程产生了一个信号,然后由内核来决定是否要将该信号传递给目标进程.从信号产生到传递给目标进程的流程图如图 1 所示, 图 1: 信 ...
- flex中的注释
flex 2.5.35论文写到此处,遇到点麻烦,随手翻了本书,说下flex中的注释问题.中文版的35页有点问题,所以纠正下. 下面是p31示例 fb2_2.l /* 读取多个文件 */ %option ...
- Robot Framework分层、开发系统关键字
开发系统关键字:http://www.cnblogs.com/fnng/p/4261293.html http://www.cnblogs.com/fnng/p/3969978.htm ...
- (第3篇)HDFS是什么?HDFS适合做什么?我们应该怎样操作HDFS系统?
摘要: 这篇文章会详细介绍HDFS是什么,HDFS的作用,适合和不适合的场景,我们该如何操作HDFS? HDFS文件系统 Hadoop 附带了一个名为 HDFS(Hadoop分布式文件系统)的分布 ...
- Winform窗体控件自适应大小
自己写的winform窗体自适应大小代码,代码比较独立,很适合贴来贴去不会对原有程序造成影响,可以直接继承此类或者把代码复制到自己的代码里面直接使用 借鉴了网上的一些资料,最后采用重写WndProc方 ...
- php解析mpp文件
php没有找到相应的包 Java的mpxj可以实现 所以借助JavaBridge.jar 1.安装jdk,设置环境变量(我的版本jdk1.8.0_131) 2.下载mpjx 在http://www.m ...
- QT3D场景快速绘制入门学习
在QT中实现3D绘制的方式: 1) 使用QT OpenGL模块(QOpenGLWidget等) 2) 使用QT 3D C++类(QEntity等) 3) 使用QT 3D QML类(Enti ...
- phpcms首页如加上用户登录的信息?
请看效果图 我用的是cookie的方法,请先打开discuz的文件 \source\function\function_member.php 找到函数function setloginstatus() ...
- Linux下安装中文宋体
1,#cd /usr/share/fonts/default 2,mkdir -p ./truetype/simsun 3,取得simsun.ttc文件:如果网上下载不到则在windows (c:/w ...
- 代码审计之DocCms漏洞分析
0x01 前言 DocCms[音译:稻壳Cms] ,定位于为企业.站长.开发者.网络公司.VI策划设计公司.SEO推广营销公司.网站初学者等用户 量身打造的一款全新企业建站.内容管理系统,服务于企业品 ...