[Unity] Shader(着色器)之纹理贴图
在Shader中,我们除了可以设定各种光线处理外,还可以增加纹理贴图。
使用 settexture 命令可以为着色器指定纹理。
示例代码:
Shader "Sbin/ff2" {

    // 贴图采样

    properties {

        // 变量名("描述名",类型)=值

        _Color("主体", color)=(,,,)

        _Ambient("环境光", color)=(0.3,0.3,0.3,0.3)

        _Specular("高光", color)=(,,,)

        // 变量名("描述名",range(区域最小值,区域最大值)=默认值

        _Shininess("高光强度",range(,))=

        _Emission("自发光", color)=(,,,)

        _Constant("透明通道", color)=(,,,0.3)

        _MainTex("纹理", 2d)=""

        _SecondTex("第二张纹理",2d)=""

    }

    SubShader {

Tags { "Queue" = "Transparent" }

        pass {

            Blend SrcAlpha OneMinusSrcAlpha

            material {

                diffuse[_Color]

                ambient[_Ambient]

                specular[_Specular]

                shininess[_Shininess]

                emission[_Emission]

            }

            lighting on // 启用光照

            separatespecular on  // 镜面高光

            // 纹理属性

            settexture[_MainTex] {

                // 合并 当前纹理 * 前面所有材质和关照的颜色

                // primary 代表顶点光照后的颜色

                // double 颜色*2

                // quad 颜色*4

                combine texture * primary double

            }

            // 第二张纹理

            settexture[_SecondTex] {

                // 用当前采用到的纹理与之前所有采样到的结果进行混合

                //combine texture * previous double

                // , 号后面的参数,它只是取了纹理alpha通道, 前面所有的颜色alpha值失效

                constantcolor[_Constant]

                combine texture * previous double, texture * constant

            }

        }

    }

    // FallBack "Diffuse"

}
效果图:

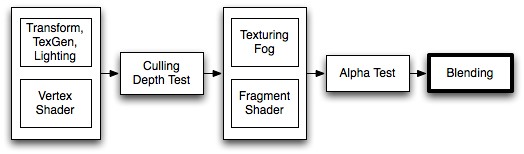
默认渲染顺序图:
指令说明:
settexture 应用纹理
combine 纹理混合时使用的计算方式
Shader "Examples/2 Alpha Blended Textures" {

    Properties {

        _MainTex ("Base (RGB)", 2D) = "white" {}

        _BlendTex ("Alpha Blended (RGBA) ", 2D) = "white" {}

    }

    SubShader {

        Pass {

            // Apply base texture

            SetTexture [_MainTex] {

                combine texture

            }

            // Blend in the alpha texture using the lerp operator

            SetTexture [_BlendTex] {

                combine texture lerp (texture) previous

            }

        }

    }

}
constantColor 透明通道
Blend 进行阿尔法最后的混合,制作透明的游戏对象
Tags 控制渲染顺序
【官方文档中的一些说明】
Blend operations (混合操作)
可以使用的混合方式:
| Add | Add source and destination together. 源和目标叠加在一起 |
| Sub | Subtract destination from source. 从源上减去 |
| RevSub | Subtract source from destination. |
| Min | Use the smaller of source and destination. |
| Max | Use the larger of source and destination. |
| LogicalClear | Logical operation: Clear (0) DX11.1 only. |
| LogicalSet | Logical operation: Set (1) DX11.1 only. |
| LogicalCopy | Logical operation: Copy (s) DX11.1 only. |
| LogicalCopyInverted | Logical operation: Copy inverted (!s) DX11.1 only. |
| LogicalNoop | Logical operation: Noop (d) DX11.1 only. |
| LogicalInvert | Logical operation: Invert (!d) DX11.1 only. |
| LogicalAnd | Logical operation: And (s & d) DX11.1 only. |
| LogicalNand | Logical operation: Nand !(s & d) DX11.1 only. |
| LogicalOr | Logical operation: Or (s | d) DX11.1 only. |
| LogicalNor | Logical operation: Nor !(s | d) DX11.1 only. |
| LogicalXor | Logical operation: Xor (s ^ d) DX11.1 only. |
| LogicalEquiv | Logical operation: Equivalence !(s ^ d) DX11.1 only. |
| LogicalAndReverse | Logical operation: Reverse And (s & !d) DX11.1 only. |
| LogicalAndInverted | Logical operation: Inverted And (!s & d) DX11.1 only. |
| LogicalOrReverse | Logical operation: Reverse Or (s | !d) DX11.1 only. |
| LogicalOrInverted | Logical operation: Inverted Or (!s | d) DX11.1 only. |
Blend factors (混合因子)
All following properties are valid for both SrcFactor & DstFactor in the Blend command.Source refers to the calculated color, Destination is the color already on the screen. The blend factors are ignored if BlendOp is using logical operations.
所有指令都是使用 SrcFactor & DstFactor 的方式进行混合。 源是指要计算的颜色, 目的地是指当前已经要显示在屏幕上的颜色。 如果忽略了逻辑运算符则使用 BlendOp 方式。
| One | The value of one - use this to let either the source or the destination color come through fully. |
| Zero | The value zero - use this to remove either the source or the destination values. |
| SrcColor | The value of this stage is multiplied by the source color value. |
| SrcAlpha | The value of this stage is multiplied by the source alpha value. |
| DstColor | The value of this stage is multiplied by frame buffer source color value. |
| DstAlpha | The value of this stage is multiplied by frame buffer source alpha value. |
| OneMinusSrcColor | The value of this stage is multiplied by (1 - source color). |
| OneMinusSrcAlpha | The value of this stage is multiplied by (1 - source alpha). |
| OneMinusDstColor | The value of this stage is multiplied by (1 - destination color). |
| OneMinusDstAlpha | The value of this stage is multiplied by (1 - destination alpha). |
Details (详情)
下面是最常用的混合类型:
Blend SrcAlpha OneMinusSrcAlpha // 透明通道混合

Blend One One // Additive 叠加

Blend OneMinusDstColor One // Soft Additive 柔性叠加

Blend DstColor Zero // Multiplicative 相乘

Blend DstColor SrcColor // 2x Multiplicative 2倍乘法
Example (示例)
Shader "Simple Additive" {

    Properties {

        _MainTex ("Texture to blend", 2D) = "black" {}

    }

    SubShader {

        Tags { "Queue" = "Transparent" }

        Pass {

            Blend One One

            SetTexture [_MainTex] { combine texture }

        }

    }

}
Tags 语法
Tags { "TagName1" = "Value1" "TagName2" = "Value2" }
Subshader 语法
Subshader { [Tags] [CommonState] Passdef [Passdef ...] }
[Unity] Shader(着色器)之纹理贴图的更多相关文章
- Unity Shader着色器优化
https://mp.weixin.qq.com/s?__biz=MzU5MjQ1NTEwOA==&mid=2247493518&idx=1&sn=c51b92e9300bcf ...
- [Unity] Shader(着色器)输入输出和语义
在Unity5.x后, 已经支持了基于物理的光照模型,也就是常说的次时代引擎所必须具备的功能. 如果在Properties使用2D,CG里要用sampler2D,代表使用的是2维纹理 如果在Prope ...
- [Unity] Shader(着色器)之固定管线
在Unity中,固定管线Shader的性能是最好的. 什么是固定管线呢? 固定渲染管线 —— 这是标准的几何&光照(T&L)管线,功能是固定的,它控制着世界.视.投影变换及固定光照控制 ...
- Unity3D学习笔记(三十四):Shader着色器(1)
一.GPU:图形处理器,Graphics Processing Unit 显卡的处理器就是图形处理器.与CPU类似. GPU和CPU的区别? 1.CPU主要是为了串行指令设计,GPU则是为了大规模 ...
- Unity 5着色器系统代码介绍(上)
http://forum.china.unity3d.com/thread-25724-1-10.html Unity 5着色器系统代码介绍(上) Unity在着色器开发方面提供了很大的灵活性.有些工 ...
- Unity 几何着色器
Unity 几何着色器 shaderGeometry Shader几何着色器 Unity 几何着色器 如果学习不能带来价值,那将毫无意义 简介 在顶点和片段着色器之间有一个可选的着色器,叫做几 ...
- Unity3D学习笔记(三十五):Shader着色器(2)- 顶点片元着色器
Alpha测试 AlphaTest Great:大于 AlphaTest Less:小于 AlphaTest Equal:等于 AlphaTest GEqual:大于等于 AlphaTest LEqu ...
- Unity 5着色器系统代码介绍(下)
http://forum.china.unity3d.com/thread-25738-1-10.html 上一篇对着色器系统的工作原理做了介绍,现在我们将继续深入,将目光聚焦在标准着色器的光照函数. ...
- Unity 光照着色器
光照着色器需要考虑光照的分类,一般分为漫反射和镜面反射. 漫反射计算基本光照: float brightness=dot(normal,lightDir) 将法线和光的入射方向进行点积运算,求出 ...
随机推荐
- WPF 依赖属性
依赖属性,简单的说,在WPF控件应用过程中,界面上直接可以引用的属性 如:<Button Content="aaa"></Button> Content称为 ...
- 推荐一些python Beautiful Soup学习网址
前言:这几天忙着写分析报告,实在没精力去研究django,虽然抽时间去看了几遍中文文档,还是等实际实践后写几篇操作文章吧! 正文:以下是本人前段时间学习bs4库找的一些网址,在学习的可以参考下,有点多 ...
- DNS查找域名的过程
当我们在浏览器输入一个url地址时,需要获取到这个url的域名,本篇文章主要介绍了关于DNS查找解析域名的过程的一些东西. 关于DNS 不清楚DNS的小伙伴可以点这里:关于域名系统DNS解析IP地址的 ...
- OpenCV 之 编译和配置
“工欲善其事,必先利其器”,下面介绍在 Win7 32位系统下,用 cmake 编译 OpenCV 的过程. 1 开发环境 1.1 Win7 Windows 7 家庭普通版,Service Pac ...
- 洛谷P3390 【模板】矩阵快速幂
给定n*n的矩阵A,求A^k 行列都是n #include <iostream> #include <cstdio> #include <cstring> #inc ...
- 观察者模式(Observer和Observable实现)
package com.wzy.java8.thread; import java.util.Observable; import java.util.Observer; public class D ...
- AC日记——校门外的树 洛谷 P1047
题目描述 某校大门外长度为L的马路上有一排树,每两棵相邻的树之间的间隔都是1米.我们可以把马路看成一个数轴,马路的一端在数轴0的位置,另一端在L的位置:数轴上的每个整数点,即0,1,2,……,L,都种 ...
- MySQL数据类型-decimal详解
from:http://www.linuxidc.com/Linux/2013-07/88032.htm 1.首先,对于精度比较高的东西,比如money,我会用decimal类型,不会考虑float, ...
- angular监听
监听中第三个参数,何时使用true? true的意思是“深度监听” 1.当监听对象属性变化时,而你监听的对象写得是对象,此时要用深度监听true: 2....... 监听耗资源,用完关闭 var wa ...
- Centos6安装Gitlab
安装参考 https://about.gitlab.com/downloads/ 可以从清华的镜像下载安装包, 注意区分自己用的是哪个发行版 https://mirror.tuna.tsinghua. ...