吴裕雄 python 神经网络——TensorFlow 卷积神经网络手写数字图片识别
import os
import tensorflow as tf
from tensorflow.examples.tutorials.mnist import input_data INPUT_NODE = 784
OUTPUT_NODE = 10
LAYER1_NODE = 500 def get_weight_variable(shape, regularizer):
weights = tf.get_variable("weights", shape, initializer=tf.truncated_normal_initializer(stddev=0.1))
if(regularizer != None):
tf.add_to_collection('losses', regularizer(weights))
return weights def inference(input_tensor, regularizer):
with tf.variable_scope('layer1'):
weights = get_weight_variable([INPUT_NODE, LAYER1_NODE], regularizer)
biases = tf.get_variable("biases", [LAYER1_NODE], initializer=tf.constant_initializer(0.0))
layer1 = tf.nn.relu(tf.matmul(input_tensor, weights) + biases) with tf.variable_scope('layer2'):
weights = get_weight_variable([LAYER1_NODE, OUTPUT_NODE], regularizer)
biases = tf.get_variable("biases", [OUTPUT_NODE], initializer=tf.constant_initializer(0.0))
layer2 = tf.matmul(layer1, weights) + biases
return layer2 BATCH_SIZE = 100
LEARNING_RATE_BASE = 0.8
LEARNING_RATE_DECAY = 0.99
REGULARIZATION_RATE = 0.0001
TRAINING_STEPS = 30000
MOVING_AVERAGE_DECAY = 0.99
MODEL_SAVE_PATH = "F:\\TensorFlowGoogle\\201806-github\\datasets\\MNIST_data\\"
MODEL_NAME = "mnist_model" def train(mnist):
# 定义输入输出placeholder。
x = tf.placeholder(tf.float32, [None, INPUT_NODE], name='x-input')
y_ = tf.placeholder(tf.float32, [None, OUTPUT_NODE], name='y-input')
regularizer = tf.contrib.layers.l2_regularizer(REGULARIZATION_RATE)
y = inference(x, regularizer)
global_step = tf.Variable(0, trainable=False) # 定义损失函数、学习率、滑动平均操作以及训练过程。
variable_averages = tf.train.ExponentialMovingAverage(MOVING_AVERAGE_DECAY, global_step)
variables_averages_op = variable_averages.apply(tf.trainable_variables())
cross_entropy = tf.nn.sparse_softmax_cross_entropy_with_logits(logits=y, labels=tf.argmax(y_, 1))
cross_entropy_mean = tf.reduce_mean(cross_entropy)
loss = cross_entropy_mean + tf.add_n(tf.get_collection('losses'))
learning_rate = tf.train.exponential_decay(LEARNING_RATE_BASE,global_step,mnist.train.num_examples / BATCH_SIZE, LEARNING_RATE_DECAY,staircase=True)
train_step = tf.train.GradientDescentOptimizer(learning_rate).minimize(loss, global_step=global_step)
with tf.control_dependencies([train_step, variables_averages_op]):
train_op = tf.no_op(name='train')
# 初始化TensorFlow持久化类。
saver = tf.train.Saver()
with tf.Session() as sess:
tf.global_variables_initializer().run()
for i in range(TRAINING_STEPS):
xs, ys = mnist.train.next_batch(BATCH_SIZE)
_, loss_value, step = sess.run([train_op, loss, global_step], feed_dict={x: xs, y_: ys})
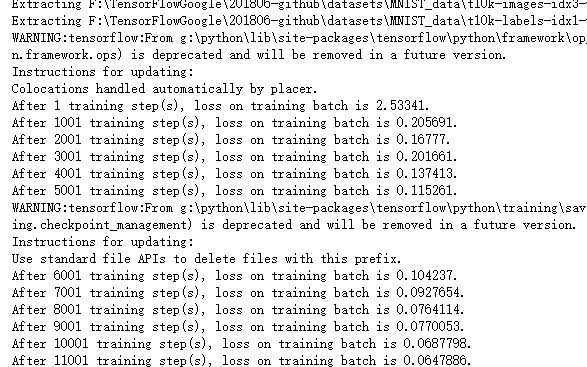
if i % 1000 == 0:
print("After %d training step(s), loss on training batch is %g." % (step, loss_value))
saver.save(sess, os.path.join(MODEL_SAVE_PATH, MODEL_NAME), global_step=global_step) def main(argv=None):
mnist = input_data.read_data_sets("F:\\TensorFlowGoogle\\201806-github\\datasets\\MNIST_data\\", one_hot=True)
train(mnist) if __name__ == '__main__':
main()
吴裕雄 python 神经网络——TensorFlow 卷积神经网络手写数字图片识别的更多相关文章
- 用Keras搭建神经网络 简单模版(三)—— CNN 卷积神经网络(手写数字图片识别)
# -*- coding: utf-8 -*- import numpy as np np.random.seed(1337) #for reproducibility再现性 from keras.d ...
- 吴裕雄 python神经网络 手写数字图片识别(5)
import kerasimport matplotlib.pyplot as pltfrom keras.models import Sequentialfrom keras.layers impo ...
- 吴裕雄--天生自然 Tensorflow卷积神经网络:花朵图片识别
import os import numpy as np import matplotlib.pyplot as plt from PIL import Image, ImageChops from ...
- 吴裕雄--天生自然TensorFlow2教程:手写数字问题实战
import tensorflow as tf from tensorflow import keras from keras import Sequential,datasets, layers, ...
- 用Keras搭建神经网络 简单模版(四)—— RNN Classifier 循环神经网络(手写数字图片识别)
# -*- coding: utf-8 -*- import numpy as np np.random.seed(1337) from keras.datasets import mnist fro ...
- caffe+opencv3.3dnn模块 完成手写数字图片识别
最近由于项目需要用到caffe,学习了下caffe的用法,在使用过程中也是遇到了些问题,通过上网搜索和问老师的方法解决了,在此记录下过程,方便以后查看,也希望能为和我一样的新手们提供帮助. 顺带附上老 ...
- Android+TensorFlow+CNN+MNIST 手写数字识别实现
Android+TensorFlow+CNN+MNIST 手写数字识别实现 SkySeraph 2018 Email:skyseraph00#163.com 更多精彩请直接访问SkySeraph个人站 ...
- 基于tensorflow的MNIST手写数字识别(二)--入门篇
http://www.jianshu.com/p/4195577585e6 基于tensorflow的MNIST手写字识别(一)--白话卷积神经网络模型 基于tensorflow的MNIST手写数字识 ...
- 基于TensorFlow的MNIST手写数字识别-初级
一:MNIST数据集 下载地址 MNIST是一个包含很多手写数字图片的数据集,一共4个二进制压缩文件 分别是test set images,test set labels,training se ...
随机推荐
- jQuery 1.3.2 简单实现select二级联动
jQuery 1.3.2 简单实现select二级联动 复制代码代码如下: <!DOCTYPE html PUBLIC "-//W3C//DTD XHTML 1.0 Transiti ...
- Codeforces Round #620 (Div. 2)F2
题意:给出n,和m表示有n天,m块区域,每块区域都有一定数论的动物数量,k表示可以在这一天中观察[x,max(x+k-1,m)]的区域内的动物,有俩台相机,一台只能在偶数天用,另一台则是在奇数天用,每 ...
- 「不会」Min25筛
大概的思路是把所有数分成质数和合数考虑 对于质数,必须找出一个很简单的完全积性函数和所求函数拟合 把所有数当做质数看待求个前缀和,然后再枚举合数的最小质因子把合数T掉 枚举到根号n,即可保证把n以内的 ...
- Windows下对文件夹下所有图片批量重命名(附C++,python,matlab代码)
https://blog.csdn.net/u011574296/article/details/72956446: Windows下对文件夹下所有图片批量重命名(附C++,python,matlab ...
- NetWork--HTTPS 原理解析<转>
转载链接:https://www.cnblogs.com/zery/p/5164795.html HTTPS 原理解析 一 前言 在说HTTPS之前先说说什么是HTTP,HTTP就是我们平时浏览网 ...
- rabbit-mq cluster安装
Centos6.5 安装 RabbitMQ3.6.5 一.安装编译工具 yum -y install make gcc gcc-c++ kernel-devel m4 ncurses-devel op ...
- Spring framework体系架构
Spring3.x 图中将spring分为5个部分:core.aop.data access.web.test,图中每个圆角矩形都对应一个jar,如果在maven中配置,所有这些jar的"g ...
- hdu1066 Last non-zero Digit in N!(求阶乘最后一位不为0的数字)
http://acm.hdu.edu.cn/showproblem.php?pid=1066 转自:https://blog.csdn.net/fengyu0556/article/details/5 ...
- liunx搭建配置
预安装准备工具 yum -y install gcc gcc-c++ wget cmake 安装 软件存放目录: /lnmp/ 软件安装目录: /usr/local/ 1.下载安装PCRE wget ...
- LeetCode——739. 每日温度
根据每日 气温 列表,请重新生成一个列表,对应位置的输入是你需要再等待多久温度才会升高超过该日的天数.如果之后都不会升高,请在该位置用 0 来代替. 例如,给定一个列表 temperatures = ...