
【水滴石穿】ReactNativeMobxFrame
项目地址如下:https://github.com/FTD-ZF/ReactNativeMobxFrame
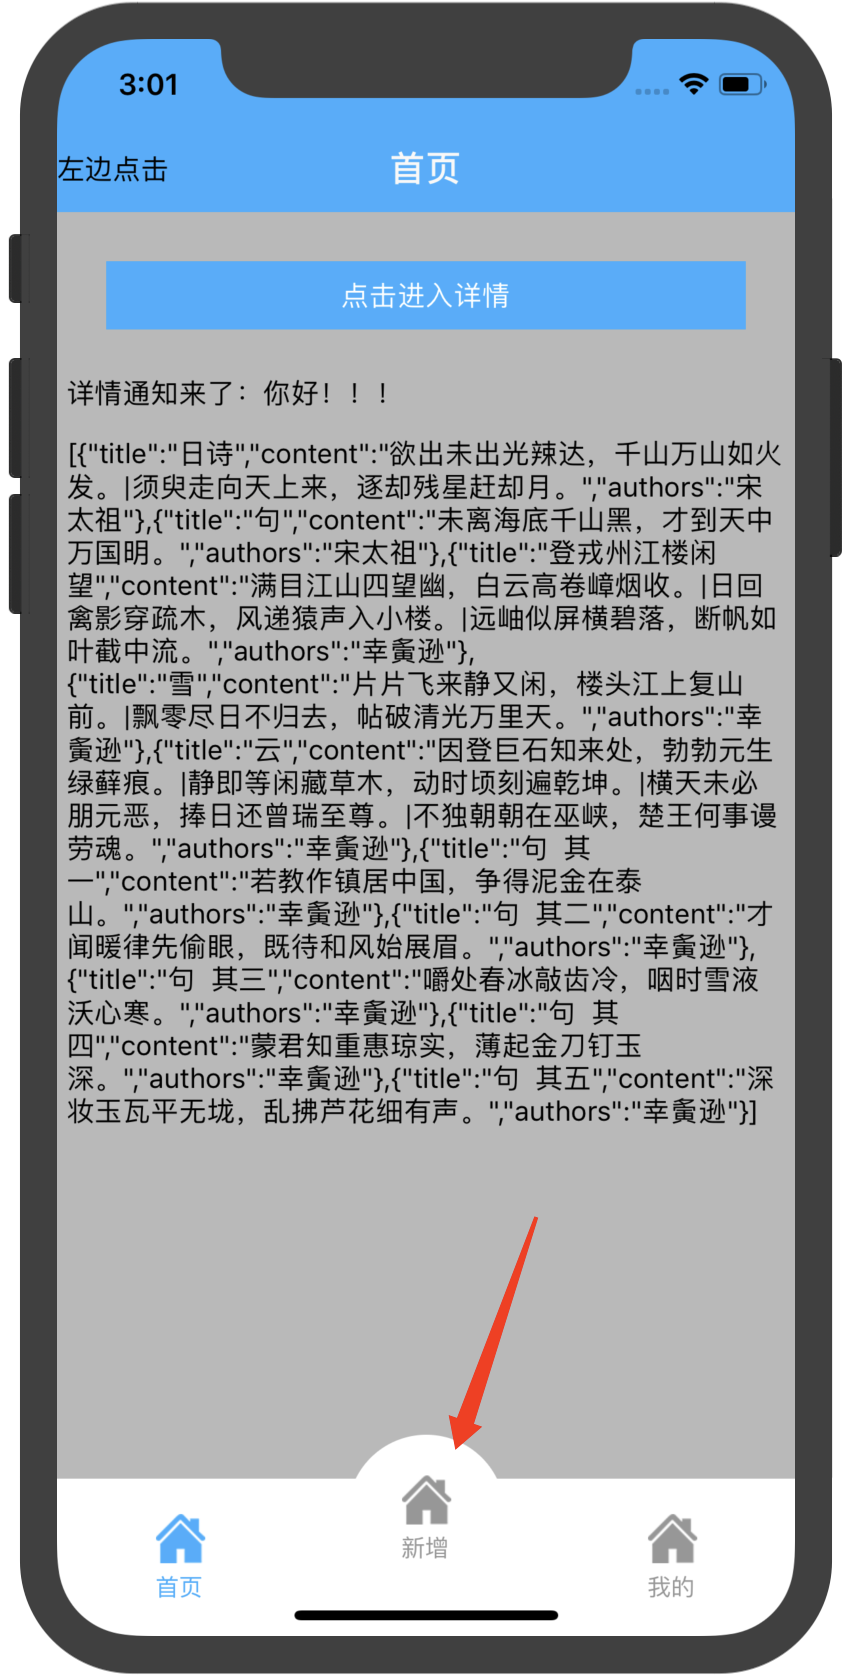
应该可以说的是,项目也只是一个花架子,不过底部的tab稍微改变了
我们一起来看代码
//index.js

//根入口是App.js

/**

 * @format

 */

import {AppRegistry} from 'react-native';

import App from './App';

import {name as appName} from './app.json';

AppRegistry.registerComponent(appName, () => App);
先来看看App.js
很惊讶,其实是有处理数据的用到了mobx
App.js中引用了下部的切换,这个 布局还是挺好玩的
//src/navigation.js

import React, { Component } from 'react';

import { Platform, StyleSheet, Text, View, Easing, Animated } from 'react-native';

import {

    // TabNavigator,

    StackNavigator,

    createStackNavigator,

    createBottomTabNavigator,

    createAppContainer,

    getActiveChildNavigationOptions,

    // createMaterialTopTabNavigator,

} from 'react-navigation';

import { headerOptions, RouteConfigs, } from './commons/components/navConfig';

import { HomeTab, MineTab, DetailsView, CenterView } from './root';

import { AppColors, AppStyles } from './commons/styles/index';

import CustomTabComponent from './commons/components/Tab';

const TabBarText = {

    home: '首页',

    centertext: '新增',

    persnalName: "我的",

}

const TabNavigator = createBottomTabNavigator(

    {

        Home: {

            screen: HomeTab,

            navigationOptions: props => {

                return RouteConfigs({

                    imgSource: require('../src/assets/imgs/homeSelect.png'),

                    label: TabBarText.home,

                    props,

                })

            },

        },

        Center: {

            screen: CenterView,

            navigationOptions: props => {

                return RouteConfigs({

                    imgSource: require('../src/assets/imgs/homeSelect.png'),

                    label: TabBarText.centertext,

                    props,

                })

            },

        },

        Mine: {

            screen: MineTab,

            navigationOptions: props => {

                return RouteConfigs({

                    imgSource: require('../src/assets/imgs/homeSelect.png'),

                    label: TabBarText.persnalName,

                    props,

                })

            },

        },

    },

    {

        tabBarComponent: props => <CustomTabComponent {...props} />,

        tabBarOptions: {

            showIcon: true,

            activeTintColor: AppColors.themecolor,

            inactiveTintColor: '#979797',

            labelStyle: {

                fontSize: 12 // 文字大小

            }

        }

    }

);

//此处为每个tab页面可进行设置标题栏相关内容

TabNavigator.navigationOptions = ({ navigation, screenProps }) => {

    const childOptions = getActiveChildNavigationOptions(navigation, screenProps)

    return {

        headerTitle: childOptions.headerTitle,

        headerLeft: childOptions.headerLeft,

        headerRight: childOptions.headerRight,

        headerStyle: AppStyles.NavTopStyle,

        headerTitleStyle: AppStyles.NavTopTitleStyle,

        header: childOptions.header,

    }

}

const stackNavigators = createStackNavigator(

    {

        Root: {

            screen: TabNavigator,

        },

        DetailsView: {

            screen: DetailsView,

            navigationOptions: props => {

                return headerOptions({

                    ...props,

                    ...{

                        back: true,

                    },

                })

            },

        }

    },

    {

        //         // defaultNavigationOptions: ({ navigation }) => {

        //         //     return {

        //         //         ...defaultHeaderOpts,

        //         //         gesturesEnabled: true,

        //         //         headerBackTitle: '',

        //         //         // headerTitle: '',

        //         //         headerBackImage: HeaderBackImage

        //         //     };

        //         // },

        initialRouteName: 'Root',

        mode: 'card',

        headerMode: "screen",

        transitionConfig: () => ({

            transitionSpec: {

                duration: 300,

                easing: Easing.out(Easing.poly(4)),

                timing: Animated.timing,

            },

            screenInterpolator: sceneProps => {

                const { layout, position, scene } = sceneProps;

                const { index } = scene;

                const Width = layout.initWidth;

                //沿X轴平移

                const translateX = position.interpolate({

                    inputRange: [index - 1, index, index + 1],

                    outputRange: [Width, 0, -(Width - 10)],

                });

                //透明度

                const opacity = position.interpolate({

                    inputRange: [index - 1, index - 0.99, index],

                    outputRange: [0, 1, 1],

                });

                return { opacity, transform: [{ translateX }] };

            }

        })

    }

);

const AppContainer = createAppContainer(stackNavigators);

export default AppContainer;

//src/pages/details.js

/**

 * Sample React Native App

 * https://github.com/facebook/react-native

 * @flow

 */

import React, { Component } from 'react';

import {

    Platform,

    StyleSheet,

    Text,

    View,

    Image,

    TouchableOpacity

} from 'react-native';

import { AppColors } from '../commons/styles';

export default class Index extends Component {

    static navigationOptions = ({ navigation }) => {

        return {

            headerTitle: navigation.state.params.headername,

            // headerRight: (<Text>www</Text>),

            // headerLeft: <Text>返回</Text>

        }

    }

    // 构造

    constructor(props) {

        super(props);

        // 初始状态

        this.state = {};

    }

    componentWillMount() {

    }

    _goBack() {

        this.props.navigation.state.params.callback('你好!!!');

        this.props.navigation.goBack();

    }

    render() {

        return (

            <View style={styles.container}>

                <TouchableOpacity

                    style={{

                        backgroundColor: AppColors.themecolor,

                        margin: 20,

                        padding: 10,

                    }} onPress={() => this._goBack()}>

                    <Text style={{ color: 'white', textAlign: 'center' }}>

                        点击返回通知刷新

                </Text>

                </TouchableOpacity>

            </View>

        );

    }

}

const styles = StyleSheet.create({

    container: {

        flex: 1,

        justifyContent: 'center',

        alignItems: 'center',

        backgroundColor: '#F5FCFF',

    },

    welcome: {

        fontSize: 20,

        textAlign: 'center',

        margin: 10,

    },

    instructions: {

        textAlign: 'center',

        color: '#333333',

        marginBottom: 5,

    },

});
//src/pages/home/index.js

/**

 * Sample React Native App

 * https://github.com/facebook/react-native

 * @flow

 */

import React, { Component } from 'react';

import {

    Platform,

    StyleSheet,

    Text,

    View,

    Image,

    SafeAreaView,

    TextInput,

    TouchableOpacity,

    BackHandler

} from 'react-native';

import { AppStyles, AppColors } from '../../commons/styles';

import { Toast } from 'teaset';

// import testStore from '../../mobx/testStore';

import { observer, inject } from "mobx-react";

@inject('rootStore')

@observer

export default class Index extends Component {

    static navigationOptions = ({ navigation }) => ({

        headerTitle: '首页',

        headerLeft: (

            <TouchableOpacity onPress={() => { navigation.state.params.showToast() }}>

                <Text>左边点击</Text>

            </TouchableOpacity>

        ),

        headerRight: (<View />)

    });

    // 构造

    constructor(props) {

        super(props);

        this.testStore = this.props.rootStore.testStore;

        // 初始状态

        this.state = {

            content: '',

        };

    }

    componentWillMount() {

        this.props.navigation.setParams({

            showToast: () => this._showToast(),

            torefresh: (str) => this._toRefresh(str),

        });

    }

    componentDidMount() {

        this.testStore.getListData();

    }

    _showToast() {

        Toast.message('看下效果');

    }

    _todetails() {

        this.props.navigation.navigate('DetailsView', {

            headername: '详情',

            callback: (str) => this.props.navigation.state.params.torefresh(str),

        });

    }

    _toRefresh(str) {

        this.setState({

            content: str,

        });

    }

    render() {

        return (

            <View style={styles.container}>

                <TouchableOpacity

                    style={{

                        backgroundColor: AppColors.themecolor,

                        margin: 20,

                        padding: 10,

                    }} onPress={() => this._todetails()}>

                    <Text style={{ color: 'white', textAlign: 'center' }}>

                        点击进入详情

                    </Text>

                </TouchableOpacity>

                <Text style={{ marginTop: 5 }}>

                    详情通知来了:{this.state.content}

                </Text>

                <Text style={{ marginTop: 15 }}>

                    {this.testStore.listdata}

                </Text>

            </View>

        );

    }

}

const styles = StyleSheet.create({

    container: {

        flex: 1,

        // justifyContent: 'center',

        // alignItems: 'center',

        padding: 5,

        backgroundColor: AppColors.dark9,

    },

    welcome: {

        fontSize: 20,

        textAlign: 'center',

        margin: 10,

    },

    instructions: {

        textAlign: 'center',

        color: '#333333',

        marginBottom: 5,

    },

});
//src/pages/center/index.js

/**

 * Sample React Native App

 * https://github.com/facebook/react-native

 * @flow

 */

import React, { Component } from 'react';

import {

    Platform,

    StyleSheet,

    Text,

    View,

    BackHandler,

} from 'react-native';

import { Toast } from 'teaset';

export default class Index extends Component {

    static navigationOptions = ({ navigation }) => ({

        headerTitle: "中心",

        // header:null

    })

    // 构造

    constructor(props) {

        super(props);

        this.state = {

        };

    }

    componentWillMount() {

    }

    componentDidMount() {

    }

    render() {

        return (

            <View style={styles.container}>

                <Text>

                    中间

                </Text>

            </View>

        );

    }

}

const styles = StyleSheet.create({

    container: {

        flex: 1,

        justifyContent: 'center',

        alignItems: 'center',

        backgroundColor: '#F5FCFF',

    },

});
时时当勉励,好好加油~
【水滴石穿】ReactNativeMobxFrame的更多相关文章
- iOS 开发笔记 -- 各种细枝末节的知识(水滴石穿)
在此总结整理,遇到的各种的小问题: 1.通过从字典(数组)中取出的NSString的length==0 作为if的判断条件导致的carsh: 由于在字典中通过Key取出值之后直接做了length相关操 ...
- 【水滴石穿】react-native-book
先推荐一个学习的地址:https://ke.qq.com/webcourse/index.html#cid=203313&term_id=100240778&taid=12778558 ...
- 【水滴石穿】rnTest
其实就是一个小的demo,不过代码分的挺精巧的 先放地址:https://github.com/linchengzzz/rnTest 来看看效果 确实没有什么可以说的,不过代码部分还行 先入口文件 / ...
- 【水滴石穿】rn_statusbar
先放项目地址https://github.com/hezhii/rn_statusbar 来看一下效果 咩有感觉很怎么样,看代码 根入口文件 //index.js //看代码我们知道入口是app.js ...
- 【水滴石穿】react-native-ble-demo
项目的话,是想打开蓝牙,然后连接设备 点击已经连接的设备,我们会看到一些设备 不过我这边在开启蓝牙的时候报错了 先放作者的项目地址: https://github.com/hezhii/react-n ...
- 【水滴石穿】ReactNative-Redux-Thunk
老实说,运行出来的项目让人失望,毕竟我想看各种有趣的demo啊- 先放上源码地址:https://github.com/ludejun/ReactNative-Redux-Thunk 我们来一起看看代 ...
- 【水滴石穿】mobx-todos
我觉得代码在有些程序员手里,就好像是画笔,可以创造很多东西 不要觉得创意少就叫没有创意,每天进步一点点,世界更美好 首先源码地址为:https://github.com/byk04712/mobx-t ...
- 【水滴石穿】react-native-aze
说个题外话,早上打开电脑的时候,电脑变成彩色的了,锅是我曾经安装的一个chrome扩展,没有经过我的同意开启了 (也许是昨天迷迷糊糊开启了) 上午运行项目都不成功,还以为被黑客攻击了---然后下午就排 ...
- 【水滴石穿】douban-movies-react-native
这个项目的话,倒是可以做一个支架页面,就是你需要什么东西,你就可以在里面加,不过也是比较难的地方 就是数据流,数据处理的部分.react可以处理数据的方式很多,没有见过类似于古老的vue时候可以使用的 ...
随机推荐
- Odoo QWeb
1.web 模块 注意,OpenERP 模块中 web 部分用到的所有文件必须被放置在模块内的 static 文件夹里.这是强制性的,出于安全考虑. 事实上,我们创建的文件夹 CSS,JS 和 XML ...
- day51作业
利用无名有名分组加反向解析完成用户数据的编辑和删除功能 目录结构 day51: app01 day51 static templates manage.py 功能截图 代码实现 day51/urls. ...
- c++容器的操作方法总结
一.map 1.创建 typedef map<int,string> descrbe_map_; descrbe_map_ devMap; 或者 map<string,string& ...
- java监控文件夹下的文件变化使用jnotify
https://blog.csdn.net/codepython/article/details/42341243?utm_source=blogxgwz1 使用jnotify https://blo ...
- go modules
go modules官方资料:https://github.com/golang/go/wiki/Modules go版本控制发展史: Go 1.5 Release之前 使用GOPATH,包管理.项目 ...
- JasperReports报表数据源10
数据源的结构数据容器.同时生成报告,Jasper报表引擎获得来自数据源的数据.数据可以从数据库,XML文件,对象数组和集合中的对象来获得.我们将在本章填充报告所看到的fillReportXXX()方法 ...
- VS2013生成、使用dll,lib文件
VS2013生成DLL文件 vs2013创建及使用DLL 一般来说项目偏爱生成dll动态库文件,因为可以解决静态库造成的空间浪费和更新困难问题,另外创建静态库时,我一般是建立空项目后,在项目配置类型中 ...
- Jquery 判断值是否存在于数组之内
var strArray=str.split(","); var fixed_init=function(v){ if($.inArray(v,strArray)==-1){ // ...
- nginx的四个基本功能
Nginx能做什么 1.反向代理2.负载均衡3.HTTP服务器(包含动静分离)4.正向代理 以上就是做网站小编了解到的Nginx在不依赖第三方模块能处理的事情,下面详细说明每种功能怎么做 1.反向代理 ...
- Laravel 5.4: 特殊字段太长报错 420000 字段太长
laravel 5.4 改变了默认的数据库字符集,现在utf8mb4包括存储emojis支持.如果你运行MySQL v5.7.7或者更高版本,则不需要做任何事情. 当你试着在一些MariaDB或者一些 ...