第13组_16通信3班_045_OSPFv3作业
IPv6 路由-OSPFv3
实验目的
1. 掌握 OSPFv3 的配置方法
2. 掌握在帧中继环境下 OSPFv3 的配置方法
3. 掌握 OSPFv3 NSSA 的配置方法
4. 学会查看 OSPFv3 数据库
5. 掌握外部路由汇总的配置
6. 掌握区域间路由的汇总配置
7. 掌握虚链路的配置
8. 掌握往 OSPFv3 区域注入一条缺省路由的方法
9. 掌握修改 OSPFv3 网络类型的方法
ip地址规划
我的学号是201610110045,所以地址是45。
|
路由器 |
接口 |
Ipv6地址 |
Ipv4地址 |
|
R2 |
S0/0 |
2001:DB8:45:1::2/64 |
10.45.1.2/24 |
|
R3 |
S0/0 |
2001:DB8:45:1::1/64 |
10.45.1.1/24 |
|
R4 |
S0/0 |
2001:DB8:45:1::3/64 |
10.45.1.3/24 |
|
F0/0 |
2001:DB8:45:2::1/64 |
10.45.2.1/24 |
|
|
R6 |
F0/0 |
2001:DB8:45:2::2/64 |
10.45.2.2/24 |
|
F0/1 |
2001:DB8:45:3::1/64 |
10.45.3.1/24 |
|
|
R7 |
F0/0 |
2001:DB8:45:2::3/64 |
10.45.2.3/24 |
|
F0/1 |
2001:DB8:45:4::1/64 |
10.45.4.1/24 |
|
|
R8 |
F0/0 |
2001:DB8:45:3::2/64 |
10.45.3.2/24 |
|
F0/1 |
2001:DB8:45:4::2/64 |
10.45.4.2/24 |
|
|
F1/0 |
2001:DB8:45:5::2/64 |
10.45.5.2/24 |
|
|
R9 |
F0/0 |
2001:DB8:45:5::1/64 |
10.45.5.1/24 |
拓扑图
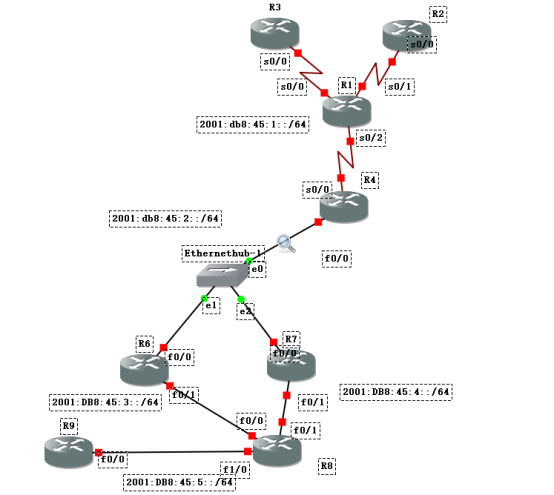
OSPFv3实验文档
在R1,R2,R3,R4,上配置帧中继,R1作为帧中继交换机
R1:
R1(config)#frame-relay switching //将路由器配置成帧中继交换机模式
R1(config)#int s0/0
R1(config-if)#encapsulation frame-relay //接口模式变为帧帧中继
R1(config-if)#frame-relay intf-type dce //设置帧中继的终端类型为dce
R1(config-if)#clock rate 64000 //配置时钟频率64000
R1(config-if)#frame-relay route 102 interface serial 0/1 201 //配置帧中继路由策略
R1(config-if)#frame-relay route 103 interface serial 0/2 301
R1(config-if)#no shutdown
R1(config)#int s0/1
R1(config-if)#encapsulation frame-relay
R1(config-if)#frame-relay intf-type dce
R1(config-if)#clock rate 64000
R1(config-if)#frame-relay route 201 interface serial 0/0 102
R1(config-if)#frame-relay route 104 interface serial 0/2 401
R1(config-if)#no shutdown
R1(config)#int s0/2
R1(config-if)#encapsulation frame-relay
R1(config-if)#frame-relay intf-type dce
R1(config-if)#clock rate 64000
R1(config-if)#frame-relay route 301 interface serial 0/0 103
R1(config-if)#frame-relay route 401 interface serial 0/1 104
R1(config-if)#no shutdown
R3:
R3(config)#ipv6 unicast-routing
R3(config)#ipv6 router ospf 1
R3(config-rtr)#router-id 1.1.1.5
R3(config-rtr)#int s0/0
R3(config-if)#ipv6 ospf 1 area 2
R3(config)#int serial 0/0
R3(config-if)#ipv6 enable
R3(config-if)#ipv6 address 2001:db8:45:1::1 64
R3(config-if)#encapsulation frame-relay
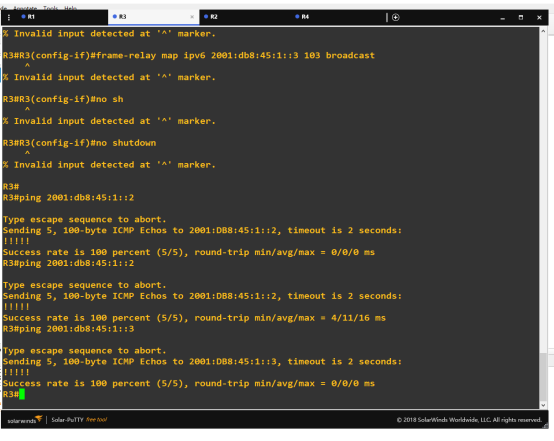
R3(config-if)#frame-relay map ipv6 2001:db8:45:1::2 102 broadcast //配置帧中继ip地址路由策略
R3(config-if)#frame-relay map ipv6 2001:db8:45:1::3 103 broadcast
R3(config-if)#frame-relay map ipv6 FE80::C602:9FF:FE68:0 102 broadcast //这里是用于ospf的hallo报文交换的ipv6地址
R3(config-if)#frame-relay map ipv6 FE80::C604:9FF:FE86:0 103 broadcast
R3(config-if)#no shutdown
R2:
R2(config)#ipv6 unicast-routing
R2(config)#ipv6 router ospf 1
R2(config-rtr)#router-id 1.1.1.6
R2(config-rtr)#int s0/0
R2(config-if)#ipv6 ospf 1 area 2
R2(config)#int serial 0/0
R2(config-if)#ipv6 enable
R2(config-if)#ipv6 address 2001:db8:45:1::2 64
R2(config-if)#encapsulation frame-relay
R2(config-if)#frame-relay map ipv6 2001:db8:45:1::1 201 broadcast
R2(config-if)#frame-relay map ipv6 2001:db8:45:1::3 104 broadcast
R2(config-if)#frame-relay map ipv6 FE80::C603:9FF:FE77:0 201 broadcast
R2(config-if)#frame-relay map ipv6 FE80::C604:9FF:FE86:0 104 broadcast
R2(config-if)#no shutdown
R4:
R2(config)#ipv6 unicast-routing
R2(config)#ipv6 router ospf 1
R2(config-rtr)#router-id 1.1.1.1
R4(config)#int serial 0/0
R4(config-if)#ipv6 ospf 1 area 2
R2(config)#int serial 0/0
R2(config-if)#ipv6 enable
R2(config-if)#ipv6 address 2001:db8:45:4::3 64
R2(config-if)#encapsulation frame-relay
R2(config-if)#frame-relay map ipv6 2001:db8:45:1::1 301 broadcast
R2(config-if)#frame-relay map ipv6 2001:db8:45:1::2 401 broadcast
R4(config-if)#frame-relay map ipv6 FE80::C603:9FF:FE77:0 301 broadcast
R4(config-if)#frame-relay map ipv6 FE80::C602:9FF:FE68:0 401 broadcast
R4(config-if)#ipv6 ospf neighbor FE80::C603:9FF:FE77:0 priority 0
R4(config-if)#ipv6 ospf neighbor FE80::C602:9FF:FE68:0 priority 0
R2(config-if)#no shutdown
到此帧中继网络部分配置完成,R3pingR2,R4测试结果如下:
配置R4,R6,R7的ospfv3,为area0。
R4:
R4(config)#int fastEthernet 0/0
R4(config-if)#ipv6 enable
R4(config-if)#ipv6 address 2001:db8:45:2::1/64
R4(config-if)#ipv6 ospf 1 area 0
R4(config-if)#no shutdown
R6:
R6(config)#ipv6 unicast-routing
R6(config)#ipv6 router ospf 1
R6(config-rtr)#router-id 1.1.1.2
R6(config-rtr)#exit
R6(config)#int fastEthernet 0/0
R6(config-if)#ipv6 enable
R6(config-if)#ipv6 address 2001:db8:45:2::2/64
R6(config-if)#ipv6 ospf 1 area 0
R6(config-if)#no shutdown
R7:
R7(config)#ipv6 unicast-routing
R7(config)#ipv6 router ospf 1
R7(config-rtr)#router-id 1.1.1.3
R7(config-rtr)#exit
R7(config)#int fastEthernet 0/0
R7(config-if)#ipv6 enable
R7(config-if)#ipv6 address 2001:db8:45:2::3/64
R7(config-if)#ipv6 ospf 1 area 0
R7(config-if)#no shutdown
然后查看R7在area0的ospf的邻居关系
R7#show ipv6 ospf neighbor

配置R6 F0/1,R7 F0/1,R8 F0/0 F0/1ospf area1为nssa 区域
R6:
R6(config)#ipv6 router ospf 1
R6(config-rtr)#area 1 nssa
R6(config-rtr)#int f0/1
R6(config-if)#ipv6 enable
R6(config-if)#ipv6 address 2001:Db8:45:3::1/64
R6(config-if)#ipv6 ospf 1 area 1
R6(config-if)#no shutdown
R7:
R7(config)#ipv6 router ospf 1
R7(config-rtr)#area 1 nssa
R7(config-rtr)#int f0/1
R7(config-if)#ipv6 enable
R7(config-if)#ipv6 address 2001:Db8:45:4::1/64
R7(config-if)#ipv6 ospf 1 area 1
R7(config-if)#no shutdown
R8:
R8(config)#ipv6 unicast-routing
R8(config)#ipv6 router ospf 1
R8(config-rtr)#router-id 1.1.1.4
R8(config-rtr)#area 1 nssa
R8(config-rtr)#int f0/0
R8(config-if)#ipv6 enable
R8(config-if)#ipv6 address 2001:db8:45:3::2/64
R8(config-if)#ipv6 ospf 1 area 1
R8(config-if)#no shutdown
R8(config-rtr)#int f0/1
R8(config-if)#ipv6 enable
R8(config-if)#ipv6 address 2001:db8:45:4::2/64
R8(config-if)#ipv6 ospf 1 area 1
R8(config-if)#no shutdown
查看R8 ospfv3路由表
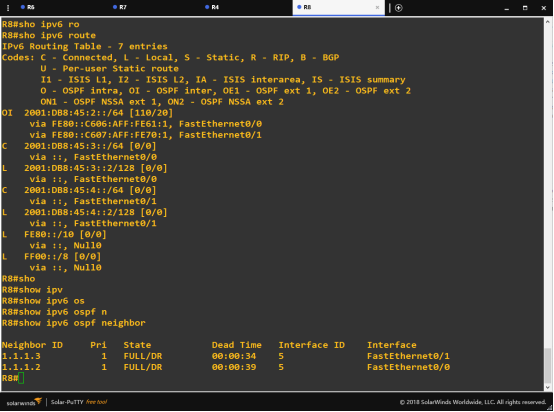
到此ipv6 ospfv3部分配置完成,测试R2 ping R8成功

配置R9到R8 RIPng部分并且重分布到ospfv3
R9:
R9(config)#ipv6 unicast-routing
R9(config)#ipv6 router rip 1
R9(config)#int fastEthernet 0/0
R9(config-if)#ipv6 enable
R9(config-if)#ipv6 address 2001:Db8:45:5::1/64
R9(config-if)#ipv6 rip 1 enable
R9(config-if)#no shutdown
R8:
R9(config)#ipv6 router rip 1
R9(config)#int fastEthernet 1/0
R9(config-if)#ipv6 enable
R9(config-if)#ipv6 address 2001:Db8:45:5::2/64
R9(config-if)#ipv6 rip 1 enable
R9(config-if)#no shutdown
R8(config-if)#exit
R8(config)#ipv6 router ospf 1
R8(config-rtr)#redistribute rip 1
R8(config-rtr)#redistribute connected //配置rip重分布到ospf中
R8(config-rtr)#exit
R8(config)#ipv6 router rip 1
R8(config-rtr)#redistribute ospf 1 //配置ospf重分布到rip中
R8(config-rtr)#redistribute connected
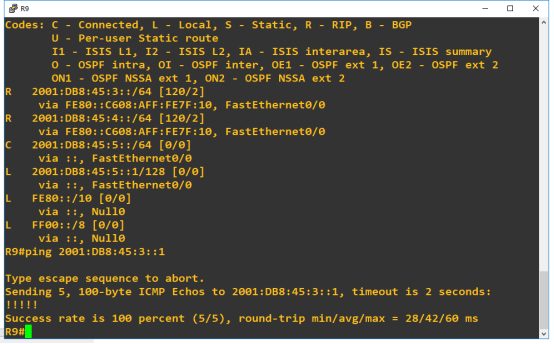
这时查看R9的路由表,发现ospfv3的网段也在表中。测试R9ping area1区域内的IP地址成功。但是无法获取除了area1以外区域的路由表。
OSPF实验文档
配置R2,R3,R4的ipv4帧中继。
R3:
R3(config)#router ospf 1
R3(config-router)#router-id 2.2.2.2
R3(config-router)#network 10.45.1.0 0.0.0.255 area 2
R3(config)#int s0/0
R3(config-if)#ip address 10.45.1.1 255.255.255.0
R3(config-if)#frame-relay map ip 10.45.1.2 102
R3(config-if)#frame-relay map ip 10.45.1.3 103
R2:
R2(config)#int s0/0
R2(config-if)#ip address 10.45.1.2 255.255.255.0
R2(config-if)#frame-relay map ip 10.45.1.1 201
R2(config-if)#frame-relay map ip 10.45.1.3 104
R2(config)#router ospf 1
R2(config-router)#router-id 2.2.2.3
R2(config-router)#network 10.45.1.0 0.0.0.255 area 2
R4:
R4(config)#router ospf 1
R4(config-router)#router-id 2.2.2.1
R4(config-router)#network 10.45.2.0 0.0.0.255 area 0
R4(config-router)#int f0/0
R4(config-if)#ip address 10.45.2.1 255.255.255.0
R4(config-if)exi
R4(config)#router ospf 1
R4(config-router)#network 10.45.1.0 0.0.0.255 area 2
R4(config-router)#neighbor 10.45.1.1 priority 0
R4(config-router)#neighbor 10.45.1.2 priority 0
R4(config)#int s0/0
R4(config-if)#ip address 10.45.1.3 255.255.255.0
R4(config-if)#frame-relay map ip 10.45.1.1 301
R4(config-if)#frame-relay map ip 10.45.1.2 401
查看R4的ospf邻居成功

配置R4,R6,R7的area0
R4:
R4(config)#int f0/0
R4(config-if)#ip address 10.45.2.1 255.255.255.
R6:
R6(config)#router ospf 1
R6(config-router)#router-id 2.2.2.4
R6(config-router)#network 10.45.2.0 0.0.0.255 area 0
R6(config-router)#network 10.45.3.0 0.0.0.255 area 1
R6(config-router)#area 1 nssa
R6(config)#int fastEthernet 0/0
R6(config-if)#ip address 10.45.2.2 255.255.255.0
R6(config-router)#int f0/1
R6(config-if)#ip address 10.45.3.1 255.255.255.0
R7:
R7(config)#router ospf 1
R7(config-router)#router-id 2.2.2.5
R7(config-router)#network 10.45.2.0 0.0.0.255 area 0
R7(config-router)#network 10.45.4.0 0.0.0.255 area 1
R7(config-router)#area 1 nssa
R7(config-router)#int f0/0
R7(config-if)#ip address 10.45.2.3 255.255.255.0
R7(config-if)#int f0/1
R7(config-if)#ip address 10.45.4.1 255.255.255.0
R8:
R8(config)#router ospf 1
R8(config-router)#router-id 2.2.2.6
R8(config-router)#network 10.45.3.0 0.0.0.255 area 1
R8(config-router)#network 10.45.4.0 0.0.0.255 area 1
R8(config-router)#area 1 nssa
R8(config-router)#int f0/0
R8(config-if)#ip address 10.45.3.2 255.255.255.0
R8(config-if)#int f0/1
R8(config-if)#ip address 10.45.4.2 255.255.255.0
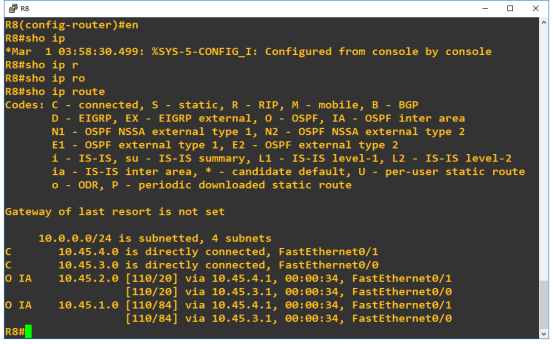
查看路由表R8
配置R9和R8之间的rip并将rip引入ospf
R9:
R9(config)#int f0/0
R9(config-if)#ip address 10.45.5.1 255.255.255.0
R9(config-if)#exit
R9(config)#router rip
R9(config-router)#network 10.45.5.0
R8:
R8(config)#ROuteR rip
R8(config-router)#network 10.45.5.0
R8(config-router)#int f1/0
R8(config-if)#ip address 10.45.5.2 255.255.255.0
R8(config-if)#exi
R8(config)#router rip
R8(config-router)#redistribute ospf 1
R8(config-router)#redistribute connected
R8(config-router)#exi
R8(config)#router ospf 1
R8(config-router)#redistribute rip subnets
R8(config-router)#redistribute connected
这时查看R9路由表

重分布成功。
总结
这次作业是基于ospf和ospfv3进行的,总体来说已经学过并不是特别困难。新的知识点主要是在于rip和ospf的重分布以及帧中继这两个部分,通过查阅文档和百度先按照别人的指令打一遍,然后研究每条指令的意思,都很好理解。通过这次作业让我进一步加深了对ospf以及ospfv3的理解,以及对新的知识点有了进一步的了解。
|
OSPF、OSPFv3协议评分标准 |
||||||
|
评分标准及要求: |
||||||
|
序号 |
基本要求 |
具体要求 |
分值 |
自评得分 |
小组评分 |
作业评分 |
|
1 |
1、地址合规性检查,每位同学只能使用自己的IP地址;如不符合要求,此次作业为0分; |
合规 |
0 |
|||
|
不合规 |
-100 |
|||||
|
命名正确 |
5 |
5 |
5 |
|||
|
抄袭 |
-100 |
|||||
|
2 |
1、需要列出网络地址规划表; |
列出地址规划表 |
5 |
5 |
5 |
|
|
配置步骤可重演,不许截图 |
5 |
5 |
5 |
|||
|
连通性测试,有图有描述 |
5 |
5 |
5 |
|||
|
3 |
帧中继环境下的配置 |
OSPF |
5 |
5 |
5 |
|
|
OSPFv3 |
5 |
5 |
5 |
|||
|
4 |
NSSA的配置 |
OSPF |
5 |
5 |
5 |
|
|
OSPFv3 |
5 |
5 |
5 |
|||
|
5 |
路由汇总 |
OSPF |
5 |
3 |
3 |
|
|
OSPFv3 |
5 |
3 |
3 |
|||
|
6 |
路由注入 |
OSPF |
10 |
10 |
10 |
|
|
OSPFv3 |
10 |
10 |
10 |
|||
|
7 |
总结,写对知识点的总结,遇到的问题,解决的方法等。 |
不少于50字 |
10 |
10 |
10 |
|
|
8 |
排版(字体:宋体;字号:5号;首行缩进;行距:固定值,20磅) |
字体、字号正确 |
5 |
5 |
5 |
|
|
首行缩进,行距正确 |
5 |
5 |
5 |
|||
|
9 |
在完成提交自己的作业后,先进行自评,然后看其他同学的作品并给出评价。 |
有自评 |
5 |
5 |
5 |
|
|
有小组互评 |
5 |
5 |
5 |
|||
|
10 |
总评成绩 |
96 |
96 |
|||
第13组_16通信3班_045_OSPFv3作业的更多相关文章
- IPv4组播通信原理
2011-05-08 21:21:14 标签:组播 vin_do,vin_do学习笔记,笔记 休闲 职场 摘自网络,感谢原作者 摘要: 本文试图成为学习TCP/IP网络组播技术的入门材料.文中介绍了组 ...
- 【MPI学习7】MPI并行程序设计模式:MPI的进程组和通信域
基于都志辉老师MPI编程书中的第15章内容. 通信域是MPI的重要概念:MPI的通信在通信域的控制和维护下进行 → 所有MPI通信任务都直接或间接用到通信域这一参数 → 对通信域的重组和划分可以方便实 ...
- 【GDKOI2014】JZOJ2020年8月13日提高组T3 壕壕的寒假作业
[GDKOI2014]JZOJ2020年8月13日提高组T3 壕壕的寒假作业 题目 Description Input Output 输出n行.第i行输出两个整数,分别表示第i份作业最早完成的时刻以及 ...
- 广州商学院16级软工一班&二班-第一次作业成绩
广州商学院16级软工一班&二班-第一次作业成绩 作业地址 16软工一班 16软工二班 总结 本次作业反映了几个比较严重的问题: 不按要求阅读相应的文章,回答问题只是敷衍几句. 部分同学的版式混 ...
- 福州大学2020年春软工实践W班第一次作业
作业描述 这个作业属于哪个课程 福州大学2020年春软工实践W班 这个作业要求在哪里 寒假作业(1/2) 这个作业的目标 建立博客.回顾,我的初心.当下和未来.学习路线 作业正文 福州大学2020年春 ...
- 第九组 通信3班 063 OSPFv2与OSPFv3综合实验
实验目的 1. 掌握 OSPFv3(v2) 的配置方法 2. 掌握在帧中继环境下 OSPFv3 (v2)的配置方法 3. 掌握 OSPFv3(v2) NSSA 的配置方法 4. 掌握外部路由汇总的配置 ...
- 第三组 通信一班 030 OSPFv2、OSPFv3综合实验
一. 实验目的 掌握 OSPFv2. OSPFv3 的配置方法 掌握在帧中继环境下OSPFv2. OSPFv3 的配置方法 掌握 OSPFv2. OSPFv3 NSSA 的配置方法 ...
- 第三组 通信一班 030 IPv6 RIPng (PT)
实验拓扑 地址规划 设备 接口 IPV6 地址/掩码 PC0 / 2001:DB8:30:2:201:42FF:FE8A:7688/64 PC1 / 2001:DB8:30:1:230:A3FF:F ...
- 第九组 通信3班 063 自反ACL
一.拓扑图 R4为外网,R2和R3为内网. 二.地址表 Device Interface IP address R1 F 0/0 10.1.63.1 F 0/1 14.1.63.1 R2 F 0/0 ...
随机推荐
- (转)Java Web(一) Servlet详解!!
https://www.cnblogs.com/whgk/p/6399262.html 这篇文章到上一篇,距离的有点遥远呀,隔了大概有两个月把,中间在家过了个年,哈哈~ 现在重新开始拾起,最近在看一本 ...
- GPS坐标系
本次测试之坑,人车定位偏差,分析如下 车的定位由后台提供,由gps上报位置,采用WGS-84坐标系 前端(app/小程序)使用腾讯地图,或者高德地图,采用的是GCJ-02坐标系,或者在GCJ-02基础 ...
- ABP 依赖注入
1.ABP自动注入 //IapplicationService注入方式暴露接 //ITransientDependency 不会暴露接口 ITransientDependency和ISingleton ...
- PLSQL账号密码
Product Code:4t46t6vydkvsxekkvf3fjnpzy5wbuhphqzserial Number:601769 password:xs374ca
- O365 Manager Plus帮助台委派功能一览表
O365 Manager Plus帮助台委派介绍 虽然Office 365允许您在全球任何地方工作,但它提供的管理功能十分不足.当一个组织分布在多个国家/地区时,一个管理员很难单独管理所有用户和邮箱. ...
- vim编辑器中没有高亮显示,退格键不能使用的问题
在~/.vimrc下添加如下内容,立即生效
- Linux---基础命令(二)
https://www.linuxprobe.com/chapter-02.html (Linux就要这么学) 一.基本权限命令 权限命令:chmod - rwx rwx rwx 第一位代表的是系统 ...
- elasticsearch中 refresh 和flush区别(转)
elasticsearch中有两个比较重要的操作:refresh 和 flush refresh操作 当我们向ES发送请求的时候,我们发现es貌似可以在我们发请求的同时进行搜索.而这个实时建索引并可以 ...
- Windows 注册表 16进制时间转换( Convert Reg_binary Time to a Datetime )
背景: Windows注册表中,存在大量16进制的时间,以 reg_binary存储在注册表中. 例如: 0D 6C A4 4B 37 C5 CE 01 这种值日常报表中需要转换为适合人阅读的格式,实 ...
- Python开发——11.异常及异常处理
一.异常 1.定义 异常及时程序运行时发生错误的信号 2.种类 异常分为语法错误和逻辑错误,语法错误在程序执行之前就应该改正. 常用异常 AttributeError 试图访问一个对象没有的树形,比如 ...