
Android笔记之自定义对话框
效果如下图
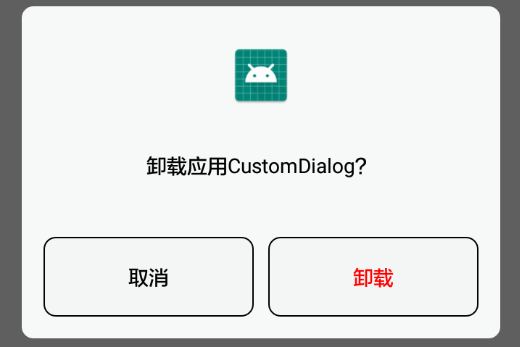
对话框布局
dialog_uninstallation_confirmation.xml
<?xml version="1.0" encoding="utf-8"?>

<LinearLayout xmlns:android="http://schemas.android.com/apk/res/android"

    xmlns:tools="http://schemas.android.com/tools"

    android:layout_width="match_parent"

    android:layout_height="match_parent"

    android:layout_marginLeft="15dp"

    android:layout_marginRight="15dp"

    android:background="@drawable/uninstallation_dialog_background"

    android:orientation="vertical">

    <ImageView

        android:id="@+id/iconImageView"

        android:layout_width="match_parent"

        android:layout_height="45dp"

        android:layout_gravity="center"

        android:layout_marginTop="25dp"

        android:layout_marginBottom="30dp"

        tools:src="@mipmap/ic_launcher" />

    <TextView

        android:id="@+id/messageTextView"

        android:layout_width="match_parent"

        android:layout_height="wrap_content"

        android:gravity="center"

        android:textColor="@android:color/black"

        tools:text="是否卸载CustomDialog" />

    <LinearLayout

        android:layout_width="match_parent"

        android:layout_height="wrap_content"

        android:layout_marginTop="40dp"

        android:layout_marginBottom="15dp">

        <TextView

            android:id="@+id/cancelTextView"

            android:layout_width="match_parent"

            android:layout_height="wrap_content"

            android:layout_marginLeft="15dp"

            android:layout_marginRight="5dp"

            android:layout_weight="1"

            android:background="@drawable/uninstallation_dialog_button_background"

            android:gravity="center"

            android:padding="18dp"

            android:text="取消"

            android:textColor="@android:color/black" />

        <TextView

            android:id="@+id/uninstallTextView"

            android:layout_width="match_parent"

            android:layout_height="wrap_content"

            android:layout_marginLeft="5dp"

            android:layout_marginRight="15dp"

            android:layout_weight="1"

            android:background="@drawable/uninstallation_dialog_button_background"

            android:gravity="center"

            android:padding="18dp"

            android:text="卸载"

            android:textColor="#FF0000" />

    </LinearLayout>

</LinearLayout>
自定义的对话框类
UninstallationConfirmationDialog.java
package com.bu_ish.custom_dialog_example;

import android.app.Dialog;

import android.content.Context;

import android.os.Bundle;

import android.view.View;

import android.view.Window;

import android.view.WindowManager;

import android.widget.ImageView;

import android.widget.TextView;

public abstract class UninstallationConfirmationDialog extends Dialog {

    private ImageView iconImageView;

    private TextView messageTextView;

    private int iconResId;

    private String message;

    public abstract void onCancelClicked();

    public abstract void onUninstallClicked();

    public UninstallationConfirmationDialog(Context context) {

        super(context, R.style.UninstallationConfirmationDialog);

    }

    public UninstallationConfirmationDialog setIcon(int resId) {

        this.iconResId = resId;

        return this;

    }

    public UninstallationConfirmationDialog setMessage(String message) {

        this.message = message;

        return this;

    }

    @Override

    public void show() {

        super.show();

        Window window = getWindow();

        WindowManager.LayoutParams layoutParams = window.getAttributes();

        layoutParams.width = WindowManager.LayoutParams.MATCH_PARENT;

        window.setAttributes(layoutParams);

    }

    @Override

    protected void onCreate(Bundle savedInstanceState) {

        super.onCreate(savedInstanceState);

        setContentView(R.layout.dialog_uninstallation_confirmation);

        iconImageView = findViewById(R.id.iconImageView);

        messageTextView = findViewById(R.id.messageTextView);

        iconImageView.setImageResource(iconResId);

        messageTextView.setText(message);

        findViewById(R.id.cancelTextView).setOnClickListener(new View.OnClickListener() {

            @Override

            public void onClick(View v) {

                onCancelClicked();

                dismiss();

            }

        });

        findViewById(R.id.uninstallTextView).setOnClickListener(new View.OnClickListener() {

            @Override

            public void onClick(View v) {

                onUninstallClicked();

                dismiss();

            }

        });

    }

}
对话框style
    <style name="UninstallationConfirmationDialog" parent="@android:style/Theme.Dialog">

        <item name="android:windowNoTitle">true</item>

        <item name="android:windowBackground">@android:color/transparent</item>

    </style>
P.S.
对话框默认风格是带标题的,通过windowNoTitle设置为无标题
为保证对话框宽度与屏幕匹配,须通过Window.setAttributes(WindowManager.LayoutParams)设置宽度
完整Demo链接:https://pan.baidu.com/s/1RItjQZ7v1xMHL7b5C6lLzw,提取码:qbwu
Android笔记之自定义对话框的更多相关文章
- [android] 手机卫士自定义对话框布局
手机防盗页面部分 点击手机防盗,进行判断,如果没有设置密码,显示一个设置密码的对话框,如果已经设置密码了,弹出输入密码对话框 密码保存在SharedPreferences中,数据取出进行判断 自定义一 ...
- Android开发之自定义对话框
由于系统自带的对话框不好看,于是本人就自定义了一个对话框,以后有类似的就可以直接使用啦.先上效果图: 1,布局文件dialog_clear_normal.xml <?xml version=&q ...
- android笔记:DatePickerDialog日期设置对话框
在开发中,可以通过DatePickerDialog来设置日期,TimePickerDialog来设置时间. 实例化DatePickerDialog对象之后,再调用show方法就可以显示对话框了. 具体 ...
- Android笔记之自定义的RadioGroup、RadioButton,以及View实例状态的保存与恢复
效果图 activity_main.xml <?xml version="1.0" encoding="utf-8"?> <LinearLay ...
- Android笔记之自定义PopupWindow
效果图 popup_window_addition.xml <?xml version="1.0" encoding="utf-8"?> <L ...
- Android开发学习笔记-自定义对话框
系统默认的对话框只能显示简单的标题内容以及按钮,而如果想要多现实其他内容则就需要自定义对话框,下面是自定义对话框的方法. 1.先定义对话框的模版 <?xml version="1.0& ...
- Android笔记之为自定义对话框添加移动动画效果
给底部的对话框添加移动动画效果 可通过Window.setWindowAnimations(int resId)设置 SharingDialog.java package com.bu_ish.sha ...
- Android—关于自定义对话框的工具类
开发中有很多地方会用到自定义对话框,为了避免不必要的城府代码,在此总结出一个工具类. 弹出对话框的地方很多,但是都大同小异,不同无非就是提示内容或者图片不同,下面这个类是将提示内容和图片放到了自定义函 ...
- Android中的AlertDialog使用示例五(自定义对话框)
在Android开发中,我们经常会需要在Android界面上弹出一些对话框,比如询问用户或者让用户选择.这些功能我们叫它Android Dialog对话框,AlertDialog实现方法为建造者模式. ...
随机推荐
- LeetCode OJ--Permutation Sequence *
求第k个排列. 刚开始按照一个排列一个排列的求,超时. 于是演算了一下,发下有数学规律,其实就是康托解码. 康托展开:全排列到一个自然数的双射 X=an*(n-1)!+an-1*(n-2)!+...+ ...
- LeetCode OJ——Validate Binary Search Tree
http://oj.leetcode.com/problems/validate-binary-search-tree/ 判断一棵树是否为二叉搜索树.key 是,在左子树往下搜索的时候,要判断是不是子 ...
- ListView+EditText使用遇到的坑
最近项目中某功能需要ListView嵌套EditText来实现,使用过程中遇到一些问题: 1.点击弹出编辑框,edittext会失去焦点. 解决焦点丢失的问题 解决思路:软键盘弹出的时候会重新绘制界面 ...
- Sping、SpringMVC、SpringBoot的对比
原文链接:https://dzone.com/articles/spring-boot-vs-spring-mvc-vs-spring-how-do-they-compare 作者: Ranga Ka ...
- Nginx图片防盗链的方式
原文:http://www.open-open.com/code/view/1430750263460 location ~* \.(gif|jpg|jpeg|png|ico)$ { valid_re ...
- Java反射之Field用法
在Java反射中Field用于获取某个类的属性或该属性的属性值 一:如何通过Field反射获取类的属性 Field提供如下几种方法: :1:Class.getDeclaredField(String ...
- python中 urllib, urllib2, httplib, httplib2 几个库的区别
转载 摘要: 只用 python3, 只用 urllib 若只使用python3.X, 下面可以不看了, 记住有个urllib的库就行了 python2.X 有这些库名可用: urllib, urll ...
- 【转】Ubuntu下出现Mysql error(2002)的解决方法
过了一阵子后,为了写分布式作业,重新使用Mysql时,发现虽然启动成功了,但是连接的时候去出现如下错误ERROR 2002 (HY000): Can't connect to local MySQL ...
- Frotinet60D IP映射 開放指定端口是實際應用
有多個外網IP的環境中,在某一部電腦上,如何使用多個外網IP中的某一個?且為使用的Bitcomet開放TCP,TUP特定端口? 1.在本機windows防火墻中"輸入" 和&quo ...
- NYOJ 353 3D dungeon 【bfs】
题意:给你一个高L长R宽C的图形.每个坐标都能够视为一个方格.你一次能够向上.下.左,右,前,后任一方向移动一个方格, 可是不能向有#标记的方格移动. 问:从S出发能不能到达E,假设能请输出最少的移动 ...