react-native学习(一)————使用react-native-tab-navigator创建底部导航
使用react-native-tab-navigator创建底部Tab导航
1.使用npm安装react-native-tab-navigator
npm install react-native-tab-navigator --save
2.页面引入
import TabNavigator from 'react-native-tab-navigator
3.完整代码
import React, {Component} from 'react';

import { StyleSheet,  View, Image} from 'react-native';

import TabNavigator from 'react-native-tab-navigator'

type Props = {};

export default class App extends Component<Props> {

    constructor(props){

        super(props);

        this.state = {

          selectedTab: 'tb_popular',      // 默认选择第一个

        }

    }

  render() {

    return (

        //selected:所选tab项指代名称

        //selectedTitleStyle:设置选中颜色

        //title: tab项展示名称

        //renderIcon:默认icon

        //renderSelectedIcon :选中icon

        //badgeText:徽标数

        <TabNavigator>

          <TabNavigator.Item

            selected = {this.state.selectedTab == 'tb_popular'}

            selectedTitleStyle = {{ color: 'red'}}

            title = '最热'

            renderIcon = { () => <Image style={styles.image} source={require('./res/images/ic_polular.png')} /> }

            renderSelectedIcon = { () => <Image style={[styles.image,{tintColor:'red'}]} source = {require('./res/images/ic_polular.png')} />}

            badgeText = '1'

            onPress = {() => this.setState({ selectedTab: 'tb_popular'})}>

              <View style = {styles.page}></View>

          </TabNavigator.Item>

          <TabNavigator.Item

            selected = { this.state.selectedTab == 'tb_trending'}

            selectedTitleStyle = {{ color: 'red'}}

            title = "趋势"

            renderIcon = { () => <Image style={styles.image} source={ require('./res/images/ic_trending.png')}/>}

            renderSelectedIcon = { () => <Image style={[styles.image,{tintColor:'red'}]} source = {require('./res/images/ic_trending.png')} />}

            onPress = { () => this.setState({ selectedTab: 'tb_trending'})}>

              <View style = {styles.page1}></View>

          </TabNavigator.Item>

            <TabNavigator.Item

                selected = {this.state.selectedTab == 'tb_favorite'}

                selectedTitleStyle = {{ color: 'red'}}

                title = '收藏'

                renderIcon = { () => <Image style={styles.image} source={require('./res/images/ic_polular.png')} /> }

                renderSelectedIcon = { () => <Image style={[styles.image,{tintColor:'red'}]} source = {require('./res/images/ic_polular.png')} />}

                badgeText = '1'

                onPress = {() => this.setState({ selectedTab: 'tb_favorite'})}>

                <View style = {styles.page}></View>

            </TabNavigator.Item>

            <TabNavigator.Item

                selected = { this.state.selectedTab == 'tb_my'}

                selectedTitleStyle = {{ color: 'red'}}

                title = "我的"

                renderIcon = { () => <Image style={styles.image} source={ require('./res/images/ic_trending.png')}/>}

                renderSelectedIcon = { () => <Image style={[styles.image,{tintColor:'red'}]} source = {require('./res/images/ic_trending.png')} />}

                onPress = { () => this.setState({ selectedTab: 'tb_my'})}>

                <View style = {styles.page1}></View>

            </TabNavigator.Item>

        </TabNavigator>

    );

  }

}

const styles = StyleSheet.create({

    page:{

      flex:1,

      backgroundColor:'red',

    },

    page1:{

      flex:1,

      backgroundColor:'yellow'

    },

    image:{

      height:22,

      width:22

    }

});
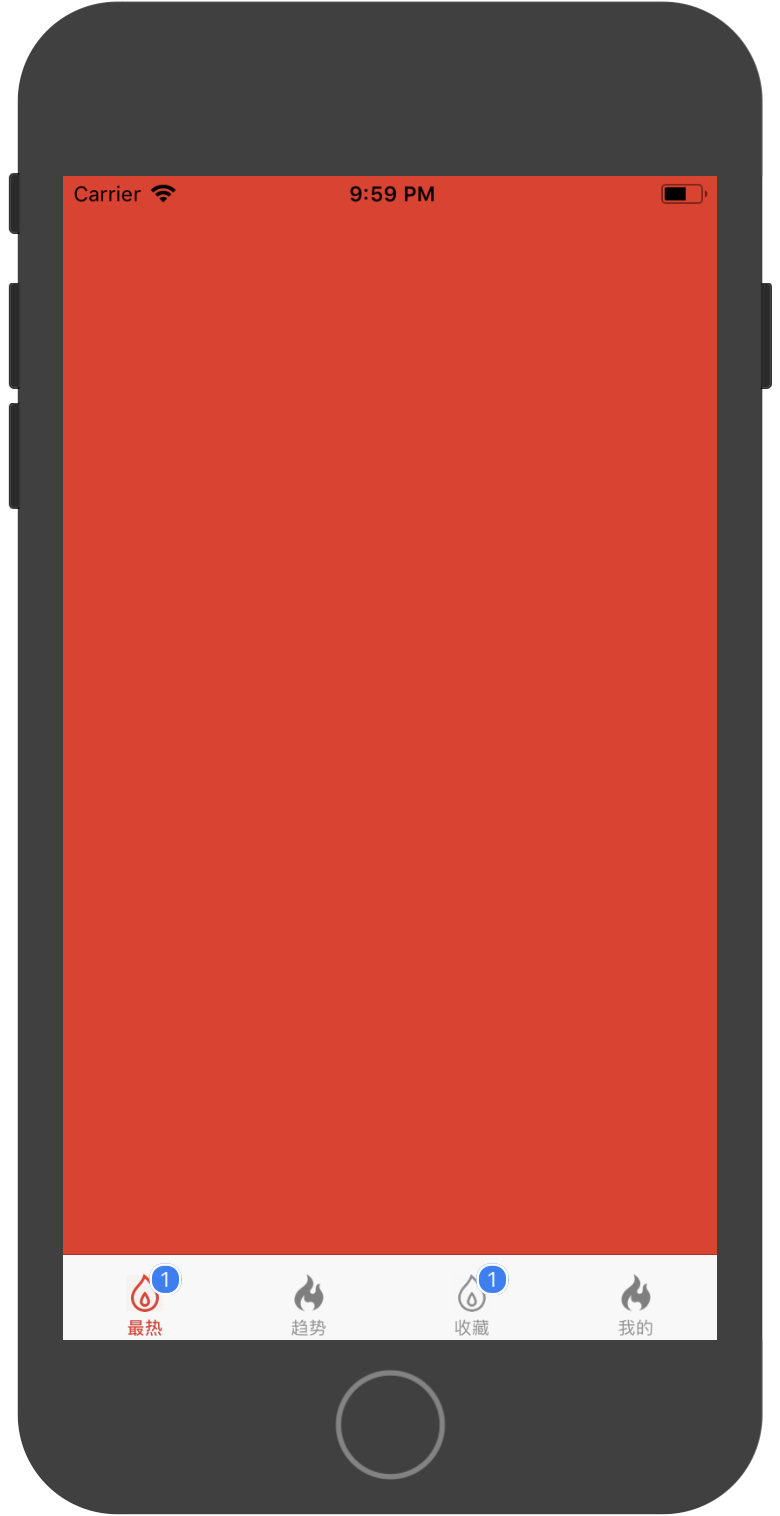
4.执行结果
react-native学习(一)————使用react-native-tab-navigator创建底部导航的更多相关文章
- (转)2019年 React 新手学习指南 – 从 React 学习线路图说开去
原文:https://www.html.cn/archives/10111 注:本文根据 React 开发者学习线路图(2018) 结构编写了很多新手如何学习 React 的建议.2019 年有标题党 ...
- React+Redux学习笔记:React+Redux简易开发步骤
前言 React+Redux 分为两部分: UI组件:即React组件,也叫用户自定义UI组件,用于渲染DOM 容器组件:即Redux逻辑,处理数据和业务逻辑,支持所有Redux API,参考之前的文 ...
- android布局学习-使用FrameLayout和LinearLayout制作QQ空间底部导航栏
[声明:本博客通过学习“J灬叶小超 ”博客而写,链接:http://www.cnblogs.com/yc-755909659/p/4288260.html] --------------------- ...
- React Native 学习-01
React Native 学习 (学习版本 0.39) 一.环境配置 二.IDE选择 webstorm 1.webstorm配置 ①.首先是可以选择使用汉化包汉化.eu68 ②.安装插件和外部库. 由 ...
- react native 学习一(环境搭配和常见错误的解决)
react native 学习一(环境搭配) 首页,按照http://reactnative.cn/docs/0.30/getting-started.html#content上的介绍,下载安装pyt ...
- React Native学习(三)—— 使用导航器Navigation跳转页面
本文基于React Native 0.52 参考文档https://reactnavigation.org/docs/navigators/navigation-prop 一.基础 1.三种类型 Ta ...
- React Native 学习资料
React Native 学习资料 学习资料 网址 React Native中文网 https://reactnative.cn/
- React Native 学习(三)之 FlexBox 布局
React Native 学习(三)之 FlexBox 布局
- React Native 学习笔记--进阶(二)--动画
React Native 进阶(二)–动画 动画 流畅.有意义的动画对于移动应用用户体验来说是非常必要的.我们可以联合使用两个互补的系统:用于全局的布局动画LayoutAnimation,和用于创建更 ...
随机推荐
- restful接口风格
一.定义 REST全称是Representational State Transfer, 中文意思是表述性状态转移. REST指的是一组架构约束条件和原则,如果一个架构符合REST的约束条件和原则,我 ...
- JavaScript之ECMAScript
JavaScript脚本语言, 运行在浏览器上,无需编译, 轻量级的语言. 功能:让页面有执行逻辑的功能, 可以产生一些动态的效果 JavaScript = ECMAScript + BOM + DO ...
- 【leetcode】1023. Binary String With Substrings Representing 1 To N
题目如下: Given a binary string S (a string consisting only of '0' and '1's) and a positive integer N, r ...
- 【leetcode】897. Increasing Order Search Tree
题目如下: 解题思路:我的方法是先用递归的方法找出最左边的节点,接下来再对树做一次递归中序遍历,找到最左边节点后将其设为root,其余节点依次插入即可. 代码如下: # Definition for ...
- 获取mysql数据库表字段的备注信息
SELECT COLUMN_NAME as field_name , COLUMN_COMMENT as remark FROM information_schema.COLUMNS WHERE T ...
- 23-25 October in 614
Practice sort 给定一系列形如 \(A<B\) 的不等关系,判断前 \(k\) 个不等关系是否即可确定 \(n\) 个元素之间的大小顺序:如果不可确定,判断前 \(k\) 个不等关系 ...
- Appium移动端自动化:元素定位uiautomatorviewer
一.启动uiautomatorviewer mac: 1.打开终端,进入Android/sdk/tools目录 2.打开uiautomatorviewer(我的路径是Android/sdk/tools ...
- Linux系统ubuntu17安装jdk8并配置环境变量
上班多年,一直没有真正在Linux下开发过,没有捣鼓到Linux服务器,成为憾事.最近由于想学习Python,于是开始看书,学习Linux,学习shell编程. 选择Linux,先从最简单的ubunt ...
- Cocos2d-x之String
| 版权声明:本文为博主原创文章,未经博主允许不得转载. 在Cocos2d-x中能够使用的字符串constchar*.std::string和cocos2d::__String等,其中const ...
- Vue.use
不管是对象还是函数install 是Vue.use()必须要有的方法 否则无法使用(Vue.use(MintUI))但axios 不需要Vue.use(axios) 可以直接使用 因为axios没有i ...