vue-tree 组织架构图/树形图自动生成(含添加、删除、修改)
<template>

    <table v-if="treeData.name">

      <tr>

        <td :colspan="treeData.children ? treeData.children.length * 2 : 1" :class="{parentLevel: treeData.children, extend: treeData.children && treeData.extend}">

          <div :class="{node: true, hasMate: treeData.mate}">

            <div class="person" @click="$emit('click-node', treeData)">

              <div class="avat">

                <img :src="treeData.image_url" />

              </div>

              <div class="name">{{treeData.name}}</div>

            </div>

            <div class="person" v-if="treeData.mate" @click="$emit('click-node', treeData.mate)">

              <div class="avat">

                <img :src="treeData.mate.image_url" />

              </div>

              <div class="name">{{treeData.mate.name}}</div>

            </div>

          </div>

          <div class="extend_handle" v-if="treeData.children" @click="toggleExtend(treeData)"></div>

        </td>

      </tr>

      <tr v-if="treeData.children && treeData.extend">

        <td v-for="(children, index) in treeData.children" :key="index" colspan="2" class="childLevel">

          <TreeChart :json="children" @click-node="$emit('click-node', $event)"/>

        </td>

      </tr>

    </table>

</template>
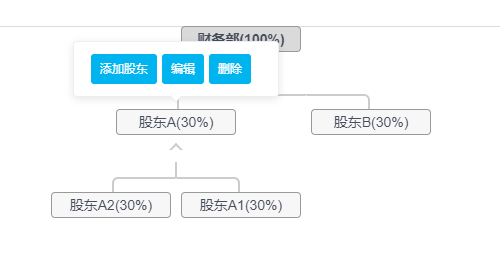
<el-popover

  placement="top"

  width="180"

  trigger="hover">

  <div style="margin: 0">

    <el-button size="mini" type="primary" @click="addStock(0)" >新增</el-button>

    <el-button type="primary" size="mini" @click="addStock(1)">编辑</el-button>

    <el-button type="primary" size="mini" @click="dialogVisible2 = true" >删除</el-button>

  </div>

  <div class="avat" slot="reference">

    {{treeData.name}}

  </div>

</el-popover>
在网上找了好几个插件,感觉这个还是比较好用的
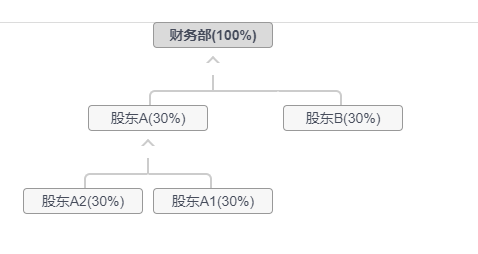
补充: 作者的树形图默认方向是由上向下,还提供了了切换为竖行的方法.但是我自己的项目是需要树形样式,由上之上的效果,如下图: 所以在原作者的代码上修改了下,主要是样式调整,有需要的可以看一下

<template>

    <table v-if="treeData.name">

      <tr v-if="treeData.children">

        <td v-for="(children, index) in treeData.children" :key="index" colspan="2" class="childLevel">

          <TreeChartOrder :json="children" @click-node="$emit('click-node', $event)"/>

        </td>

      </tr>

      <tr>

        <td :colspan="treeData.children ? treeData.children.length * 2 : 1" :class="{parentNode: treeData.children}">

          <div class="node">

            <div class="name">{{treeData.name}}</div>

          </div>

        </td>

      </tr>

    </table>

</template>

<script>

export default {

  name: "TreeChartOrder",

  props: ["json"],

  data() {

    return {

      treeData: {

        name: 'root',

        image_url: "https://static.refined-x.com/avat.jpg",

        children: [

          {

            name: 'children1',

            image_url: "https://static.refined-x.com/avat1.jpg"

          },

          {

            name: 'children2',

            image_url: "https://static.refined-x.com/avat2.jpg",

            mate: {

              name: 'mate',

              image_url: "https://static.refined-x.com/avat3.jpg"

            },

            children: [

              {

                name: 'grandchild',

                image_url: "https://static.refined-x.com/avat.jpg"

              },

              {

                name: 'grandchild2',

                image_url: "https://static.refined-x.com/avat1.jpg"

              },

              {

                name: 'grandchild3',

                image_url: "https://static.refined-x.com/avat2.jpg"

              }

            ]

          },

          {

            name: 'children3',

            image_url: "https://static.refined-x.com/avat.jpg"

          }

        ]

      }

    }

  },

  watch: {

    json: {

      handler: function(Props){

        let extendKey = function(jsonData){

          jsonData.extend = (jsonData.extend===void 0 ? true: !!jsonData.extend);

          if(Array.isArray(jsonData.children)){

            jsonData.children.forEach(c => {

              extendKey(c)

            })

          }

          return jsonData;

        }

        if(Props){

          this.treeData = extendKey(Props);

        }

      },

      immediate: true

    }

  },

  methods: {

    toggleExtend: function(treeData){

      treeData.extend = !treeData.extend;

      this.$forceUpdate();

    }

  }

}

</script>

<style scoped>

table{border-collapse: separate!important;border-spacing: 0!important;}

td{position: relative; vertical-align: bottom;padding:0 0 40px 0;text-align: center; }

.parentNode::after {content: "";position: absolute;left:49.9%;top:-56px;height:30px;border-left:2px solid #ccc;}

.childLevel::before{content: "";position: absolute;left:50%;bottom:57px;height:15px;border-left:2px solid #ccc;transform: translate3d(-1px,0,0)}

.childLevel::after{content: "";position: absolute;left:0;right:0;bottom:55px;border-top:2px solid #ccc;}

.childLevel:first-child:before, .childLevel:last-child:before{display: none;}

.childLevel:first-child:after{left:50%;height:15px; border:2px solid;border-color:transparent transparent #ccc #ccc;border-radius: 6px 0 0 0;transform: translate3d(1px,0,0)}

.childLevel:last-child:after{right:50%;height:15px; border:2px solid;border-color:transparent #ccc #ccc transparent;border-radius: 0 6px 0 0;transform: translate3d(-1px,0,0)}

.childLevel:first-child.childLevel:last-child::after{left:auto;border-radius: 0;border-color:transparent #ccc transparent transparent;transform: translate3d(1px,0,0)}

.node{position: relative; display: inline-block;width: 13em;box-sizing: border-box; text-align: center;}

.node .person{position: relative; display: inline-block;z-index: 2;width:6em; overflow: hidden;}

.node .avat{display: block;width:4em;height: 4em;margin:auto;overflow:hidden; background:#fff;border:1px solid #ccc;box-sizing: border-box;}

.node .avat img{width:100%;height: 100%;}

.node .name{height:2em;line-height: 2em;overflow: hidden;width:95%; background:#eee;border:1px solid #ccc;box-sizing: border-box;border-radius: 5px;}

</style>
git-hup地址: https://github.com/shengbid/my-element 这个文件是平时练习的项目,里面还有一些我写的其他博客的源码,有需要可以下载看看
vue-tree 组织架构图/树形图自动生成(含添加、删除、修改)的更多相关文章
- Android一个炫酷的树状图组织架构图开源控件实现过程
Android一个炫酷的树状图组织架构图开源控件 文章目录 [1 简介] [2 效果展示] [3 使用步骤] [4 实现基本布局流程] [5 实现自由放缩及拖动] [6 实现添加删除及节点动画] [7 ...
- 使用jOrgChart插件实现组织架构图的展示
项目要做组织架构图,要把它做成自上而下的树形结构. 一.说明 (1)通过后台查询数据库,生成树形数组结构,返回到前台. (2)需要引入的js插件和css文件: ①jquery.jOrgChart.cs ...
- js前端使用jOrgChart插件实现组织架构图的展示
项目要做组织架构图,要把它做成自上而下的树形结构. 需要购买阿里云产品的,可以点击此链接购买,有红包优惠哦: https://promotion.aliyun.com/ntms/yunparter/i ...
- 公司人员组织架构图用思维导图软件MindManager怎么做
有朋友一直不太明白组织架构图怎么做,其实组织架构图就是组织结构图.小编今天就在这里以一个公司为例,来给大家演示一番人员组织结构图怎么做. 老规矩,先说一下小编使用的软件跟电脑系统,这里用的是MindM ...
- Vue组织架构图组件
vue-tree-chart :deciduous_tree: Vue2树形图组件 安装 npm i vue-tree-chart --save 使用 in template: <TreeC ...
- python生成组织架构图(网络拓扑图、graph.editor拓扑图编辑器)
Graph.Editor是一款基于HTML5技术的拓补图编辑器,采用jquery插件的形式,是Qunee图形组件的扩展项目,旨在提供可供扩展的拓扑图编辑工具, 拓扑图展示.编辑.导出.保存等功能,此外 ...
- vue 辅助开发工具(利用node自动生成相关文件,自动注册路由)
vue 辅助开发工具 前言 有没有因为新建view,component,store的繁琐操作而苦恼,需要新建文件件,新建vue文件,新建js文件,注册路由...等一系列无价值操作浪费时间,为了解决这个 ...
- (六十五)c#Winform自定义控件-思维导图/组织架构图(工业)
前提 入行已经7,8年了,一直想做一套漂亮点的自定义控件,于是就有了本系列文章. GitHub:https://github.com/kwwwvagaa/NetWinformControl 码云:ht ...
- 设计数据库 ER 图太麻烦?不妨试试这两款工具,自动生成数据库 ER 图!!!
忙,真忙 点赞再看,养成习惯,微信搜索『程序通事』,关注就完事了! 点击查看更多精彩的文章 这两个星期真是巨忙,年前有个项目因为各种莫名原因,一直拖到这个月才开始真正测试.然后上周又接到新需求,马不停 ...
随机推荐
- CodeForces 342B Xenia and Spies (水题模拟,贪心)
题意:给定 n 个间谍,m个区间,一个 s,一个f,然后从 s开始传纸条,然后传到 f,然后在每个 t 时间在区间内的不能传,问你最少的时间传过去. 析:这个题,就模拟一下就好,贪心策略,能传就传,找 ...
- java 基础语言: 方法
方法 格式: 修饰符 返回值类型 方法名(参数类型 参数名1, 参数类型 参数名2, ...) { 方法体; return 返回值; } 方法使用的注意事项: 1,方法不调用,自己不执行 2,方法中不 ...
- linux 命令学习-网络相关配置
网络配置相关 网卡配置文件:etc/sysconfig/network-scripts/ifcfg-eth0 DNS 配置文件 etc/resolv.conf 主机配置文件 etc/sysconfig ...
- Lotus迁移到Exchange 2010 POC 之Domino Server的配置!
1. 在桌面点击安装完成的Domino 服务器配置:
- DELPHI XE5/6/7 android 无线真机调试
一.下载adbWireless 地址:http://sj.zol.com.cn/detail/41/40834.shtml 安装,需要ROOT权限. 运adbWireless.界面很简单,就一个大按钮 ...
- spring boot 整合 HttpClient
第一步:引入HttpClient 的jar包 1.httpClient 5.0 开始支持异步(Async)请求: 2.httpclient 版本过低上传文件会出,原因是 org.apache.http ...
- DotNetBar 中 SuperGridControl 加载数据、获取数据、设置样式
1.加载数据 构建列 //加载列 GridColumn gd = new GridColumn(); gd.Name = "第1"; gd.HeaderText = "第 ...
- BZOJ4710 分特产
题目链接:戳我 容斥题. 设\(f[i]\)表示至多有i个人能够分到(也就是至少n-i个人分不到)的方案数 \(f[i]=\prod_{j=1}^mC_{a[j]+i-1}^i-1\) a[j]表示的 ...
- 爬虫开发14.scrapy框架之分布式操作
分布式爬虫 一.redis简单回顾 1.启动redis: mac/linux: redis-server redis.conf windows: redis-server.exe redis-wi ...
- java 去最后一位字符 str.substring(0,str.length()-1)
String str = " 中国, 美国 , 意大利 ";String[] arr = str.split(",");for(int i1 =0;i1< ...