Prism for WPF 搭建一个简单的模块化开发框架(一)
原文:Prism for WPF 搭建一个简单的模块化开发框架(一)
最近闲来无事又想搞搞WPF。。。。。
做个框架吧,可能又是半途而废。。。。总是坚持不下来
不废话了,
先看一下工程结构
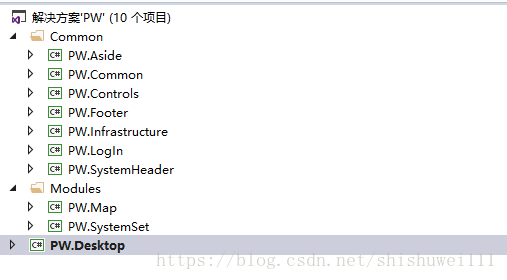
布局大概是这样的
| SystemHeader | |
| Aside | Main |
| Footer | |
PW.SystemHeader是用来放导航条,Log或者系统名称的
PW.Aside是准备放每个模块的树形菜单的,可以根据后续系统的需要做相应的变动和扩展
PW.Login就是一个登陆的模块了
PW.Footer只是一个底部的占位栏,需要的话可以放置一些显示信息
Main初始化时存放了Login的region 此时SystemHeader、Aside、Footer还未加载,所以主界面就算一个登陆页面
在登陆之后LoadModule,对应的区域也就加载上对用的模块了
主窗体布局代码是这样的
<Window x:Class="PW.Desktop.Shell"

        xmlns="http://schemas.microsoft.com/winfx/2006/xaml/presentation"

	xmlns:x="http://schemas.microsoft.com/winfx/2006/xaml"

	xmlns:d="http://schemas.microsoft.com/expression/blend/2008" xmlns:mc="http://schemas.openxmlformats.org/markup-compatibility/2006" mc:Ignorable="d"

    xmlns:local="clr-namespace:PW.Desktop"

        xmlns:prism="http://www.codeplex.com/prism"

	x:Name="Window"

	Title="Desktop"

    WindowStartupLocation="CenterScreen"

	UseLayoutRounding="True"

	Width="1024" Height="768" WindowState="Maximized" Loaded="Window_Loaded" WindowStyle="None" ResizeMode="NoResize">

    <Window.Background>

        <ImageBrush ImageSource="Images/bg/ocean.jpg"/>

    </Window.Background>

    <Grid x:Name="window">

        <Grid.RowDefinitions>

            <RowDefinition Height="Auto"/>

            <RowDefinition Height="*"/>

        </Grid.RowDefinitions>

        <Grid Height="30" Background="{DynamicResource ModuleControl.Panel.BackgroundBrush}" MouseLeftButtonDown="Grid_MouseLeftButtonDown" Cursor="Hand">

            <StackPanel  VerticalAlignment="Center" Orientation="Horizontal" FlowDirection="RightToLeft">

                <Button Width="25" Height="25" Content="X"  x:Name="closeBtn" Click="closeBtn_Click"></Button>

                <Button Width="25" Height="25" Content="口" x:Name="maxBtn" Click="maxBtn_Click"></Button>

                <Button Width="25" Height="25" Content="-" x:Name="minBtn" Click="minBtn_Click"></Button>

            </StackPanel>

        </Grid>

        <Grid x:Name="LayoutRoot" Grid.Row="1">

    	<Grid.RowDefinitions>

            <RowDefinition Height="Auto"/>

            <RowDefinition Height="*"/>

            <RowDefinition Height="Auto"/>

    	</Grid.RowDefinitions>

        <Grid.ColumnDefinitions>

            <ColumnDefinition Width="Auto"/>

            <ColumnDefinition Width="*"/>

        </Grid.ColumnDefinitions>

        <Grid Grid.Row="0" Grid.Column="0" x:Name="gridHeader" Grid.ColumnSpan="2" Margin="0">

            <ContentControl x:Name="headerContentControl" prism:RegionManager.RegionName="HeaderRegion" Margin="0" HorizontalAlignment="Stretch" VerticalAlignment="Stretch"></ContentControl>

        </Grid>

        <Grid Grid.Row="1" Grid.Column="0" x:Name="gridAside" Margin="0">

            <ContentControl x:Name="asideContentControl" prism:RegionManager.RegionName="AsideRegion" Margin="0" HorizontalAlignment="Stretch" VerticalAlignment="Stretch"></ContentControl>

        </Grid>

        <Grid  Grid.Row="1" Grid.Column="1" x:Name="gridMain" Margin="0">

            <ContentControl x:Name="mainContentControl" prism:RegionManager.RegionName="MainRegion" Margin="0" HorizontalAlignment="Stretch" VerticalAlignment="Stretch"></ContentControl>

        </Grid>

        <Grid  Grid.Row="3" Grid.Column="0" x:Name="gridFooter"  Grid.ColumnSpan="2" Margin="0">

                <ContentControl x:Name="footerContentControl" prism:RegionManager.RegionName="FooterRegion" Margin="0" HorizontalAlignment="Stretch" VerticalAlignment="Stretch"></ContentControl>

        </Grid>

    </Grid>

    </Grid>

</Window>
那么到底是怎么实现模块化松耦合呢,先贴一下代码
Bootstrapper.cs
// Copyright (c) Microsoft Corporation. All rights reserved. See License.txt in the project root for license information.

namespace PW.Desktop

{

    using System.ComponentModel.Composition;

    using System.ComponentModel.Composition.Hosting;

    using System.Windows;

    using Prism.Logging;

    using Prism.Modularity;

    using Prism.Mef;

    /// <summary>

    /// Initializes Prism to start this quickstart Prism application to use Managed Extensibility Framework (MEF).

    /// </summary>

    public class Bootstrapper : MefBootstrapper

    {

        private readonly CallbackLogger callbackLogger = new CallbackLogger();

        /// <summary>

        /// Creates the shell or main window of the application.

        /// </summary>

        /// <returns>The shell of the application.</returns>

        /// <remarks>

        /// If the returned instance is a <see cref="DependencyObject"/>, the

        /// <see cref="MefBootstrapper"/> will attach the default <seealso cref="Microsoft.Practices.Composite.Regions.IRegionManager"/> of

        /// the application in its <see cref="Microsoft.Practices.Composite.Presentation.Regions.RegionManager.RegionManagerProperty"/> attached property

        /// in order to be able to add regions by using the <seealso cref=""Microsoft.Practices.Composite.Presentation.Regions.RegionManager.RegionNameProperty"/>

        /// attached property from XAML.

        /// </remarks>

        protected override DependencyObject CreateShell()

        {

            return this.Container.GetExportedValue<Shell>();

        }

        /// <summary>

        /// Initializes the shell.

        /// </summary>

        /// <remarks>

        /// The base implemention ensures the shell is composed in the container.

        /// </remarks>

        protected override void InitializeShell()

        {

            base.InitializeShell();

            Application.Current.MainWindow = (Shell) this.Shell;

            Application.Current.MainWindow.Show();

        }

        /// <summary>

        /// Configures the <see cref="AggregateCatalog"/> used by MEF.

        /// </summary>

        /// <remarks>

        /// The base implementation does nothing.

        /// </remarks>

        protected override void ConfigureAggregateCatalog()

        {

            base.ConfigureAggregateCatalog();

            // Add this assembly to export ModuleTracker

            this.AggregateCatalog.Catalogs.Add(new AssemblyCatalog(typeof(Bootstrapper).Assembly));

            // Module A is referenced in in the project and directly in code.

            this.AggregateCatalog.Catalogs.Add(new AssemblyCatalog(typeof(PW.LogIn.LoginModule).Assembly));

            // Module B and Module D are copied to a directory as part of a post-build step.

            // These modules are not referenced in the project and are discovered by inspecting a directory.

            // Both projects have a post-build step to copy themselves into that directory.

            DirectoryCatalog catalog = new DirectoryCatalog("DirectoryModules");

            this.AggregateCatalog.Catalogs.Add(catalog);

        }

        /// <summary>

        /// Configures the <see cref="CompositionContainer"/>.

        /// May be overwritten in a derived class to add specific type mappings required by the application.

        /// </summary>

        /// <remarks>

        /// The base implementation registers all the types direct instantiated by the bootstrapper with the container.

        /// The base implementation also sets the ServiceLocator provider singleton.

        /// </remarks>

        protected override void ConfigureContainer()

        {

            base.ConfigureContainer();

            // Because we created the CallbackLogger and it needs to be used immediately, we compose it to satisfy any imports it has.

            this.Container.ComposeExportedValue<CallbackLogger>(this.callbackLogger);

        }

        /// <summary>

        /// Creates the <see cref="IModuleCatalog"/> used by Prism.

        /// </summary>

        /// <remarks>

        /// The base implementation returns a new ModuleCatalog.

        /// </remarks>

        /// <returns>

        /// A ConfigurationModuleCatalog.

        /// </returns>

        protected override IModuleCatalog CreateModuleCatalog()

        {

            // When using MEF, the existing Prism ModuleCatalog is still the place to configure modules via configuration files.

            return new ConfigurationModuleCatalog();

        }

        /// <summary>

        /// Create the <see cref="ILoggerFacade"/> used by the bootstrapper.

        /// </summary>

        /// <remarks>

        /// The base implementation returns a new TextLogger.

        /// </remarks>

        /// <returns>

        /// A CallbackLogger.

        /// </returns>

        protected override ILoggerFacade CreateLogger()

        {

            // Because the Shell is displayed after most of the interesting boostrapper work has been performed,

            // this quickstart uses a special logger class to hold on to early log entries and display them

            // after the UI is visible.

            return this.callbackLogger;

        }

    }

}
这里可以看到,基本上就算copy了Prism的demo代码,只是略微改动了一下ConfigureAggregateCatalog方法
手动加载了LogIn模块,这里工程里需要引入Login模块,然后剩余的所有布局模块以及系统模块都是在DirectoryModules下面
程序生成目录下面是这样的
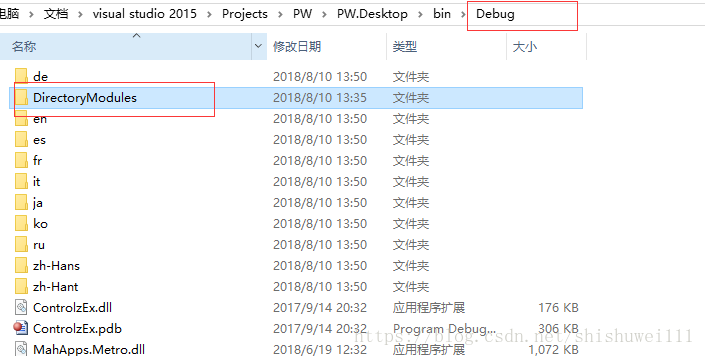
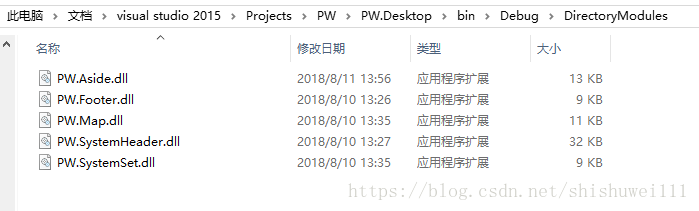
这样的好处就算,各模块互不相干,以后可以像插件一样做一个新的模块放到DirectoryModules就能运行
然后每个模块下面只要做一个module的接口实现类类似AsideModule.cs这样
using Prism.Modularity;

using Prism.Mef.Modularity;

using Prism.Regions;

using System.ComponentModel.Composition;

using System;

using PW.Infrastructure;

namespace PW.Aside

{

    [ModuleExport(typeof(AsideModule), InitializationMode = InitializationMode.OnDemand)]

    public class AsideModule : IModule

    {

        private readonly IModuleTracker moduleTracker;

        private readonly IRegionManager regionManager;

        /// <summary>

        /// Initializes a new instance of the <see cref="ModuleB"/> class.

        /// </summary>

        /// <param name="moduleTracker">The module tracker.</param>

        [ImportingConstructor]

        public AsideModule(IModuleTracker moduleTracker, IRegionManager regionManager)

        {

            if (moduleTracker == null)

            {

                throw new ArgumentNullException("moduleTracker");

            }

            this.moduleTracker = moduleTracker;

            this.moduleTracker.RecordModuleConstructed(ModuleNames.Aside);

            this.regionManager = regionManager;

        }

        /// <summary>

        /// Notifies the module that it has be initialized.

        /// </summary>

        public void Initialize()

        {

            this.moduleTracker.RecordModuleInitialized(ModuleNames.Aside);

            regionManager.RegisterViewWithRegion(RegionNames.Aside, typeof(MenuView));

        }

    }

}
每个模块的基本上都一样,只是在Initialize中去为当前Region注册不同的view
好像也没什么好写的了,差不多就这样吧
说一下我遇到的坑和怎么解决的吧
就说布局中的MainRegion,因为初始化拿它加载了login模块,但是在登陆成功后想去加载Map或者SystemSet时,本来想的是用RegionManager更改mainContentControl的Region名称,但是死活不行,各种报错,有一种方法是能做到去加载不同的Region的,就是用ItemsControl,但是用ItemsControl效果很不好,不是全屏显示在MainRegion里
然后查资料,问csdn,都没有结构,可能是现在用wpf的本来就少吧,
最后没事儿时偶然就想到了,在不同的模块能有自己独立的Region做导航,MainRegion只是导航到各模块的主页面,就这样解决了
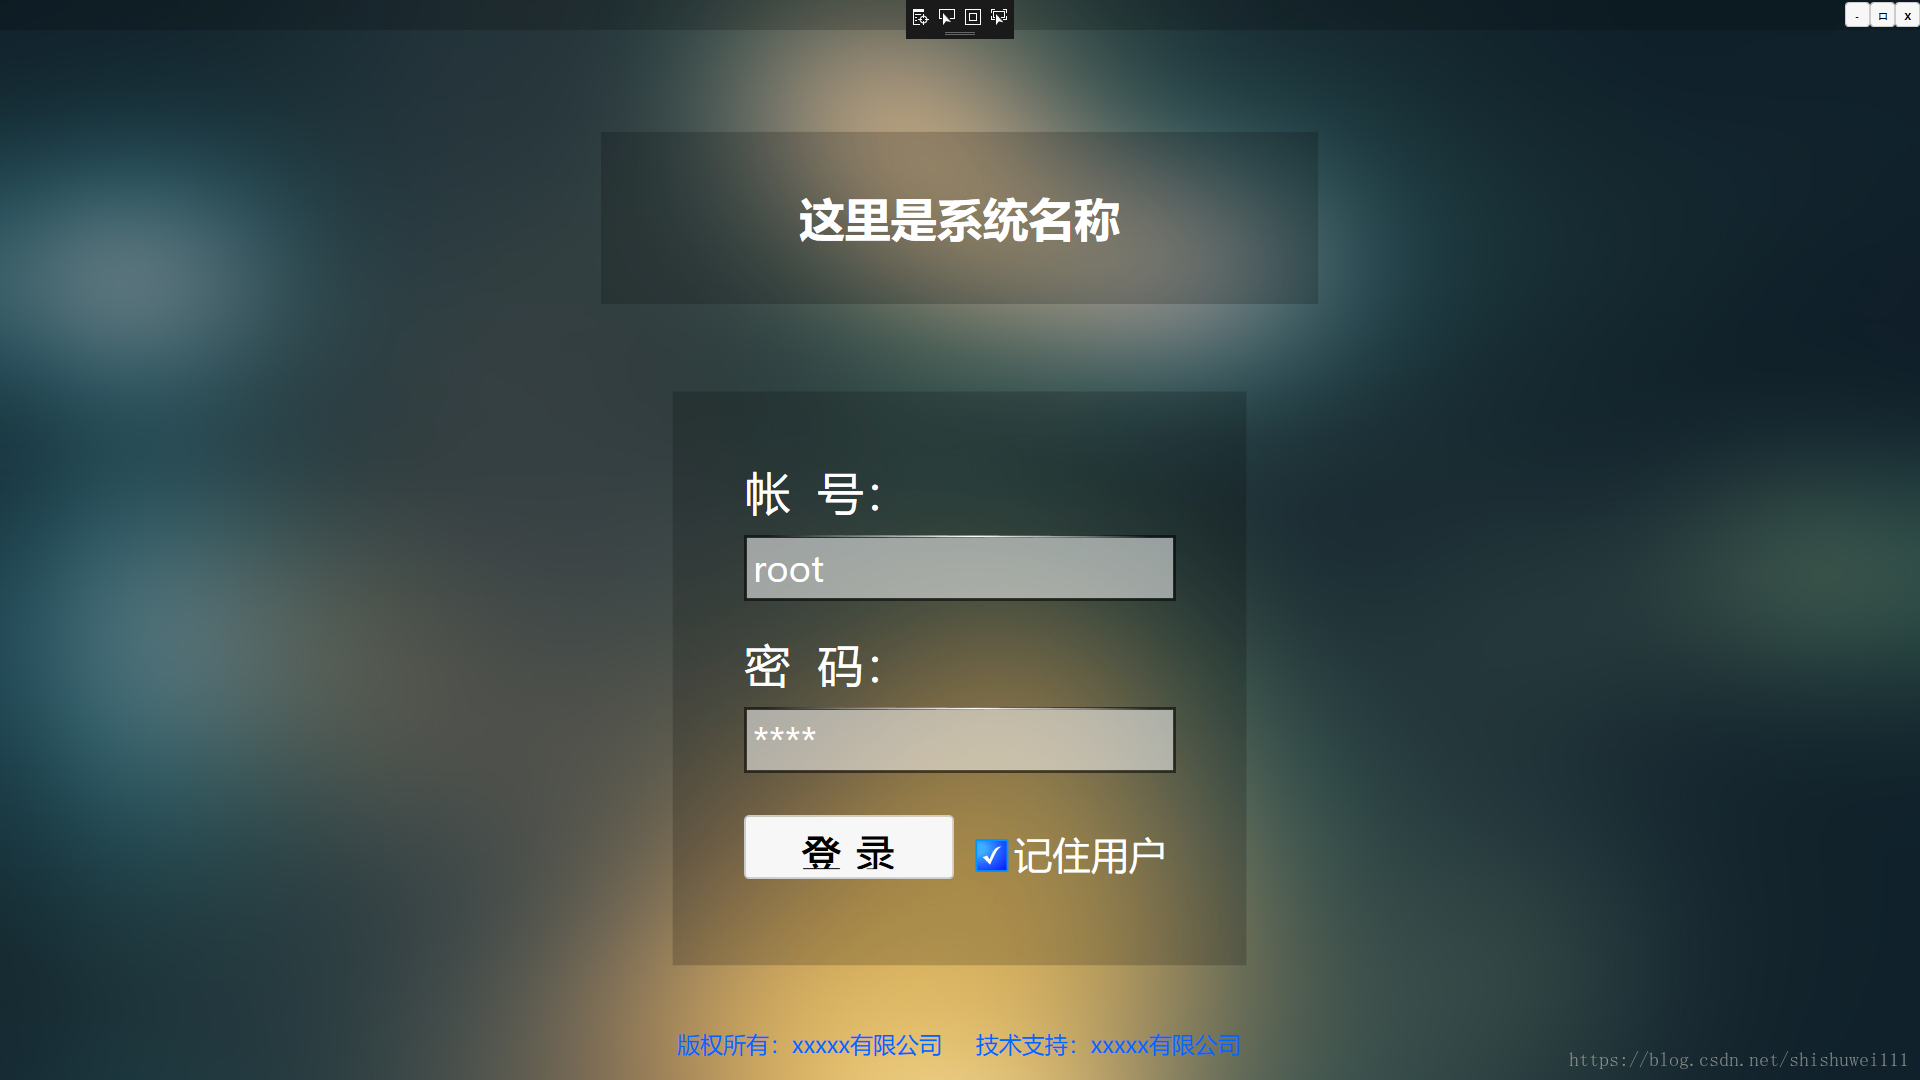
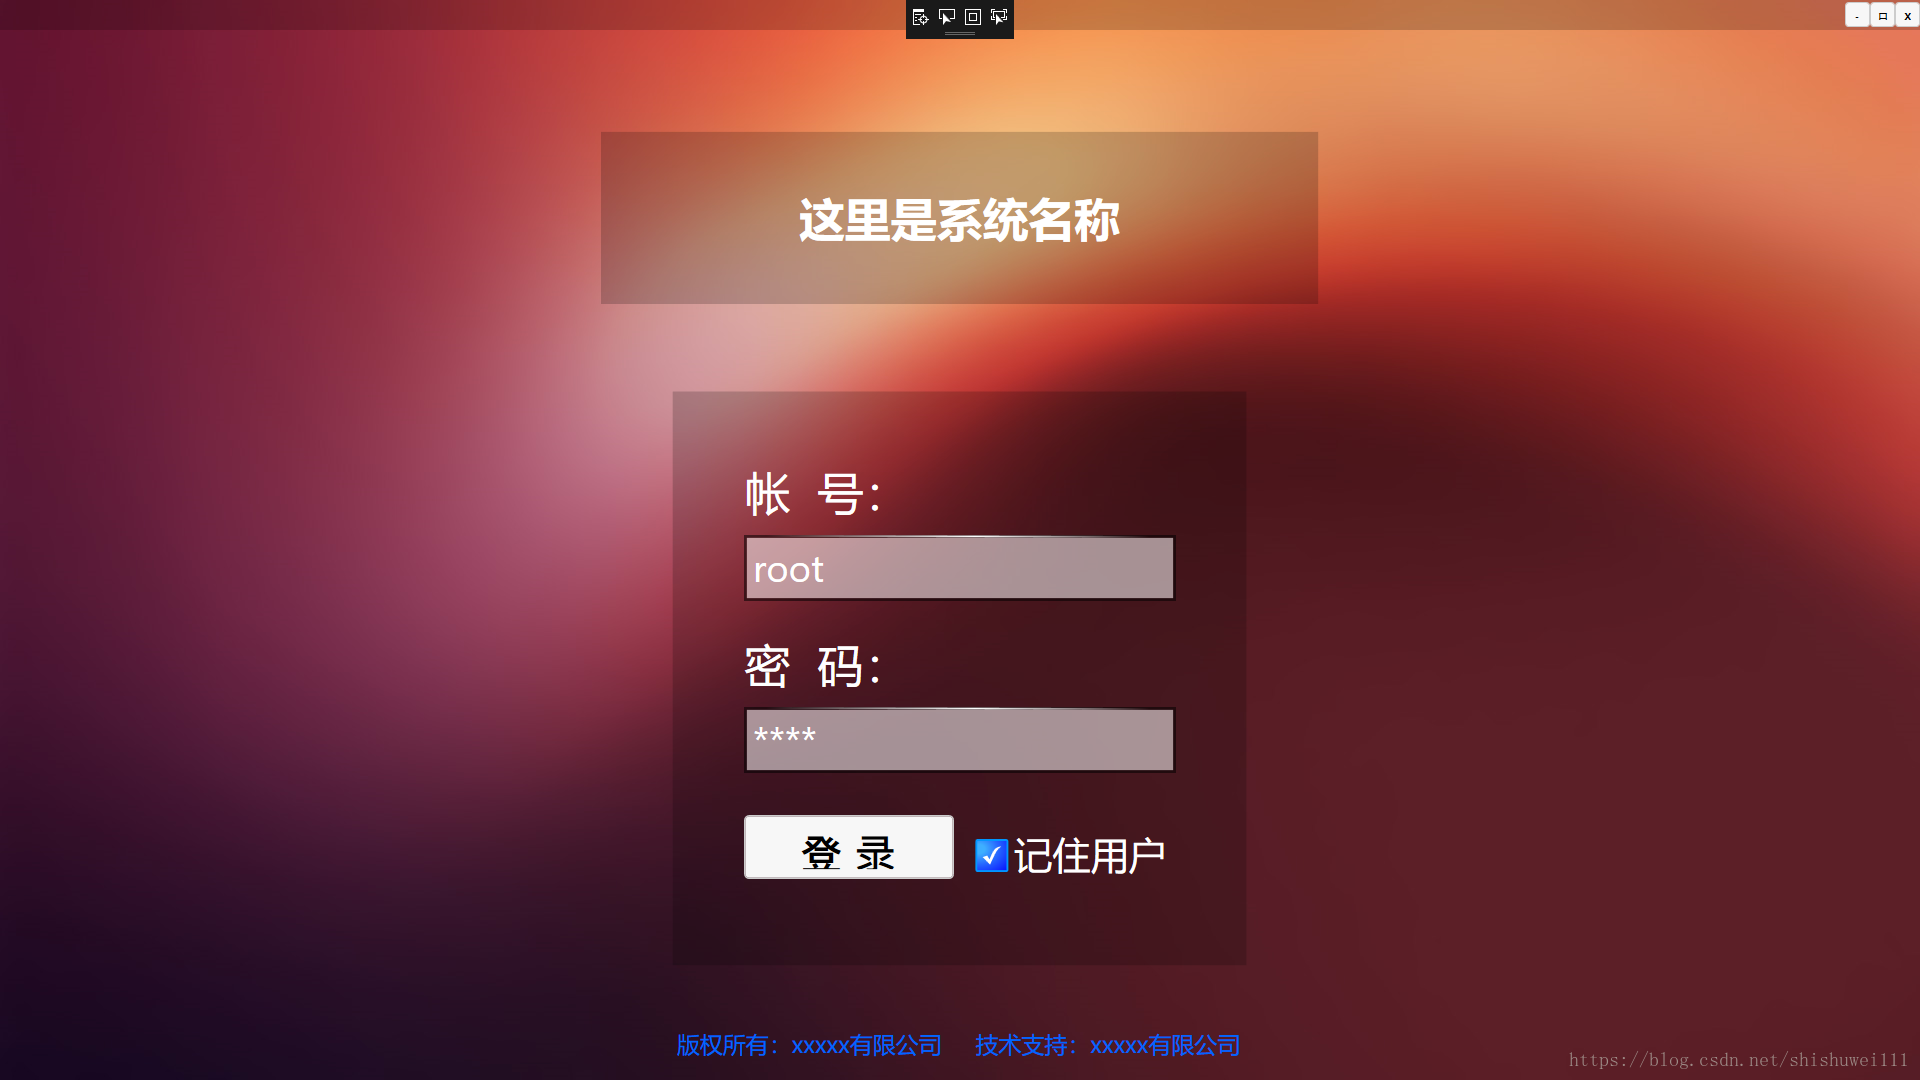
下面是做到现在的截图
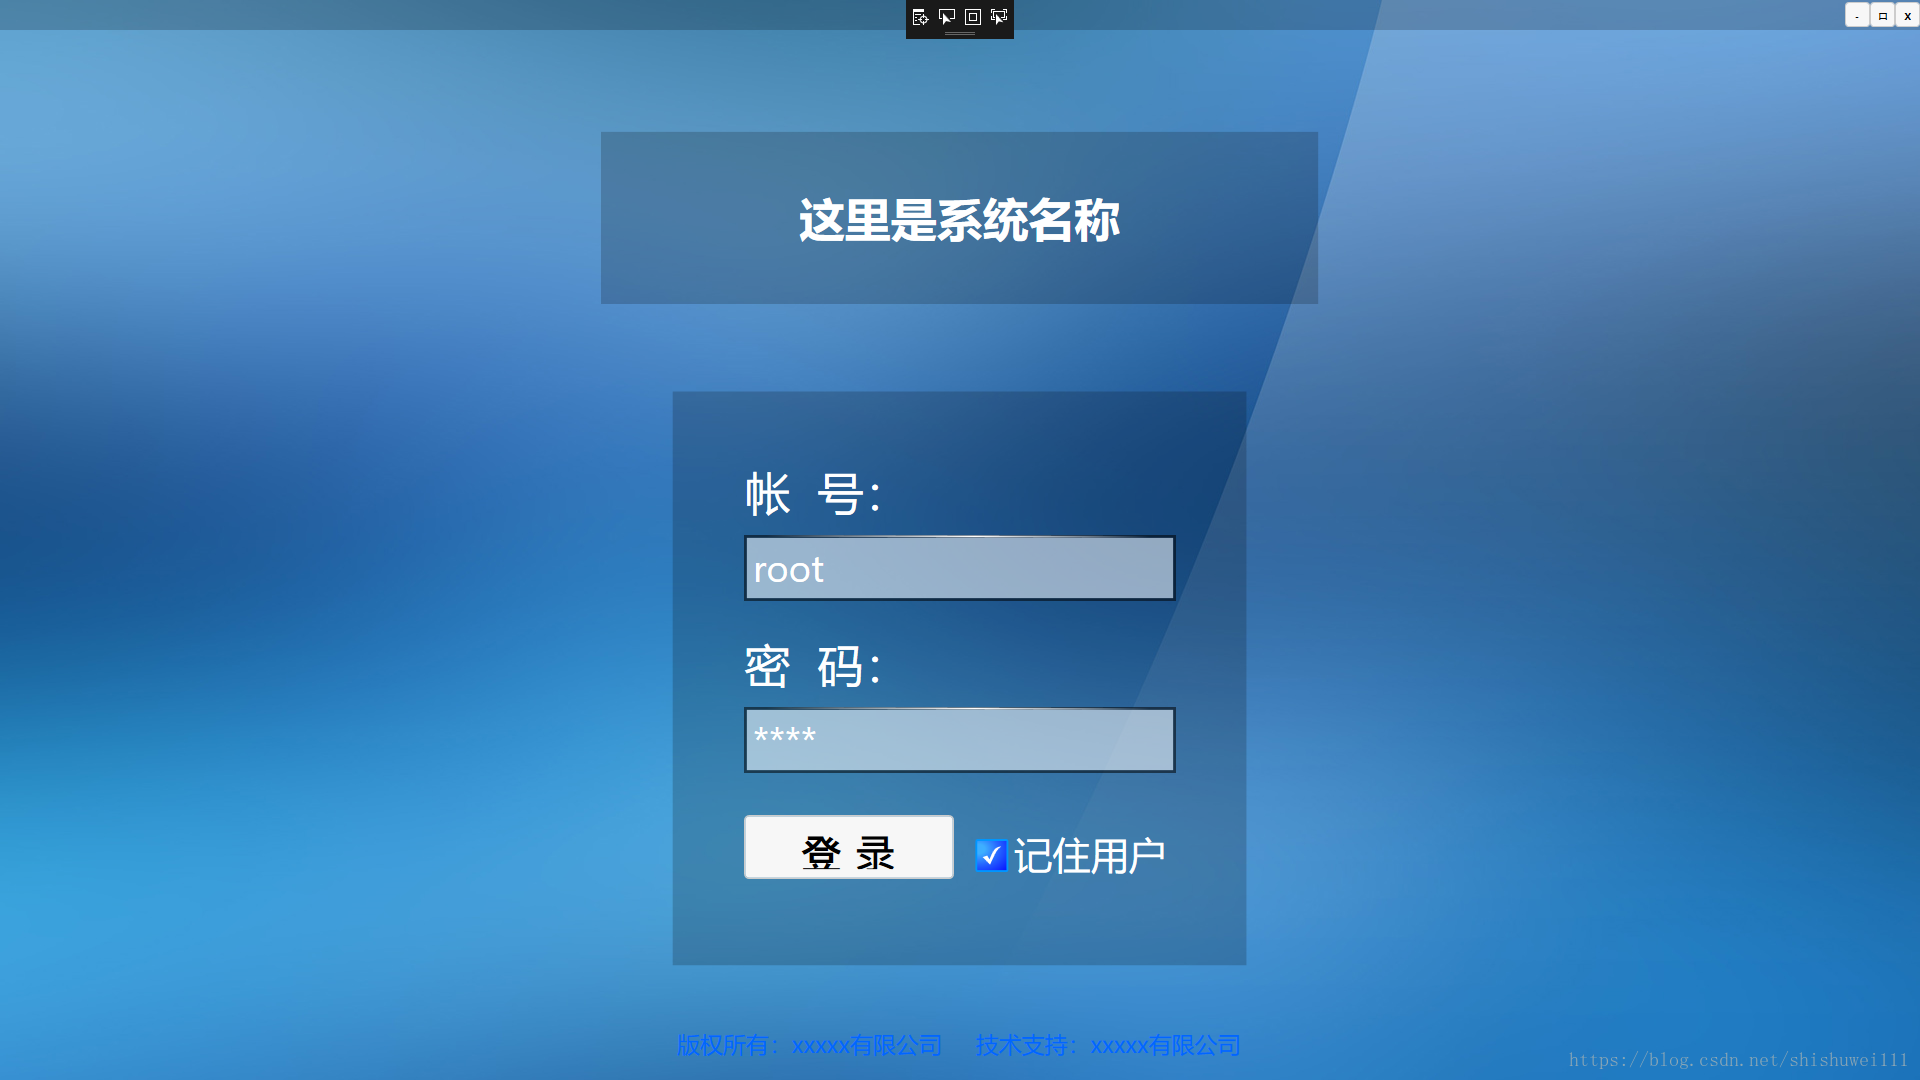
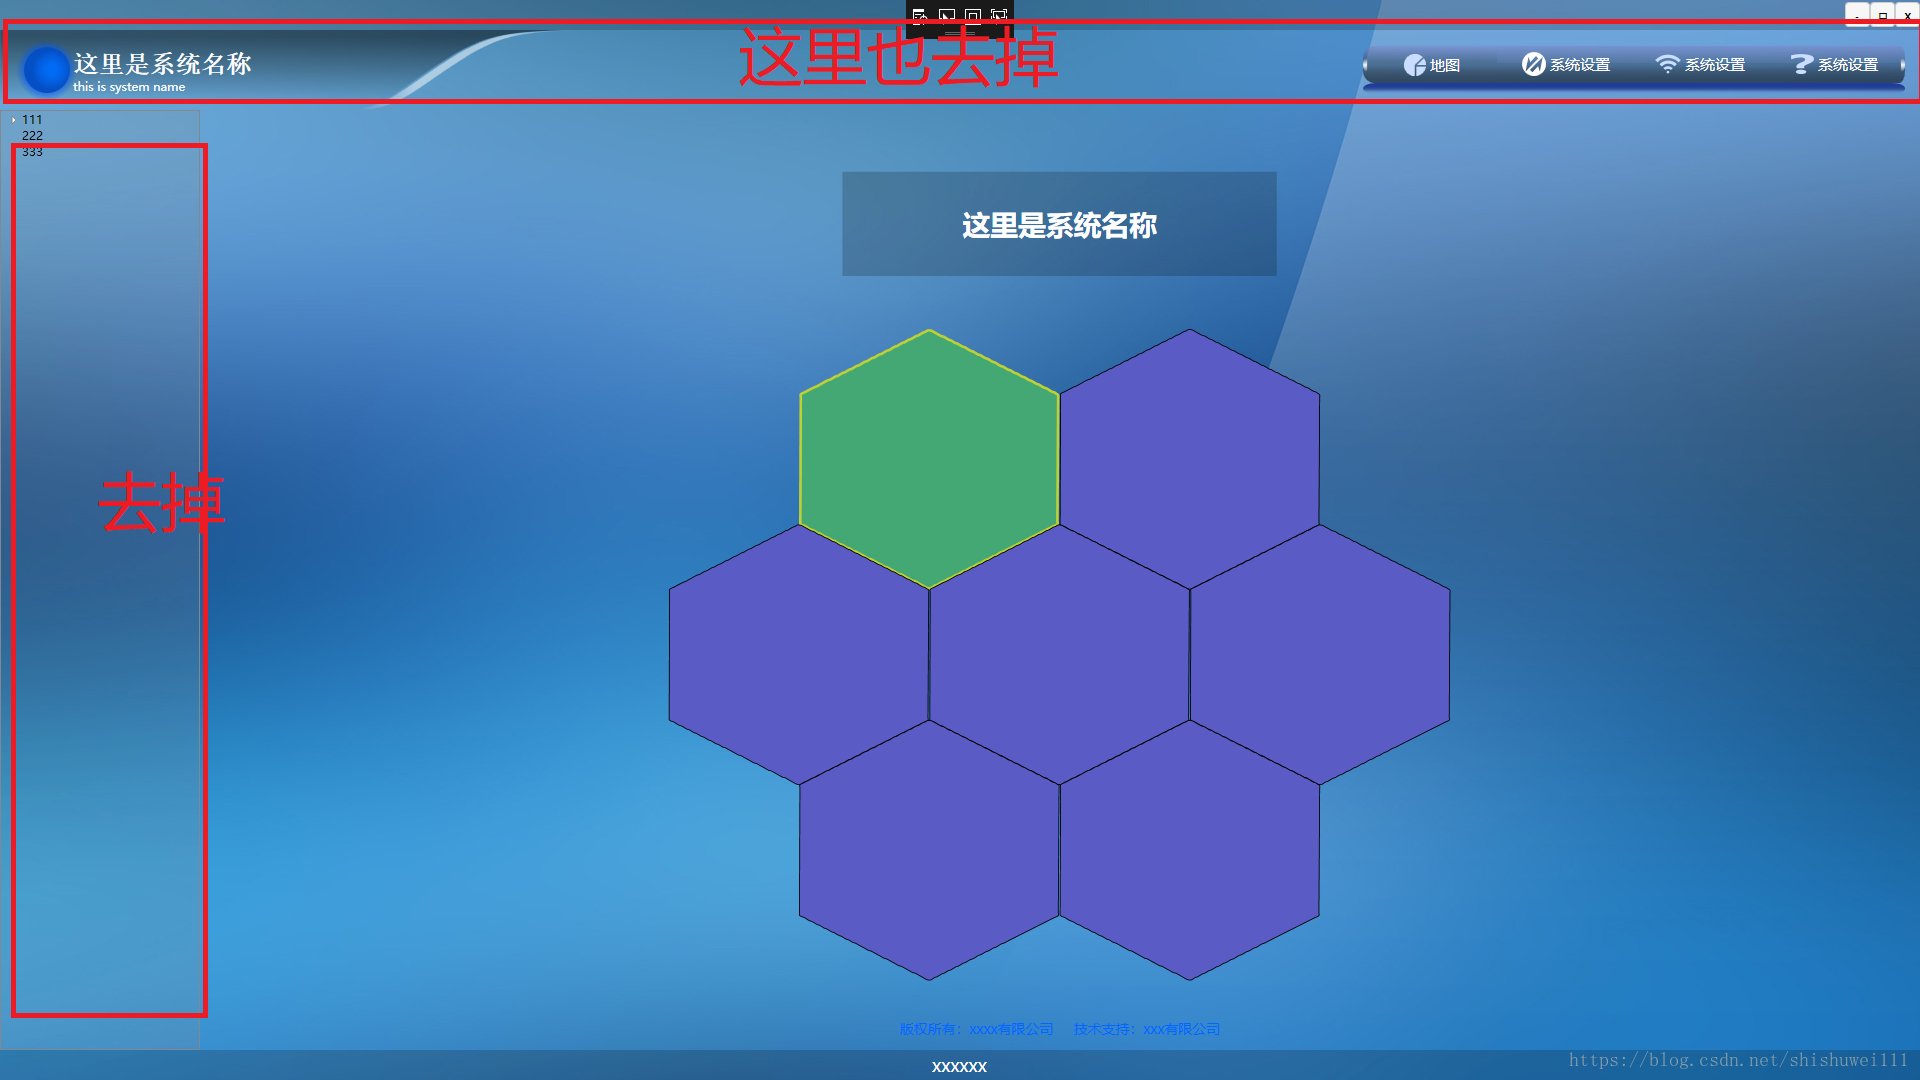
这个本来是打算做一个登陆后的主导航的,上边和左边是要去掉的,还没处理,这时候布局其实已经出来了

再来几个换个风格的,其实就是换个背景图

写的比较乱,想用到项目里,就不上源码了,框架样式都还需要调整,对wpf不熟悉,也是写到哪查到哪,各种不会
现在准备给各模块做公用样式呢,又不知道怎么弄好了,,,,我多想有一个wpf的前辈给指教指教啊。。。。看到的朋友知道怎么弄可以给说一下啊,有好的方法,好的建议都能写下来啊,,,,感觉自己实在是有点瞎弄啊
Prism for WPF 搭建一个简单的模块化开发框架(一)的更多相关文章
- Prism for WPF 搭建一个简单的模块化开发框架 (一个节点)
原文:Prism for WPF 搭建一个简单的模块化开发框架 (一个节点) 这里我就只贴图不贴代码了,看看这个节点之前的效果 觉得做的好的地方可以范之前的文章看看 有好的建议也可以说说 填充数据 ...
- Prism for WPF 搭建一个简单的模块化开发框架(六)隐藏菜单、导航
原文:Prism for WPF 搭建一个简单的模块化开发框架(六)隐藏菜单.导航 这个实际上是在聊天之前做的,一起写了,也不分先后了 看一下效果图,上面是模块主导航,左侧是模块内菜单,现在加一下隐藏 ...
- Prism for WPF 搭建一个简单的模块化开发框架(四)异步调用WCF服务、WCF消息头添加安全验证Token
原文:Prism for WPF 搭建一个简单的模块化开发框架(四)异步调用WCF服务.WCF消息头添加安全验证Token 为什么选择wcf? 因为好像wcf和wpf就是哥俩,,, 为什么选择异步 ...
- Prism for WPF 搭建一个简单的模块化开发框架(五)添加聊天、消息模块
原文:Prism for WPF 搭建一个简单的模块化开发框架(五)添加聊天.消息模块 中秋节假期没事继续搞了搞 做了各聊天的模块,需要继续优化 第一步画页面 页面参考https://github.c ...
- Prism for WPF 搭建一个简单的模块化开发框架(三) 给TreeView加样式做成菜单
原文:Prism for WPF 搭建一个简单的模块化开发框架(三) 给TreeView加样式做成菜单 昨天晚上把TreeView的样式做了一下,今天给TreeView绑了数据,实现了切换页面功能 上 ...
- Prism for WPF 搭建一个简单的模块化开发框架(二)
原文:Prism for WPF 搭建一个简单的模块化开发框架(二) 今天又有时间了,再改改,加了一些控件全局的样式 样式代码 <ResourceDictionary xmlns="h ...
- 用express搭建一个简单的博客系统
转自:https://blog.csdn.net/qq_29721837/article/details/62055603 Express 简介 Express 是一个简洁而灵活的 node.js W ...
- 从零开始搭建一个简单的基于webpack的vue开发环境
原文地址:https://segmentfault.com/a/1190000012789253?utm_source=tag-newest 从零开始搭建一个简单的基于webpack的react开发环 ...
- 用nodejs搭建一个简单的服务器
使用nodejs搭建一个简单的服务器 nodejs优点:性能高(读写文件) 数据操作能力强 官网:www.nodejs.org 验证是否安装成功:cmd命令行中输入node -v 如果显示版本号表示安 ...
随机推荐
- JavaScript的DOM_节点类型的扩展
DOM 自身存在很多类型,比如 Element 类型(元素节点)再比如 Text 类型(文本节点).DOM 还提供了一些扩展功能. 一.Node类型 Node 接口是 DOM1 级就定义了,Node ...
- BZOJ4011:[HNOI2015]落忆枫音(DP,拓扑排序)
Description 「恒逸,你相信灵魂的存在吗?」 郭恒逸和姚枫茜漫步在枫音乡的街道上.望着漫天飞舞的红枫,枫茜突然问出这样一个问题. 「相信吧.不然我们是什么,一团肉吗?要不是有灵魂……我们也 ...
- BZOJ1770:[USACO]lights 燈(高斯消元,DFS)
Description 貝希和她的閨密們在她們的牛棚中玩遊戲.但是天不從人願,突然,牛棚的電源跳閘了,所有的燈都被關閉了.貝希是一個很膽小的女生,在伸手不見拇指的無盡的黑暗中,她感到驚恐,痛苦與絕望. ...
- [BJOI2018]治疗之雨
题目 我还没疯 发现如果我们将血量抽象成点,一轮操作抽象成图上的一条边,我们如果能求出每一条边的概率,我们就能搞一下这道题 假设我们求出了这个图\(E\),设\(dp_i\)表示从\(i\)点到达\( ...
- Linux CentOS6系统安装最新版本Node.js环境及相关文件配置
Node.js,当前应用非常广泛的Javascript运行环境,采用C++编写的,目前应用较多的用于WEB应用中,执行效率还是非常高的,虽然老左不从业程序的开发,但是有些时候在玩VPS的时候还是会遇到 ...
- sendmail启动报错
sendmail启动不了,报错如下: 解决方法: 在/etc/mail/sendmail.cf 配置文件中查找 Dj$w,并在此行下面增加这一行. Dj$w. 在/etc/hosts 增加一行 192 ...
- 【luogu P3623 [APIO2008]免费道路】 题解
题目链接:https://www.luogu.org/problemnew/show/P3623 说是对克鲁斯卡尔的透彻性理解 正解: 先考虑加入水泥路,然后再考虑加入剩下必须要加入的最少鹅卵石路. ...
- Css animation 与 float 、flex 布局问题
1. 有这样一段css html 代码 <div class="container"> <div class="float-left"> ...
- OSMboxPend()
1. 原型:void *OSMboxPend(OS_EVENT *pevent, INT16U timeout, INT8U *err) 2. 参数意义: pevent :消息邮箱 timeout ...
- Adnroid studio 无法 Build APK(s)
报错 Error:java.nio.file.AccessDeniedException: C:\Program Files\Android\android-sdk-windows\.android\ ...