【转】Phong和Blinn-Phong光照模型
来自:http://www.cnblogs.com/bluebean/p/5299358.html
Phong和Blinn-Phong是计算镜面反射光的两种光照模型,两者仅仅有很小的不同之处。

1.Phong模型

Phone模型计算中的一个关键步骤就是反射向量R的计算:
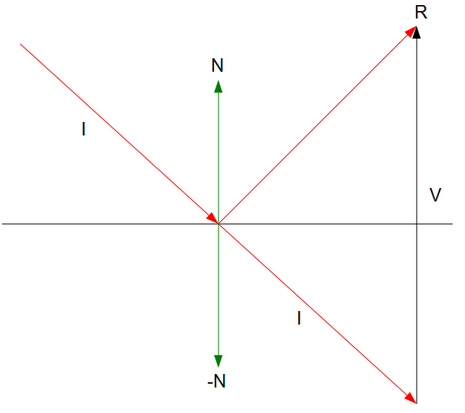
上图中的位于表面“下面”的向量 ‘I’ 是原始 ‘I’ 向量的拷贝,并且二者是一样的,现在我们的目标计算出向量 ‘R’ 。根据向量相加原则,向量 ‘R’ 等于 'I' + 'V',‘I’ 是已知的,所以我们需要做的就是找出向量 ‘V’。注意法向量 ‘N’ 的负方向就是 ‘-N’,我们可以在 ‘I’ 和 ‘-N’ 之间使用一个点乘运算就能得到 ‘I’ 在 ‘-N’ 上面的投影的模。这个模正好是 ‘V’ 的模的一半,由于 ‘V’ 与 ‘N’ 有相同的方向,我们可以将这个模乘上 ‘N’ (其模为 1 )再乘上 2 即可得到 ‘V’。总结一下就是下面的公式:

2.Blinn-Phong模型
Phong模型中计算反射光线的向量是一件相对比较耗时的任务,因此Blinn-Phong对这一点进行了改进。

Ks:物体对于反射光线的衰减系数
N:表面法向量
H:光入射方向L和视点方向V的中间向量
Shininess:高光系数
可见,通过该式计算镜面反射光是符合基本规律的,当视点方向和反射光线方向一致时,计算得到的H与N平行,dot(N,H)取得最大;当视点方向V偏离反射方向时,H也偏离N。
同时H的计算比起反射向量R的计算简单的多,R向量的计算需要若干次的向量乘法与加法,而H的计算仅仅需要一次加法。
下面是用cg着色语言书写的Phong和Blinn-Phong的顶点和片段着色程序
Phong_FragmentLighting_v.cg

 1 struct V2F{

 2     float4 position:POSITION;

 3     float3 worldPosition: TEXCOORD0;

 4     float3 worldNormal :TEXCOORD1;

 5 };

 6 void Phong_FragmentLighting_v(float4 position :POSITION,

 7                               float4 normal:NORMAL,

 8                               uniform float4x4 modelMatrix,

 9                               uniform float4x4 modelMatrix_IT,

10                               uniform float4x4 modelViewProj,

11                               out V2F O){

12     O.position=mul(modelViewProj,position);

13     O.worldPosition=mul(modelMatrix,position).xyz;

14     O.worldNormal=normalize(mul(modelMatrix_IT,normal)).xyz;

15 }
Phong_FragmentLighting_f.cg
 1 void Phong_FragmentLighting_f(float3 position :TEXCOORD0,

 2                                float3 normal: TEXCOORD1,

 3                                uniform float3 globalAmbient,

 4                                uniform float3 lightColor,

 5                                uniform float3 lightPosition,

 6                                uniform float3 eyePosition,

 7                                uniform float3 Ke,

 8                                uniform float3 Ka,

 9                                uniform float3 Kd,

10                                uniform float3 Ks,

11                                uniform float  shininess,

12                                out float4 color:COLOR)

13               {

14                   float3 N=normalize(normal);

15                   float3 L=normalize(lightPosition-position);

16                   float3 V=normalize(eyePosition-position);

17

18                   float3 R=reflect(-L,N);

19                   R=normalize(R);

20

21                   // Compute emissive term

22                   float3 emissive = Ke;

23

24                  // Compute ambient term

25                  float3 ambient = Ka * globalAmbient;

26

27                 // Compute the diffuse term

28                 float diffuseLight = max(dot(N, L), 0);

29                 float3 diffuse = Kd * lightColor * diffuseLight;

30

31                 // Compute the specular term

32                 float specularLight = pow(max(dot(V, R), 0), shininess);

33                 if (diffuseLight <= 0) specularLight = 0;

34                 float3 specular = Ks * lightColor * specularLight;

35

36                 //color.xyz = emissive + ambient + diffuse + specular;

37                 color.xyz=ambient + diffuse + specular;

38                 color.w = 1;

39               }
BlinnPhong_FragmentLighting_v.cg
 1 struct V2F{

 2     float4 position:POSITION;

 3     float3 worldPosition: TEXCOORD0;

 4     float3 worldNormal :TEXCOORD1;

 5 };

 6 void BlinnPhong_FragmentLighting_v(float4 position :POSITION,

 7                               float4 normal:NORMAL,

 8                               uniform float4x4 modelMatrix,

 9                               uniform float4x4 modelMatrix_IT,

10                               uniform float4x4 modelViewProj,

11                               out V2F O){

12     O.position=mul(modelViewProj,position);

13     O.worldPosition=mul(modelMatrix,position).xyz;

14     O.worldNormal=normalize(mul(modelMatrix_IT,normal)).xyz;

15 }
BlinnPhong_FragmentLighting_f.cg
 1 void BlinnPhong_FragmentLighting_f(float3 position :TEXCOORD0,

 2                                float3 normal: TEXCOORD1,

 3                                uniform float3 globalAmbient,

 4                                uniform float3 lightColor,

 5                                uniform float3 lightPosition,

 6                                uniform float3 eyePosition,

 7                                uniform float3 Ke,

 8                                uniform float3 Ka,

 9                                uniform float3 Kd,

10                                uniform float3 Ks,

11                                uniform float  shininess,

12                                out float4 color:COLOR)

13               {

14                   float3 N=normalize(normal);

15                   float3 L=normalize(lightPosition-position);

16                   float3 V=normalize(eyePosition-position);

17

18                  float3 H=normalize(L+V);

19

20                   // Compute emissive term

21                   float3 emissive = Ke;

22

23                  // Compute ambient term

24                  float3 ambient = Ka * globalAmbient;

25

26                 // Compute the diffuse term

27                 float diffuseLight = max(dot(N, L), 0);

28                 float3 diffuse = Kd * lightColor * diffuseLight;

29

30                 // Compute the specular term

31                 float specularLight = pow(max(dot(H, N), 0), shininess);

32                 if (diffuseLight <= 0) specularLight = 0;

33                 float3 specular = Ks * lightColor * specularLight;

34

35                 color.xyz=ambient + diffuse + specular;

36                 color.w = 1;

37               }
效果对比:
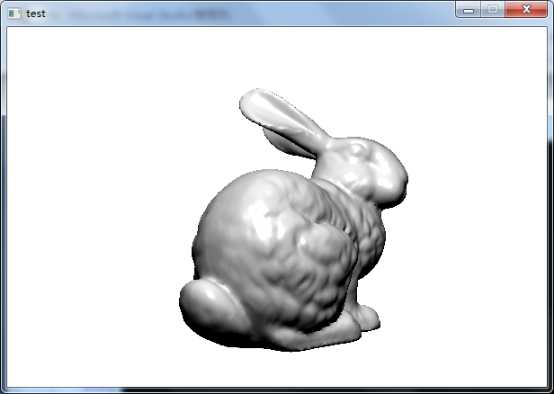
Phong光照模型
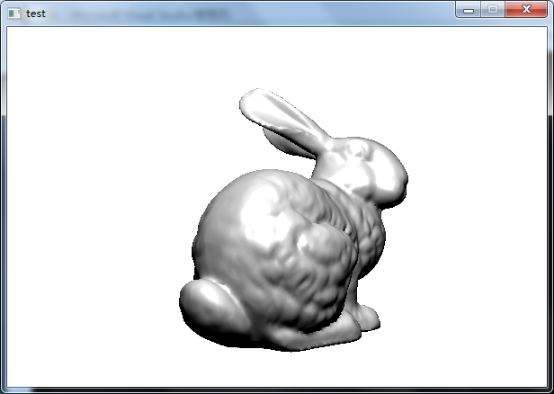
Blinn-Phong光照模型

通过简单的对比发现,在相同条件下Blinn-Phong的高光范围要比Phong更大,写实效果Phong光照模型更好。但算法简单,运行速度快是Blinn-Phong光照模型的优点。
【转】Phong和Blinn-Phong光照模型的更多相关文章
- 用DirectX12实现Blinn Phong
这次我们来用DirectX12实现一下基本的Blinn Phong光照模型.让我们再把这个光照模型的概念过一遍:一个物体的颜色由三个因素决定:ambient, diffuse, specular.am ...
- Unity-Shader-镜面高光Phong&BlinnPhong-油腻的师姐在哪里
[旧博客转移 - 2016年4月4日 13:13 ] 油腻的师姐: 以前玩过一款很火热的端游<剑灵>,剑灵刚出来的时候,某网页游戏广告视频中有句台词:"我不断的在寻找,有你的世界 ...
- Lambert漫反射.BLinnPhong及Phong模型 Unity自带的在Lighting.cginc里
1.漫反射 此模型属于经验模型,主要用来简单模拟粗糙物体表面的光照现象 此模型假设物体表面为理想漫反射体(也就是只产生漫反射现象,也成为Lambert反射体),同时,场景中存在两种光,一种为环境光,一 ...
- 如何在Unity中分别实现Flat Shading(平面着色)、Gouraud Shading(高洛德着色)、Phong Shading(冯氏着色)
写在前面: 先说一下为什么决定写这篇文章,我也是这两年开始学习3D物体的光照还有着色方式的,对这个特别感兴趣,在Wiki还有NVIDIA官网看了相关资料后,基本掌握了渲染物体时的渲染管道(The re ...
- 【Aladdin Unity3D Shader编程】之三 光照模型(二)
高光反射模型 Specular=直射光*pow(cosθ,高光的参数) θ:是反射光和视野方向的夹角 编写高光反射Shader Shader "AladdinShader/07 Specul ...
- 【Unity Shader】(三) ------ 光照模型原理及漫反射和高光反射的实现
[Unity Shader](三) ---------------- 光照模型原理及漫反射和高光反射的实现 [Unity Shader](四) ------ 纹理之法线纹理.单张纹理及遮罩纹理的实现 ...
- (转)光照模型及cg实现
经典光照模型(illumination model) 物体表面光照颜色由入射光.物体材质,以及材质和光的交互规律共同决定. 由于环境光给予物体各个点的光照强度相同,且没有方向之分,所以在只有环境光的情 ...
- 三种光照模型的shader实现
1.Lambert模型,公式为I=Kd*Il(N*L): Shader "Custom/Lambert_A" { Properties { _Diffuse(,,,) } SubS ...
- 合金装备V 幻痛 制作技术特辑
合金装备V:幻痛 制作特辑 资料原文出自日版CGWORLD2015年10月号 在[合金装备4(Metal Gear Solid IV)]7年后,序章作品[合金装备5 :原爆点 (Metal Gea ...
- 【Unity Shader】(六) ------ 复杂的光照(上)
笔者使用的是 Unity 2018.2.0f2 + VS2017,建议读者使用与 Unity 2018 相近的版本,避免一些因为版本不一致而出现的问题. [Unity Sha ...
随机推荐
- 可靠的推送IM消息
一. 报文类型: 1.请求报文(request,后简称为为R): 2.应答报文(acknowledge,后简称为A): 3.通知报文(notify,后简称为N). R:客户端主动发送给服务器 ...
- ORACLE expdp/impdp详解
ORCALE10G提供了新的导入导出工具,数据泵.Oracle官方对此的形容是:Oracle DataPump technology enables Very High-Speed movement ...
- 处理json的常用java类库:Json-lib(org.json)、Gson、Jackson、Fastjson
更多的处理json的java类库,有人做了性能对比,GitHub地址:https://github.com/fabienrenaud/java-json-benchmark 处理json的java类库 ...
- hybrid app、react-native 区别
hybrid app.react-native 区别: 项目 hybrid app react-native 组件 用HTML.CSS.JavaScript实现页面的制作,然后运行在Webview上( ...
- 机器学习Hands On Lab
fetch_data fetch_mldata默认路径是在scikit_learn_data路径下,mnist的mat文件其实直接放置到scikit_lean/mldata下面即可通过fetch_ml ...
- POJ2777(线段树裸题)
题目:http://poj.org/problem?id=2777 别忘了各地的return: 有可能输入的L<R,手动swap: 似乎是多组输入? pushup和pushdown的位置. (原 ...
- hadoop技术入门学习之发行版选择
经常会看到这样的问题:零基础学习hadoop难不难?有的人回答说:零基础学习hadoop,没有想象的那么难,也没有想象的那么容易.看到这样的答案不免觉得有些尴尬,这个问题算是白问了,因为这个回答似乎什 ...
- hadoop大数据处理平台与案例
大数据可以说是从搜索引擎诞生之处就有了,我们熟悉的搜索引擎,如百度搜索引擎.360搜索引擎等可以说是大数据技处理技术的最早的也是比较基础的一种应用.大概在2015年大数据都还不是非常火爆,2015年可 ...
- Redis 密码设置和查看密码
Redis 密码设置和查看密码 redis没有实现访问控制这个功能,但是它提供了一个轻量级的认证方式,可以编辑redis.conf配置来启用认证. 1.初始化Redis密码: 在配置文件中有个参数: ...
- SpringMVC整合Hessian访问远程服务
1.1 Hessian简介 Hessian是一个轻量级的Web服务实现工具,它采用的是二进制协议,因此很适合发送二进制数据.它的一个基本原理就是把远程服务对象以二进制的方式进行发送 ...