SegNet网络的Pytorch实现
1.文章原文地址
SegNet: A Deep Convolutional Encoder-Decoder Architecture for Image Segmentation
2.文章摘要
语义分割具有非常广泛的应用,从场景理解、目标相互关系推断到自动驾驶。早期依赖于低水平视觉线索的方法已经快速的被流行的机器学习算法所取代。特别是最近的深度学习在手写数字识别、语音、图像中的分类和目标检测上取得巨大成功。如今有一个活跃的领域是语义分割(对每个像素进行归类)。然而,最近有一些方法直接采用了为图像分类而设计的网络结构来进行语义分割任务。虽然结果十分鼓舞人心,但还是比较粗糙。这首要的原因是最大池化和下采样减小了特征图的分辨率。我们设计SegNet的动机来自于分割任务需要将低分辨率的特征图映射到输入的分辨率并进行像素级分类,这个映射必须产生对准确边界定位有用的特征。
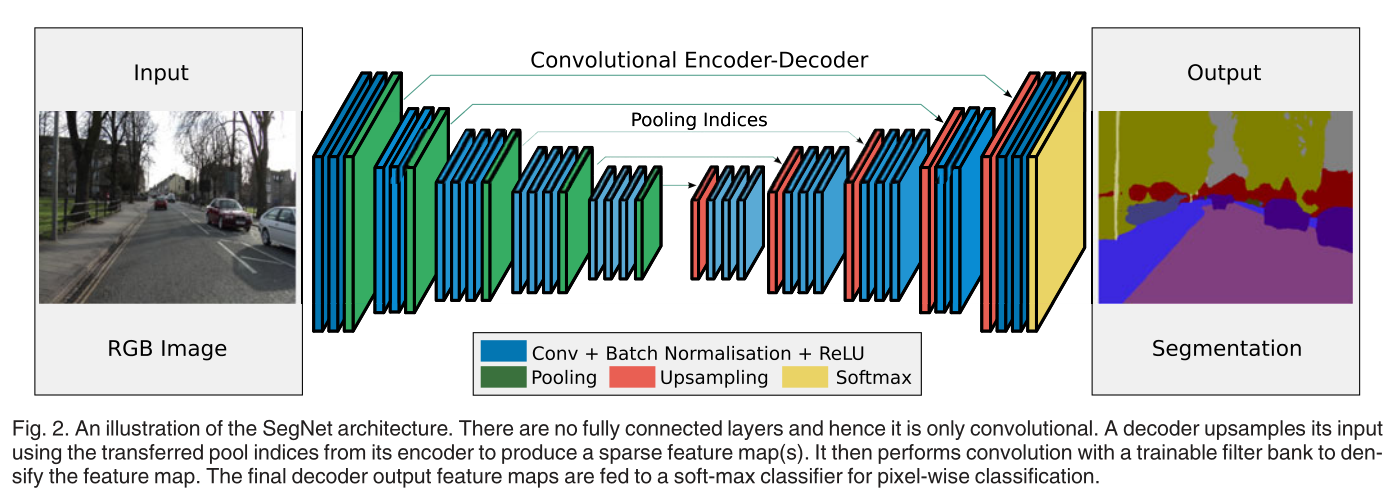
3.网络结构
4.Pytorch实现
 import torch.nn as nn

 import torch

 class conv2DBatchNormRelu(nn.Module):

     def __init__(self,in_channels,out_channels,kernel_size,stride,padding,

                  bias=True,dilation=1,is_batchnorm=True):

         super(conv2DBatchNormRelu,self).__init__()

         if is_batchnorm:

             self.cbr_unit=nn.Sequential(

                 nn.Conv2d(in_channels,out_channels,kernel_size=kernel_size,stride=stride,padding=padding,

                           bias=bias,dilation=dilation),

                 nn.BatchNorm2d(out_channels),

                 nn.ReLU(inplace=True),

             )

         else:

             self.cbr_unit=nn.Sequential(

                 nn.Conv2d(in_channels, out_channels, kernel_size=kernel_size, stride=stride, padding=padding,

                           bias=bias, dilation=dilation),

                 nn.ReLU(inplace=True)

             )

     def forward(self,inputs):

         outputs=self.cbr_unit(inputs)

         return outputs

 class segnetDown2(nn.Module):

     def __init__(self,in_channels,out_channels):

         super(segnetDown2,self).__init__()

         self.conv1=conv2DBatchNormRelu(in_channels,out_channels,kernel_size=3,stride=1,padding=1)

         self.conv2=conv2DBatchNormRelu(out_channels,out_channels,kernel_size=3,stride=1,padding=1)

         self.maxpool_with_argmax=nn.MaxPool2d(kernel_size=2,stride=2,return_indices=True)

     def forward(self,inputs):

         outputs=self.conv1(inputs)

         outputs=self.conv2(outputs)

         unpooled_shape=outputs.size()

         outputs,indices=self.maxpool_with_argmax(outputs)

         return outputs,indices,unpooled_shape

 class segnetDown3(nn.Module):

     def __init__(self,in_channels,out_channels):

         super(segnetDown3,self).__init__()

         self.conv1=conv2DBatchNormRelu(in_channels,out_channels,kernel_size=3,stride=1,padding=1)

         self.conv2=conv2DBatchNormRelu(out_channels,out_channels,kernel_size=3,stride=1,padding=1)

         self.conv3=conv2DBatchNormRelu(out_channels,out_channels,kernel_size=3,stride=1,padding=1)

         self.maxpool_with_argmax=nn.MaxPool2d(kernel_size=2,stride=2,return_indices=True)

     def forward(self,inputs):

         outputs=self.conv1(inputs)

         outputs=self.conv2(outputs)

         outputs=self.conv3(outputs)

         unpooled_shape=outputs.size()

         outputs,indices=self.maxpool_with_argmax(outputs)

         return outputs,indices,unpooled_shape

 class segnetUp2(nn.Module):

     def __init__(self,in_channels,out_channels):

         super(segnetUp2,self).__init__()

         self.unpool=nn.MaxUnpool2d(2,2)

         self.conv1=conv2DBatchNormRelu(in_channels,out_channels,kernel_size=3,stride=1,padding=1)

         self.conv2=conv2DBatchNormRelu(out_channels,out_channels,kernel_size=3,stride=1,padding=1)

     def forward(self,inputs,indices,output_shape):

         outputs=self.unpool(inputs,indices=indices,output_size=output_shape)

         outputs=self.conv1(outputs)

         outputs=self.conv2(outputs)

         return outputs

 class segnetUp3(nn.Module):

     def __init__(self,in_channels,out_channels):

         super(segnetUp3,self).__init__()

         self.unpool=nn.MaxUnpool2d(2,2)

         self.conv1=conv2DBatchNormRelu(in_channels,out_channels,kernel_size=3,stride=1,padding=1)

         self.conv2=conv2DBatchNormRelu(out_channels,out_channels,kernel_size=3,stride=1,padding=1)

         self.conv3=conv2DBatchNormRelu(out_channels,out_channels,kernel_size=3,stride=1,padding=1)

     def forward(self,inputs,indices,output_shape):

         outputs=self.unpool(inputs,indices=indices,output_size=output_shape)

         outputs=self.conv1(outputs)

         outputs=self.conv2(outputs)

         outputs=self.conv3(outputs)

         return outputs

 class segnet(nn.Module):

     def __init__(self,in_channels=3,num_classes=21):

         super(segnet,self).__init__()

         self.down1=segnetDown2(in_channels=in_channels,out_channels=64)

         self.down2=segnetDown2(64,128)

         self.down3=segnetDown3(128,256)

         self.down4=segnetDown3(256,512)

         self.down5=segnetDown3(512,512)

         self.up5=segnetUp3(512,512)

         self.up4=segnetUp3(512,256)

         self.up3=segnetUp3(256,128)

         self.up2=segnetUp2(128,64)

         self.up1=segnetUp2(64,64)

         self.finconv=conv2DBatchNormRelu(64,num_classes,3,1,1)

     def forward(self,inputs):

         down1,indices_1,unpool_shape1=self.down1(inputs)

         down2,indices_2,unpool_shape2=self.down2(down1)

         down3,indices_3,unpool_shape3=self.down3(down2)

         down4,indices_4,unpool_shape4=self.down4(down3)

         down5,indices_5,unpool_shape5=self.down5(down4)

         up5=self.up5(down5,indices=indices_5,output_shape=unpool_shape5)

         up4=self.up4(up5,indices=indices_4,output_shape=unpool_shape4)

         up3=self.up3(up4,indices=indices_3,output_shape=unpool_shape3)

         up2=self.up2(up3,indices=indices_2,output_shape=unpool_shape2)

         up1=self.up1(up2,indices=indices_1,output_shape=unpool_shape1)

         outputs=self.finconv(up1)

         return outputs

 if __name__=="__main__":

     inputs=torch.ones(1,3,224,224)

     model=segnet()

     print(model(inputs).size())

     print(model)
参考
https://github.com/meetshah1995/pytorch-semseg
SegNet网络的Pytorch实现的更多相关文章
- 群等变网络的pytorch实现
CNN对于旋转不具有等变性,对于平移有等变性,data augmentation的提出就是为了解决这个问题,但是data augmentation需要很大的模型容量,更多的迭代次数才能够在训练数据集合 ...
- U-Net网络的Pytorch实现
1.文章原文地址 U-Net: Convolutional Networks for Biomedical Image Segmentation 2.文章摘要 普遍认为成功训练深度神经网络需要大量标注 ...
- ResNet网络的Pytorch实现
1.文章原文地址 Deep Residual Learning for Image Recognition 2.文章摘要 神经网络的层次越深越难训练.我们提出了一个残差学习框架来简化网络的训练,这些 ...
- GoogLeNet网络的Pytorch实现
1.文章原文地址 Going deeper with convolutions 2.文章摘要 我们提出了一种代号为Inception的深度卷积神经网络,它在ILSVRC2014的分类和检测任务上都取得 ...
- AlexNet网络的Pytorch实现
1.文章原文地址 ImageNet Classification with Deep Convolutional Neural Networks 2.文章摘要 我们训练了一个大型的深度卷积神经网络用于 ...
- VGG网络的Pytorch实现
1.文章原文地址 Very Deep Convolutional Networks for Large-Scale Image Recognition 2.文章摘要 在这项工作中,我们研究了在大规模的 ...
- 【转载】PyTorch系列 (二):pytorch数据读取
原文:https://likewind.top/2019/02/01/Pytorch-dataprocess/ Pytorch系列: PyTorch系列(一) - PyTorch使用总览 PyTorc ...
- pytorch预训练
Pytorch预训练模型以及修改 pytorch中自带几种常用的深度学习网络预训练模型,torchvision.models包中包含alexnet.densenet.inception.resnet. ...
- PyTorch使用总览
PyTorch使用总览 https://blog.csdn.net/u014380165/article/details/79222243 深度学习框架训练模型时的代码主要包含数据读取.网络构建和其他 ...
随机推荐
- 海思NB-IOT模组在平台上注册
1. 添加设备,网页测试平台 https://develop.ct10649.com:8093/#/applications/1_lq7clNExjnGvPvGMG8w7_oYn4a/products ...
- 单元测试-测试技术(Unit Test)
1.1白盒测试和单元测试的区别的论述: 1) 单元测试和白盒测试是不同的,虽然单元测试和白盒测试都是关注功能,虽然他们都需要代码支持,但是级别不同, 白盒测试关注的是类中一个方法的功能是更小的单位,但 ...
- VUE 多页面打包webpack配置
思路:多配置一个main的文件,用于webpack入口使用, 然后路由的导向也应该默认指向新组件,最后通过webpack构建出一个新的独立的html文件. 缺点:生成多个html会new出多个vu ...
- google浏览器插件fq教程
google插件fq教程 思路 谷歌浏览器的应用市场 上有很多vp恩插件,不过要能访问谷歌浏览器的应用市场就得fq出去才行,而有一个很棒的插件就可以访问谷歌的旗下的一些东西,例如邮箱,Google搜索 ...
- 【VS开发】从sockaddr中取得客户端或者数据源的Ip地址和端口号
在socket编程中,服务器端accept()等待一个客户端的连接,当连接成功后,accept拷贝客户端的地址信息到sin_addr里面,我们如何从sin_addr取得此客户端的Ip地址和端口号呢? ...
- const的用法及它在C语言和C++中的不同
(1)可以定义const常量. (2)Const可以修饰函数的参数和返回值,甚至定义体.被const修饰的东西都受到强制保护. (3)Const修饰成员函数时,用于成员函数前面,则返回值不能作为左值. ...
- 感受typescript定义变量和数据类型的神奇魔力
变量和数据类型 你的Javascript能力到达瓶颈?那是因为你还不会typescript.掌握TS,让你的开发更加准确简洁. 今天的学习中,我们接着从TS的数据类型和变量入手,感受它们的奇妙魔力. ...
- dotnet core JWT Demo
JWT介绍 JSON Web Token(JWT)是目前最流行的跨域身份验证解决方案.JWT的官网地址:https://jwt.io/. 通俗地来讲,JWT是能代表用户身份的令牌,可以使用JWT令牌在 ...
- python学习-40 生产者和消费者模型
import time def buy(name): # 消费者 print('%s上街去买蛋' %name) while True: eggs=yield print('%s买了%s' %(name ...
- Redis string操作命令
字符串类型 string set 从v2.6.12版本开始,Redis增强了set功能, 语法如下: SET key value [EX seconds] [PX milliseconds] [NX ...