How to Install Apache Tomcat 8.5 on CentOS 7.3
How to Install Apache Tomcat 8.5 on CentOS 7.3
From:
https://www.howtoforge.com/tutorial/how-to-install-tomcat-on-centos/
Apache Tomcat is an open source Java Servlet implementation developed by the Apache Software Foundation. Beside Java Servlets, Tomcat implements several other Java server technologies including JavaServer Pages (JSP), Java Expression Language, and Java WebSocket. Tomcat provides an HTTP Web Server for Java applications with support for HTTP/2, OpenSSL for JSSE and TLS virtual hosting.
In this tutorial, I will show you how to install and configure Apache Tomcat 8.5 on a CentOS 7 server and how to install and configure Java on a CentOS server which is one of the prerequisites for Tomcat.
Prerequisites
- Server with CentOS 7 - 64bit
- 2 GB or more RAM (Recommended)
- Root Privileges on the server
Step 1 - Install Java (JRE and JDK)
In this step, we will install the Java JRE and JDK from the CentOS repository. We will install Java 1.8.11 on the server with the yum command.
Run this command to install Java JRE and JDK from CentOS repository with yum:
yum -y install java-1.8.0-openjdk.x86_64 java-1.8.0-openjdk-devel.x86_64It will take some time, wait until the installation finished.
Then you should check the Java version with the command below:
java -versionYou should see results similar to the ones below:
openjdk version "1.8.0_111"
OpenJDK Runtime Environment (build 1.8.0_111-b15)
OpenJDK 64-Bit Server VM (build 25.111-b15, mixed mode)
Step 2 - Configure the Java Home Environment
In the first step, we've installed Java. Now we need to configure the JAVA_HOME environment variable on the CentOS server so that Java applications can find the right Java version and Tomcat requires the JAVA_HOME environment to be setup properly, so we need to configure it.
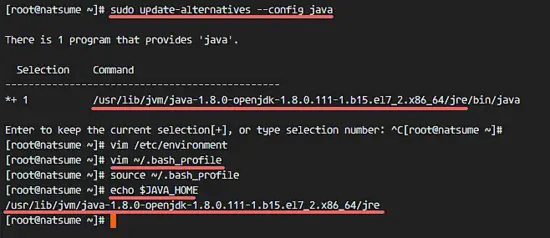
Before we configure the JAVA_HOME environment, we need to know where the Java directory is. Check the Java directory with the command below:
sudo update-alternatives --config javaJava directory = "/usr/lib/jvm/java-1.8.0-openjdk-1.8.0.111-1.b15.el7_2.x86_64/jre"
Then edit the environment file with vim:
vim /etc/environmentAdd the JAVA_HOME environment variable by adding the configuration below:
JAVA_HOME="/usr/lib/jvm/java-1.8.0-openjdk-1.8.0.111-1.b15.el7_2.x86_64/jre"Save the /etc/environment file and exit vim.
Next, edit the .bash_profile file and add the JAVA_HOME variable as well:
vim ~/.bash_profileAt the end of the file, paste the configuration below:
export JAVA_HOME=/usr/lib/jvm/java-1.8.0-openjdk-1.8.0.111-1.b15.el7_2.x86_64/jre
export PATH=$JAVA_HOME/bin:$PATH
Save the file, then reload the bash_profile file.
source ~/.bash_profileMake sure there is no error, Finally check the JAVA_HOME environment variable:
echo $JAVA_HOMEYou will see Java path directory.
Step 3 - Install Apache Tomcat 8.5
In this step, we will install Apache Tomcat under the user tomcat (which we have to create first).
Create a user and group named tomcat:
groupadd tomcat
useradd -s /bin/false -g tomcat -d /opt/tomcat tomcatNote:
-s /bin/false = disable shell access
-g tomcat = assign new user to the group tomcat
-d /opt/tomcat = define the home directory for the user
Next, go to the /opt directory and download tomcat with the wget command:
cd /opt/
wget http://mirror.wanxp.id/apache/tomcat/tomcat-8/v8.5.6/bin/apache-tomcat-8.5.6.tar.gz
Extract Tomcat and move all the files and directories that are in the 'apache-tomcat-8.5.6' directory to the 'tomcat' directory.
tar -xzvf apache-tomcat-8.5.6.tar.gz
mv apache-tomcat-8.5.6/* tomcat/
Now change the owner of the tomcat directory to the tomcat user and group.
chown -hR tomcat:tomcat tomcatStep 4 - Test Apache Tomcat
In step 3, we installed and configure tomcat. In this step, we just want to run a short test to make sure there are no errors.
Go to the tomcat/bin directory and run the command 'startup.sh' to test Apache Tomcat:
cd /opt/tomcat/bin/
./startup.sh
Make sure the result is 'Tomcat started'.
Tomcat is using port 8080 now, check the open port on the server with the netstat command.
netstat -plntu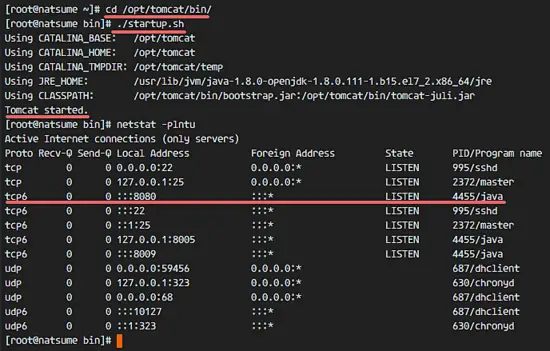
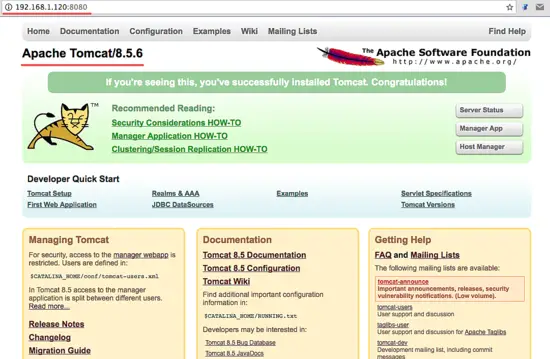
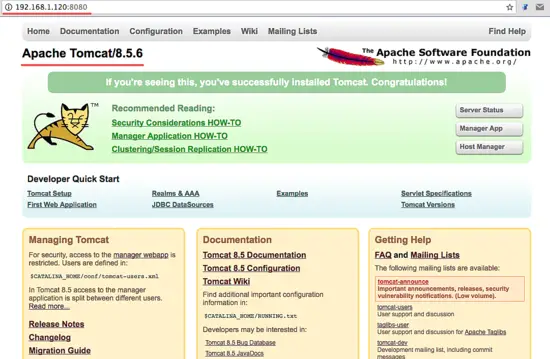
Or visit the server IP address with port 8080 - in my case 192.168.1.120:8080 - with a web browser. You will see the Apache Tomcat default page.
Next, stop Apache Tomcat and because we will run it Tomcat with a systemd service file in the final configuration. Make sure the tomcat directory is owned by the tomcat user and group.
cd /opt/tomcat/bin/
./shutdown.sh
chown -hR tomcat:tomcat /opt/tomcat/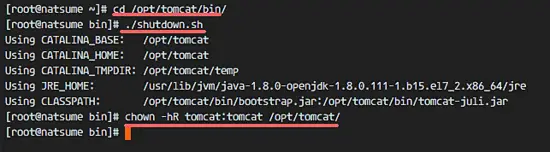
Step 5 - Setup Apache Tomcat Service
In this tutorial, we will run Apache Tomcat as tomcat user with a systemd service file for easy starting and stopping of the service. So the next step is to create a 'tomcat.service' file.
Go to the systemd system directory and create a new file 'tomcat.service'.
cd /etc/systemd/system/
vim tomcat.service
Paste the configuration below:
[Unit]
Description=Apache Tomcat 8 Servlet Container
After=syslog.target network.target

[Service]
User=tomcat
Group=tomcat
Type=forking
Environment=CATALINA_PID=/opt/tomcat/tomcat.pid
Environment=CATALINA_HOME=/opt/tomcat
Environment=CATALINA_BASE=/opt/tomcat
ExecStart=/opt/tomcat/bin/startup.sh
ExecStop=/opt/tomcat/bin/shutdown.sh
Restart=on-failure

[Install]
WantedBy=multi-user.target
Save the file and exit vim.
Reload the systemd daemon, then start and add the Apache Tomcat service at boot time.
systemctl daemon-reload
systemctl start tomcat
systemctl enable tomcat
Now check that tomcat is running by checking the open port 8080.
netstat -plntuAnd check the tomcat status, make sure the service is active.
systemctl status tomcat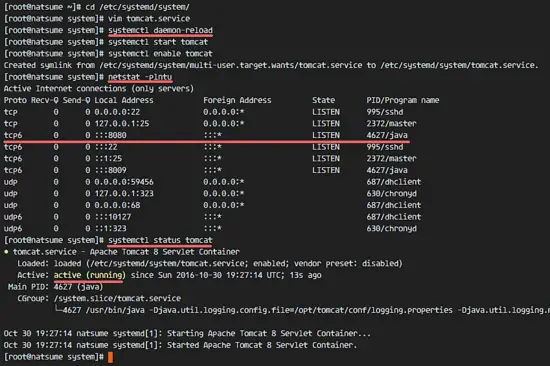
Step 6 - Configure Apache Tomcat Users
In this step, we will configure the users for Apache Tomcat. Tomcat is installed, and it's running by default on port 8080, we can access it with a web browser, but we can not access the site-manager dashboard yet. To enable and configure Tomcat users, edit the file 'tomcat-users.xml'.
Go to the tomcat configuration directory and edit the tomcat-users.xml file with vim.
cd /opt/tomcat/conf/
vim tomcat-users.xml
Create a new line under line 43 and paste configuration below:
<role rolename="manager-gui"/>
<user username="admin" password="password" roles="manager-gui,admin-gui"/>
Save the file and exit vim.
Next, go to the manager directory and edit the context.xml file.
cd /opt/tomcat/webapps/manager/META-INF/
vim context.xml
Comment out line 19 and 20.
<Context antiResourceLocking="false" privileged="true" >
<!--  <Valve className="org.apache.catalina.valves.RemoteAddrValve"
         allow="127\.\d+\.\d+\.\d+|::1|0:0:0:0:0:0:0:1" /> -->
</Context>
Save the file and exit vim.
Go to the host-manager directory and edit the context.xml file again.
cd /opt/tomcat/webapps/host-manager/META-INF/
vim context.xml
Comment out again line 19 and 20.
<Context antiResourceLocking="false" privileged="true" >
<!--  <Valve className="org.apache.catalina.valves.RemoteAddrValve"
         allow="127\.\d+\.\d+\.\d+|::1|0:0:0:0:0:0:0:1" /> -->
</Context>
Save the file and exit, then restart tomcat.
systemctl restart tomcatStep 7 - Configure Firewalld
In CentOS 7, we have a default firewall tool named firewalld. It replaces the iptables interface and connects to the Netfilter kernel code.
In this step, we will start the firewalld service and open port 8080 so we can access the Apache Tomcat server from the outside of the network.
Start the firewalld service and add it to start at boot time with the systemctl command.
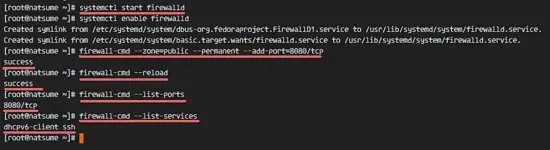
systemctl start firewalld
systemctl enable firewalld
Next, add the apache tomcat port 8080 to the firewall with the firewall-cmd command, and reload the firewalld service.
firewall-cmd --zone=public --permanent --add-port=8080/tcp
firewall-cmd --reload
Check that all the services are available in the firewall and check that the Apache Tomcat port 8080 is open.
firewall-cmd --list-ports
firewall-cmd --list-services
Apache Tomcat port 8080 is accessible from outside of the network, and the ssh port is open by default as well.
Step 8 - Testing
Open your web browser and type in your server IP with port 8080. You will see the Apache Tomcat default page.
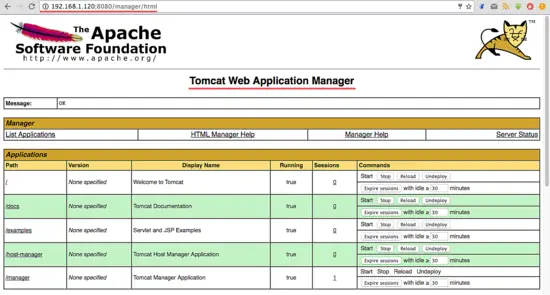
Go to the manager dashboard with URL below:
http://192.168.1.120:8080/manager/html
Type in the admin username 'admin' with password 'mypassword', the configuration that we made on step 5.
Now go to the host-manager dashboard with URL below:
http://192.168.1.120:8080/host-manager/html
Enter the admin user and password that you set in step 5, you will see the Tomcat Virtual host Manager.

Apache Tomcat 8.5 has been installed on a CentOS 7 Server.
Links
How to Install Apache Tomcat 8.5 on CentOS 7.3的更多相关文章
- How to Install Apache Solr 4.5 on CentOS 6.4
By Shay Anderson on October 2013 Knowledge Base / Linux / How to Install Apache Solr 4.5 on Cent ...
- digitalocean --- How To Install Apache Tomcat 8 on Ubuntu 16.04
https://www.digitalocean.com/community/tutorials/how-to-install-apache-tomcat-8-on-ubuntu-16-04 Intr ...
- How To Install Apache Tomcat 7 on CentOS 7 via Yum
摘自:https://www.digitalocean.com/community/tutorials/how-to-install-apache-tomcat-7-on-centos-7-via-y ...
- Install Apache, PHP And MySQL On CentOS 7 (LAMP)
This tutorial shows how you can install an Apache2 webserver on a CentOS 7.0 server with PHP5 suppor ...
- Apache Tomcat开机后台启动
作为软件开发人员,经常接触Tomcat,完成的项目,需要部署到服务器上的Tomcat,才能供其他人访问浏览. 因为存在以下问题,所以需要把Tomcat设置为后台自动启动: 1.服务器可能因环境故障面临 ...
- Apache + Tomcat + mod_jk实现集群服务
Tomcat中的集群原理是通过组播的方式进行节点的查找并使用TCP连接进行会话的复制. 实现效果:用apache 分发请求到tomcat中的对应的项目 环境说明: 操作系统:window xp Jav ...
- Apache+Tomcat构建Tomcat负载均衡集群
一.环境介绍 二.安装后端服务器 三.安装前端Apache服务 四.配置Apache使用mod_jk模块实现代理及负载均衡 五.配置Apache基于mod_proxy模块实现代理及负载均衡 六.论坛安 ...
- Apache +Tomcat的负载均衡与集群配置
实验拓扑图: 一.搭配环境 (1).Tomcat的安装和配置 Tomcat_a的ip:192.168.55.229 Tomcat_b的ip:192.168.55.231 Tomcat的需要安装jdk和 ...
- 一步一步教你如何在linux下配置apache+tomcat(转)
一步一步教你如何在linux下配置apache+tomcat 一.安装前准备. 1. 所有组件都安装到/usr/local/e789目录下 2. 解压缩命令:tar —vxzf 文件名(. ...
随机推荐
- 学习笔记<2>Android基本四大组件
<1>Activity(活动) ------与用户交互的界面 (1)Activity启动基本流程 <2>service(服务) <3>ContentProvider ...
- Hibernate,关系映射的多对一单向关联、多对一双向关联、一对一主键关联、一对一外键关联、多对多关系关联
2018-11-10 22:27:02开始写 下图内容ORM.Hibernate介绍.hibername.cfg.xml结构: 下图内容hibernate映射文件结构介绍 下图内容hibernate ...
- MongoDB在windows上的安装
D:\MongoDB\Server\4.0\bin 下载地址:https://www.mongodb.com/download-center/community 中文教程:http://www.run ...
- 原生JavaScript插件编写指南(转载)
原生js开发指南 https://www.jianshu.com/p/e65c246beac1 在jQuery大量使用的环境下,目前网上的众多jQuery插件也能基本满足要求,但是在项目具体需求下,有 ...
- window下nodejs用nodemon启动koa2项目(用cmd启动不了,要用Git Bash Here 启动才可以)
window下nodejs用nodemon启动koa2项目(用cmd启动不了,要用Git Bash Here 启动才可以)nodemon --watch 'app/**/*' -e ts --exec ...
- 以太坊ETH中智能合约消耗的Gas、Gas Limit是什么?
以太坊ETH中智能合约消耗的Gas.Gas Limit是什么? 数字货币交易一般是有交易费的,比特币(BTC)的交易费很容易理解,就是直接支付一定额度的BTC作为手续费.而以太坊(ETH)的交易费表面 ...
- Django框架----命名URL和URL反向解析
在使用Django 项目时,一个常见的需求是获得URL 的最终形式,以用于嵌入到生成的内容中(视图中和显示给用户的URL等)或者用于处理服务器端的导航(重定向等).人们强烈希望不要硬编码这些URL(费 ...
- pat 团体赛练习题集 L2-008. 最长对称子串
对给定的字符串,本题要求你输出最长对称子串的长度.例如,给定"Is PAT&TAP symmetric?",最长对称子串为"s PAT&TAP s&quo ...
- li设置inline-block后,li左边出现空隙问题。
方法1:在ul设置font-size=0,然后再li再单独设置font-size 方法2:li连着写不要换行,也可以解决. <ul> <li>测试1</li>< ...
- 使用Oracle数据库时的org.springframework.jdbc.BadSqlGrammarException:
org.springframework.jdbc.BadSqlGrammarException: ### Error querying database. Cause: java.sql.SQLExc ...