WPF实现Win10汉堡菜单
WPF开发者QQ群: 340500857 | 微信群 -> 进入公众号主页 加入组织
前言
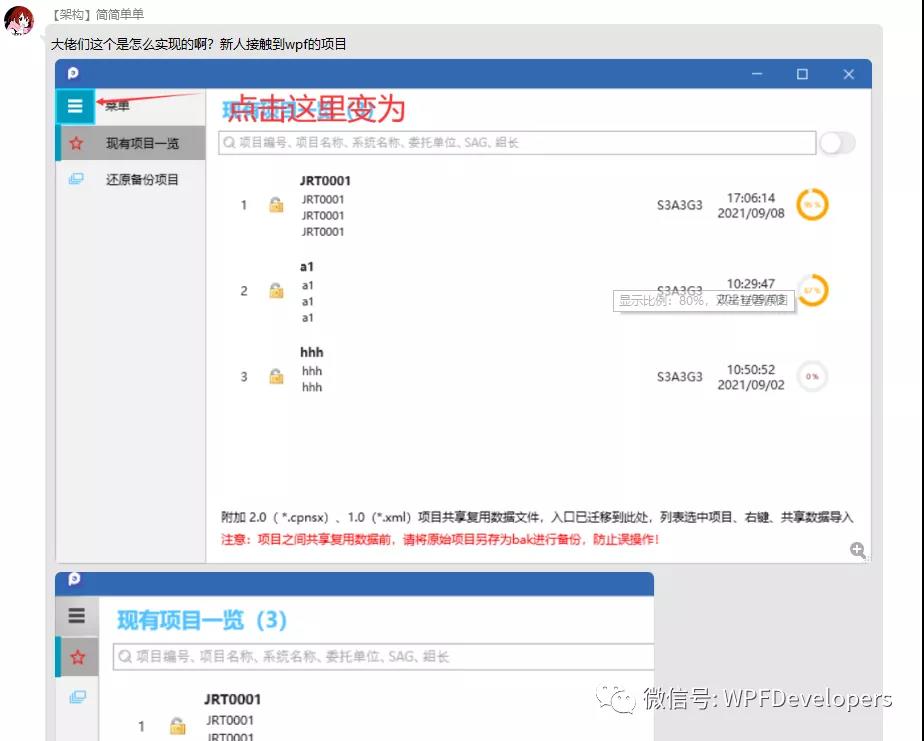
有小伙伴提出需要实现Win10汉堡菜单效果。

由于在WPF中没有现成的类似UWP的汉堡菜单,所以我们自己实现一个。
一、创建 Win10Menu.cs 菜单继承 ContentControl 代码如下。
1、IsOpen :判定是否展开、收起 。
2、Content :存放菜单集合。
3、SelectionIndicatorColor :选中菜单状态栏颜色。
4、MenuItemForeground:菜单集字体颜色。
using System.Collections.Generic;

using System.Windows;

using System.Windows.Controls;

using System.Windows.Media;

namespace WPFDevelopers.Controls

{

    public class Win10Menu : ContentControl

    {

        public new List<Win10MenuItem> Content

        {

            get { return (List<Win10MenuItem>)GetValue(ContentProperty); }

            set { SetValue(ContentProperty, value); }

        }

        public new static readonly DependencyProperty ContentProperty =

            DependencyProperty.Register("Content", typeof(List<Win10MenuItem>), typeof(Win10Menu),new FrameworkPropertyMetadata(null));

        static Win10Menu()

        {

            DefaultStyleKeyProperty.OverrideMetadata(typeof(Win10Menu), new FrameworkPropertyMetadata(typeof(Win10Menu)));

        }

        public override void BeginInit()

        {

            Content = new List<Win10MenuItem>();

            base.BeginInit();

        }

        public bool IsOpen

        {

            get { return (bool)GetValue(IsOpenProperty); }

            set

            {

                SetValue(IsOpenProperty, value);

            }

        }

        public static readonly DependencyProperty IsOpenProperty =

            DependencyProperty.Register("IsOpen", typeof(bool), typeof(Win10Menu), new PropertyMetadata(true));

        public System.Windows.Media.Brush MenuIconColor

        {

            get { return (System.Windows.Media.Brush)GetValue(MenuIconColorProperty); }

            set { SetValue(MenuIconColorProperty, value); }

        }

        public static readonly DependencyProperty MenuIconColorProperty =

            DependencyProperty.Register("MenuIconColor", typeof(System.Windows.Media.Brush), typeof(Win10Menu), new PropertyMetadata(Brushes.White));

        public Brush SelectionIndicatorColor

        {

            get { return (Brush)GetValue(SelectionIndicatorColorProperty); }

            set { SetValue(SelectionIndicatorColorProperty, value); }

        }

        public static readonly DependencyProperty SelectionIndicatorColorProperty =

            DependencyProperty.Register("SelectionIndicatorColor", typeof(Brush), typeof(Win10Menu), new PropertyMetadata(Brushes.Red));

        public Brush MenuItemForeground

        {

            get { return (Brush)GetValue(MenuItemForegroundProperty); }

            set { SetValue(MenuItemForegroundProperty, value); }

        }

        public static readonly DependencyProperty MenuItemForegroundProperty =

            DependencyProperty.Register("MenuItemForeground", typeof(Brush), typeof(Win10Menu), new PropertyMetadata(Brushes.Transparent));

    }

}
二、创建 Win10Menu.xaml 为 Win10Menu.cs 进行布局 代码如下
Win10Menu.xaml 思路如下
1、ToggleButton :控制IsChecked动画如下
IsOpen = False:DoubleAnimation修改controls:Win10Menu的Width为 180。
IsOpen = True :DoubleAnimation修改controls:Win10Menu的Width为 50。
2、ListBox:ItemsSource="{TemplateBinding Content}"展示菜单集合。
需注意如下
ScrollViewer.HorizontalScrollBarVisibility="Disabled",不然当Win10Menu的Width 为50时会出现滚动条。
<Style TargetType="ToggleButton">

        <Setter Property="IsChecked" Value="False"/>

        <Setter Property="Template">

            <Setter.Value>

                <ControlTemplate TargetType="{x:Type ToggleButton}">

                    <Grid Background="{TemplateBinding Background}">

                        <ContentPresenter HorizontalAlignment="Center" VerticalAlignment="Center" />

                    </Grid>

                </ControlTemplate>

            </Setter.Value>

        </Setter>

        <Style.Triggers>

            <Trigger Property="IsMouseOver" Value="True">

                <Setter Property="Opacity" Value="0.8" />

                <Setter Property="Cursor" Value="Hand" />

                <Setter Property="Template">

                    <Setter.Value>

                        <ControlTemplate TargetType="{x:Type ToggleButton}">

                            <Border

                                        Background="{TemplateBinding Background}"

                                        BorderBrush="Black"

                                        BorderThickness="1">

                                <ContentPresenter HorizontalAlignment="Center" VerticalAlignment="Center" />

                            </Border>

                        </ControlTemplate>

                    </Setter.Value>

                </Setter>

            </Trigger>

        </Style.Triggers>

</Style>

    <Style TargetType="ListBox">

        <Setter Property="Background" Value="Transparent" />

        <Setter Property="BorderBrush" Value="Transparent" />

        <Setter Property="Template">

            <Setter.Value>

                <ControlTemplate>

                    <ScrollViewer>

                        <ItemsPresenter Margin="0" />

                    </ScrollViewer>

                </ControlTemplate>

            </Setter.Value>

        </Setter>

</Style>

<Style TargetType="controls:Win10Menu">

        <Setter Property="Width" Value="50"/>

        <Setter Property="Visibility" Value="Visible"/>

        <Setter Property="IsOpen" Value="True"/>

        <Setter Property="Template">

            <Setter.Value>

                <ControlTemplate TargetType="controls:Win10Menu">

                    <Grid Background="{TemplateBinding Background}">

                        <ToggleButton HorizontalAlignment="Left" Background="#333"

                                      VerticalAlignment="Top" Height="40" Width="50"

                                      IsChecked="{Binding RelativeSource={RelativeSource AncestorType={x:Type controls:Win10Menu}}, Path=IsOpen}">

                            <Path HorizontalAlignment="Center"

                                  VerticalAlignment="Center"

                                  Stretch="Uniform" Width="20"

                                  Fill="{TemplateBinding MenuIconColor}"

                                  Data="{StaticResource PathMenu}"/>

                        </ToggleButton>

                        <ListBox ItemsSource="{TemplateBinding Content}"

                                 HorizontalAlignment="Left" Margin="0,40,0,0"

                                 VerticalAlignment="Top"

                                 ScrollViewer.HorizontalScrollBarVisibility="Disabled"

                                 SelectedIndex="0"/>

                    </Grid>

                </ControlTemplate>

            </Setter.Value>

        </Setter>

        <Style.Triggers>

            <Trigger Property="IsOpen" Value="False">

                <Trigger.EnterActions>

                    <BeginStoryboard>

                        <Storyboard>

                            <DoubleAnimation

                                         Storyboard.TargetProperty="Width"

                                         To="180"

                                         Duration="0:0:0.2"/>

                        </Storyboard>

                    </BeginStoryboard>

                </Trigger.EnterActions>

                <Trigger.ExitActions>

                    <BeginStoryboard>

                        <Storyboard>

                            <DoubleAnimation

                                         Storyboard.TargetProperty="Width"

                                         To="50"

                                         Duration="0:0:0.2"/>

                        </Storyboard>

                    </BeginStoryboard>

                </Trigger.ExitActions>

            </Trigger>

        </Style.Triggers>

</Style>
三、创建 Win10MenuItem.cs 继承 ListBoxItem 代码如下。
Win10MenuItem.cs 思路如下
1、Text 菜单文本内容展示。
2、Icon 菜单图标为ImageSource类型。
3、SelectionIndicatorColor选中的侧边状态颜色。
4、SelectionCommand 选中事件。
using System.Windows;

using System.Windows.Controls;

using System.Windows.Input;

using System.Windows.Media;

namespace WPFDevelopers.Controls

{

    public class Win10MenuItem : ListBoxItem

    {

        static Win10MenuItem()

        {

            DefaultStyleKeyProperty.OverrideMetadata(typeof(Win10MenuItem), new FrameworkPropertyMetadata(typeof(Win10MenuItem)));

        }

        public string Text

        {

            get { return (string)GetValue(TextProperty); }

            set { SetValue(TextProperty, value); }

        }

        public static readonly DependencyProperty TextProperty =

            DependencyProperty.Register("Text", typeof(string), typeof(Win10MenuItem), new PropertyMetadata(string.Empty));

        public ImageSource Icon

        {

            get { return (ImageSource)GetValue(IconProperty); }

            set { SetValue(IconProperty, value); }

        }

        public static readonly DependencyProperty IconProperty =

            DependencyProperty.Register("Icon", typeof(ImageSource), typeof(Win10MenuItem), new PropertyMetadata(null));

        public Brush SelectionIndicatorColor

        {

            get { return (Brush)GetValue(SelectionIndicatorColorProperty); }

            set { SetValue(SelectionIndicatorColorProperty, value); }

        }

        public static readonly DependencyProperty SelectionIndicatorColorProperty =

            DependencyProperty.Register("SelectionIndicatorColor", typeof(Brush), typeof(Win10MenuItem), new PropertyMetadata(Brushes.Blue));

        public ICommand SelectionCommand

        {

            get { return (ICommand)GetValue(SelectionCommandProperty); }

            set { SetValue(SelectionCommandProperty, value); }

        }

        public static readonly DependencyProperty SelectionCommandProperty =

            DependencyProperty.Register("SelectionCommand", typeof(ICommand), typeof(Win10MenuItem), new PropertyMetadata(null));

    }

}
四、创建 Win10MenuItem.xaml 为 Win10MenuItem.cs 进行布局 代码如下
<Style x:Key="ButtonFocusVisual">

        <Setter Property="Control.Template">

            <Setter.Value>

                <ControlTemplate>

                    <Border>

                        <Rectangle

            Margin="2"

            StrokeThickness="1"

            Stroke="#60000000"

            StrokeDashArray="1 2"/>

                    </Border>

                </ControlTemplate>

            </Setter.Value>

        </Setter>

</Style>

    <!-- Fill Brushes -->

    <SolidColorBrush x:Key="NormalBrush" Color="Transparent" />

    <SolidColorBrush x:Key="DarkBrush" Color="#ddd" />

    <SolidColorBrush x:Key="PressedBrush" Color="#80FFFFFF" />

    <SolidColorBrush x:Key="DisabledForegroundBrush" Color="Transparent" />

    <SolidColorBrush x:Key="DisabledBackgroundBrush" Color="Transparent" />

    <!-- Border Brushes -->

    <SolidColorBrush x:Key="NormalBorderBrush" Color="Transparent" />

    <SolidColorBrush x:Key="PressedBorderBrush" Color="Transparent" />

    <SolidColorBrush x:Key="DefaultedBorderBrush" Color="Transparent" />

    <SolidColorBrush x:Key="DisabledBorderBrush" Color="Transparent" />

    <Style TargetType="Button">

        <Setter Property="SnapsToDevicePixels" Value="true"/>

        <Setter Property="OverridesDefaultStyle" Value="true"/>

        <Setter Property="FocusVisualStyle" Value="{StaticResource ButtonFocusVisual}"/>

        <Setter Property="MinHeight" Value="23"/>

        <Setter Property="MinWidth" Value="75"/>

        <Setter Property="Cursor" Value="Hand" />

        <Setter Property="Template">

            <Setter.Value>

                <ControlTemplate TargetType="Button">

                    <Border

          x:Name="Border"

          CornerRadius="0"

          BorderThickness="0"

          Background="{StaticResource NormalBrush}"

          BorderBrush="{StaticResource NormalBorderBrush}">

                        <ContentPresenter

            HorizontalAlignment="Stretch"

            VerticalAlignment="Stretch"

            RecognizesAccessKey="True"/>

                    </Border>

                    <ControlTemplate.Triggers>

                        <Trigger Property="IsKeyboardFocused" Value="true">

                            <Setter TargetName="Border" Property="BorderBrush" Value="{StaticResource DefaultedBorderBrush}" />

                        </Trigger>

                        <Trigger Property="IsDefaulted" Value="true">

                            <Setter TargetName="Border" Property="BorderBrush" Value="{StaticResource DefaultedBorderBrush}" />

                        </Trigger>

                        <Trigger Property="IsMouseOver" Value="true">

                            <Setter TargetName="Border" Property="Background" Value="{StaticResource DarkBrush}" />

                        </Trigger>

                        <Trigger Property="IsPressed" Value="true">

                            <Setter TargetName="Border" Property="Background" Value="{StaticResource PressedBrush}" />

                            <Setter TargetName="Border" Property="BorderBrush" Value="{StaticResource PressedBorderBrush}" />

                        </Trigger>

                        <Trigger Property="IsEnabled" Value="false">

                            <Setter TargetName="Border" Property="Background" Value="{StaticResource DisabledBackgroundBrush}" />

                            <Setter TargetName="Border" Property="BorderBrush" Value="{StaticResource DisabledBorderBrush}" />

                            <Setter Property="Foreground" Value="{StaticResource DisabledForegroundBrush}"/>

                        </Trigger>

                    </ControlTemplate.Triggers>

                </ControlTemplate>

            </Setter.Value>

        </Setter>

</Style>

    <Style TargetType="controls:Win10MenuItem">

        <Setter Property="HorizontalContentAlignment" Value="Stretch" />

        <Setter Property="Foreground" Value="{Binding RelativeSource={RelativeSource AncestorType={x:Type controls:Win10Menu}}, Path=MenuItemForeground}"/>

        <Setter Property="SelectionIndicatorColor" Value="{Binding RelativeSource={RelativeSource AncestorType={x:Type controls:Win10Menu}}, Path=SelectionIndicatorColor}"/>

        <Setter Property="Template">

            <Setter.Value>

                <ControlTemplate TargetType="controls:Win10MenuItem">

                    <Button x:Name="PART_Button" Height="44"

                            Command="{TemplateBinding SelectionCommand}"

                            ToolTip="{TemplateBinding Text}"

                            HorizontalContentAlignment="Stretch" VerticalContentAlignment="Stretch">

                        <Grid>

                            <Grid.ColumnDefinitions>

                                <ColumnDefinition Width="5"/>

                                <ColumnDefinition/>

                            </Grid.ColumnDefinitions>

                            <Grid Grid.ColumnSpan="2">

                                <Grid Margin="0" Width="300">

                                    <Grid.ColumnDefinitions>

                                        <ColumnDefinition Width="45"/>

                                        <ColumnDefinition/>

                                    </Grid.ColumnDefinitions>

                                    <Image Grid.Column="0" Source="{TemplateBinding Icon}" Margin="10,5,5,5"/>

                                    <TextBlock Text="{TemplateBinding Text}" Grid.Column="1"

                                                   Margin="10,0,0,0" HorizontalAlignment="Left"

                                                   VerticalAlignment="Center"

                                                   FontSize="{StaticResource TitleFontSize}"

                                                   Foreground="{TemplateBinding Foreground}"

                                                   TextWrapping="Wrap"/>

                                </Grid>

                            </Grid>

                            <Grid Name="PART_ItemSelectedIndicator"

                                  Grid.Column="0"

                                  Background="{TemplateBinding SelectionIndicatorColor}"

                                  Visibility="Collapsed" />

                        </Grid>

                    </Button>

                    <ControlTemplate.Triggers>

                        <Trigger Property="IsSelected" Value="True">

                            <Setter TargetName="PART_ItemSelectedIndicator" Property="Visibility" Value="Visible" />

                        </Trigger>

                        <Trigger SourceName="PART_Button" Property="IsPressed" Value="True">

                            <Trigger.ExitActions>

                                <BeginStoryboard>

                                    <Storyboard>

                                        <BooleanAnimationUsingKeyFrames Storyboard.TargetProperty="IsSelected">

                                            <DiscreteBooleanKeyFrame KeyTime="00:00:00" Value="True" />

                                        </BooleanAnimationUsingKeyFrames>

                                    </Storyboard>

                                </BeginStoryboard>

                            </Trigger.ExitActions>

                        </Trigger>

                    </ControlTemplate.Triggers>

                </ControlTemplate>

            </Setter.Value>

        </Setter>

</Style>
五、创建Win10MenuExample.xaml代码如下
Win10MenuExample.xaml实现思路如下
1、Grid布局分为两列设置第零列Width为Auto自适应。
2、第零列为Win10menu。
3、第一列为Frame设置NavigationUIVisibility="Hidden"
<UserControl x:Class="WPFDevelopers.Samples.ExampleViews.Win10Menu.Win10MenuExample"

             xmlns="http://schemas.microsoft.com/winfx/2006/xaml/presentation"

             xmlns:x="http://schemas.microsoft.com/winfx/2006/xaml"

             xmlns:mc="http://schemas.openxmlformats.org/markup-compatibility/2006"

             xmlns:d="http://schemas.microsoft.com/expression/blend/2008"

             xmlns:local="clr-namespace:WPFDevelopers.Samples.ExampleViews.Win10Menu"

             xmlns:wpfdev="https://github.com/yanjinhuagood/WPFDevelopers"

             mc:Ignorable="d"

             d:DesignHeight="450" d:DesignWidth="800">

    <Grid Background="#FF7B7BFF">

        <Grid.ColumnDefinitions>

            <ColumnDefinition  Width="Auto"/>

            <ColumnDefinition/>

        </Grid.ColumnDefinitions>

        <wpfdev:Win10Menu Background="#eee"

                          SelectionIndicatorColor="{StaticResource PrimaryPressedSolidColorBrush}"

                          MenuItemForeground="{StaticResource BlackSolidColorBrush}" HorizontalAlignment="Left">

            <wpfdev:Win10Menu.Content>

                <wpfdev:Win10MenuItem Icon="pack://application:,,,/Images/CircularMenu/2.png" Text="主页"

                                      SelectionCommand="{Binding HomeCommand,RelativeSource={RelativeSource AncestorType=local:Win10MenuExample}}"/>

                <wpfdev:Win10MenuItem Icon="pack://application:,,,/Images/CircularMenu/4.png" Text="Edge"

                                      SelectionCommand="{Binding EdgeCommand,RelativeSource={RelativeSource AncestorType=local:Win10MenuExample}}"/>

                <wpfdev:Win10MenuItem Icon="pack://application:,,,/Images/CircularMenu/1.png" Text="云盘"

                                      SelectionCommand="{Binding CloudCommand,RelativeSource={RelativeSource AncestorType=local:Win10MenuExample}}"/>

                <wpfdev:Win10MenuItem Icon="pack://application:,,,/Images/CircularMenu/8.png" Text="邮件"

                                      SelectionCommand="{Binding MailCommand,RelativeSource={RelativeSource AncestorType=local:Win10MenuExample}}"/>

                <wpfdev:Win10MenuItem Icon="pack://application:,,,/Images/CircularMenu/6.png" Text="视频"

                                      SelectionCommand="{Binding VideoCommand,RelativeSource={RelativeSource AncestorType=local:Win10MenuExample}}"/>

            </wpfdev:Win10Menu.Content>

        </wpfdev:Win10Menu>

        <Frame Name="myFrame" Grid.Column="1" Margin="0,40,0,0"

               NavigationUIVisibility="Hidden"></Frame>

    </Grid>

</UserControl>
六、创建Win10MenuExample.xaml.cs代码如下
Win10MenuExample.xaml实现思路如下
1、定义List<Uri>赋值集合为菜单需要跳转的页面。
2、构造为myFrame.Navigate(_uriList[0]);第零页。
using System;

using System.Collections.Generic;

using System.Windows;

using System.Windows.Controls;

using System.Windows.Input;

using WPFDevelopers.Samples.Helpers;

namespace WPFDevelopers.Samples.ExampleViews.Win10Menu

{

    /// <summary>

    /// Win10MenuExample.xaml 的交互逻辑

    /// </summary>

    public partial class Win10MenuExample : UserControl

    {

        private List<Uri> _uriList = new List<Uri>()

        {

            new Uri("ExampleViews/Win10Menu/HomePage.xaml",UriKind.Relative),

            new Uri("ExampleViews/Win10Menu/EdgePage.xaml",UriKind.Relative),

        };

        public Win10MenuExample()

        {

            InitializeComponent();

            myFrame.Navigate(_uriList[0]);

        }

        public ICommand HomeCommand => new RelayCommand(obj =>

        {

            myFrame.Navigate(_uriList[0]);

        });

        public ICommand EdgeCommand => new RelayCommand(obj =>

        {

            myFrame.Navigate(_uriList[1]);

        });

        public ICommand CloudCommand => new RelayCommand(obj =>

        {

            MessageBox.Show("点击了云盘");

        });

        public ICommand MailCommand => new RelayCommand(obj =>

        {

            MessageBox.Show("点击了邮件");

        });

        public ICommand VideoCommand => new RelayCommand(obj =>

        {

            MessageBox.Show("点击了视频");

        });

    }

}
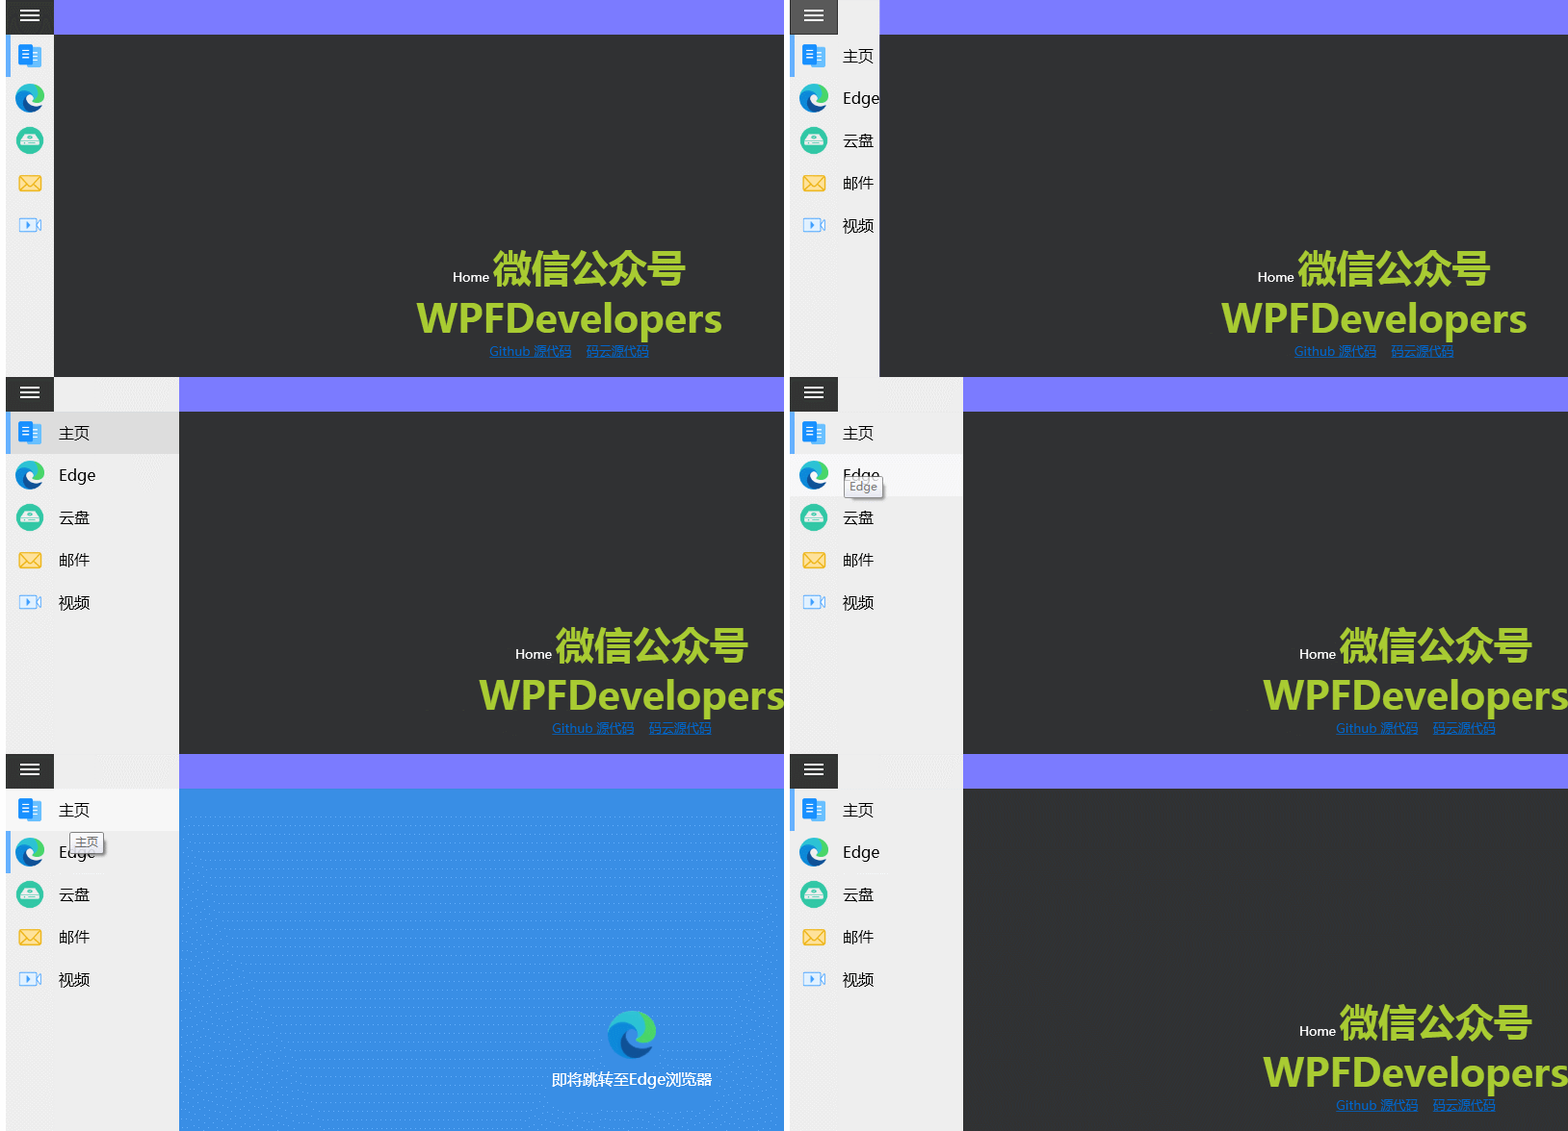
效果预览

更多教程欢迎关注微信公众号:加微信群限时

WPF开发者QQ群: 340500857
blogs: https://www.cnblogs.com/yanjinhua/p/14345136.html
源码Github:https://github.com/yanjinhuagood/WPFDevelopers.git
gitee:https://gitee.com/yanjinhua/WPFDevelopers.git
WPF实现Win10汉堡菜单的更多相关文章
- Win10 UWP 开发系列:使用SplitView实现汉堡菜单及页面内导航
在Win10之前,WP平台的App主要有枢轴和全景两种导航模式,我个人更喜欢Pivot即枢轴模式,可以左右切换,非常方便.全景视图因为对设计要求比较高,自己总是做不出好的效果.对于一般的新闻阅读类Ap ...
- 【Win10开发】关于汉堡菜单-SplitView的用法
SplitView(汉堡菜单)是win10新加的一种控件,顾名思义,其实就是将视图分割成两部分,废话不多说,下面来介绍一下SplitView的基本用法. 首先介绍几个SplitView经常用到的属性. ...
- 张高兴的 UWP 开发笔记:汉堡菜单进阶
不同于Windows 8应用,Windows 10引入了"汉堡菜单"这一导航模式.说具体点,就拿官方的天气应用来说,左上角三条横杠的图标外加一个SplitView控件组成的这一导航 ...
- (UWP开发)在ListView中通过向右滑动展开汉堡菜单
首先在移动APP开发中,手势滑动已经成为一个必备的技能,无论大大小小的APP都需要拥有手势滑动功能.在Android和iOS操作系统的APP中,手势滑动比较普及.然而由于国内有关UWP应用的教程比较少 ...
- Win10系统菜单打不开问题的解决,难道是Win10的一个Bug ?
Win10左下角菜单打不开,好痛苦,点击右下角的时间也没反应,各种不爽,折磨了我好几天,重装又不忍心,实在费劲,一堆开发环境要安装,上网找了很多方法都不适用.今天偶然解决了,仔细想了下,难道是Win1 ...
- win10开始菜单打不开怎么办 win菜单键没反应解决办法
win10开始菜单打不开怎么办 win菜单键没反应解决办法 —————————————————————————————————————————————————————————————————————— ...
- 10分钟制作UWP汉堡菜单
什么是汉堡菜单? 汉堡菜单,指的是一个可以弹出和收回的侧边栏.在UWP和Android应用中,汉堡菜单都非常常见. 首先我们列出所有需要掌握的前置知识: 1,SplitView 2,StackPane ...
- [WPF疑难]如何禁用WPF窗口的系统菜单(SystemMenu)
原文 [WPF疑难]如何禁用WPF窗口的系统菜单(SystemMenu) [WPF疑难]如何禁用WPF窗口的系统菜单(SystemMenu) 周银辉 点击窗口左上角图标时弹出来的菜单也就是这里所说的系 ...
- 张高兴的 Xamarin.Forms 开发笔记:为 Android 与 iOS 引入 UWP 风格的汉堡菜单 ( MasterDetailPage )
所谓 UWP 样式的汉堡菜单,我曾在"张高兴的 UWP 开发笔记:汉堡菜单进阶"里说过,也就是使用 Segoe MDL2 Assets 字体作为左侧 Icon,并且左侧使用填充颜色 ...
随机推荐
- Ubuntu 16.04 Install NVidia Driver (download from nvidia official site)
sudo apt-get update sudo apt-mark hold libreoffice sudo apt-get update && sudo apt-get upgra ...
- VSCode中相对路径设置问题
使用的版本 对于import xxx操作,相对路径为sys.path 对于open("test.txt",'r')文件打开操作,相对路径为os.getcwd() 对于termina ...
- 用C++实现的Eratosthenes筛法程序
运行示例 只输出素数总数的运行示例 PS H:\Read\num\x64\Release> .\esieve.exe Eratosthenes sieve: a method to find o ...
- Tomcat集群Cluster实现原理
1.Tomcat集群 Tomcat集群的问题之一是如何处理Session,Session是有状态的,请求到了Tomcat,后续流传是要根据上下文(Context)来进行的.我们可以改造 ...
- Oracle环境配置之山路十八弯
Oracle数据库的安装 背景: 因为疫情原因,只能在家上网课,学习Oracle的时候需要安装数据库,但是!! 安装的时候出现了报错: 无法检查指定的位置是否位于 CFS 上. 出来这个基本无解,这个 ...
- python variable scope 变量作用域
python 中变量的作用域经常让我感到很迷 In Python, on the other hand, variables declared in if-statements, for-loop b ...
- hibernate01
什么是hibernate ORM框架/持久层框架 jdbc的一个框架 object reference mapping 通过管理对象来改变数据库中的数据 通过管理对象来操作数据库 hibernate的 ...
- Django——session保持登录
Django操作session语法: # 1.设置Sessions值 request.session['session_name'] ="admin" # 2.获取Sessions ...
- Identity用户管理入门二(显示用户列表)
在Controllers中新建AccountController,并在构造方法(函数)中注入SignInManager,UserManager UserManager 用户管理(注册,查找,修改, ...
- 手工添加数据到Chart
private void button1_Click(object sender, EventArgs e) { //清除Series chart1.Series.Clear(); Random ra ...
