转一篇Unity的相机动画控制
最近真是忙,连研究细看的时间都没有了,原帖地址:https://alastaira.wordpress.com/2013/11/08/smooth-unity-camera-transitions-with-animation-curves/
先贴到这里
I’m creating a game in which I want to transition between two camera views – a top-down, overhead camera that gives a zoomed-out world view, and an over-the-shoulder style forward-facing camera to give a close-up view. Let’s say for the sake of discussion that these positions are defined relative to the player, as follows:
- Overview: Position x/y/z: (0, 100, 0). Rotation x/y/z: (-90, 0, 0) (60 units above, rotated straight down)
- Close-up: Position x/y/z: (0, 0, –0.5). Rotation x/y/z: (0, 0, 0) (0.5 units behind, aligned with player direction)
Rather than simply cut between the two camera views, or present the top-down view in a second minimap camera alongside the main game view, I want to use a single camera and transition smoothly between the two view locations. Initially, I tried to simply interpolate the position and rotation of the camera between the two locations (using lerp() for linear interpolation of the position vectors and slerp() for the rotation quaternions), based on a single zoom parameter:
transform.position = Vector3.Lerp(zoomstart.position, zoomend.position, zoom);transform.rotation = Quaternion.Slerp(zoomstart.rotation, zoomend.rotation, zoom); |
This gives:

However, this didn’t create the effect I wanted – I wanted to remain largely looking down as the camera zoomed in, and only pull up to match that player’s look vector at relatively close zoom levels, and also to ease the movement at both ends of the zoom.
My next thought was to ease in/out the camera motion using one of the functions described in this earlier post – perhaps a sigmoid curve, so that the rate of rotation was greatest at either extreme of the zoom spectrum. But I had trouble finding a function that exactly described the motion I wanted to create.
And then I discovered Unity’s AnimationCurves. I don’t know why they’re called animation curves, because they’re not specific to animations at all – they allow you to define custom curves based on an arbitrary number of control points (keys), and then evaluate the value of the function at any point along the curve.
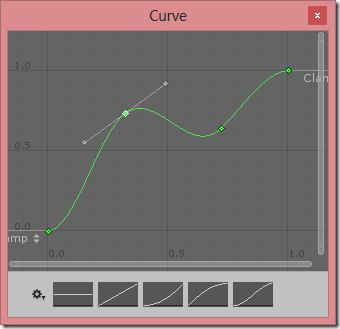
To look up the value at any point along the curve use the Evaluate() method. For example, in the curve above, the y value of the curve at x=0.5 is given by Curve.Evaluate(0.5) , which results in 0.692. Using this you can smoothly adjust any variable based on a single dimensional input.
Curves for Smooth Camera Movement
I have three camera transform parameters that change between my two camera locations – the offset position in y and z axes, and the rotation in the x axis. Since each animation curve can express only one dimension, I thought I might need to create three animation curves – one to describe each parameter that varies as the camera zooms in. However, on more thought I decided a better way: to have one curve to control the rotation around the x axis (i.e. adjusting the pitch of the camera), and then a second curve to set the distance which the camera should be offset back based on the forward direction of the camera at that point. Since the camera rotates about the x axis, translating back along its normal means that the second curve will govern both the height (y) and offset (z) in a single curve.
You can create animation curves in the inspector, but I initialised them in code as follos:
public class CameraScript : MonoBehaviour { // How camera pitch (i.e. rotation about x axis) should vary with zoom public AnimationCurve pitchCurve; // How far the camera should be placed back along the chosen pitch based on zoom public AnimationCurve distanceCurve; // Use this for initialization void Start () { // Create 'S' shaped curve to adjust pitch // Varies from 0 (looking forward) at 0, to 90 (looking straight down) at 1 pitchCurve = AnimationCurve.EaseInOut(0.0f, 0.0f, 1.0f, 90.0f); // Create exponential shaped curve to adjust distance // So zoom control will be more accurate at closer distances, and more coarse further away Keyframe[] ks = new Keyframe[2]; // At zoom=0, offset by 0.5 units ks[0] = new Keyframe(0, 0.5f); ks[0].outTangent = 0; // At zoom=1, offset by 60 units ks[1] = new Keyframe(1, 60); ks[1].inTangent = 90; distanceCurve = new AnimationCurve(ks); }} |
This generates the following curves:
| Pitch
|
Distance
|


I then evaluate the appropriate point from each curve based on the camera zoom level, as follows:
// Calculate the appropriate pitch (x rotation) for the camera based on current zoom float targetRotX = pitchCurve.Evaluate(zoom);// The desired yaw (y rotation) is to match that of the target objectfloat targetRotY = target.rotation.eulerAngles.y;// Create target rotation as quaternion// Set z to 0 as we don't want to roll the cameraQuaternion targetRot = Quaternion.Euler(targetRotX, targetRotY, 0.0f); // Calculate in world-aligned axis, how far back we want the camera to be based on current zoomVector3 offset = Vector3.forward * distanceCurve.Evaluate(zoom);// Then subtract this offset based on the current camera rotationVector3 targetPos = target.position - targetRot * offset; |

Finally, rather than setting the camera position/rotation directly, I lerp/slerp between the current transform.position/rotation towards the target position/rotation to smooth the movement and get the result as follows, which I’m pretty happy with (scene view on the left, resulting camera view on the right):
转一篇Unity的相机动画控制的更多相关文章
- 关于Unity中Mecanim动画的动画状态代码控制与代码生成动画控制器
对于多量的.复杂的.有规律的控制器使用代码生成 动画状态代码控制 1:每个动画状态,比如进入状态,离开状态, 等都有可能需要代码来参与和处理,比如,进入这个动画单元后做哪些事情,来开这个动画单元后做哪 ...
- unity 对Animator动画系统的研究
unity的新动画系统叫Mecanim,使用Animator来取代旧系统Animation,按Unity文档的惯例:知识点主要分2部分:unity manual和unity script,读者可以边看 ...
- Unity MegaFiers 顶点动画
使用 MegaFiers 插件,能够使得Unity支持顶点动画的播放. 官方视频教程例如以下: 在这里简单測试使用下,环境例如以下: Blender 2.72 Unity 4.5.4 Mega ...
- Unity正交相机智能包围物体(组)方案
Unity正交相机智能包围物体(组)方案 目录 Unity正交相机智能包围物体(组)方案 一.技术背景 二.相关概念 2.1 正交摄像机 2.2 正交相机的Size 2.3 相机的Aspect 2.4 ...
- 深入学习jQuery动画控制
× 目录 [1]动画状态 [2]停止动画 [3]动画延迟[4]全局控制 前面的话 jQuery动画可以使用fade.hide.slide等方法实现基本动画效果,可以使用animate实现自定义动画,甚 ...
- iOS开发Swift篇—(六)流程控制
iOS开发Swift篇—(六)流程控制 一.swift中的流程控制 Swift支持的流程结构如下: 循环结构:for.for-in.while.do-while 选择结构:if.switch 注意:这 ...
- i3D的一篇Unity教程中的笔记
原地址:http://blog.sina.com.cn/s/blog_72b936d80100wwej.html 以下是i3D的一篇Unity教程中的笔记. i3D的这篇教程是[i3D.Next-Ge ...
- Unity Shader序列帧动画学习笔记
Unity Shader序列帧动画学习笔记 关于无限播放序列帧动画的一点问题 在学shader的序列帧动画时,书上写了这样一段代码: fixed4 frag(v2f i){ // 获得整数时间 flo ...
- unity代码添加动画,并传参数
测试界面 button一个 sprite一个 测试代码 public class BgObject : MonoBehaviour { void Start() { List<string> ...
随机推荐
- mysql 触发器的创建 修改 删除
//做一个简单的练习,创建一个简单的触发器 完成添加文章的时候,自动加上时间,默认作者 为 ‘日记本的回忆‘ show columns from test; //查看表结构 //查看已存在触发器 sh ...
- django自动化部署脚本
while read line;do echo'kill '$line; kill $line; done < /tmp/celeryd.pid while read line;do echo' ...
- Java的各种工具类
下面是java的各种工具,包括获取时间和时间比较,检验集合和字符串是否为空和长度大小等等 1 import java.io.BufferedReader; import java.io.File; i ...
- POJ 3384 Feng Shui --直线切平面
题意:房间是一个凸多边形,要在里面铺设两条半径为r的圆形地毯,可以重叠,现在要求分别铺设到哪,使地毯所占的地面面积最大. 解法:要使圆形地毯所占面积最大,圆形地毯一定是与边相切的,这样才能使尽量不重叠 ...
- 创建MyOffice项目
创建查看评分窗体(FrmLOOK),添加定义成员数组,将员工数据绑定到FrmLOOK窗体的ListView控件上 public ListViewItem lv; private void Form1_ ...
- JAVA中的单利
单列:单例模式分三种:懒汉式单例.饿汉式单例.登记式单例三种.单例模式有一下特点:1.单例类只能有一个实例.2.单例类必须自己自己创建自己的唯一实例.3.单例类必须给所有其他对象提供这一实例. 一.懒 ...
- [No000028]Python的使用之禅及程序员应该明白的一些道理
最近疯狂的学习ruby和python着两门语言,看到书本上一些比较赞同的段子,摘抄并翻译如下: Python的使用之禅 Beautiful is better than ugly. 美丽好过丑陋Exp ...
- 在移动端如何选择字体大小和布局的单位,px或dp?
android开发中,文字大小的单位是sp,非文字的尺寸单位用dp,但是我们在设计稿用的单位是px.这些单位如何换算,是设计师.开发者需要了解的关键. 简单理解的话,px(像素)是我们UI设计师在PS ...
- 后缀自动机&序列自动机综合
好像序列自动机还没有写过- 串长为n的串共有n+1个节点,除了串中的n个节点,还有一个空的根节点放在串首.每个节点至多有26条出边,每条边连向它之后的第一个字符. 串中的任意一个子序列对应了一条根到某 ...
- [Cache] C#操作缓存--CacheHelper缓存帮助类 [复制链接]
using System;using System.Web;using System.Collections; namespace DotNet.Utilities{ public class Cac ...