C#开发Windows服务详细流程
1.Windows服务简单介绍
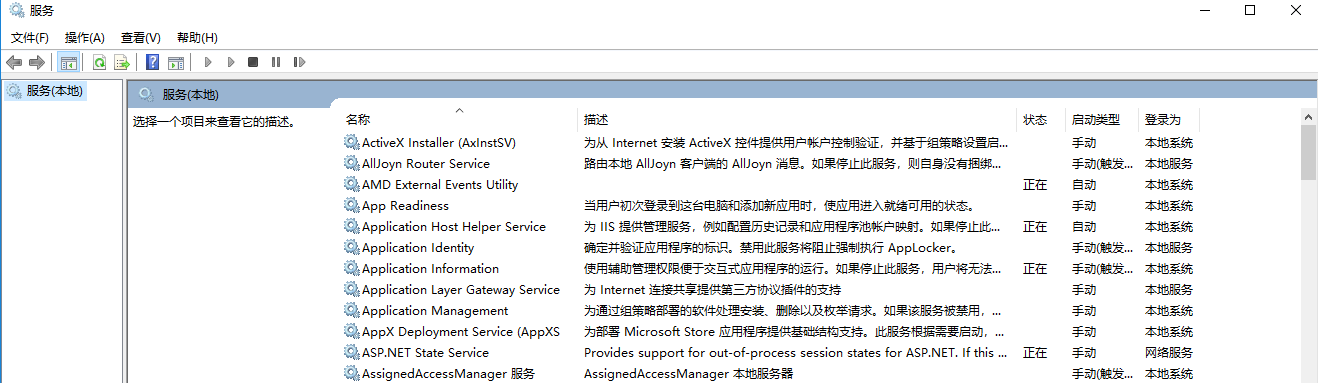
Windows服务程序是在Windows操作系统下能完成特定功能的可执行的应用程序,主要用于长时间运行的功能或者执行定时任务。一般情况下,用户不能通过用户界面来安装和启动Windows服务程序,服务的启动方式有自动启动和手动启动两种。我们可以在运行中输入services.msc 命令打开服务管理界面,在这里可以进行启动或者停止服务:
2.C#开发windows服务
1.windows服务开发流程
1.1 windows的基本开发流程
使用.Net可以很方便地开发windows服务,下边通过一个栗子演示下开发windows服务的简单流程。
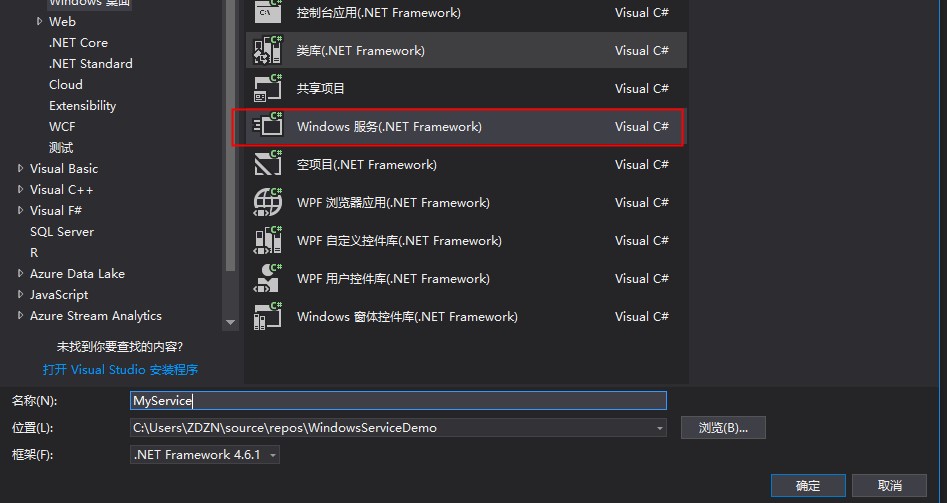
首先创建一个Windows服务项目,如下图我们创建了一个叫MyService的服务项目
然后打开自动生成的Service1.cs,该文件默认有两个方法: OnStart()和OnStop() ,OnStart()指定当服务启动时要执行的操作,OnStop()指定当服务停止时要执行的操作。 我们重写OnStart()方法,让服务开启的时候,每隔一秒在一个文本文件中记录当前时间,代码如下图

然后在右键Service1.cs文件,选择查看设计器,在界面上右键选择添加安装程序,如下图

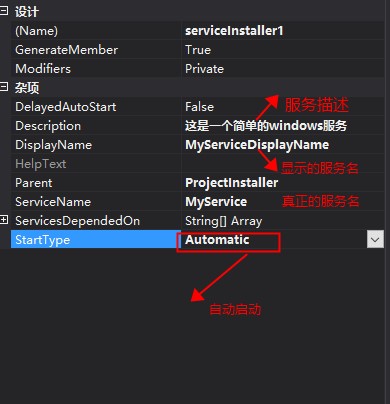
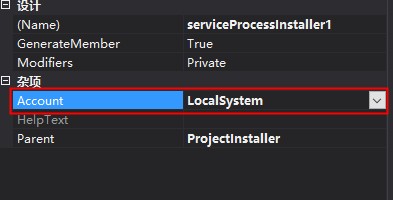
修改serviceInstaller和serviceProcessInstaller,如下图所示,到这里服务的创建工作就完成了
1.2 安装和卸载Windows服务项目
我们先通过下边命令来安装和卸载服务,其中第二行命令用于安装服务,命令的地址是我们服务项目生成的exe文件所在路径,第三行命令用于卸载服务。
cd C:\Windows\Microsoft.NET\Framework\v4.0.30319

InstallUtil C:\Users\ZDZN\source\repos\WindowsServiceDemo\WindowsServiceInstall\bin\Debug\MyService.exe    ----------安装服务
InstallUtil -u C:\Users\ZDZN\source\repos\WindowsServiceDemo\WindowsServiceInstall\bin\Debug\MyService.exe ----------卸载服务
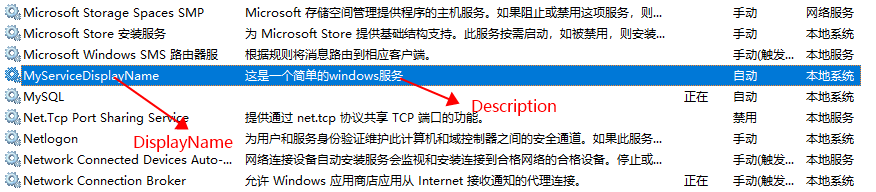
执行成功后在服务管理界面可以看到我们刚才安装的服务,这说明服务已经安装成功了:
我们可以在命令行中通过以下命令控制服务的开启和停止:
net start MyService //开启服务

net stop MyService //停止服务
sc delete MyService //删除服务
如果程序没有错误的话,服务启动后会在F盘中生成一个hello.txt文件,内容如下:

2.通过Winform控制windows服务
虽然通过命令行可以实现Windows服务的安装、卸载、启动、停止等操作,但是这样对于用户来说还是太过麻烦。如果能通过Winform来实现这些功能,用户使用起来就方便多了。怎么让Winform控制windows服务呢?
首先要知道的一些知识:使用AssemblyInstaller可以进行Windows服务的安装和卸载,ServiceController可以控制windows服务的启动,停止,暂停,继续等,知道了这些就容易实现了。
添加一个winform应用程序,引用我们的服务项目,程序代码如下,这里的命名都很明显就不详细说明:
    public partial class Form1 : Form

    {

        public Form1()

        {

            InitializeComponent();

        }

        //设置服务地址和服务名

        string serviceFilePath = $"{Application.StartupPath}/MyService.exe";

        string serviceName = "MyService";

        private void btnInstall_Click(object sender, EventArgs e)

        {

            Task.Run(() =>

            {

                ShowMessage("开始安装服务...");

                if (IsServiceExisted(serviceName))

                {

                    UninstallService(serviceFilePath);

                }

                InstallService(serviceFilePath);

            });

        }

        private void btnStart_Click(object sender, EventArgs e)

        {

            Task.Run(() =>

            {

                ShowMessage("服务正在启动...");

                if (IsServiceExisted(serviceName))

                {

                    ServiceStart(serviceName);

                    ShowMessage("服务已启动");

                }

            });

        }

        private void btnStop_Click(object sender, EventArgs e)

        {

            Task.Run(() =>

            {

                ShowMessage("服务正在停止...");

                if (IsServiceExisted(serviceName))

                {

                    ServiceStop(serviceName);

                    ShowMessage("服务已停止");

                }

            });

        }

        private void btnUninstall_Click(object sender, EventArgs e)

        {

            Task.Run(() =>

            {

                ShowMessage("开始卸载服务...");

                if (this.IsServiceExisted(serviceName))

                {

                    this.ServiceStop(serviceName);

                }

                this.UninstallService(serviceFilePath);

            });

        }

        #region 方法封装

        private void ShowMessage(string s)

        {

            Action setState = () =>

            {

                myTxtBox.AppendText(DateTime.Now.ToString("f") + ":");

                myTxtBox.AppendText(Environment.NewLine);

                myTxtBox.AppendText(s);

                myTxtBox.AppendText(Environment.NewLine);

            };

            myTxtBox.Invoke(setState);

        }

        //判断服务是否存在

        private bool IsServiceExisted(string serviceName)

        {

            try

            {

                ServiceController[] services = ServiceController.GetServices();

                foreach (ServiceController sc in services)

                {

                    if (sc.ServiceName.ToLower() == serviceName.ToLower())

                    {

                        return true;

                    }

                }

                return false;

            }

            catch (Exception ex)

            {

                ShowMessage(ex.Message);

                return false;

            }

        }

        //安装服务

        private void InstallService(string serviceFilePath)

        {

            try

            {

                using (AssemblyInstaller installer = new AssemblyInstaller())

                {

                    installer.UseNewContext = true;

                    installer.Path = serviceFilePath;

                    IDictionary savedState = new Hashtable();

                    installer.Install(savedState);

                    installer.Commit(savedState);

                    ShowMessage("服务安装完成");

                }

            }

            catch (Exception ex)

            {

                ShowMessage(ex.Message);

            }

        }

        //卸载服务

        private void UninstallService(string serviceFilePath)

        {

            try

            {

                using (AssemblyInstaller installer = new AssemblyInstaller())

                {

                    installer.UseNewContext = true;

                    installer.Path = serviceFilePath;

                    installer.Uninstall(null);

                    ShowMessage("服务卸载完成");

                }

            }

            catch (Exception ex)

            {

                ShowMessage(ex.Message);

            }

        }

        //启动服务

        private void ServiceStart(string serviceName)

        {

            try

            {

                using (ServiceController control = new ServiceController(serviceName))

                {

                    if (control.Status == ServiceControllerStatus.Stopped)

                    {

                        control.Start();

                    }

                }

            }

            catch (Exception ex)

            {

                ShowMessage(ex.Message);

            }

        }

        //停止服务

        private void ServiceStop(string serviceName)

        {

            try

            {

                using (ServiceController control = new ServiceController(serviceName))

                {

                    if (control.Status == ServiceControllerStatus.Running)

                    {

                        control.Stop();

                    }

                }

            }

            catch (Exception ex)

            {

                ShowMessage(ex.Message);

            }

        }

        #endregion

        #region 页面元素

        private void Form1_Load(object sender, EventArgs e)

        {

            Control.CheckForIllegalCrossThreadCalls = false;

            timer1.Interval = ;

            timer1.Enabled = true;

        }

        //btn状态

        private void ButtonState()

        {

            if (IsServiceExisted(serviceName))

            {

                btnInstall.Enabled = false;

                btnUninstall.Enabled = true;

                using (var service = new ServiceController(serviceName))

                {

                    if (service.Status == ServiceControllerStatus.Running || service.Status == ServiceControllerStatus.StartPending)

                    {

                        btnUninstall.Enabled = false;

                        btnStart.Enabled = false;

                        btnStop.Enabled = true;

                    }

                    else

                    {

                        btnUninstall.Enabled = true;

                        btnStart.Enabled = true;

                        btnStop.Enabled = false;

                    }

                }

            }

            else

            {

                btnInstall.Enabled = true;

                btnUninstall.Enabled = false;

                btnStart.Enabled = false;

                btnStop.Enabled = false;

            }

        }

        //底部label状态

        private void LabelState()

        {

            if (!IsServiceExisted(serviceName))

            {

                this.labState.Text = $"【{serviceName}】服务未安装";

                return;

            }

            using (var service = new ServiceController(serviceName))

            {

                switch (service.Status)

                {

                    case ServiceControllerStatus.Running:

                        this.labState.Text = $"【{serviceName}】服务已启动";

                        break;

                    case ServiceControllerStatus.StartPending:

                        this.labState.Text = $"【{serviceName}】服务正在启动...";

                        break;

                    case ServiceControllerStatus.Stopped:

                        this.labState.Text = $"【{serviceName}】服务已停止";

                        break;

                    case ServiceControllerStatus.StopPending:

                        this.labState.Text = $"【{serviceName}】服务正在停止...";

                        break;

                    default:

                        break;

                }

            }

        }

        private void timer1_Tick(object sender, EventArgs e)

        {

            ButtonState();

            LabelState();

        }

        #endregion

    }
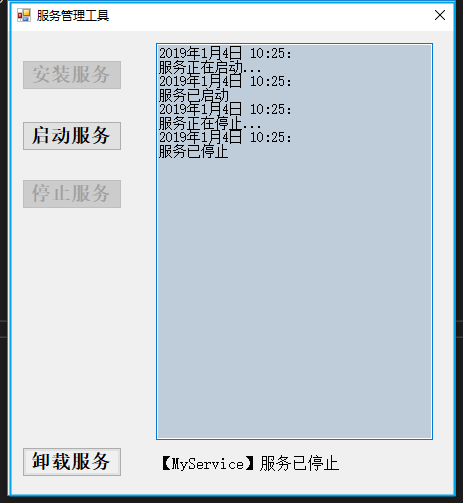
完成这一步后,我们就可以通过可视化界面对服务的安装,卸载,运行,停止进行控制了。
补充:使用TopShelf也可以实现Windows服务的快速开发,参考文档 http://docs.topshelf-project.com/en/latest/index.html
C#开发Windows服务详细流程的更多相关文章
- C#开发Windows服务 附简单实例实现禁止QQ运行
本实例主要实现下面三个基本功能 1.C#开发windows服务 2.禁止QQ等程序运行 3.为windows服务创建自动安装程序 下面针对这三个基本功能进行实现 一.C#开发windows服务 Win ...
- C# DateTime的11种构造函数 [Abp 源码分析]十五、自动审计记录 .Net 登陆的时候添加验证码 使用Topshelf开发Windows服务、记录日志 日常杂记——C#验证码 c#_生成图片式验证码 C# 利用SharpZipLib生成压缩包 Sql2012如何将远程服务器数据库及表、表结构、表数据导入本地数据库
C# DateTime的11种构造函数 别的也不多说没直接贴代码 using System; using System.Collections.Generic; using System.Glob ...
- C#开发windows服务如何调试——资料整理
原文标题:C# Windows服务程序如何进行调试 原文地址:https://jingyan.baidu.com/article/456c463b18e1b00a583144b3.html 第一种: ...
- 使用Visual Studio 2015 Community 开发windows服务
昨天研究在.NET下开发Windows服务程序,期间遇到一些小问题,这里仅将自己的开发过程和需要注意的地方写下和广大网友分享…… 1.基础 Windows服务是指系统启动时能够自己运行的程序.W ...
- VS2013开发Windows服务项目
这篇随笔里,我将介绍如何用VS2013开发Windows服务项目,实现的功能是定时发送电子邮件. 开发环境:VS2013,SQL Server2008,采用C#语言开发 步骤一:创建Windows服务 ...
- 使用Topshelf开发Windows服务、log4net记录日志
开发windows服务,除了在vs里新建服务项目外(之前有写过具体开发方法,可点击查看),还可以使用Topshelf. 不过使用topshelf需要.netframework 4.5.2版本,在vs2 ...
- 开发Windows服务
在开发Windows服务时需要注意一点,如果在开发完成后,需要通过命令来进行安装的,那么在开发的时候,需要在服务类上面添加一个安装文件.如下图: 添加完成后,就 ...
- c#金额转换成中文大写金额 .Net开发Windows服务
c#金额转换成中文大写金额 2018-08-24 转别人 c#金额转换成中文大写金额 /// <summary> /// 金额转换成中文大写金额 /// </summary> ...
- C#常规开发Windows服务
.Net平台下开发Windows服务的支持库很多,除了通过标准的Windows服务项目,还有一些优秀的开源架构比如:TopSelf:本文以常规项目为例 一.开发 1.新建[Windows服务] 项目: ...
随机推荐
- MongoDB在Linux系统下的安装与启动
Mongodb介绍 MongoDB是一个开源文档数据库,提供高性能,高可用性和自动扩展,官方文档:https://docs.mongodb.com/manual/introduction/ Mongo ...
- PowerShell执行脚本时“系统上禁止运行脚本”问题解决
PowerShell执行脚本策略错误 错误信息:PowerShell运行脚本错误--"系统上禁止运行脚本" 原因:默认执行策略为Restricted 解决:执行Set-Execut ...
- easyUI行删除
function removeRow(target,number) { if (number) { var index = getRowIndex(target); $datagrid.datagri ...
- 基于Angular和Spring WebFlux做个小Demo
前言 随着Spring Boot2.0正式发布,Spring WebFlux正式来到了Spring Boot大家族里面.由于Spring WebFlux可以通过更少的线程去实现更高的并发和使用更少的硬 ...
- Jquery自动补全插件的使用
1.引入css和js <script src="js/jquery-ui.min.js"></script> <link href="cs ...
- PHP程序员从小白到高手,掌握这些技能少走弯路
PHP程序员从小白到高手,掌握这些技能少走弯路 PHP究竟是不是最好的语言,一直以来是程序员最大的“争议”,但毋庸置疑的是,PHP绝对是最有前途和力量的变成语言,也是你入门最值得学习的语言. 作为老牌 ...
- 2019年桌面Linux需要做好的7件事
2019年桌面Linux需要做好的7件事 新的一年已经到来,这意味着又一年过去了,Linux还是没有发现自己主宰了桌面.Linux在许多方面做得非常好,在接下来的几周,我们将研究一些最适合您各种需求的 ...
- OpenCV 与 OpenGL 的关系是什么?
OpenCV是 Open Source Computer Vision LibraryOpenGL是 Open Graphics LibraryOpenCV主要是提供图像处理和视频处理的基础算法库,还 ...
- React-propsType和defaultProps
TodoItem.propTypes={ content:PropTypes.string, text:PropTypes.string.isRequired, handleDeleteItem:Pr ...
- xgboost 参数调优指南
一.XGBoost的优势 XGBoost算法可以给预测模型带来能力的提升.当我对它的表现有更多了解的时候,当我对它的高准确率背后的原理有更多了解的时候,我发现它具有很多优势: 1 正则化 标准GBDT ...