Android XML shape 标签使用详解(apk瘦身,减少内存好帮手)
Android XML shape 标签使用详解
一个android开发者肯定懂得使用 xml 定义一个 Drawable,比如定义一个 rect 或者 circle 作为一个 View 的背景。但是,也肯定也有人在能使用 Drawable 的地方选择使用一张 png 图(或者是一张 .9 图)作为 View 的背景,因为后者把问题交给 UI 设计人员去了,省事。当然,使用图片这种在项目中也很常见,如果不考虑 apk 大小,内存占用问题的话,是没有任何问题的。如果要给 apk 瘦身,减少内存占用,那么本文 Drawable 的价值就提现出来了。首先提出几个问题?
备注:本文所说的 Drawable 都特指 shape 标签定义的 Drawable
- shape 标签定义的 Drawable 是哪种类型的 Drawable?
- 使用 Drawable 有什么好处?
- 什么情况下选择使用 Drawable,而不是使用一张图,反之呢?
- shape 标签能定义多少种类型的 Drawable?(这是本文的重点,方便我这种懒惰的程序员直接拷贝代码修改)
本文需要先了解shape标签的基本用法,关于Android shape标签的各个属性详解请移步:
Android GradientDrawable(shape标签定义) 静态使用和动态使用(圆角,渐变实现)
首先给出GitHub地址,后续有新的内容会持续加入
Github地址:https://github.com/PopFisher/AndroidDrawClassic
下面依次回答上面几个问题
shape标签定义的Drawable是哪种类型的Drawable?
shape 标签定义的 Drawable 类型对应 GradientDrawable
这里可能会认为是 ShapeDrawale ,我一开始也是这样认为的,因为我看到官方文档上说 ShapeDrawable 也是使用 shape 标签定义的,可是去看 GradientDrawable 的时候也是同样的解释,简直懵逼了,后面经过代码实际检验,shape 标签定义的 Drawable 能直接强制转换为 GradientDrawable,而不能转换为 ShapeDrawable,这个时候只能认为是 ShapeDrawable 的文档解释有点问题了,可能文档错了吧。
ShapeDrawable 与 GradientDrawale 确实有很多相似之处,具体情况后续单独写文章来说明,本文不涉及 ShapeDrawable 的其他内容。
使用Drawable有什么好处?
- 很方便得到一个矩形,圆,椭圆,圆环,很容易维护和修改
- 很方便实现圆角,渐变(线性渐变,径向渐变,扫描渐变)
- 代替图片作为 View 的背景,减少 apk 的体积(减少 apk 体积最明显最有效的步骤就是去掉图片)
- 大图片耗内存,使用 Drawable 节省内存,Android 本身对 Drawable 做了很好的优化(内存优化需要考虑)
什么情况下选择使用Drawable,而不是使用一张图,反之呢?
- 理论上能用 Drawable 的地方就用 Drawable
- 如果能够通过 shape 标签就能定义的几何图形就能满足需求,就不用图片来表示
- 渐变类型的背景也尽量使用 shape 来实现
- 不规则的,复杂的图形还是只能使用图片,比如要一个表示手机的图标,一个人的头像
- 有些特殊拉升效果需要使用 .9.png 图片(尽可能的小吧,越小越省内存)
shape标签能定义多少种类型的Drawable?
shape 可以定义四种类型的几何图形,由 android:shape 属性指定
line --> 线
rectangle --> 矩形(圆角矩形)
oval --> 椭圆,圆
ring --> 圆环
shape 可以定义边框属性
有边框,无边框,虚线边框,实线边框
shape 可以实现矩形圆角效果
可以指定其中一个角或者多个角设置圆角效果
指定圆角半径设置圆角的大小
shape 可以实现三种渐变,由子标签 gradient 实现
linear --> 线性渐变(水平,垂直,对角线三个渐变)
sweep --> 扫描渐变(只支持顺时针方向,其实颜色反过来就跟逆时针一样的了)
radial --> 径向渐变(由指定的中心点开始向外渐变,指定半径)
xml 实现只支持三个颜色,startColor,CenterColor,endColor
更多更详细关于 shape 的介绍请移步 Android GradientDrawable(shape标签定义) 静态使用和动态使用(圆角,渐变实现)
由上面的组合可以定义很多 Drawable,下面依次进行介绍:
线(实线+虚线)
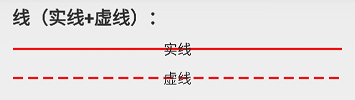
实线:line_solid.xml
<?xml version="1.0" encoding="utf-8"?>

<!-- 实线 -->

<shape xmlns:android="http://schemas.android.com/apk/res/android"

	android:shape="line"

	android:useLevel="true">

<stroke

    android:width="2dp"

    android:color="#ffff0000" />

</shape>
虚线:line_dashed.xml
<?xml version="1.0" encoding="utf-8"?>

<!--虚线

    设置类型会line

    需要关闭硬件加速虚线才能绘制出来,布局文件中使用的时候需要设置android:layerType="software"

    android:width 线宽,布局文件中的View的高度需要比这个值大才可以绘制出来

    android:dashWidth 每段破折线的长度

    android:dashGap="5dp"每段破折线之间的间隔-->

<shape xmlns:android="http://schemas.android.com/apk/res/android"

    android:shape="line"

    android:useLevel="true">

    <stroke

        android:width="2dp"

        android:dashGap="5dp"

        android:dashWidth="10dp"

        android:color="#ffff0000" />

</shape>
矩形(边框+填充)
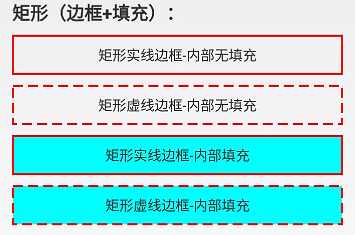
矩形实线边框内部无填充:rect_solid_border.xml
<?xml version="1.0" encoding="utf-8"?>

<!-- 实线边框 -->

<shape xmlns:android="http://schemas.android.com/apk/res/android"

    android:shape="rectangle"

    android:useLevel="true">

    <stroke

        android:width="2dp"

        android:color="#ffff0000" />

</shape>
矩形虚线边框内部无填充:rect_dashed_border.xml
<?xml version="1.0" encoding="utf-8"?>

<!-- 虚线边框 -->

<shape xmlns:android="http://schemas.android.com/apk/res/android"

    android:shape="rectangle"

    android:useLevel="true">

    <stroke

        android:width="2dp"

        android:color="#ffff0000"

        android:dashGap="5dp"

        android:dashWidth="10dp" />

</shape>
矩形实线边框-内部填充:rect_solid_border_and_fill.xml
<?xml version="1.0" encoding="utf-8"?>

<!-- 实线边框+内部填充 -->

<shape xmlns:android="http://schemas.android.com/apk/res/android"

    android:shape="rectangle"

    android:useLevel="true">

    <stroke

        android:width="2dp"

        android:color="#ffff0000" />

    <solid android:color="#ff00ffff" />

</shape>
矩形虚线边框-内部填充:rect_dashed_border_and_fill.xml
<?xml version="1.0" encoding="utf-8"?>

<!-- 虚线边框+内部填充 -->

<shape xmlns:android="http://schemas.android.com/apk/res/android"

    android:shape="rectangle"

    android:useLevel="true">

    <stroke

        android:width="2dp"

        android:color="#ffff0000"

        android:dashGap="5dp"

        android:dashWidth="10dp" />

    <solid android:color="#ff00ffff" />

</shape>
圆角矩形
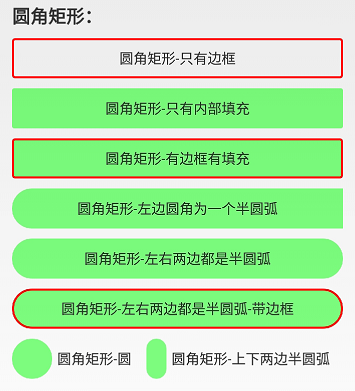
圆角矩形-只有边框:rect_rounded_border.xml
<?xml version="1.0" encoding="utf-8"?>

<!-- 矩形边框圆角 -->

<shape xmlns:android="http://schemas.android.com/apk/res/android"

    android:shape="rectangle"

    android:useLevel="true">

    <size android:height="100dp"

        android:width="100dp"/>

    <stroke

        android:width="2dp"

        android:color="#ffff0000" />

    <corners android:bottomLeftRadius="2dp"

        android:bottomRightRadius="2dp"

        android:topLeftRadius="2dp"

        android:topRightRadius="2dp" />

</shape>
圆角矩形-只有内部填充:rect_rounded_fill.xml
<?xml version="1.0" encoding="utf-8"?>

<!-- 圆角矩形 -->

<shape xmlns:android="http://schemas.android.com/apk/res/android"

    android:shape="rectangle"

    android:useLevel="true">

    <size android:height="100dp"

        android:width="100dp"/>

    <solid android:color="#8000ff00" />

    <corners android:bottomLeftRadius="2dp"

        android:bottomRightRadius="2dp"

        android:topLeftRadius="2dp"

        android:topRightRadius="2dp" />

</shape>
圆角矩形-有边框有填充:rect_rounded_border_and_fill.xml
<?xml version="1.0" encoding="utf-8"?>

<!-- 矩形边框+填充 圆角 -->

<shape xmlns:android="http://schemas.android.com/apk/res/android"

    android:shape="rectangle"

    android:useLevel="true">

    <size android:height="100dp"

        android:width="100dp"/>

    <stroke

        android:width="2dp"

        android:color="#ffff0000" />

    <solid android:color="#8000ff00" />

    <corners android:bottomLeftRadius="2dp"

        android:bottomRightRadius="2dp"

        android:topLeftRadius="2dp"

        android:topRightRadius="2dp" />

</shape>
圆角矩形-左边圆角为一个半圆弧:rect_rounded_left_arc.xml
<?xml version="1.0" encoding="utf-8"?>

<!-- 矩形圆角+左右两边为一个圆弧 -->

<shape xmlns:android="http://schemas.android.com/apk/res/android"

    android:shape="rectangle"

    android:useLevel="true">

    <size

        android:width="50dp"

        android:height="10dp" />

    <solid android:color="#8000ff00" />

    <!-- 圆角半径是高度的一般就是一个圆弧了 -->

    <corners

        android:bottomLeftRadius="20dp"

        android:topLeftRadius="20dp" />

</shape>
圆角矩形-左右两边都是半圆弧:rect_rounded_left_right_arc.xml
<?xml version="1.0" encoding="utf-8"?>

<!-- 矩形圆角+左右两边为一个圆弧 -->

<shape xmlns:android="http://schemas.android.com/apk/res/android"

    android:shape="rectangle"

    android:useLevel="true">

    <size

        android:width="50dp"

        android:height="10dp" />

    <solid android:color="#8000ff00" />

    <!-- 圆角半径是高度的一般就是一个圆弧了 -->

    <corners android:radius="20dp" />

</shape>
圆角矩形-左右两边都是半圆弧-带边框:rect_rounded_left_right_arc_border.xml
<?xml version="1.0" encoding="utf-8"?>

<!-- 矩形圆角+左右两边为一个圆弧 -->

<shape xmlns:android="http://schemas.android.com/apk/res/android"

    android:shape="rectangle"

    android:useLevel="true">

    <size

        android:width="50dp"

        android:height="10dp" />

    <stroke android:color="#ffff0000"

        android:width="2dp"/>

    <solid android:color="#8000ff00" />

    <!-- 圆角半径是高度的一般就是一个圆弧了 -->

    <corners android:radius="20dp" />

</shape>
圆角矩形-圆:rect_rounded_arc.xml
<?xml version="1.0" encoding="utf-8"?>

<!-- 矩形圆角+圆出一个圆弧 -->

<shape xmlns:android="http://schemas.android.com/apk/res/android"

    android:shape="rectangle"

    android:useLevel="true">

    <size android:height="10dp"

        android:width="10dp"/>

    <solid android:color="#8000ff00" />

    <corners android:radius="20dp" />

</shape>
圆角矩形-上下两边半圆弧:rect_rounded_top_bottom_arc.xml
<?xml version="1.0" encoding="utf-8"?>

<!-- 矩形圆角+左右两边为一个圆弧 -->

<shape xmlns:android="http://schemas.android.com/apk/res/android"

    android:shape="rectangle"

    android:useLevel="true">

    <size

        android:width="10dp"

        android:height="60dp" />

    <solid android:color="#8000ff00" />

    <!-- 圆角半径是高度的一般就是一个圆弧了 -->

    <corners android:radius="10dp" />

</shape>
渐变效果(以矩形为例)
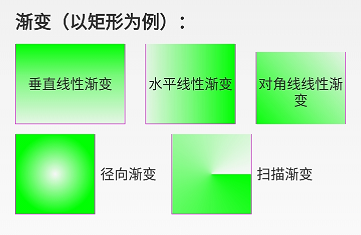
垂直线性渐变:rect_gradient_linear_vertical.xml
<?xml version="1.0" encoding="utf-8"?>

<!-- 矩形内部填充-线性垂直渐变 -->

<shape xmlns:android="http://schemas.android.com/apk/res/android"

    android:shape="rectangle"

    android:useLevel="true">

    <size

        android:width="@dimen/shape_size"

        android:height="@dimen/shape_size" />

    <stroke

        android:width="1px"

        android:color="#ffff00ff" />

    <!-- 调整angle实现水平渐变,垂直渐变或者对角渐变 -->

    <gradient

        android:angle="-45"

        android:centerX="0.5"

        android:centerY="0.4"

        android:centerColor="#8000ff00"

        android:endColor="#1000ff00"

        android:startColor="#ff00ff00"

        android:type="linear" />

</shape>
水平线性渐变:rect_gradient_linear_horizon.xml
<?xml version="1.0" encoding="utf-8"?>

<!-- 矩形内部填充-线性水平渐变 -->

<shape xmlns:android="http://schemas.android.com/apk/res/android"

    android:shape="rectangle"

    android:useLevel="true">

    <size

        android:width="@dimen/shape_size"

        android:height="@dimen/shape_size" />

    <stroke

        android:width="1px"

        android:color="#ffff00ff" />

    <!-- 调整angle实现水平渐变,垂直渐变或者对角渐变 -->

    <gradient

        android:angle="0"

        android:centerX="0.5"

        android:centerY="0.5"

        android:centerColor="#8000ff00"

        android:endColor="#ff00ff00"

        android:startColor="#1000ff00"

        android:type="linear" />

</shape>
对角线线性渐变:rect_gradient_linear_diagonal.xml
<?xml version="1.0" encoding="utf-8"?>

<!-- 矩形内部填充-线性对角线渐变 -->

<shape xmlns:android="http://schemas.android.com/apk/res/android"

    android:shape="rectangle"

    android:useLevel="true">

    <size

        android:width="@dimen/shape_size"

        android:height="@dimen/shape_size" />

    <stroke

        android:width="1px"

        android:color="#ffff00ff" />

    <!-- 调整angle实现水平渐变,垂直渐变或者对角渐变 -->

    <gradient

        android:angle="45"

        android:centerX="0.5"

        android:centerY="0.5"

        android:centerColor="#8000ff00"

        android:endColor="#1000ff00"

        android:startColor="#ff00ff00"

        android:type="linear" />

</shape>
径向渐变:rect_gradient_radial.xml
<?xml version="1.0" encoding="utf-8"?>

<!-- 矩形内部填充-径向渐变,一般不用在rect上,用到圆或者椭圆上 -->

<shape xmlns:android="http://schemas.android.com/apk/res/android"

    android:shape="rectangle"

    android:useLevel="true">

    <size

        android:width="@dimen/shape_size"

        android:height="@dimen/shape_size" />

    <stroke

        android:width="1px"

        android:color="#ffff00ff" />

    <!-- 径向渐变angle无效 -->

    <gradient

        android:angle="0"

        android:centerX="0.5"

        android:centerY="0.5"

        android:startColor="#0000ff00"

        android:endColor="#ff00ff00"

        android:gradientRadius="40dp"

        android:type="radial" />

</shape>
扫描渐变:rect_gradient_sweep.xml
<?xml version="1.0" encoding="utf-8"?>

<!-- 矩形内部填充-扫描渐变 -->

<shape xmlns:android="http://schemas.android.com/apk/res/android"

    android:shape="rectangle"

    android:useLevel="true">

    <!--如果布局中没有设置View的大小,会size设置的大小为默认值-->

    <size

        android:width="20dp"

        android:height="20dp" />

    <stroke

        android:width="1px"

        android:color="#ffff00ff" />

    <!--调整angle不能实现角度变化

        centerX,centerY是中心点的位置,这里用的是百分比值(0-1)

        在rect中gradientRadius无效-->

    <gradient

        android:angle="0"

        android:centerX="0.5"

        android:centerY="0.5"

        android:startColor="#ff00ff00"

        android:gradientRadius="20dp"

        android:type="sweep" />

</shape>
圆(边框+填充+渐变)
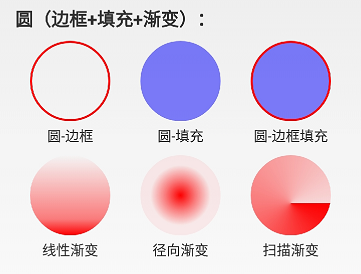
圆-边框:circle_border.xml
<?xml version="1.0" encoding="utf-8"?>

<!-- 圆形边框 -->

<shape xmlns:android="http://schemas.android.com/apk/res/android"

    android:shape="oval"

    android:useLevel="true">

    <size

        android:width="80dp"

        android:height="80dp" />

    <stroke

        android:width="2dp"

        android:color="#ffff0000" />

</shape>
圆-填充:circle_fill.xml
<?xml version="1.0" encoding="utf-8"?>

<!-- 圆形边框 + 填充 -->

<shape xmlns:android="http://schemas.android.com/apk/res/android"

    android:shape="oval"

    android:useLevel="true">

    <size

        android:width="80dp"

        android:height="80dp" />

    <solid android:color="#800000ff" />

</shape>
圆-边框填充:circle_border_and_fill.xml
<?xml version="1.0" encoding="utf-8"?>

<!-- 圆形边框 + 填充 -->

<shape xmlns:android="http://schemas.android.com/apk/res/android"

    android:shape="oval"

    android:useLevel="true">

    <size

        android:width="80dp"

        android:height="80dp" />

    <stroke

        android:width="2dp"

        android:color="#ffff0000" />

    <solid android:color="#800000ff" />

</shape>
线性渐变:circle_gradient_linear.xml
<?xml version="1.0" encoding="utf-8"?>

<!-- 圆形内部填充-线性渐变 -->

<shape xmlns:android="http://schemas.android.com/apk/res/android"

    android:shape="oval"

    android:useLevel="true">

    <size

        android:width="@dimen/shape_size"

        android:height="@dimen/shape_size" />

    <!-- angle调整渐变角度,只能是45的倍数,centerX, centerY是百分百(0-1) -->

    <gradient

        android:angle="-90"

        android:centerX="0.5"

        android:centerY="0.8"

        android:centerColor="#80ff0000"

        android:endColor="#ffff0000"

        android:startColor="#00ff0000"

        android:type="linear" />

</shape>
径向渐变:circle_gradient_radial.xml
<?xml version="1.0" encoding="utf-8"?>

<!-- 圆形内部填充-径向渐变 -->

<shape xmlns:android="http://schemas.android.com/apk/res/android"

    android:shape="oval"

    android:useLevel="true">

    <size

        android:width="40dp"

        android:height="40dp" />

    <!-- centerX, centerY是百分百(0-1) -->

    <gradient

        android:centerX="0.5"

        android:centerY="0.5"

        android:startColor="#ffff0000"

        android:centerColor="#80ff0000"

        android:endColor="#10ff0000"

        android:gradientRadius="30dp"

        android:type="radial" />

</shape>
扫描渐变:circle_gradient_sweep.xml
<?xml version="1.0" encoding="utf-8"?>

<!-- 圆形内部填充-扫描渐变 -->

<shape xmlns:android="http://schemas.android.com/apk/res/android"

    android:shape="oval"

    android:useLevel="true">

    <size

        android:width="@dimen/shape_size"

        android:height="@dimen/shape_size" />

    <!-- sweep类型angle,gradientRadius无效,centerX, centerY是百分百(0-1) -->

    <gradient

        android:centerX="0.5"

        android:centerY="0.6"

        android:startColor="#ffff0000"

        android:centerColor="#80ff0000"

        android:endColor="#20ff0000"

        android:gradientRadius="20dp"

        android:type="sweep" />

</shape>
椭圆(边框+填充+渐变)
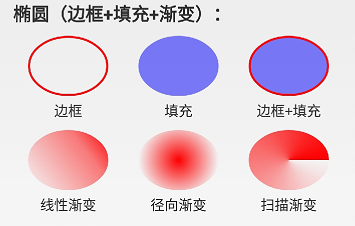
边框:oval_border.xml
<?xml version="1.0" encoding="utf-8"?>

<!-- 椭圆边框 -->

<shape xmlns:android="http://schemas.android.com/apk/res/android"

    android:shape="oval"

    android:useLevel="true">

    <stroke

        android:width="2dp"

        android:color="#ffff0000" />

</shape>
填充:oval_fill.xml
<?xml version="1.0" encoding="utf-8"?>

<!-- 椭圆填充-->

<shape xmlns:android="http://schemas.android.com/apk/res/android"

    android:shape="oval"

    android:useLevel="true">

    <solid android:color="#800000ff" />

</shape>
边框+填充:oval_border_and_fill.xml
<?xml version="1.0" encoding="utf-8"?>

<!-- 椭圆边框 + 填充-->

<shape xmlns:android="http://schemas.android.com/apk/res/android"

    android:shape="oval"

    android:useLevel="true">

    <stroke

        android:width="2dp"

        android:color="#ffff0000" />

    <solid android:color="#800000ff" />

</shape>
线性渐变:oval_gradient_linear.xml
<?xml version="1.0" encoding="utf-8"?>

<!-- 椭圆内部填充-线性渐变 -->

<shape xmlns:android="http://schemas.android.com/apk/res/android"

    android:shape="oval"

    android:useLevel="true" >

    <size

        android:width="80dp"

        android:height="60dp" />

    <gradient

        android:angle="45"

        android:centerX="0.5"

        android:centerY="0.7"

        android:centerColor="#80ff0000"

        android:endColor="#ffff0000"

        android:startColor="#00ff0000"

        android:type="linear" />

</shape>
径向渐变:oval_gradient_radial.xml
<?xml version="1.0" encoding="utf-8"?>

<!-- 椭圆内部填充-径向渐变 -->

<shape xmlns:android="http://schemas.android.com/apk/res/android"

    android:shape="oval"

    android:useLevel="true" >

    <size

        android:width="80dp"

        android:height="60dp" />

    <gradient

        android:centerX="0.5"

        android:centerY="0.5"

        android:centerColor="#80ff0000"

        android:endColor="#00ff0000"

        android:startColor="#ffff0000"

        android:gradientRadius="40dp"

        android:type="radial" />

</shape>
扫描渐变:oval_gradient_sweep.xml
<?xml version="1.0" encoding="utf-8"?>

<!-- 椭圆内部填充-扫描渐变 -->

<shape xmlns:android="http://schemas.android.com/apk/res/android"

    android:shape="oval"

    android:useLevel="true" >

    <size

        android:width="80dp"

        android:height="60dp" />

    <gradient

        android:centerX="0.5"

        android:centerY="0.5"

        android:centerColor="#80ff0000"

        android:endColor="#ffff0000"

        android:startColor="#00ff0000"

        android:type="sweep" />

</shape>
圆环(边框+填充+渐变)
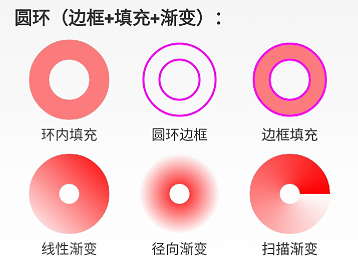
环内填充:ring_fill.xml
<?xml version="1.0" encoding="utf-8"?><!-- 圆环 -->

<shape xmlns:android="http://schemas.android.com/apk/res/android"

    android:innerRadiusRatio="4"

    android:shape="ring"

    android:thicknessRatio="4"

    android:useLevel="false">

    <!--android:useLevel="false"必须是false-->

    <size

        android:width="80dp"

        android:height="80dp" />

    <solid android:color="#80ff0000" />

</shape>
圆环边框:ring_border.xml
<?xml version="1.0" encoding="utf-8"?>

<!-- 圆环-仅有边框 -->

<shape xmlns:android="http://schemas.android.com/apk/res/android"

    android:innerRadius="20dp"

    android:shape="ring"

    android:thickness="16dp"

    android:useLevel="false">

    <!--android:useLevel="false"必须是false-->

    <size

        android:width="80dp"

        android:height="80dp" />

    <stroke

        android:width="2dp"

        android:color="#ffff00ff" />

</shape>
边框+填充:ring_border_and_fill.xml
<?xml version="1.0" encoding="utf-8"?>

<!-- 圆环 -->

<shape xmlns:android="http://schemas.android.com/apk/res/android"

    android:innerRadius="20dp"

    android:shape="ring"

    android:thickness="16dp"

    android:useLevel="false">

    <!--android:useLevel="false"必须是false-->

    <size

        android:width="80dp"

        android:height="80dp" />

    <solid android:color="#80ff0000" />

    <stroke

        android:width="2dp"

        android:color="#ffff00ff" />

</shape>
线性渐变:ring_gradient_linear.xml
<?xml version="1.0" encoding="utf-8"?>

<!-- 圆环-线性渐变 -->

<shape xmlns:android="http://schemas.android.com/apk/res/android"

    android:shape="ring"

    android:innerRadius="10dp"

    android:thickness="30dp"

    android:useLevel="false">

    <!--android:useLevel="false"必须是false-->

    <size

        android:width="80dp"

        android:height="80dp" />

    <gradient

        android:angle="45"

        android:centerColor="#80ff0000"

        android:endColor="#ffff0000"

        android:startColor="#00ff0000"

        android:type="linear" />

</shape>
径向渐变:ring_gradient_radial.xml
<?xml version="1.0" encoding="utf-8"?>

<!-- 圆环-径向渐变渐变 -->

<shape xmlns:android="http://schemas.android.com/apk/res/android"

    android:shape="ring"

    android:innerRadius="10dp"

    android:thickness="30dp"

    android:useLevel="false">

    <!--android:useLevel="false"必须是false-->

    <size

        android:width="80dp"

        android:height="80dp" />

    <!--设置径向渐变半径,渐变从圆心开始-->

    <gradient

        android:centerX="0.5"

        android:centerY="0.5"

        android:centerColor="#80ff0000"

        android:endColor="#00ff0000"

        android:startColor="#ffff0000"

        android:gradientRadius="40dp"

        android:type="radial" />

</shape>
扫描渐变:ring_gradient_sweep.xml
<?xml version="1.0" encoding="utf-8"?>

<!-- 圆环-线性渐变 -->

<shape xmlns:android="http://schemas.android.com/apk/res/android"

    android:shape="ring"

    android:innerRadius="10dp"

    android:thickness="30dp"

    android:useLevel="false">

    <!--android:useLevel="false"必须是false-->

    <size

        android:width="80dp"

        android:height="80dp" />

    <!--扫描渐变shape不能设置角度-->

    <gradient

        android:centerColor="#80ff0000"

        android:endColor="#ffff0000"

        android:startColor="#00ff0000"

        android:type="sweep" />

</shape>
总结
熟练掌握好 shape 标签的使用,能够构建出多种多样的 Drawable,这些 Drawable 可以直接作为背景设置给 View,代码通过 R.drawable 方式使用,xml 文件通过 @drawable/name 使用。跟图片的使用一模一样,关键是使用系统 Drawable 可以减少 apk 的体积,减少内存占用等好处,所以,不要觉得简单就不系统学习,越简单的东西越要熟练掌握。后面还会陆续出一些 Drawable 的文章,比如除了shape标签定义的 Drawable,其他还有哪些 xml 标签能定义 Drawable? Drawable怎么通过代码的方式创建并使用?
Android XML shape 标签使用详解(apk瘦身,减少内存好帮手)的更多相关文章
- Drawable实战解析:Android XML shape 标签使用详解(apk瘦身,减少内存好帮手)
Android XML shape 标签使用详解 一个android开发者肯定懂得使用 xml 定义一个 Drawable,比如定义一个 rect 或者 circle 作为一个 View 的背景. ...
- Android Drawable - Shape Drawable使用详解(附图)
TIPS shape图形 –简单介绍 shape图形 –如何画? shape图形 –参数详细解析 shape图形 –如何用? shape图形 –实际开发应用场景 shape图形简单介绍 用xml实现一 ...
- android中include标签使用详解
android中include标签是为了便于控件的覆用的一个很好解决方案. 但是也有一些需要注意的地方,下面是本人在项目中碰到过的一个问题,做此记录,便于以后查看. include标签用法. ...
- JSP web.xml <jsp-config>标签使用详解
<jsp-config> 包括 <taglib> 和 <jsp-property-group> 两个子元素.其中<taglib> 元素在JSP 1.2 ...
- Android GradientDrawable(shape标签定义) 静态使用和动态使用(圆角,渐变实现)
Android GradientDrawable使用优势: 1. 快速实现一些基本图形(线,矩形,圆,椭圆,圆环) 2. 快速实现一些圆角,渐变,阴影等效果 3. 代替图片设置为View的背景 4. ...
- android shape的使用详解以及常用效果(渐变色、分割线、边框、半透明阴影效果等)
shape使用.渐变色.分割线.边框.半透明.半透明阴影效果. 首先简单了解一下shape中常见的属性.(详细介绍参看 api文档 ) 转载请注明:Rflyee_大飞: http://blog.cs ...
- Android高效率编码-第三方SDK详解系列(三)——JPush推送牵扯出来的江湖恩怨,XMPP实现推送,自定义客户端推送
Android高效率编码-第三方SDK详解系列(三)--JPush推送牵扯出来的江湖恩怨,XMPP实现推送,自定义客户端推送 很久没有更新第三方SDK这个系列了,所以更新一下这几天工作中使用到的推送, ...
- Android高效率编码-第三方SDK详解系列(一)——百度地图,绘制,覆盖物,导航,定位,细腻分解!
Android高效率编码-第三方SDK详解系列(一)--百度地图,绘制,覆盖物,导航,定位,细腻分解! 这是一个系列,但是我也不确定具体会更新多少期,最近很忙,主要还是效率的问题,所以一些有效的东西还 ...
- Android 之窗口小部件详解--App Widget
Android 之窗口小部件详解--App Widget 版本号 说明 作者 日期 1.0 添加App Widge介绍和示例 Sky Wang 2013/06/27 1 App ...
随机推荐
- nginx实践(五)之代理服务(正向代理与反向代理介绍)
正向代理 正向代理代理是为客户端服务,代理负责DNS解析域名到对应ip,并进行访问服务端,返回响应给客户端 反向代理 客户端自己负责请求DNS解析域名到对应ip,服务端通过代理分发流量,进行负载均衡 ...
- Socket网络编程(二)
udp协议发送消息案例 1.创建UdpServer(udp服务器端) package com.cppdy.udp; import java.net.DatagramPacket; import jav ...
- ES6笔记
/** * Created by Administrator on 2017/4/13. */ /*---------------------Es6编码规范---------------------* ...
- popup的简单应用举例(具体在增删改查组件中用到)以及补充的知识点
一.首先说一下自执行函数 1. 立即执行函数是什么?也就是匿名函数 立即执行函数就是 声明一个匿名函数 马上调用这个匿名函数 2.popup的举例 点击,弹出一个新的窗口.保存完事,页面不刷新数据就返 ...
- jsp 运行时报错Cannot find a method to write property [firstName] of type [java.lang.String] in a bean of type [main.Employee]
原因: 代码没有安装bean的格式写 setFirstName写成了setFristName 错误代码 public void setFristName(String firstName) { thi ...
- lightoj1197 素数双筛,可以参考poj的那题双筛
/* 判断一个数是否是素数,只要判断这个数有没有在[2,sqrt(n)]区间的因子 同样,对于大数短区间的筛选,同样可以用这种判断方式, 先筛出sqrt(n)范围内的素数,然后用这些素数去筛出区间内的 ...
- Nginx详解十九:Nginx深度学习篇之进阶高级模块
这里介绍一些最新或者理解起来有一些难度的Nginx模块 一.secure_link_module模块作用原理:1.制定并允许检查请求的链接的真实性以及保护资源免遭未经授权的访问2.限制链接生效周期 配 ...
- python3 HTMLTestRunner.py
""" A TestRunner for use with the Python unit testing framework. It generates a HTML ...
- phoenix表操作
phoenix表操作 进入命令行,这是sqlline.py 配置到path环境变量的情况下 sqlline.py localhost如果要退出命令行:!q 或者 !quit 3.4.1 创建表 ...
- windows server 2012 R2 远程桌面授权模式尚未配置
windows server 2012 R2 远程桌面授权模式尚未配置,远程桌面服务将在120天内停止工作.如何破解这个宽限期,目前企业7位协议号码均不包含2012 R2以上授权. 那么只能蛋疼的“破 ...