数学之路-python计算实战(9)-机器视觉-图像插值仿射
- 插值
- Python: cv2.resize(src, dsize[, dst[, fx[, fy[, interpolation]]]]) → dst
- interpolation –
interpolation method:
- INTER_NEAREST - a nearest-neighbor interpolation
- INTER_LINEAR - a bilinear interpolation (used by default)
- INTER_AREA - resampling using pixel area relation. It may be a preferred method for image decimation, as it gives moire’-free results. But when the image is zoomed, it is similar to theINTER_NEAREST method.
- INTER_CUBIC - a bicubic interpolation over 4x4 pixel neighborhood
- INTER_LANCZOS4 - a Lanczos interpolation over 8x8 pixel neighborhood
# -*- coding: utf-8 -*-

import cv2

fn="test2.jpg"

img=cv2.imread(fn)

w=img.shape[1]

h=img.shape[0]

#放大,双立方插值

newimg1=cv2.resize(img,(w*2,h*2),interpolation=cv2.INTER_CUBIC)

#放大, 近期邻插值

newimg2=cv2.resize(img,(w*2,h*2),interpolation=cv2.INTER_NEAREST)

#放大, 象素关系重採样

newimg3=cv2.resize(img,(w*2,h*2),interpolation=cv2.INTER_AREA)

#缩小, 象素关系重採样

newimg4=cv2.resize(img,(300,200),interpolation=cv2.INTER_AREA)

cv2.imshow('preview1',newimg1)

cv2.imshow('preview2',newimg2)

cv2.imshow('preview3',newimg3)

cv2.imshow('preview4',newimg4)

cv2.waitKey()

cv2.destroyAllWindows()
仿射可进行缩放、旋转、平衡操作
- Python: cv2.warpAffine(src, M, dsize[, dst[, flags[, borderMode[, borderValue]]]]) → dst
- C: void cvWarpAffine(const CvArr* src, CvArr* dst, const CvMat* map_matrix, intflags=CV_INTER_LINEAR+CV_WARP_FILL_OUTLIERS, CvScalar fillval=cvScalarAll(0) )
- Python: cv.WarpAffine(src, dst, mapMatrix, flags=CV_INTER_LINEAR+CV_WARP_FILL_OUTLIERS, fillval=(0, 0, 0, 0)) → None
highlight=warpaffine#cv.WarpAffine" title="Permalink to this definition" style="color: rgb(101, 161, 54); text-decoration: none; visibility: hidden; font-size: 0.8em; padding: 0px 4px;">
- C: void cvGetQuadrangleSubPix(const CvArr* src, CvArr* dst, const CvMat*map_matrix)
highlight=warpaffine#void cvGetQuadrangleSubPix(const CvArr* src, CvArr* dst, const CvMat* map_matrix)" title="Permalink to this definition" style="color: rgb(101, 161, 54); text-decoration: none; visibility: hidden; font-size: 0.8em; padding: 0px 4px;">
- Python: cv.GetQuadrangleSubPix(src, dst, mapMatrix) → None
-
Parameters: - src – input image.
- dst – output image that has the size dsize and the same type assrc .
- M –
 transformation matrix.
 - dsize – size of the output image.
- flags – combination of interpolation methods (see resize() ) and the optional flag WARP_INVERSE_MAP that means that M is the inverse transformation (
 ).
). - borderMode – pixel extrapolation method (seeborderInterpolate()); when borderMode=BORDER_TRANSPARENT , it means that the pixels in the destination image corresponding to the “outliers” in the source image are not modified by the function.
- borderValue – value used in case of a constant border; by default, it is 0.
The function warpAffine transforms the source image using the specified matrix:

getRotationMatrix2D
Calculates an affine matrix of 2D rotation.
- C++: Mat getRotationMatrix2D(Point2f center, double angle, double scale)
- Python: cv2.getRotationMatrix2D(center, angle, scale) → retval
highlight=warpaffine#cv2.getRotationMatrix2D" title="Permalink to this definition" style="color: rgb(101, 161, 54); text-decoration: none; visibility: hidden; font-size: 0.8em; padding: 0px 4px;">
- C: CvMat* cv2DRotationMatrix(CvPoint2D32f center, double angle, double scale, CvMat* map_matrix)
- Python: cv.GetRotationMatrix2D(center, angle, scale, mapMatrix) → None
-
Parameters: - center – Center of the rotation in the source image.
- angle – Rotation angle in degrees. Positive values mean counter-clockwise rotation (the coordinate origin is assumed to be the top-left corner).
- scale – Isotropic scale factor.
- map_matrix – The output affine transformation, 2x3 floating-point matrix.
The function calculates the following matrix:

where

The transformation maps the rotation center to itself. If this is not the target, adjust the shift.
仿射变换。又称仿射映射。是指在几何中。一个向量空间进行一次线性变换并接上一个平移。变换为还有一个向量空间。
一个对向量 平移
平移 ,与旋转放大缩小
 的仿射映射为

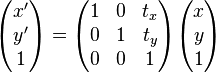
上式在 齐次坐标上,等价于以下的式子

-
为了表示仿射变换。须要使用齐次坐标,即用三维向量 (x, y, 1) 表示二维向量,对于高维来说也是如此。依照这样的方法。就能够用矩阵乘法表示变换。
 ;
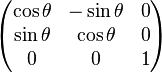
;  变为
变为在矩阵中添加一列与一行,除右下角的元素为 1 外其他部分填充为 0,通过这样的方法,全部的线性变换都能够转换为仿射变换。比如,上面的旋转矩阵变为
通过这样的方法,使用与前面一样的矩阵乘积能够将各种变换无缝地集成到一起
# -*- coding: utf-8 -*-

import cv2

fn="test3.jpg"

img=cv2.imread(fn)

w=img.shape[1]

h=img.shape[0]

#得到仿射变换矩阵,完毕旋转

#中心

mycenter=(h/2,w/2)

#旋转角度

myangle=90

#缩放尺度

myscale=0.5

#仿射变换完毕缩小并旋转

transform_matrix=cv2.getRotationMatrix2D(mycenter,myangle,myscale)

newimg=cv2.warpAffine(img,transform_matrix,(h,w))

cv2.imshow('preview',newimg)

cv2.waitKey()

cv2.destroyAllWindows()
本博客全部内容是原创,假设转载请注明来源
http://blog.csdn.net/myhaspl/

本博客全部内容是原创。假设转载请注明来源
http://blog.csdn.net/myhaspl/
数学之路-python计算实战(9)-机器视觉-图像插值仿射的更多相关文章
- 数学之路-python计算实战(21)-机器视觉-拉普拉斯线性滤波
拉普拉斯线性滤波,.边缘检測 . When ksize == 1 , the Laplacian is computed by filtering the image with the follow ...
- 数学之路-python计算实战(17)-机器视觉-滤波去噪(中值滤波)
Blurs an image using the median filter. C++: void medianBlur(InputArray src, OutputArray dst, int ks ...
- 数学之路-python计算实战(20)-机器视觉-拉普拉斯算子卷积滤波
拉普拉斯算子进行二维卷积计算,线性锐化滤波 # -*- coding: utf-8 -*- #线性锐化滤波-拉普拉斯算子进行二维卷积计算 #code:myhaspl@myhaspl.com impor ...
- 数学之路-python计算实战(15)-机器视觉-滤波去噪(归一化块滤波)
# -*- coding: utf-8 -*- #code:myhaspl@myhaspl.com #归一化块滤波 import cv2 import numpy as np fn="tes ...
- 数学之路-python计算实战(14)-机器视觉-图像增强(直方图均衡化)
我们来看一个灰度图像,让表示灰度出现的次数,这样图像中灰度为 的像素的出现概率是 是图像中全部的灰度数, 是图像中全部的像素数, 实际上是图像的直方图,归一化到 . 把 作为相应于 的累计概率 ...
- 数学之路-python计算实战(19)-机器视觉-卷积滤波
filter2D Convolves an image with the kernel. C++: void filter2D(InputArray src, OutputArray dst, int ...
- 数学之路-python计算实战(13)-机器视觉-图像增强
指数变换的基本表达式为:y=bc(x-a)-1 当中參数b.c控制曲线的变换形状,參数a控制曲线的位置. 指数变换的作用是扩展图像的高灰度级.压缩低灰度级.能够用于亮度过高的图像 本博客全部内容是原创 ...
- 数学之路-python计算实战(16)-机器视觉-滤波去噪(邻域平均法滤波)
# -*- coding: utf-8 -*- #code:myhaspl@myhaspl.com #邻域平均法滤波,半径为2 import cv2 import numpy as np fn=&qu ...
- 数学之路-python计算实战(18)-机器视觉-滤波去噪(双边滤波与高斯滤波 )
高斯滤波就是对整幅图像进行加权平均的过程.每个像素点的值,都由其本身和邻域内的其它像素值经过加权平均后得到.高斯滤波的详细操作是:用一个模板(或称卷积.掩模)扫描图像中的每个像素.用模板确定的邻域内像 ...
随机推荐
- distinct 多列详解
1.distinct单列 select distinct(a) from tableA; 2.distinct多列 select distinct a,b,c from tableA; 注意此时是将a ...
- 论文列表——text classification
https://blog.csdn.net/BitCs_zt/article/details/82938086 列出自己阅读的text classification论文的列表,以后有时间再整理相应的笔 ...
- Window配置Redis环境和简单使用
一.关于Redis Redis是一个开源(BSD许可),内存存储的数据结构服务器,可用作数据库,高速缓存和消息队列代理.它支持字符串.哈希表.列表.集合.有序集合,位图,hyperloglogs等数据 ...
- Oracle中对数字加汉字的排序(完好)
之前写过一篇 Oracle中对数字加汉字的排序以及REGEXP_SUBSTR介绍 后来在开发的过程中又遇到相似问题.数据不一样了,按之前的使用方法是不适用的. 之前的是数字在前汉字在后,最基本的差别是 ...
- express统一输出404页面
不玩不知道,一玩吓一跳,还真是,nodejs全局404怎么搞? 直接,res.render("404.html")有可能会报错:Node.js : Cannot find modu ...
- CSS3提交意见输入框样式
做了个输入框样式,如图: CSS代码例如以下: #button { cursor:pointer; width:30%; margin:5px; padding:8px; border-radius: ...
- SliTaz 从入门到精通
slitaz中文化(linux-pe)项目地址: https://code.google.com/p/linux-pe/ http://bbs.wuyou.com/forum.php?mod=view ...
- GitHub万星项目:黑客成长技术清单
最近有个GitHub项目很火,叫"Awesome Hacking",这个项目是由Twitter账号@HackwithGithub 维护,喜欢逛Twitter的安全爱好者应该了解,在 ...
- 分析jQuery源码时记录的一点感悟
分析jQuery源码时记录的一点感悟 1. 链式写法 这是jQuery语法上的最大特色,也许该改改POJO里的set方法,和其他的非get方法什么的,可以把多行代码合并,减去每次 ...
- 牛客网-《剑指offer》-用两个栈实现队列
题目:http://www.nowcoder.com/practice/54275ddae22f475981afa2244dd448c6 C++ class Solution { public: vo ...