python+selenium下拉列表option对象操作方法一
参考官方文档:https://selenium.dev/selenium/docs/api/py/webdriver_support/selenium.webdriver.support.select.html?highlight=all_selected_options#selenium.webdriver.support.select.Select.all_selected_options
一、导入(import)
from selenium.webdriver.support.select import Select
二、选择(select)
Select类提供了三种选择某一选项的方法:
               select_by_index(index)

               select_by_value(value)

               select_by_visible_text(text)
注意:
- index从 0 开始
- value是option标签的一个属性值,并不是显示在下拉框中的值
- visible_text是在option标签中间的值,是显示在下拉框的值
三、反选(deselect)
有选择必然有反选,即取消选择。Select提供了四个方法给我们取消原来的选择:
           deselect_by_index(index)


           deselect_by_value(value)


           deselect_by_visible_text(text)

           deselect_all()
前三种分别于select相对应,第四种是全部取消选择,是的,你没看错,是全部取消。
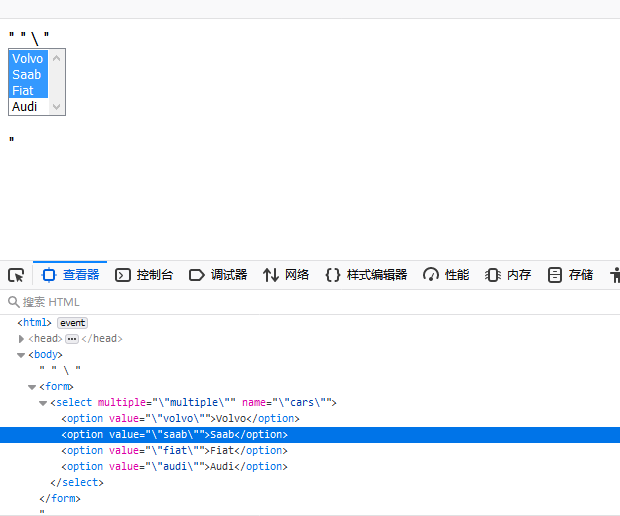
有一种特殊的select标签,即设置了multiple=”multiple”属性的select,这种select框是可以多选的,
可以通过多次select,选择多项选项,而通过deselect_all()来将他们全部取消。
注意:下面两个,表示的意思一样
#返回第一个或者当前 被选中 的子项
print(Select(driver.find_element_by_xpath("//select[@id='nr']")).first_selected_option.text)
                                                            # 输出当前选择的第一项,即显示第二个
now = Select(driver.find_element_by_css_selector("body > form > select")).first_selected_option
print(now.text)
================================================================================
from selenium import webdriver
from selenium.webdriver.common.action_chains import ActionChains
#from selenium.webdriver.support.select import Select
from selenium.webdriver.support.ui import Select
from time import sleep
driver = webdriver.Firefox()
driver.implicitly_wait(10)
driver.get('http://www.baidu.com') #-------------------------------------------------------------------------------- link = driver.find_element_by_link_text("设置")
ActionChains(driver).move_to_element(link).perform() #鼠标悬停在上面
sleep(5) driver.find_element_by_class_name("setpref").click() # 打开搜索设置
sleep(2) #------------------------------------------------------------------------- sleep(3)
print('显示第二个子项(2):')
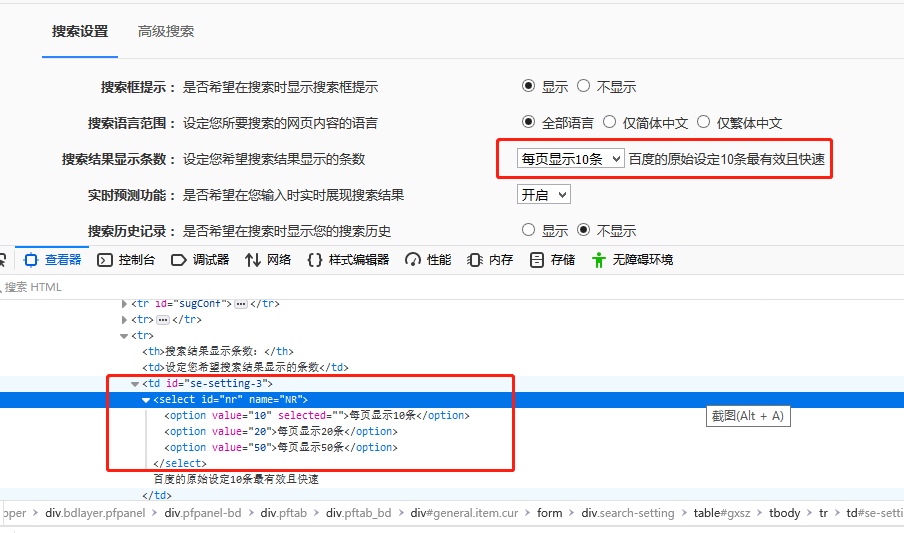
Select(driver.find_element_by_xpath("//select[@id='nr']")).select_by_index(1) #选择第二个options子项 ,每页显示20条
print(Select(driver.find_element_by_xpath("//select[@id='nr']")).first_selected_option.text) #返回第一个或者当前 被选中 的子项 sleep(3)
print('显示第三个子项(50):')
Select(driver.find_element_by_xpath("//select[@id='nr']")).select_by_value('50') #选择value为'每页显示50条'的子项,即选择第三个子项
print(Select(driver.find_element_by_xpath("//select[@id='nr']")).first_selected_option.text) #返回第一个或者当前 被选中 的子项 sleep(3)
print('显示第二个子项(20):')
Select(driver.find_element_by_xpath("//select[@id='nr']")).select_by_visible_text('每页显示20条') #选择text值为'每页显示20条'的子项
print(Select(driver.find_element_by_xpath("//select[@id='nr']")).first_selected_option.text) #返回第一个或者当前 被选中 的子项 sleep(3)
print('显示当前被选中的子项(第二个子项20):')
print(Select(driver.find_element_by_xpath("//select[@id='nr']")).first_selected_option.text) #返回第一个或者当前 被选中 的子项 #每页显示20条 #-------------------------------------------------------------------------------------
options = driver.find_elements_by_xpath('//*[@id="nr"]/option')

options[1].click()             #第二个子项被选中
sleep(2)

options[2].click()             #第三个子项被选中
sleep(2)

options[0].click()            #第一个子项被选中
sleep(2)

#-----------------------------------------------------------------------

print(options[0].text)
print(options[1].text)
print(options[2].text)
#-----------------------------------------------------------------------

driver.quit()
显示第二个子项(2):
每页显示20条
显示第三个子项(50):
每页显示50条
显示第二个子项(20):
每页显示20条
显示当前被选中的子项(第二个子项20):
每页显示20条
每页显示10条
每页显示20条
每页显示50条
+++++++++++++++++++++++++++++++++++++++++++++++++++++++++++++++++++++++++

===============================================================================================================
from selenium import webdriver
from selenium.webdriver.support.ui import Select
from time import sleep

driver = webdriver.Firefox()
driver.get("https://www.runoob.com/runcode")             # 打开浏览器,进入演示页面

driver.find_element_by_css_selector("#codeinp").clear()   # 定位输入框文本域  # 清空文本域

                                                               # 输入多选下拉框的演示源码 (multiple="multiple\")
texts = "<html> " \
        "<body><form><select multiple=\"multiple\" name=\"cars\"><option value=\"volvo\">Volvo</option>" \
        "<option value=\"saab\">Saab</option><option value=\"fiat\">Fiat</option>\" \
        \"<option value=\"audi\">Audi</option></select></form></body></html>"

driver.find_element_by_css_selector("#codeinp").send_keys(texts)

driver.find_element_by_css_selector("#btrun").click()                 # 点击提交代码
sleep(2)

#--------------------------------------------------------------------------------------------------------

all_handles = driver.window_handles
driver.switch_to.window(all_handles[1])             #切换到新的打开的运行页面

#-------------------------------------------------------------------------------------------------------
                                              # 选择全部的选项(多选),一个接着一个选择,直到全部选择

Select(driver.find_element_by_css_selector("body > form > select")).select_by_index(0)
sleep(1)

Select(driver.find_element_by_css_selector("body > form > select")).select_by_index(1)
sleep(1)

Select(driver.find_element_by_css_selector("body > form > select")).select_by_index(2)
sleep(1)

Select(driver.find_element_by_css_selector("body > form > select")).select_by_index(3)
sleep(1)

#----------------------------------------------------------------------------------------------------------------

                                                                  # 取消选择第一项选项(页面上可以观察到变化)
Select(driver.find_element_by_css_selector("body > form > select")).deselect_by_index(0)
sleep(1)
                                                            # 输出当前选择的第一项,即显示第二个
now = Select(driver.find_element_by_css_selector("body > form > select")).first_selected_option
print(now.text)

                                                                          #取消第二个选项
#Select(driver.find_element_by_css_selector("body > form > select")).deselect_by_value('\"saab\"')
Select(driver.find_element_by_css_selector("body > form > select")).deselect_by_visible_text('Saab')
sleep(3)

                                                                              #即取消三、四选项
Select(driver.find_element_by_css_selector("body > form > select")).deselect_all()  #取消所有选项
sleep(3)

#---------------------------------------------------------------------------------------------------------

driver.close()
python+selenium下拉列表option对象操作方法一的更多相关文章
- python+selenium下拉列表option对象操作方法二
options = driver.find_elements_by_tag_name('option') #获取所有的option子元素 o ...
- python+selenium的WebElement对象操作
webelement对象操作 webelement对象是selenium中所有元素的父类,也就是webelement对象拥有的方法,其它元素对象都会有: 只是不同的对象在调用特定方法时,效果是不一样的 ...
- python+selenium之字符串切割操作
python+selenium之字符串切割操作 在Python中自带的一个切割方法split(),这个方法不带参数,就默认按照空格去切割字段,如果带参数,就按照参数去切割. 新建一个python文件, ...
- Python+Selenium自动化-模拟键盘操作
Python+Selenium自动化-模拟键盘操作 0.导入键盘类Keys() selenium中的Keys()类提供了大部分的键盘操作方法:通过send_keys()方法来模拟键盘上的按键. # ...
- Python+Selenium自动化 模拟鼠标操作
Python+Selenium自动化 模拟鼠标操作 在webdriver中,鼠标的一些操作如:双击.右击.悬停.拖动等都被封装在ActionChains类中,我们只用在需要使用的时候,导入这个类就 ...
- python+selenium文本框对象以及按钮对象操作
文本框对象 from selenium import webdriverfrom time import sleep driver = webdriver.Firefox() # 指定和打开浏览器ur ...
- Python+Selenium学习--操作测试对象
场景 前面已经讲解了如果定位对象,定位之后需要对这个对象进行操作.是鼠标点击还是键盘输入,取决于我们定位的对象缩支持的操作. webdriver中比较常用的操作元素的方法有下面几个: clear ...
- python+selenium 滑动滚动条的操作
工作中碰到一种情况就是,要定位的元素需要滚动条滑到下方后才可以显示出来. 这种情况下,就要先滑动滚动条,再定位元素. 那么滑动滚动条我以前记录了appium中的操作,那么,selenium中该如何操作 ...
- python+selenium:浏览器webdriver操作(1)--基本对象定位
1.简单对象的定位-----自动化测试的核心 对象的定位应该是自动化测试的核心,要想操作一个对象,首先应该识别这个对象.一个对象就是一个人一样,他会有各种的特征(属性),如比我们可以通过一个人的身份证 ...
随机推荐
- Linux架构之Nginx之HTTPS
第52章 Nginx之HTTPS 第52章 Nginx之HTTPS 1.HTTPS安全证书基本概述 1.1 模拟服务器篡改内容 1.1.1 配置目标网站nginx 1.1.2 配置网页 1.1.3 访 ...
- select case语句 is和to用法
在select case 语句中可以使用关系运算符大于>小于<等于=等关系运算符,需要用关键字IS和TO.用个例子来说明: Private Sub Command1_Click() Dim ...
- ASP.NET Core 基础知识(五) 依赖关系注入
参考https://www.cnblogs.com/jesse2013/p/di-in-aspnetcore.html 和 https://www.cnblogs.com/artech/p/net-c ...
- 如何删除Github上的仓库
1.首先,进入自己的github账户页面,点击头像选择下面的Your repositorys,点击进入 2.进入以后选中自己要删除的仓库,点击进去该仓库界面 3.找到Settings按钮,点击进入 4 ...
- CSP2019 前 随感
因为博主并没有任何的 oi 水平.文化课水平以及作文水平,下面的东西都是对辞藻和古诗词的堆砌. 不知不觉又到了新一年的 noip 了. 好像是去年的双十一的晚上,noip 考挂的我绝望地写了 bzoj ...
- python中strftime和strptime函数
strftime和strptime函数均来自包datetime from datetime import * strftime: 将datetime包中的datetime类,按照入参格式生成字符串变量 ...
- python-语言播报
利用系统自带模块: 在cmd中 python -m pip install pypiwin32 安装win32com模块 import win32com.client sp=win32co ...
- javascript 通用定义
通用约定 注释 原则 As short as possible(如无必要,勿增注释):尽量提高代码本身的清晰性.可读性. As long as necessary(如有必要,尽量详尽):合理的注释.空 ...
- jq 获取各个元素的宽度高度的方法
JS获取各种宽度.高度的简单介绍: scrollHeight: 获取对象的滚动高度. scrollLeft:设置或获取位于对象左边界和窗口中目前可见内容的最左端之间的距离 scrollTop:设置或获 ...
- React Native 之组件的定义
App.js 也可以认为是一个组件,那么此文件中能定义多个组件吗? 方式一 import Hello from './Hello' export default class App extends C ...