HCNA配置RIPv1
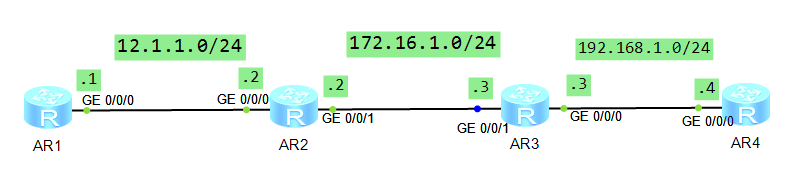
1、拓扑图
2、配置
R1
The device is running!

######

<Huawei>sys

Enter system view, return user view with Ctrl+Z.

[Huawei]sysnae

[Huawei]sysna

[Huawei]sysname R1

[R1]int

[R1]interface g0/

              ^

Error: Wrong parameter found at '^' position.

[R1]interface g0//

[R1-GigabitEthernet0//]ip add 12.1.1.1

Dec   ::-: R1 %%01IFNET//LINK_STATE(l)[]:The line protocol IP

on the interface GigabitEthernet0// has entered the UP state.

[R1-GigabitEthernet0//]q

[R1]rip

[R1-rip-]netwo

[R1-rip-100]network 12.0.0.0

[R1-rip-]q
R2
Please press enter to start cmd line!

<Huawei>

<Huawei>

Dec   ::-: Huawei %%01IFPDT//IF_STATE(l)[]:Interface GigabitEt

hernet0// has turned into UP state.

<Huawei>

Dec   ::-: Huawei %%01IFPDT//IF_STATE(l)[]:Interface GigabitEt

hernet0// has turned into UP state.

<Huawei>sys

Enter system view, return user view with Ctrl+Z.

[Huawei]sysname R2

[R2]int g0//

[R2-GigabitEthernet0//]ip add 12.1.1.2

Dec   ::-: R2 %%01IFNET//LINK_STATE(l)[]:The line protocol IP

on the interface GigabitEthernet0// has entered the UP state.

[R2-GigabitEthernet0//]q

[R2]rip

[R2-rip-]net

[R2-rip-]network 12.0.0.0

[R2-rip-]q

[R2]int

[R2]interface g0//

[R2-GigabitEthernet0//]ip add 172.16.1.2

[R2-GigabitEthernet0//]

Dec   ::-: R2 %%01IFNET//LINK_STATE(l)[]:The line protocol IP

on the interface GigabitEthernet0// has entered the UP state.

[R2-GigabitEthernet0//]q

[R2]rip

[R2-rip-]net

[R2-rip-]network 172.16.0.0

[R2-rip-]q
R3
 Configuration console exit, please press any key to log on

<R3>sys

Enter system view, return user view with Ctrl+Z.

[R3]int

[R3]interface g0//

[R3-GigabitEthernet0//]ip add 192.168.1.3

Dec   ::-: R3 %%01IFNET//LINK_STATE(l)[]:The line protocol IP

on the interface GigabitEthernet0// has entered the UP state.

[R3-GigabitEthernet0//]q

[R3]int

[R3]interface g0//

[R3-GigabitEthernet0//]ip add 172.16.1.3

Dec   ::-: R3 %%01IFNET//LINK_STATE(l)[]:The line protocol IP

on the interface GigabitEthernet0// has entered the UP state.

[R3-GigabitEthernet0//]q

[R3]rip

[R3-rip-]net

[R3-rip-]network 172.16.0.0

[R3-rip-]net

[R3-rip-]network 192.168.1.0

[R3-rip-]q

[R3]
R4
The device is running!

######################

<Huawei>

Dec   ::-: Huawei %%01IFPDT//IF_STATE(l)[]:Interface GigabitEt

hernet0// has turned into UP state.

<Huawei>sys

Enter system view, return user view with Ctrl+Z.

[Huawei]sysn

[Huawei]sysname R4

[R4]int

[R4]interface G0//

[R4-GigabitEthernet0//]ip add 192.168.1.4

Dec   ::-: R4 %%01IFNET//LINK_STATE(l)[]:The line protocol IP

on the interface GigabitEthernet0// has entered the UP state.

[R4-GigabitEthernet0//]q

[R4]rip

[R4-rip-]net

[R4-rip-]network 192.168.1.0

[R4-rip-]q
3、测试
R1上测试
 Please check whether system data has been changed, and save data in time

  Configuration console time out, please press any key to log on

<R1>

<R1>

<R1>

<R1>

<R1>

<R1>dis ip rou

<R1>dis ip routing-table

Route Flags: R - relay, D - download to fib

------------------------------------------------------------------------------

Routing Tables: Public

         Destinations :         Routes :

Destination/Mask    Proto   Pre  Cost      Flags NextHop         Interface

       12.1.1.0/  Direct                 D   12.1.1.1        GigabitEthernet

//

       12.1.1.1/  Direct                 D   127.0.0.1       GigabitEthernet

//

     12.1.1.255/  Direct                 D   127.0.0.1       GigabitEthernet

//

      127.0.0.0/   Direct                 D   127.0.0.1       InLoopBack0

      127.0.0.1/  Direct                 D   127.0.0.1       InLoopBack0

127.255.255.255/  Direct                 D   127.0.0.1       InLoopBack0

     172.16.0.0/  RIP                  D   12.1.1.2        GigabitEthernet

//

    192.168.1.0/  RIP                  D   12.1.1.2        GigabitEthernet

//

255.255.255.255/  Direct                 D   127.0.0.1       InLoopBack0

<R1>ping 192.168.1.4

  PING 192.168.1.4:   data bytes, press CTRL_C to break

    Request time out

    Request time out

    Reply from 192.168.1.4: bytes= Sequence= ttl= time= ms

    Reply from 192.168.1.4: bytes= Sequence= ttl= time= ms

    Reply from 192.168.1.4: bytes= Sequence= ttl= time= ms

  --- 192.168.1.4 ping statistics ---

     packet(s) transmitted

     packet(s) received

    40.00% packet loss

    round-trip min/avg/max = // ms

<R1>ping 192.168.1.4

  PING 192.168.1.4:   data bytes, press CTRL_C to break

    Reply from 192.168.1.4: bytes= Sequence= ttl= time= ms

    Reply from 192.168.1.4: bytes= Sequence= ttl= time= ms

    Reply from 192.168.1.4: bytes= Sequence= ttl= time= ms

    Reply from 192.168.1.4: bytes= Sequence= ttl= time= ms

    Reply from 192.168.1.4: bytes= Sequence= ttl= time= ms

  --- 192.168.1.4 ping statistics ---

     packet(s) transmitted

     packet(s) received

    0.00% packet loss

    round-trip min/avg/max = // ms
R4上测试
 Please check whether system data has been changed, and save data in time

  Configuration console time out, please press any key to log on

<R4>dis ip rou

<R4>dis ip routing-table

Route Flags: R - relay, D - download to fib

------------------------------------------------------------------------------

Routing Tables: Public

         Destinations :         Routes :

Destination/Mask    Proto   Pre  Cost      Flags NextHop         Interface

       12.0.0.0/   RIP                  D   192.168.1.3     GigabitEthernet

//

      127.0.0.0/   Direct                 D   127.0.0.1       InLoopBack0

      127.0.0.1/  Direct                 D   127.0.0.1       InLoopBack0

127.255.255.255/  Direct                 D   127.0.0.1       InLoopBack0

     172.16.0.0/  RIP                  D   192.168.1.3     GigabitEthernet

//

    192.168.1.0/  Direct                 D   192.168.1.4     GigabitEthernet

//

    192.168.1.4/  Direct                 D   127.0.0.1       GigabitEthernet

//

  192.168.1.255/  Direct                 D   127.0.0.1       GigabitEthernet

//

255.255.255.255/  Direct                 D   127.0.0.1       InLoopBack0

<R4>ping 12.1.1.1

  PING 12.1.1.1:   data bytes, press CTRL_C to break

    Reply from 12.1.1.1: bytes= Sequence= ttl= time= ms

    Reply from 12.1.1.1: bytes= Sequence= ttl= time= ms

    Reply from 12.1.1.1: bytes= Sequence= ttl= time= ms

    Reply from 12.1.1.1: bytes= Sequence= ttl= time= ms

    Reply from 12.1.1.1: bytes= Sequence= ttl= time= ms

  --- 12.1.1.1 ping statistics ---

     packet(s) transmitted

     packet(s) received

    0.00% packet loss

    round-trip min/avg/max = // ms
总结:
1.RIP协议如何工作?
在路由器上开启RIP协议,并将路由器的直连网段宣告进RIP后,RIP会将这些直连网段信息封装成RIP协议报文,
发送给邻居路由器。这样邻居路由器间就可以相互学习对方的网段信息,实现网络的互通。
2.如何配置基本的RIP网络?
第一步开启RIP协议,第二步将路由器的直连网段宣告进RIP协议。
3.RIP如何计算开销值?
RIP是基于跳数来计算的开销值。所谓跳数即是跨越网段的数量。
RIP路由的最大网络跳数为15,如果一条RIP路由的跳数到达16,路由器则认为该路由不可达。
HCNA配置RIPv1的更多相关文章
- 配置 RIPv1 和 RIPv2
拓扑图 场景您是公司的网络管理员.您所管理的小型网络中包含三台路由器,并规划了五个网络.您需要在网络中配置RIP路由协议来实现路由信息的相互传输.最初使用的是RIPv1,后来发现RIPv2更有优势,于 ...
- HCNA配置静态LACP模式链路聚合
1.静态LACP模式 静态LACP模式是一种利用LACP协议进行聚合参数协商.确定活动接口和非活动接口的链路聚合方式.该模式下,需手工创建Eth-Trunk,手工加入Eth-Trunk成员接口,由LA ...
- HCNA配置手工负载分担模式链路聚合
一.配置手工负载分担模式链路聚合 链路聚合(Link Aggregation)是将—组物理接口捆绑在一起作为一个逻辑接口来增加带宽的一种方法,又称为多接口负载均衡组(Load Sharing Grou ...
- HCNA配置浮动静态路由
1.拓扑图 2.配置IP R1 Please press enter to start cmd line! ############ <Huawei> Dec ::-: Huawei %% ...
- HCNA配置ssh远程登陆
1.拓扑图 最终实现通过AR1 来SSH登陆到AR2 上 2.配置AR2为开启SSH服务 Please press enter to start cmd line! ############## &l ...
- HCNA配置telnet远程管理
1.拓扑图 说明:通过配置最终能通过R5 用telnet协议登陆到R4上并将R4改名为R44 2.R4配置 <Huawei>sys Enter system view, return us ...
- HCNA配置接口IP地址
1.拓扑图 2.R1配置 The device is running! <Huawei>sys <Huawei>system-view Enter system view, r ...
- HCNA配置console线路密码aaa认证
Please check whether system data has been changed, and save data in time Configuration console time ...
- HCNA配置console线路密码password认证
1.华为设备配置主机名<Huawei>system <Huawei>system-view Enter system view, return user view wit ...
随机推荐
- CROSS APPLY和 OUTER APPLY 区别详解
SQL Server 2005 新增 cross apply 和 outer apply 联接语句,增加这两个东东有啥作用呢? 我们知道有个 SQL Server 2000 中有个 cross joi ...
- 练习六十八:pyecharts模块练习
用一个地图显示最热的几个城市温度 代码(用Geo模块) from pyecharts import Geo attr = ["西安","上海","苏州 ...
- java——并查集 UnionFind
时间复杂度: O(log*n),近乎是O(1)级别的 UnionFind 接口: public interface UF { int getSize(); boolean isConnected(in ...
- Vue.js-----轻量高效的MVVM框架(四、指令)
Vue指令 指令 (Directives) 是特殊的带有前缀 v- 的特性.指令的值限定为绑定表达式,因此上面提到的 JavaScript 表达式及过滤器规则在这里也适用.指令的职责就是当其表达式的值 ...
- spark on yarn,client模式时,执行spark-submit命令后命令行日志和YARN AM日志
[root@linux-node1 bin]# ./spark-submit \> --class com.kou.List2Hive \> --master yarn \> --d ...
- JS你可能还不知道的一些知识点(一)
js程序是用Unicode字符集编写的, 2.转义字符:反斜线 1 2 3 4 function Test(){ var s='you\'re right,it can\'t be a quote ...
- RTT之AT命令组件
包含客户端和服务器:用于GPRS和3G的通讯命令格式.四种基本功能 测试功能:AT+<x>=? 用于查询命令参数格式及取值范围: 查询功能:AT+<x>? 用于返回命令参数当前 ...
- [转]Tetris(俄罗斯方块) in jQuery/JavaScript!
本文转自:http://pwwang.com/2009/10/25/tetris-in-jquery-javascript/ All in jQuery/JavaScript + HTML! Demo ...
- 创建weblogic受管理服务器和安全文件
启动 admin server Oracle/Middleware/user_projects/domains/base_domain/bin> startWebLogic.sh 1创建受管服务 ...
- php用户注册页面利用js进行表单验证
<!DOCTYPE html PUBLIC "-//W3C//DTD XHTML 1.0 Transitional//EN" "http://www.w3.org/ ...